
Setup A Tent Correctly: Grommet & Stake Mistakes To Avoid
This post contains affiliate links. As an Amazon Associate, we earn from qualifying purchases.
To setup a tent, you match the tent body to a ground tarp, assemble and insert the poles through sleeves or clips, attach the rainfly, then stake the corners at a 45-degree angle before tensioning the guylines. The pole-tip grommet you choose, outer for dry climates, inner for humid, decides whether the fabric stays tight after a night of dew or sags and touches the inner wall.
Most guides tell you to stake the tent. They don’t tell you that driving the stake straight down is a rookie error that guarantees a loose corner in soft soil after the first gust. The angle matters more than the force.
This guide walks through the seven physical steps, but we’ll spend more time on the three decisions that happen between those steps. Those are the ones that separate a shelter that survives a squall from one that sounds like a snapped flag at 3 a.m.
Key Takeaways
- Stake at 45 degrees, pointing away. A vertical stake pulls straight up with minimal resistance. A 45-degree stake uses the soil’s shear strength to hold against lateral wind force.
- Match the grommet to the forecast. On tents like MSR models with two grommets per corner, use the outer one in dry conditions for maximum tension. Use the inner one when humidity is high; the fabric will expand overnight and the closer grommet keeps it taut.
- Practice at home first. Unpacking poles in a thunderstorm with fading light is the fastest way to bend a section or rip a sleeve. A 20-minute dry run in your yard saves an hour of frustration on site.
- Ventilation can increase condensation in rain. In high humidity, opening every vent draws more moist air inside the tent. A single, high vent opposite the door is often more effective at managing moisture.
- Rinse poles after beach trips. Saltwater corrosion attacks aluminum pole joints and shock cord from the inside. A freshwater rinse and a light silicone spray on the ferrules prevents seized sections.
Before You Pitch: The 3 Non-Negotiables
Your tent’s performance is decided before the first pole is snapped together. Get these three things wrong, and you’re fighting the design for the rest of the night.
First, pick a real site. Not just a flat-looking patch of grass. Get down on your knees and run your hands over the ground. Feel for buried rocks, pinecones, or roots. A pebble the size of a grape under your sleeping pad feels like a bowling ball by midnight. The ideal spot is flat, clear, and has a slight natural slope for drainage, water should run away from where you’ll lay your head.
Second, use a ground tarp or the tent’s specific footprint. That thin sheet of polyethylene or polyester is not optional. It protects the tent floor from abrasion, moisture, and punctures. Lay it with the shiny side up if it has one; this reflects some ground moisture. The tarp must be smaller than the tent’s floor outline. If it sticks out, it will catch rainwater and channel it directly under your sleeping bag.
Before you start: Tent poles under tension can snap back if a section slips. Keep your face away from the pole ends when connecting them. When staking, a misplaced swing with a rock can send a metal stake flying, hold it steady at the base.
Third, organize your components. Dump the bag and sort the pieces: body, rainfly, poles, stakes. Count the stakes. Match pole sections by color coding or diameter. This two-minute ritual prevents the panic of searching for a missing stake in the dark when the wind picks up. I learned this after a coastal trip where I assumed the stake bag was full. It wasn’t. I spent an hour at dusk rigging a corner with paracord and a heavy rock.
TL;DR: Site selection is tactile, the ground tarp is a mandatory moisture barrier, and a pre-flight component check prevents after-dark emergencies.
The Anatomy of a Modern Tent
Understanding what each part does tells you why the assembly order is rigid. The system relies on sequential tension.
| Component | Its Job | What Breaks If It’s Wrong |
|---|---|---|
| Tent Body | Your living space; breathable fabric for ventilation. | Condensation soaks through if it’s non-breathable nylon; seams leak if not sealed. |
| Pole Frame | Creates the structure; usually aluminum or fiberglass with an internal shock cord. | Shock cord loses elasticity in cold; aluminum corrodes from salt; fiberglass snaps under uneven force. |
| Rainfly | Waterproof shell; creates a ventilated air gap between it and the body. | Sagging fly touches the body, causing capillary action and wetting out the inner tent. |
| Stakes & Guylines | Anchor the structure to the ground; provide lateral stability in wind. | Vertical stakes pull out in soft soil; loose guylines allow the fly to whip and tear. |
| Vestibule | Covered space outside the door, created by the rainfly overhang. | A poorly staked vestibule becomes a rain funnel directing water under the tent door. |
The pole frame is the skeleton. Most use 9.5mm diameter aluminum poles (like those on the Coleman Montana 6) connected by a continuous shock cord. That cord keeps the sections together but it’s the first thing to fail. In cold weather or after years of UV exposure, the elastic gives up. You’ll know because the poles go limp when you try to arch them. The fix is in the MSR manual: pull sections back and forth to retension the cord, or untie the end knot and pull out fresh cord.
The rainfly is not a loose blanket. It’s a tensioned membrane. When properly staked and guyed out, it should be drum-tight. Any flapping material is not just noisy, it’s a stress point that will eventually fatigue and tear at a seam.
Common mistake: Staking the tent body before attaching the rainfly, you lose the ability to align the rainfly grommets over the pole ends, which is the only way to get a weatherproof seal at the corners. The fly will sit crooked and one corner will always leak.
Step-by-Step Assembly (And Where People Rush)
Follow this sequence exactly. Swapping steps two and three is the most common cause of a lopsided pitch.
1. Lay the Tarp and Tent Body
Unfold the tent body on top of your positioned ground tarp. Align the doors to your desired view or away from prevailing wind. Many tents and tarps have small colored tags, a red tag on the tarp matches a red tag on the tent’s left front corner, for example. This isn’t decoration. It ensures the floor is oriented correctly so the poles will fit.
2. Assemble the Poles
Connect all pole segments. Listen for a firm click as the ferrules seat, don’t just push until they seem tight. A half-connected joint will collapse under tension, potentially snapping the pole. Lay the completed poles alongside the tent in their approximate positions.
3. Build the Frame: Sleeves vs. Clips
This is the main physical action. There are two systems:
* Sleeves: Feed the pole through a fabric tunnel. This is more weatherproof but slower. Pinch the sleeve ahead of the pole tip and shove it through like you’re threading a giant needle. Don’t force it if it snags, back up and clear the fabric.
* Clips: Simply clip a plastic hook over the pole. Faster, but offers slightly less stability in high wind. Ensure each clip is fully seated around the pole.
4. Insert Pole Tips and Raise
This is the moment of truth. Lift the tent frame by raising the connected poles. Now, locate the grommets or webbing loops at the tent’s corners. Insert the pole tip.
On MSR tents and similar models, you’ll see two grommets in the corner stake loop. The outer grommet is for dry climates where the fabric will stay tight. The inner grommet is for humid or wet climates; as the nylon absorbs moisture and expands overnight, starting with the inner grommet maintains tension and prevents the fly from sagging onto the inner tent.
The pole will bend. It’s supposed to. It may feel like it’s going to break. It won’t, provided you inserted the correct end into the correct grommet. The arch creates the tension that holds the tent up.
5. Drape and Attach the Rainfly
Throw the rainfly over the erected frame. Match any color-coded patches or webbing to the corners of the tent body. Then, for a critical weather seal, take the rainfly’s corner grommet and loop it under the tent pole tip you just inserted. On many designs, this literally locks the rainfly to the structural frame. Do this at all four corners before you touch a stake.
TL;DR: The order is sacred: tarp, body, poles, raise, fly, then stakes. Attaching the rainfly grommets under the pole ends is the step that blocks corner leaks.
Peg It Out: Staking for a Storm
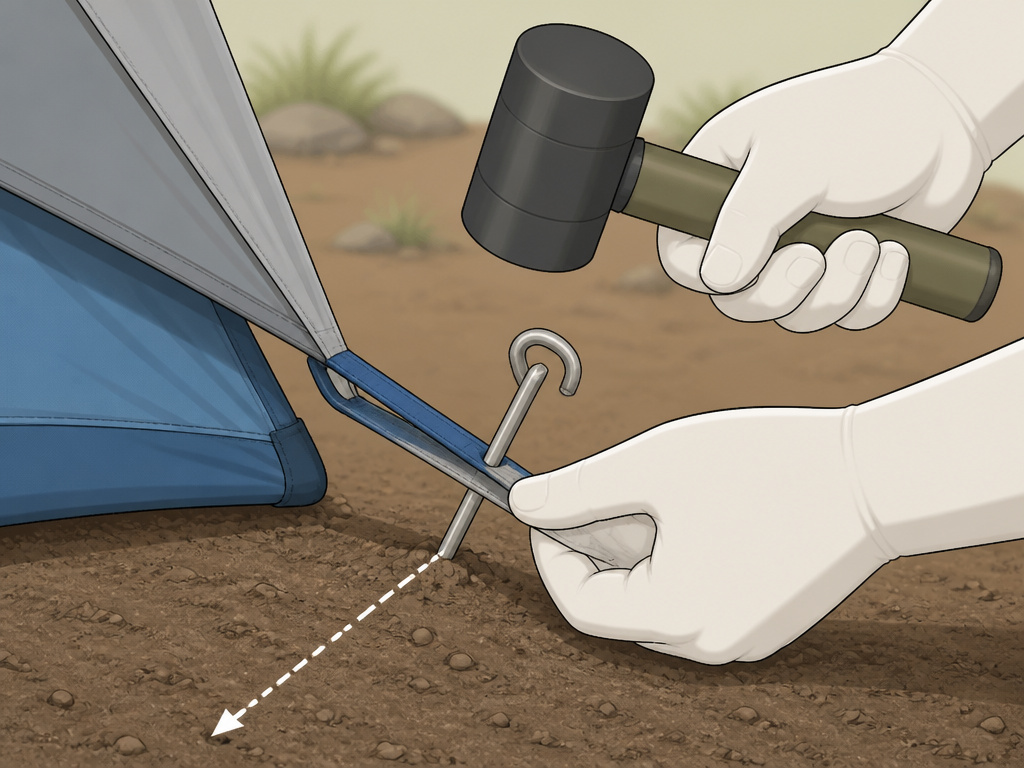
Staking is not just pushing metal into dirt. It’s engineering a low-angle anchor. The physics are simple: a stake driven straight down resists force pulling directly upward. Wind almost never pulls straight up, it pulls laterally. A stake at a 45-degree angle uses the soil’s shear strength along its length to resist that lateral pull.
- Start at a corner. Push the stake through both the tent body loop and the rainfly loop.
- Position the stake so it points directly away from the tent, at that 45-degree angle.
- Drive it in. Use a mallet, a rock, or your foot if the soil is soft. Get it flush with the ground.
- Move to the opposite corner and repeat. This “opposing corners first” method pulls the tent square.
- Stake the remaining corners, then any side loops or vestibule attachments.
If the ground is too hard, don’t hammer the stake into a pretzel. Use a rock to dig a starter hole, or find a larger, heavier rock to use as a deadman anchor. Tie your guyline to the rock and bury it or place it on top of the webbing.
Common mistake: Staking the guylines too close to the tent, this doesn’t allow the rainfly to be pulled taut. The guyline should be at least a few feet out, creating a wide, stable triangle with the ground. A short, tight guyline does almost nothing for stability.
The Final Touches: Ventilation and Guyline Tension
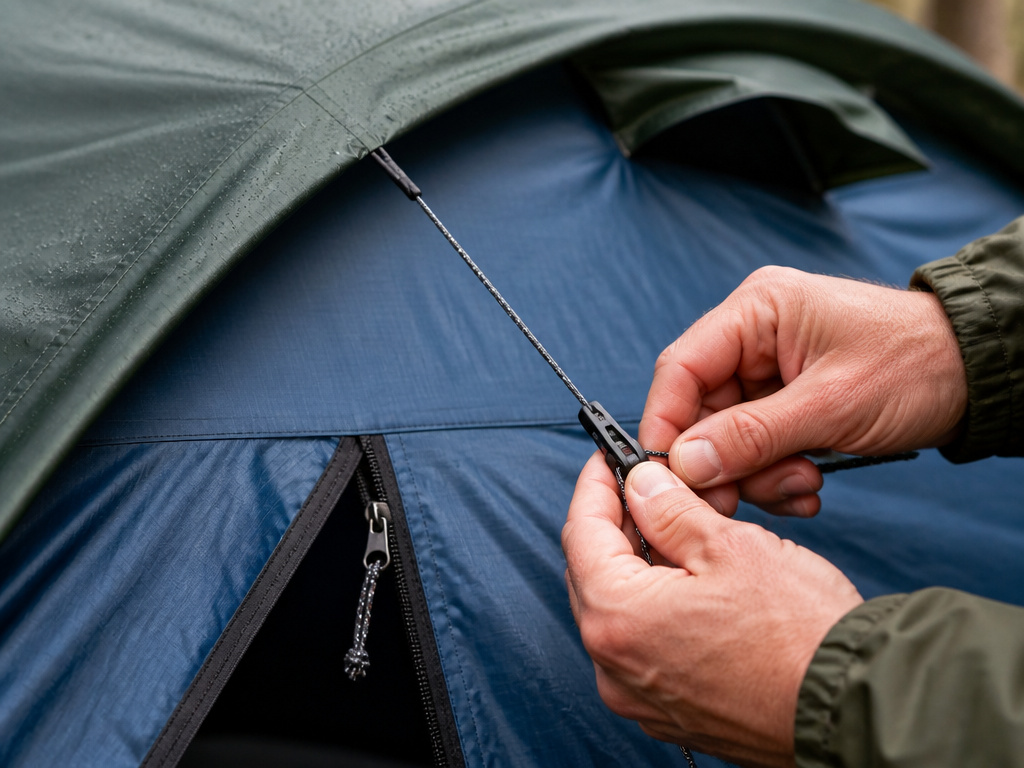
With the tent staked, now address the rainfly. Attach all guylines and walk each one out to its stake. Pull it hand-tight, then add two more inches of tension. The fly should have no loose areas that can flap. Many flies have ladder-lock or cinch buckles on the guylines, use them.
Ventilation is about managing airflow, not just opening every zip. In high humidity or rain, the air itself is saturated. According to the MSR manual, maximum ventilation can sometimes draw more wet air inside, increasing condensation. The goal is to create a single, coherent flow. Open the high vent at the rear of the rainfly and crack the door at the bottom opposite it. This sets up a chimney effect, letting moist air rise and exit.
Finally, do the walk-around. Sight down the seams. Check that the rainfly has a consistent gap from the body all the way around, this is the vestibule and critical air gap. Kick each stake to ensure it’s solid. A tight tent is a quiet tent.
Climate and Condition Adjustments
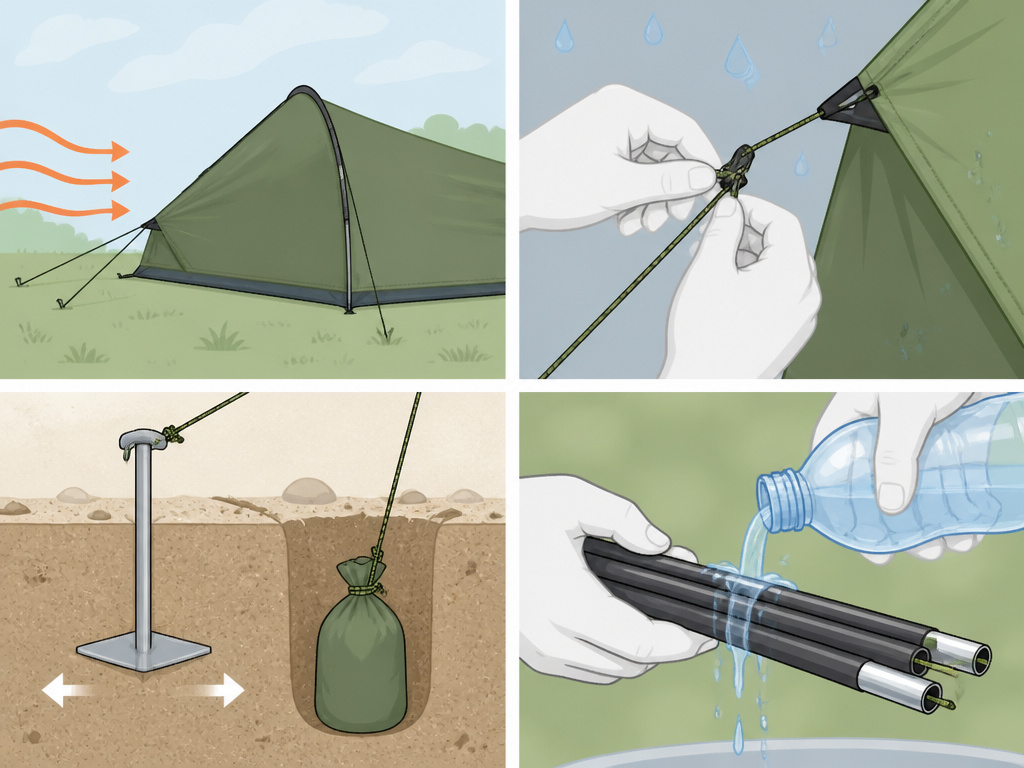
The standard pitch works for a calm, dry evening. The real world is different.
For Wind: Always pitch the narrowest end of the tent into the wind. This presents the smallest surface area. Stake every single guyline point, even the ones that seem superfluous. Tighten everything one notch more than you think you need.
For Rain: Pitch the rainfly first. Some tents allow you to set up the fly with its poles, creating a sheltered area to then assemble the inner tent underneath, keeping it dry. Always ensure the fly is taut, a sagging fly will drip water inside at the slightest touch.
For Sand or Snow: Use special wide-plate sand stakes or deadman anchors (bury a stuff sack filled with sand or snow tied to your guyline). Standard stakes are useless.
After Saltwater Exposure: This is a silent killer. The MSR manual specifically warns that salt causes corrosion. At the end of a beach trip, rinse your pole sections with fresh water. Let them dry, then apply a light coat of silicone lubricant to the ferrule joints. This prevents them from seizing solid by your next trip.
Frequently Asked Questions
Should you put a tarp under your tent?
Yes, always. A ground tarp or footprint protects the tent floor from abrasion, moisture, and punctures. Ensure it is trimmed or folded so it does not extend beyond the tent floor, or it will collect and channel rainwater underneath you.
Which way should the door face on a tent?
Face the door away from the prevailing wind and weather. If you’re unsure of the wind direction, observe the trees or grass before setting up. Also consider privacy from other campers and the morning sun if you want to sleep in.
How tight should tent guylines be?
Tent guylines should be taut enough that they don’t sag, but not so tight they distort the rainfly or put extreme stress on the stake points. In windy conditions, they should be very tight, you should be able to pluck them like a guitar string with minimal movement.
Why is there condensation inside my tent?
Condensation forms when warm, moist air from your breath and body meets the cooler surface of the tent fabric. It’s not a leak. You minimize it by maximizing ventilation (creating a cross-breeze), avoiding cooking inside, and ensuring the rainfly is properly tensioned so it doesn’t touch the inner tent body.
Can you setup a tent by yourself?
Absolutely. Dome and tunnel tents are designed for solo pitching. The key is to stake one or two corners lightly first to hold the tent in place while you assemble the poles. Take your time and follow the step-by-step sequence.
The Bottom Line
Setting up a tent correctly is a series of small, intentional actions, not one heroic heave. The 45-degree stake angle, the climate-appropriate grommet choice, and the sacred assembly order matter more than the brand on the bag. A perfect pitch is silent in the wind, dry in the rain, and feels like a refuge, not a project.
Practice in your backyard once. That single rehearsal will teach you more about your tent’s quirks than any manual. Then, when you’re on that perfect site with the light fading, you’ll have the muscle memory to build your shelter fast and right, leaving you time to actually enjoy the view you pitched the door to face.
