
How To Attach Tent To Backpack & Avoid Loosening Straps Mistake
This post contains affiliate links. As an Amazon Associate, we earn from qualifying purchases.
To attach a tent to a backpack, you must choose a location, bottom, side, or top, and secure it using the pack’s built-in compression straps, threading them through the tent sack’s loops or around the bundle itself to create a tight, sway-free load. The exact method depends on your pack’s features and whether the tent is wet or dry.
Most people cinch the straps once at the trailhead and forget them. That’s the mistake. On an uphill climb, the load oscillates with every step. Straps loosen. A tent that started tight can sag to thigh level within an hour, throwing your balance off and snagging on every branch.
This guide covers the three external attachment methods, when to pack a tent inside, and the non-negotiable pre-hike check that stops a loose load before it ruins your hike.
Key Takeaways
- Pack a dry tent inside your pack, centered against your spine, for optimal weight distribution. A wet tent must go outside to protect other gear from moisture.
- Check compression strap tension every 30–45 minutes on ascents. The vertical load movement causes strap creep, a gradual loosening that shifts weight to your shoulders.
- Never let an externally packed tent sag below your waistline. A low-slung tent pulls your center of gravity backward and downward, forcing you to lean forward to compensate.
- Use a dry bag for external attachment, not the tent’s included stuff sack. Standard nylon stuff sacks are not fully waterproof and offer no UV protection for the straps cinching them down.
- Separate poles and stakes. Poles go in a side pocket or lashed vertically; stakes go in a secured, dedicated pocket to prevent them from poking holes in your pack or other gear.
Where to Put Your Tent: Inside vs. Outside
The first decision isn’t how to attach it, but where. Getting this wrong adds fatigue and risk before you take a single step.
Before you start: A loose external load can snag on brush, topple you on uneven terrain, or shift your center of gravity enough to cause a fall. A wet tent packed inside can soak your sleeping bag and clothes, risking hypothermia in cool conditions. Secure the load tightly and keep wet gear outside.
Pack it inside if it fits and is dry. A tent is a dense, mid-weight item. Placing it in the middle of your pack, close to your back, keeps the weight centered over your hips. This is the most stable, energy-efficient position. Many modern backpacking tents for two are designed to be compact enough for this. On a multi-day trip, your sleeping bag goes at the very bottom, then your tent, then heavier items like your food bag and stove on top of it.
Pack it outside if it’s wet or your pack is full. A damp tent will transfer moisture to everything it touches. Strapping it to the exterior lets it air out while you hike and protects the rest of your kit. This is also the only option if your lightweight two-person tents have longer poles that won’t fit internally on a smaller pack frame.
The trade-off is stability. An external load, especially a bulky one, can sway. Your goal is to minimize that movement through tight lashing and smart placement.
How to Attach a Tent to the Bottom of a Backpack
This is the most common method, but it’s often done poorly. The goal is a rock-solid, horizontal bundle that doesn’t bounce.
You need a pack with robust bottom compression straps. Most hiking packs like the Osprey Atmos AG 65 or Gregory Baltoro 75 have these. If your pack lacks them, this method is off the table.
- Empty and compress the tent. Remove the poles and stakes. Stuff, don’t roll, the tent body and rainfly back into its sack. A stuffed bundle conforms to the pack’s shape better than a rigid roll.
- Position the bundle horizontally. Lay the tent sack across the bottom of your pack, just above the sleeping pad straps (if you have them). The bundle should sit width-wise, not dangling length-wise.
- Thread and cinch the straps. Run the pack’s compression straps through the loops on the tent’s stuff sack. If there are no loops, wrap the straps directly around the bundle. Pull tight, then pull again. You should not be able to slide a finger between the strap and the bundle.
- Secure loose ends. Tuck any excess strap length back through the buckle or under another strap. Dangling ends catch on brush.
Common mistake: Using the tent’s flimsy stuff sack for external carry, the sun degrades the nylon within a season, and the seams aren’t reinforced for point-loading from straps. A 20D silnylon dry bag lasts three times as long.
TL;DR: Strap the tent sack horizontally across the pack’s bottom, threading compression straps through its loops for a secure, bounce-free mount.
How to Attach a Tent to the Side of a Backpack
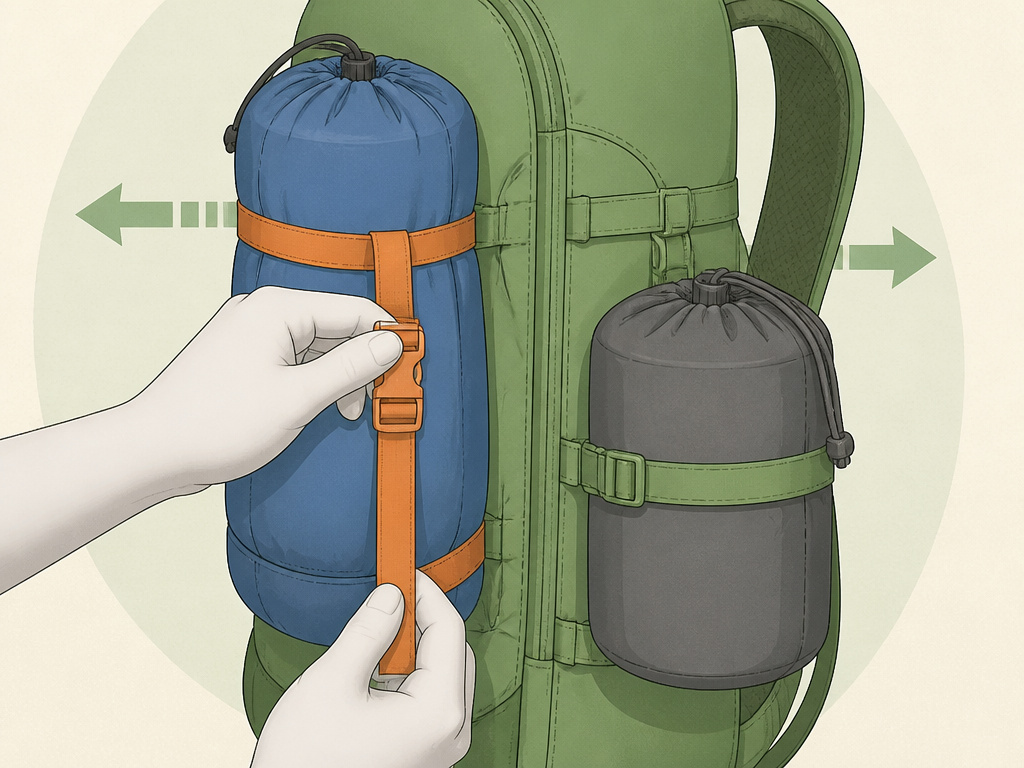
Side-mounting is for when the bottom is occupied or the tent is too long for a horizontal fit. It’s trickier to balance.
Use the side compression straps and lash points. Most packs have vertical straps on the sides. Some also have gear loops or daisy chains.
| Attachment Point | Best For | Risk If Skipped |
|---|---|---|
| Side compression straps | Smaller, cylindrical items like a tent sans poles. | The bundle can rotate around the vertical strap, swinging like a pendulum with each step. |
| Water bottle pockets | Tent poles only. | Poles can slide out on a steep descent if not secured with a bungee cord over the top. |
| Gear loops / daisy chains | Adding a carabiner to clip a stuff sack. | Carabiners clank and add rotational leverage, amplifying sway. |
- Isolate the soft goods. Pack the tent body and rainfly in their sack.
- Vertical lashing. Place the sack against the pack’s side panel. Wrap the side compression straps around it vertically. Cinch them as tight as possible.
- Counter-balance. If you must put a tent on one side, add a similarly weighted item (like your cook pot in its stuff sack) on the opposite side. An unbalanced pack pulls you to one side all day.
- Stow poles separately. Slide tent poles into a water bottle pocket. If they protrude, secure them with a shock cord or the pocket’s own elastic top.
TL;DR: Side-mount a tent using vertical compression straps, and always counter-balance the weight on the opposite side to prevent a lopsided carry.
How to Attach a Tent to the Top of a Backpack
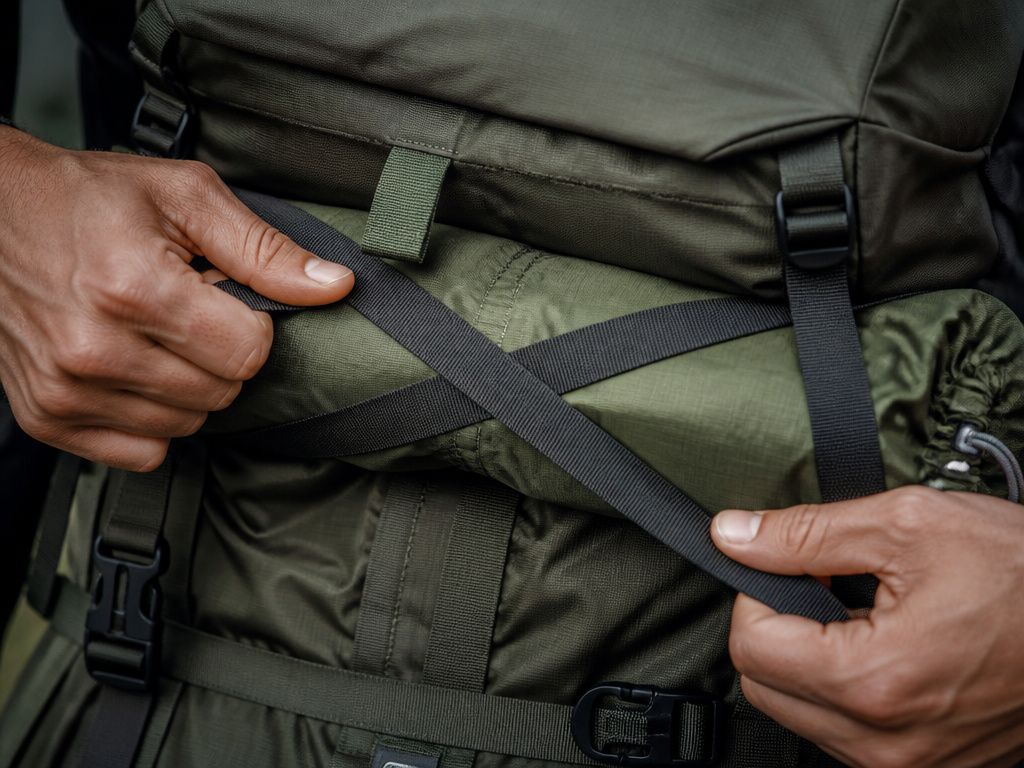
Top mounting is a last resort. It raises your center of gravity, making you less stable on technical terrain. Use it only for very short, flat approaches or if every other spot is taken.
This only works with a top lid or a robust top compression strap system. The bundle must be secured front-to-back and side-to-side.
- Create a low-profile bundle. If using the top lid’s extension collar, stuff the tent loosely so it fills the space without creating a tall, teetering tower.
- Cross the straps. Use the top compression straps in an X-pattern over the bundle. This prevents forward/backward and side-to-side movement.
- Test for head clearance. Put the pack on. Turn your head side to side and look up. The tent bundle should not contact your head or block your peripheral vision.
Common mistake: Letting a top-mounted tent block access to the lid’s pocket, you’ll stop every hour to dig out your map or snacks. If the lid is inaccessible, remount the tent.
The Gear Separation Principle: Poles, Stakes, and Fly
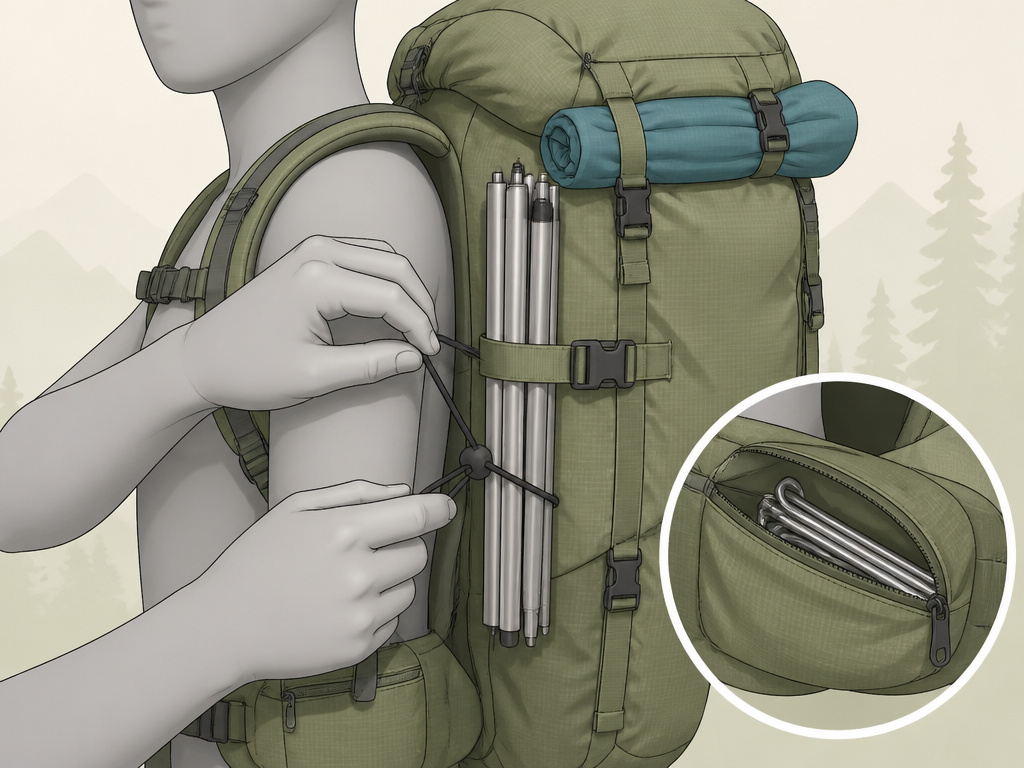
Never attach the whole tent kit as one giant unit. It’s unstable and inefficient. Split it up.
- Tent Poles: These are long, rigid, and awkward. They belong in a side water bottle pocket, secured with a bungee cord over the top. Or, lash them vertically to the side compression straps of your pack. Vertical alignment prevents them from catching on overhanging branches.
- Tent Stakes: These are small, sharp, and dangerous loose. They go in a dedicated pocket, often a front shove-it pocket or a zip-closed hipbelt pocket. A zippered pouch is ideal. Throwing them loose into a big pocket lets them migrate and puncture your water bladder or rain jacket.
- Rainfly (if wet): If your fly is soaked, do not pack it with the dry tent body. Lash it separately outside, perhaps under the top lid, where it can air out. Packing wet with dry guarantees everything ends up damp.
This separation also lets you pack the softer, bulkier tent body inside if space allows, while carrying the poles and stakes externally. Many ultralight 2-person tents use this hybrid approach to maximize internal space for food and clothing.
The Pre-Hike Sway Test (The Step Nobody Skips)
You’ve attached the tent. It looks good. Now you must test it.
Lift the loaded pack by the shoulder straps. Give it a firm shake side-to-side. Then shake it front-to-back. Listen and feel.
- If you hear a thunk or feel a shift, the bundle is loose. Re-tension every strap.
- If the pack twists on the harness, the load is unbalanced. Adjust the side placement or counter-weight.
- If the tent sags more than an inch from the pack body, it will act as a pendulum. Reposition it higher or tighter.
This 30-second test catches 90% of attachment failures. Do it every time you pack, and again after the first 45 minutes of hiking uphill, when strap creep is most active.
Frequently Asked Questions
Can I just use bungee cords or rope to attach my tent?
You can, but you shouldn’t. Bungee cords stretch, which allows movement. They also degrade quickly in UV light. Rope is difficult to tension perfectly and hard to adjust on the trail. Your pack’s built-in compression straps are purpose-designed for this job, use them.
What if my backpack doesn’t have external straps?
If your pack lacks compression straps, external attachment is not a safe or reliable option. You must pack the entire tent inside. Consider a compact solo tent or a tarp tent system on your next purchase if external carry is important for your style.
How do I attach a tent to a backpack without loops?
If your tent’s stuff sack has no loops, wrap the compression straps directly around the stuffed bundle itself. Cinch them down until the sack fabric is slightly deformed. For extra security, you can place the sack inside a larger mesh pocket (if your pack has one) before strapping over it.
Is it better to roll or stuff a tent for backpack attachment?
Always stuff, never roll. A stuffed tent bundle conforms to the shape of your pack and compresses more evenly under straps. A rolled tent is a rigid cylinder that creates pressure points and is more likely to work itself loose.
The Bottom Line
Attaching a tent to your backpack isn’t about making it fit, it’s about making it disappear. A properly secured load doesn’t sway, doesn’t sag, and doesn’t shift your balance. Use the pack’s built-in straps, split the tent into its components, and place weighty items like the tent body close to your back. Check your straps on the first uphill. That’s the difference between a focused hike and a constant, annoying fight with your gear. Your shoulders will tell you which one you chose by mile ten.
