
How Do You Waterproof A Tent? Our Proven $12 Method Explained
This post contains affiliate links. As an Amazon Associate, we earn from qualifying purchases.
To waterproof a tent, you must address three specific failure points: the seams, the durable water repellent (DWR) coating on the rainfly exterior, and the polyurethane or silicone coating on the rainfly and floor interior. This process requires matching the correct sealant to your tent’s fabric type, using silicone sealant on a silicone-treated nylon tent and polyurethane (PU) sealant on a PU-coated tent. A proper refresh can extend a tent’s waterproof life by multiple seasons, but using the wrong product guarantees a leak.
Most people assume a leak means the whole tent is ruined. They buy a new one. The real failure is usually in one spot, a seam, a worn patch on the floor, or a degraded DWR coating that lets the fabric “wet out.” Missing that distinction costs you a few hundred dollars and sends a perfectly good shelter to the landfill.
This guide walks through diagnosing the actual leak, choosing the right products, and applying them so the repair lasts. It covers the difference between a factory-taped seam and a field-sealed one, why you should never store a tent wet, and how to tell if the problem is condensation, not a leak at all.
Key Takeaways
- Fabric type dictates sealant type. Using silicone seam sealer on a PU-coated tent (or vice versa) creates a weak bond that fails in the first storm.
- Seam tape degrades from UV exposure and folding. If the factory tape is peeling, remove it completely and apply a liquid seam sealer, don’t just paint over the top.
- Hydrolysis destroys waterproof coatings from the inside. Storing a tent damp, especially in warmth, turns the PU coating sticky and non-functional within months.
- Condensation mimics a leak. Beads of water on the inside ceiling, especially at the seams, are often just trapped humidity. Improve ventilation before assuming the waterproofing failed.
- A Hydrostatic Head (HH) rating of 3,000mm is the baseline for reliable rain protection. Tents below that will wet through faster, requiring more frequent DWR reapplication.
The 3-Step Waterproofing Process
You don’t waterproof the whole tent. You reinforce its designed barriers. The process is sequential: clean, seal, then coat. Skipping the cleaning step is the most common reason new sealant peels off within weeks.
A tent’s waterproofing is a composite system. The fabric has a durable water repellent (DWR) coating on the outside to shed water, a polyurethane (PU) or silicone coating on the inside to block moisture penetration, and sealed seams to bridge the needle holes. Failure in any one layer compromises the whole shelter.
First, set the tent up fully in a dry, shaded area. You need access to every seam, especially along the rainfly and the floor. A partially assembled tent hides the critical stress points at corners and guy-out attachments.
Grab a soft-bristle brush, a bucket of lukewarm water, and a squeeze of mild soap like Dr. Bronner’s. Scrub the rainfly and floor gently to remove dirt, tree sap, and body oils. These contaminants prevent sealant from adhering. Rinse thoroughly with a hose or a damp cloth, soap residue also blocks adhesion.
Let the tent dry completely. This is not a quick step. A damp nylon or polyester fabric will reject liquid seam sealer; the water molecules block the chemical bond. Wait for a sunny day or let it air-dry overnight indoors.
TL;DR: Clean first, then seal. A spotless, bone-dry surface is the only foundation a repair will stick to.
Step 1: Seam Sealing. The Most Critical Repair
Every stitch hole is a potential leak. Factory seam tape is a heat-applied strip that covers these holes. Over time, UV exposure and repeated folding cause the tape’s adhesive to fail. It starts to peel at the edges.
If the tape is intact and lying flat, leave it alone. If it’s curling or flaking, you must remove it. Picking at it can damage the fabric underneath. The safer method is to apply a liquid seam sealer directly over the failing tape, effectively gluing it back down and filling any gaps. For a completely bare seam, the liquid sealer becomes the primary barrier.
Common mistake: Applying seam sealer in cold weather, the formula needs temperatures above 60°F (15°C) to cure properly. Below that, it stays tacky and collects dirt, washing away in the next rain.
The choice between Gear Aid Seam Grip WP (for PU-coated tents) and Gear Aid Seam Grip SIL (for silicone-treated tents) is absolute. Check your tent’s manual or the hangtag. Using the wrong type is like using oil-based paint on a latex primer, it never fully bonds.
| Tent Fabric Type | Correct Seam Sealer | Visual Identifier |
|---|---|---|
| Polyurethane (PU) coated nylon/polyester | Gear Aid Seam Grip WP (or McNett Seam Grip) | Fabric interior has a plastic-like, often shiny, coating |
| Silicone-treated nylon (SilNylon) | Gear Aid Seam Grip SIL | Fabric interior feels slick, less plasticky, and is highly tear-resistant |
Cut the applicator tip to a small opening. Apply a thin bead directly on the seam, then use the built-in brush or a small paintbrush to spread it evenly, forcing sealant into the stitch holes. Cover every seam on the rainfly, including those over zippers and around windows. Don’t forget the floor seams and the reinforced patches where guylines attach.
The sealant needs at least 6 hours to cure to the touch, but 12-24 hours is better for full strength. A gentle breeze helps. Rain within that window washes the uncured sealant right off.
Step 2: Refreshing the DWR Coating
The DWR coating is what makes water bead up and roll off your rainfly. When it wears out, the fabric “wets out”, it saturates, becoming heavy and losing its ability to shed water. This leads to seepage, even if the interior coating is intact.
You refresh the DWR from the outside. Products like Nikwax TX.Direct are designed for this. Again, match the product to your fabric. Most sprays work for both nylon and polyester.
Lay the dry rainfly flat on a tarp or grass. Shake the spray can well. Hold it about 6 inches from the fabric and apply an even, light coat. Don’t drench it. Immediately after spraying, use a clean cloth to gently rub the product into the fabric. This ensures even distribution and prevents blotchy water behavior.
Let the rainfly dry for a full 24 hours. The DWR needs time to chemically bond to the fabric fibers. Packing it away damp ruins the treatment.
This step is periodic maintenance, not a one-time fix. How often? If water stops beading and instead soaks in within minutes, it’s time. For frequent campers, that might be once a season.
Step 3: Reapplying Interior Coatings (When Necessary)
The interior PU or silicone coating is your last line of defense. It rarely fails before seams or DWR. The killer is hydrolysis, a chemical reaction where moisture breaks down the PU coating from the inside.
If the interior coating feels sticky or tacky to the touch, or if you see visible cracking, it’s hydrolyzing. For small areas, you can spot-treat with the same liquid seam sealer used for the seams. For large-scale failure, consider a full recoating with a product like Gear Aid Tent Fabric Sealant, but know this is a major project and often a sign the tent is near retirement.
For silicone-coated tents, recoating is more complex and rarely advised; damage here usually means replacement.
TL;DR: Address seams and DWR first. Interior coating failure is often a symptom of chronic damp storage, not general wear.
Tools and Materials You Actually Need
You don’t need a workshop. You need the right three products and two basic tools. Buying a generic “waterproofing kit” often gives you the wrong type of sealant for your tent.
Here’s the short, specific list:
– Correct liquid seam sealer: Gear Aid Seam Grip WP or SIL, or McNett Seam Grip.
– DWR spray: Nikwax TX.Direct or Gear Aid Revivex.
– Mild soap: For cleaning.
– Small paintbrush: For precise seam sealer application (if the tube doesn’t have one).
– Soft cloths: For cleaning and working in the DWR spray.
The total cost for these specifics is under $40. Using them on a mid-range tent can add three seasons of life. That’s a return no generic kit can match.
| Item | Purpose | Cost Estimate | Skip-It Consequence |
|---|---|---|---|
| Seam Sealer (PU or SIL) | Fills stitch holes, repairs failing tape | $10–$15 | Leaks along every seam in first sustained rain |
| DWR Spray | Restores water-beading on rainfly exterior | $15–$20 | Fabric wets out, leading to seepage and interior condensation |
| Soft-bristle Brush | Removes dirt without damaging fabric | $5 | Sealant bonds to dirt, not fabric, and flakes off |
| Lint-free Cloths | For applying/rubbing in DWR | Already owned | Uneven DWR application causes spot-wetting |
Investing in a well-reviewed best tents under $200 often gets you better factory waterproofing that lasts longer between these maintenance sessions. The initial quality matters.
Diagnosing a Leak: Condensation or Failure?
Before you buy sealant, confirm you have a leak. Condensation is the great impersonator. On a cool night, your body moisture and breath hit the cooler tent wall and form droplets. These run down and pool, perfectly mimicking a seam leak.
A true leak often appears during rain, not just in cool, still air. The water mark is usually localized to one seam or a specific spot on the floor. Condensation is widespread, covering large sections of the ceiling and walls.
Water inside along the seams, especially at the top of the tent, is condensation 90% of the time. A leak from a failed seam typically shows water coming through the stitch line itself, often on the sidewalls or floor where rain directly hits.
To test, set the tent up in your yard on a dry day. Get inside, close it up, and look for pinpricks of light along the seams, these are potential leak paths. You can also run a gentle hose spray over a suspected area while a friend watches inside. Start low and slow; a firehose blast will force water through even a good seal.
If your tent is a budget model, understand that lower hydrostatic head ratings mean it will wet out faster. This isn’t a leak, but a performance limit. For consistently wet conditions, you might need to look at dedicated best tents for heavy rain designed with higher HH ratings and superior ventilation.
Silicone vs. Polyurethane: The Choice That Can’t Be Wrong
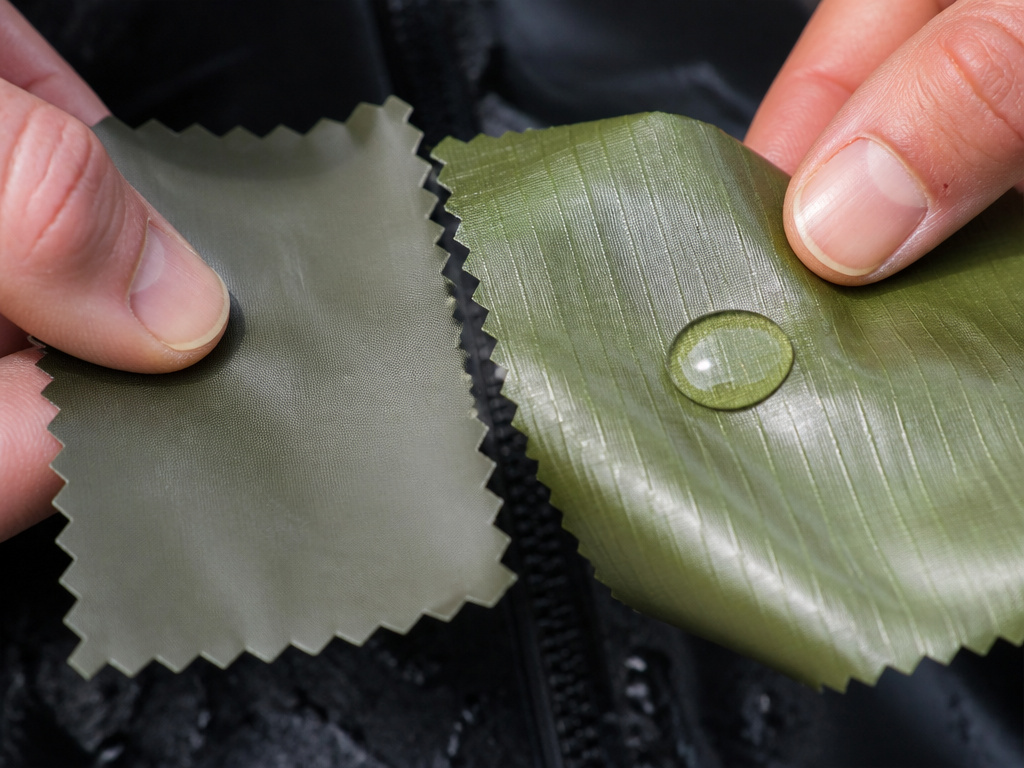
This is the most technical, most important distinction in tent repair. Get it wrong and your work is worthless.
Polyurethane (PU) coatings are the most common. They feel plasticky on the inside of the fabric. They are durable and affordable, but susceptible to hydrolysis from damp storage. Most mainstream tents from brands like Marmot use PU coatings. When maintaining these, you must use PU-based sealants like McNett Seam Grip.
Silicone-treated fabrics (often called SilNylon) feel slicker and are dramatically more tear-resistant. They are common in ultralight and high-end shelters. Silicone is immune to hydrolysis but requires its own specific sealant, like Gear Aid Seam Grip SIL. Water-based PU sealants will not adhere to silicone.
How do you know? Check the manufacturer’s specs. If it’s silent, the rub test helps: a PU coating often has a slight rubbery drag; silicone is almost frictionless. When comparing best ultralight two-person tents, you’ll see this material choice directly impact weight, cost, and maintenance needs.
How to Store a Tent So It Stays Waterproof
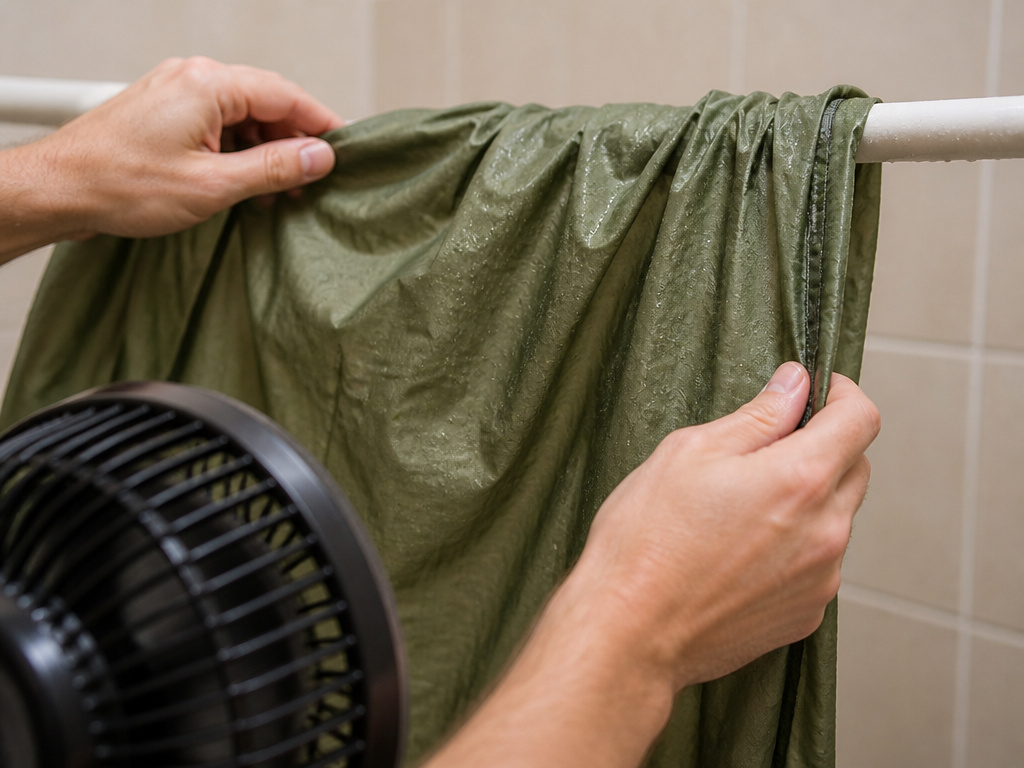
The repair is only as good as the storage. Storing a tent wet is the single fastest way to destroy it. Hydrolysis doesn’t need a monsoon, a damp stuff sack in a warm garage gets the reaction started.
Common mistake: Packing the tent away slightly damp after a morning dew, hydrolysis works slowly, and that residual moisture, trapped against the coating for weeks, is enough to start the breakdown. The coating turns sticky by the next season.
Always, always dry your tent completely before storage. If you get home in bad weather, hang the tent indoors, over a shower rod, in a basement, anywhere with air flow. Even a fan blowing on it for a few hours is better than stuffing it damp.
Store the tent loosely in a large cotton sack or even a garbage bag, not compressed in its original stuff sack. Compression creases stress coatings and seam tape year-round. Every 3-4 months, take it out, shake it, and let it air out for an hour. This prevents musty smells and spots mildew before it starts.
For long-term storage of a durable canvas tent, the rules are even stricter. Canvas needs to be absolutely dry to prevent mold, which rots the fabric itself.
When Waterproofing Isn’t Worth It
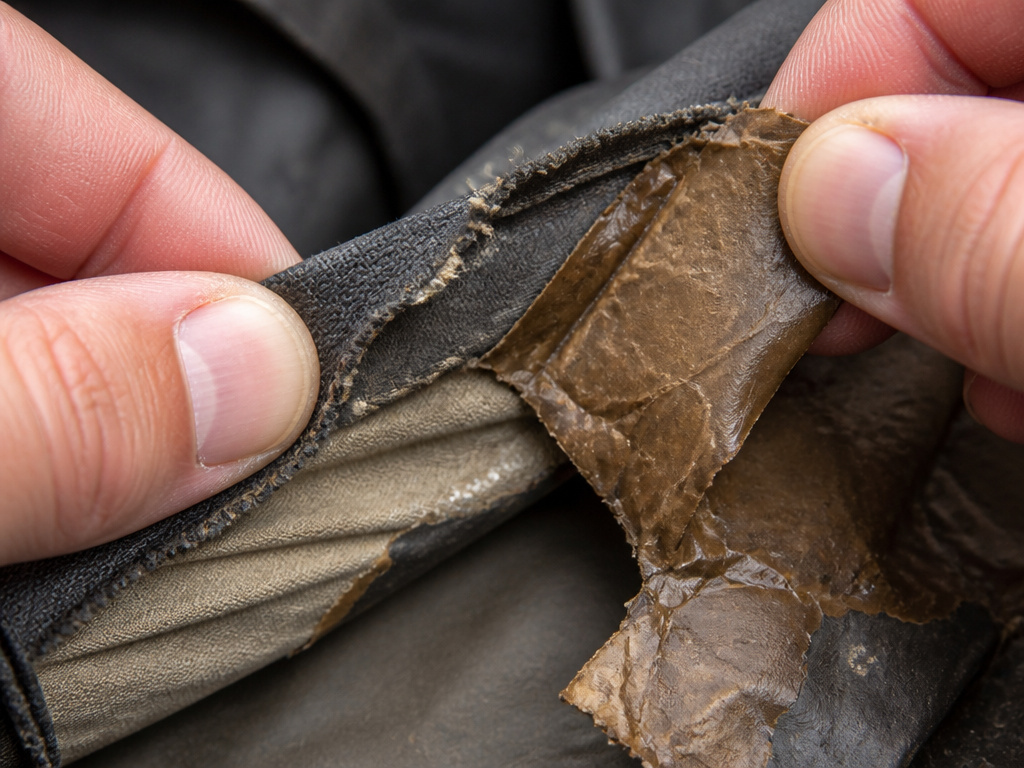
Sometimes, the tent is telling you it’s done. If the interior PU coating is sticky and peeling off in sheets, that’s advanced hydrolysis. Recoating the entire interior is a messy, uncertain project that often costs more in time and materials than the tent is worth.
If the fabric itself is fraying, thin, or tearing easily, no coating will restore structural integrity. Similarly, if a budget tent with a very low HH rating (under 1500mm) leaks everywhere, you’re fighting its fundamental design. Your effort and money are better put toward a more capable shelter.
For families needing reliable space, investing in a quality tent under $200 might be a smarter move than trying to resurrect a failing, cramped model. The waterproofing on a new, well-designed tent will be intact and last for years with proper care.
Frequently Asked Questions
Can you use duct tape to seal a tent seam?
No. Duct tape adhesive dissolves in water and leaves a terrible residue. It might hold for an hour in a pinch, but it will fail and make a proper repair with real seam sealer much harder later. Never use it as a permanent solution.
How often should you waterproof a tent?
There’s no fixed schedule. Waterproof when performance drops. If water stops beading on the rainfly, refresh the DWR. If you find a seam leak, seal it. A well-cared-for tent might need a DWR refresh every year or two of active use, and seam inspection annually.
Can you waterproof a tent in the rain?
Absolutely not. The surfaces must be completely clean and dry for any sealant or coating to adhere. Applying products to a wet tent is a total waste, they will not bond and will wash away.
What’s the difference between a $20 tent and a $200 tent in terms of waterproofing?
The cheaper tent likely uses a thinner fabric with a lower hydrostatic head rating and less durable seam tape. It might keep light rain out when new, but the coatings degrade faster. The more expensive tent uses better materials and more robust factory sealing, giving you a longer service life before maintenance is needed. Our roundup of the best tents under $100 highlights models that still offer reliable waterproofing at that budget.
Does washing a tent remove the waterproofing?
Washing with a mild soap and water does not harm the coatings. In fact, cleaning removes dirt and oils that degrade DWR over time. What damages waterproofing is using harsh detergents, machine washing (which abrades fabrics), or high-heat drying.
The Bottom Line
Waterproofing a tent isn’t about slapping on a magic spray. It’s a diagnostic repair. Find the actual failure point, be it a seam, a worn DWR layer, or a hydrolyzed coating, and treat it with the exact product your fabric type demands. Clean first, then seal. Let everything cure fully. Store the tent dry and loose.
That process turns a leaky liability back into a reliable shelter. It saves you money and keeps a functional piece of gear out of the landfill. The next time rain finds you in the woods, you’ll hear it bead and roll off the fly, not drip onto your sleeping bag. That’s the sound of a job done right.
