
How to Make Tent Cards in Word with the Avery 5305 Template
This post contains affiliate links. As an Amazon Associate, we earn from qualifying purchases.
To create tent cards in Microsoft Word, use the built-in Avery 5305 template for a fast, two-per-page layout. For full control, build a custom template by setting page margins to 0.5″ top/sides and 0″ bottom, then insert and size text boxes to 2.5″ wide by 7.5″ tall. Format text at 150-200pt, duplicate and rotate the second card, and print on 14pt-16pt card stock using your printer’s manual feed tray.
Most guides tell you to insert a text box and hit print. They skip the part where your printer jams on card stock, the text prints upside down on the back, or the tent card folds off-center because the margins were wrong. You waste paper, time, and patience.
This walkthrough fixes that. We’ll cover the two real methods: the quick template for a standard event and the build-from-scratch method for when you need exact control. We’ll also cover the printing step that causes 90% of the problems.
Key Takeaways
- The free Avery 5305 template in Word creates two tent cards per page, but you must ignore its default layout and set your own margins for a custom size.
- For a durable tent card that stands without flopping, use 14pt to 16pt card stock (80-110 lb weight). Regular paper curls and collapses.
- When printing double-sided, you must set the duplex option to “Flip on Short Edge” for a landscape-folded card; “Flip on Long Edge” prints the back upside down.
- If Word warns about margins being outside the printable area when you set a 0″ bottom margin, click “Ignore”. The warning is for standard paper, not card stock.
- For mail merging names onto dozens of tent cards, build your own sideways template. Word’s default mail-merge templates for tent cards often misalign the back side.
The Quick Template Method (and When to Skip It)
Open a new Word document and search for “tent card” in the template gallery. The Avery 5305 is the one you want. It’s designed for two tent cards per standard letter page. This method gets you from zero to print in under five minutes.
The template drops in two pre-sized text boxes. You type your text, maybe center it, and you’re done. It works for last-minute place cards where “good enough” is the goal.
Common mistake: Assuming the template’s default text size is large enough for a head table. The default 72pt font looks fine on screen but reads as a whisper from six feet away. Bump it to 150pt minimum for names and 200pt for table numbers. Anything smaller gets lost in the ambient light of a venue.
But the template has limits. It assumes you’re printing on standard 20lb paper. If you feed 14pt card stock through your printer’s main tray, it might jam. The template also won’t help if you need a custom size, like a taller card for a buffet menu or a wider one for a long company name.
TL;DR: Use the Avery 5305 template for speed on simple jobs with standard paper. For card stock, custom sizes, or mail merge, build your own.
Build Your Own Template from Scratch
When the pre-built box doesn’t fit, you draw your own. Start with a blank document. Go to Layout > Orientation and ensure it’s set to Portrait. Then click Margins > Custom Margins.
Here are the numbers that matter. Set the top, left, and right margins to 0.5 inches. Set the bottom margin to 0 inches.
Word will throw a warning dialog. It will claim these margins are outside the printable area of the page. This warning is for standard paper. Card stock feeds differently. Click “Ignore”. The 0″ bottom margin is what gives you a perfectly centered fold line later.
Now, insert your text container. You have two options: a table or text boxes.
The Table Method (Best for Precision)
Head to Insert > Table and create a table with 2 rows and 2 columns. This gives you four cells, which will become two tent cards (front and back in each row). Right-click the table, select Table Properties, and go to the Row tab. Check “Specify height” and set it to 7.5 inches. This is the height of a folded tent card on a standard 11-inch page. In the Column tab, set the width to 2.5 inches. Merge the two cells in the top row to create one wide cell for the front of the first card. Do the same for the bottom row for the back.
The Text Box Method (More Manual Control)
Go to Insert > Text Box > Draw Text Box. Click and drag to draw a box on the top half of the page. With the box selected, go to the Shape Format tab. In the Size group, set the height to 3.75 inches and the width to your desired card width, typically around 5 inches for a landscape fold. This box is the front of your first tent card.
This 3.75-inch height isn’t arbitrary. A standard page is 11 inches tall. With 0.5-inch top and bottom margins, you have 10 inches of space. Divide that by two for a front and back, and you get 5 inches per half. A text box height of 3.75 inches leaves a 1.25-inch buffer at the top and bottom for the fold and printer grip, which is the safe zone where most printers won’t jam on heavy paper.
Type your text into the first box. Select it and use the Home tab to set the font size. For a name, start at 150pt. For a table number, go to 200pt. Click the Center alignment button.
Now, copy this text box (Ctrl+C). Paste it (Ctrl+V). Drag the pasted copy to the bottom half of the page. This will be the back of the tent card. Here’s the critical part: click the circular rotation handle at the top of the pasted text box and rotate it 180 degrees. The text should now be upside down relative to the page. When you print this sheet, fold it in half horizontally, and stand it up, both the front and back will be right-side up.
| Method | Best For | The One Step Everyone Forgets |
|---|---|---|
| Avery 5305 Template | Speed, standard events | Load card stock in the manual feed tray, not the main tray. |
| Custom Table | Mail merge, perfect alignment | Set cell height to 7.5″ and width to 2.5″ before merging. |
| Custom Text Box | Artistic layouts, irregular shapes | Rotate the bottom box 180°, not just 90°. |
Formatting for Readability (Not Just Looks)
Big text is just the start. The font you pick changes how far away the card can be read. A thin, script font at 150pt is useless. A bold, sans-serif font at 120pt is crystal clear.
Stick to fonts like Arial Black, Impact, or Franklin Gothic Heavy. These typefaces have a high “stroke weight” – the lines that make up the letters are thick and solid. From across a table, that weight matters more than fancy curls.
Color contrast is non-negotiable. Black text on a white or light pastel card works. Dark blue on a grey card does not. If you’re printing on colored card stock, do a test print on plain paper first and hold it against the colored stock under the kind of light you expect at the event. Dim restaurant lighting washes out low-contrast prints.
Common mistake: Centering text visually instead of using Word’s Center Align button. You drag the text box around until it looks centered. When you print, the text is off by a quarter-inch because printer drivers have their own margin interpretations. Always use the Center Align button in the Paragraph group. Then, to be sure, turn on View > Gridlines. The grid shows you the true printable area.
Add a logo or graphic? Keep it small and in the top corner. A massive logo behind the text makes the name impossible to read. Export your logo as a high-resolution .PNG file with a transparent background. Insert it via Insert > Pictures, then wrap the text “In Front of Text” so you can position it freely.
Printing: The Step Everyone Gets Wrong
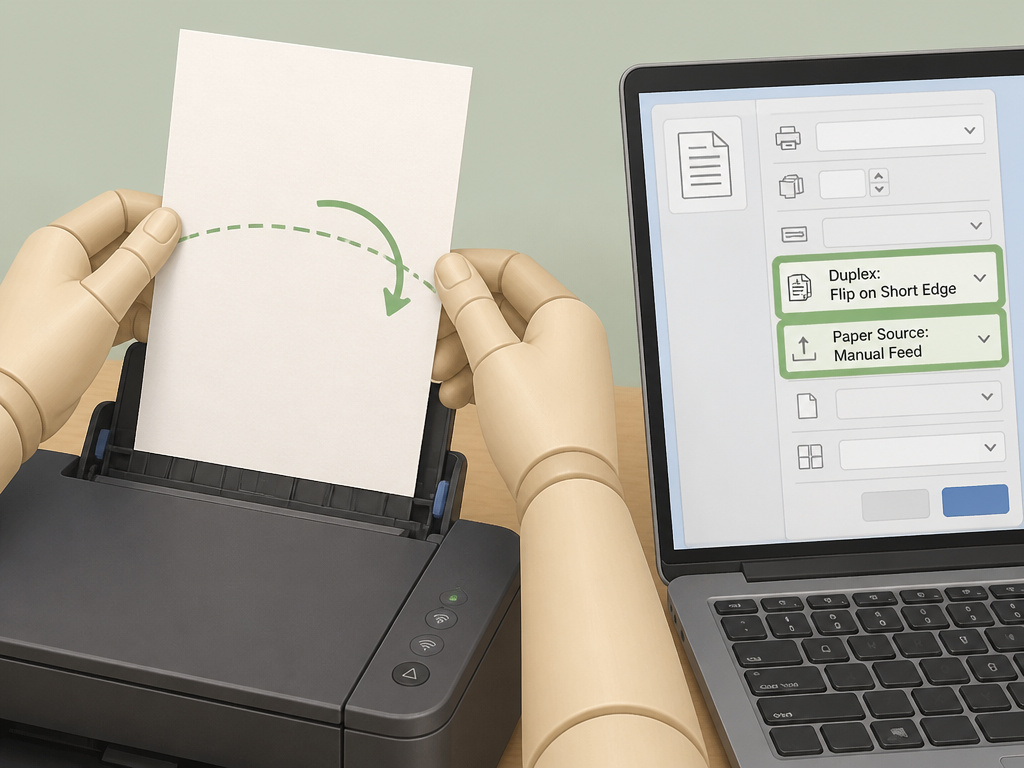
This is where perfect designs go to die. You’ve built a flawless template. You click Print. The first side prints. You reload the paper to print the second side, and the text is upside down. Or the printer grabs two sheets of card stock and jams.
The problem is almost always the paper and the duplex setting.
First, paper. Standard 20lb printer paper is too flimsy. A tent card made from it will sag in the middle. You need card stock. The sweet spot is 14pt to 16pt thickness (often labeled 80lb to 110lb cover weight). This weight is stiff enough to stand, but most desktop printers can still handle it.
Most desktop printers have a hard time pulling heavy card stock from the main paper tray. The rollers slip. Use the manual feed tray or “multi-purpose tray” usually found on the front or side of the printer. In Word’s Print dialog, click “Printer Properties,” find the Paper Source setting, and select “Manual Feed” or “Tray 2.”
Second, duplex. If your printer has an automatic duplex unit, you’re golden – but you must tell it how to flip. In the same Printer Properties dialog, look for “Duplex” or “Two-Sided Printing.” You will see two options: “Flip on Long Edge” and “Flip on Short Edge.”
- Flip on Short Edge: Use this for a tent card. The page is folded like a book, top-to-bottom (a “tent” fold). The printer flips the paper over the short, top edge to print the back.
- Flip on Long Edge: This is for standard document duplexing, where you flip the page like a book page. Using this for a tent card prints the back upside down.
If your printer doesn’t duplex, you have to print manually. Print all the “fronts” first. Then, take that stack of paper, flip each sheet over, and reload it into the manual feed tray facing the correct direction. Run the “backs” print job. Do a test print on regular paper first to confirm the orientation.
TL;DR: Load 14pt card stock in the manual feed tray. In printer properties, set duplex to “Flip on Short Edge.” Do a single test print first.
Mail Merging for Big Events
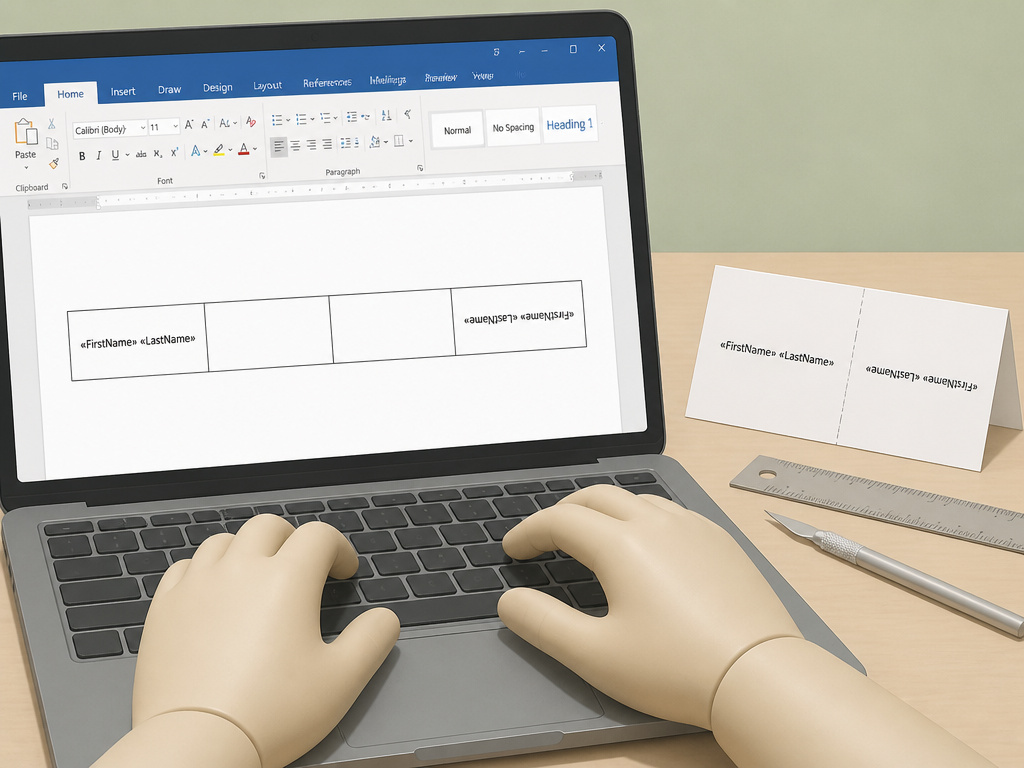
You have 75 wedding guests. You are not typing 75 names into 75 text boxes. You use Mail Merge. The built-in Avery 5305 template technically supports mail merge, but its alignment for the back side is often wrong. You’ll get names creeping off the edge.
The fix is to build your own mail-merge template from scratch, set up sideways. Create a new Word document and set the orientation to Landscape. Set your margins to 0.5″ on all sides. Insert a 4-column, 1-row table. Set the column width to 4.25 inches (half of an 8.5-inch page in landscape). Set the row height to 7.5 inches. This creates two tent cards side-by-side on one landscape page – the left side is the front, the right side is the back after folding.
Type «FirstName» «LastName» in the left cell. Copy it, paste it into the right cell, and rotate the text in the right cell 180 degrees. Now go to Mailings > Start Mail Merge > Step-by-Step Mail Merge Wizard. Follow the prompts, connect to your Excel guest list, and insert the merge fields. When you finish, you’ll have a document with all 75 tent cards laid out correctly, ready to print.
I merged 120 name cards for a charity gala using the default template. The back-side text printed 0.3 inches too high on every single card because the template’s text box positioning didn’t account for my printer’s driver. I spent two hours with a craft knife and a ruler, trimming each one. Now I build the sideways table every time. It takes five extra minutes and saves an evening of corrective surgery.
The merge will populate the front of each card. The rotated text in the right cell ensures the back is also right-side up when folded. Print a single test page on regular paper, fold it, and check the alignment before running the whole batch on card stock.
Frequently Asked Questions
What is the best paper weight for tent cards?
Use 14pt to 16pt card stock (80lb to 110lb cover weight). This thickness provides enough rigidity for the card to stand without support. Lighter paper will curl or collapse, especially in humid environments or under stage lighting.
Why is the text on the back of my tent card upside down?
Your printer’s duplex setting is set to “Flip on Long Edge.” For a tent card that folds along the top edge (a landscape fold), the paper must flip over the short edge. Change the duplex setting in your printer’s properties to “Flip on Short Edge” before printing.
Can I print tent cards on a printer that doesn’t do double-sided printing?
Yes. Print all the “front” sides first. Then, take that stack, flip each sheet over top-to-bottom, and reload them into your printer’s manual feed tray. Ensure the paper is facing the correct direction (usually printed side down, top edge first). Then print the “backs.” Always do a one-sheet test first.
My printer keeps jamming when I try to use card stock. What am I doing wrong?
You are likely using the main paper tray. Most desktop printers struggle with heavy card stock in the standard tray. Use the manual feed slot or multi-purpose tray, which has a straighter paper path and stronger rollers. Also, fan the stack of card stock before loading to prevent sheets from sticking together.
The Bottom Line
Creating tent cards in Word is a fight against default settings. The built-in Avery 5305 template is a fast start, but it assumes you’re using plain paper. For a professional result on card stock, you must override the margins, use the manual feed tray, and set duplex to flip on the short edge. Building your own template with a 4-column table and 7.5-inch row height gives you control for mail merge and guarantees the back side prints right-side up. Skip the 20lb paper. Spend the extra dollar on 14pt card stock – the difference between a placeholder and a polished finish is that one stands up straight.
