
How To Install Tent | The Cable Height That Stops Sag
This post contains affiliate links. As an Amazon Associate, we earn from qualifying purchases.
To install a tent, you match the frame type to the ground, set the cable height between 5 ¼” and 5 ¾”, and stake at a 45-degree angle at least 3.6 feet from the foot. Pole tents use a 28’3″ diagonal to square the stake line; frame tents assemble flat on the ground before raising. Skipping the site survey for utilities is the legal mistake. Ignoring the cable height is the structural one.
Most guides tell you to call before you dig and stake it down. They miss the half-inch window that decides whether your tent sags or stands straight. Get the bottom cable lower than 5 ¼” off the ground and the peak pole assembly bows inward by the second hour. Leave more than 6 inches of stake head exposed and a 15-mph gust has enough leverage to pull it clean out.
This guide walks through the two main tent installs, frame and pole, using the exact measurements from the manufacturer sheets. You will get the stake distance, the cable height, and the one diagonal number that squares a 10×10 pole tent every time.
Key Takeaways
- The bottom cable on a frame tent must be set between 5 ¼” and 5 ¾” off level ground. Outside that range, the frame bows or the legs splay.
- Drive ground stakes at least 3.6 feet from the tent foot and angle them away at 45 degrees. Leave less than 6 inches of the stake head exposed.
- For a square 10×10 pole tent layout, use a diagonal measurement of 28 feet 3 inches between opposite corner stakes.
- Assemble the entire frame on the ground before raising it. A frame built in the air twists at the joints and won’t seat correctly.
- Cold weather makes corner webbing loops stiff. Warm the loop with your hands before stretching it over the corner hook, or you risk tearing the seam.
What Happens When You Skip the Site Survey?
You find the sprinkler head with the stake. Or you arc the aluminum frame into an overhead power line. The first mistake gets you a water bill. The second gets you a funeral.
The Textile Industry Tent Handbook lists site inspection as the non-negotiable first step. It is not a suggestion. Call 811 or your local “call before you dig” service. Mark any underground lines. Then walk the perimeter and look up. Tree branches, guy wires, and power lines all love to snag a canopy.
Before you start: A metal frame conducts electricity. A polyester canopy can melt on a hot branch. A stake through a gas line can explode. Survey takes ten minutes. The alternative takes an ambulance.
Soft soil needs more stakes. The manual for the Intentional Tents VISTA™ series says to add stakes whenever the first set pulls up. Hardpack clay holds a single stake. Sandy or loose soil needs two per leg, sometimes with a deadman anchor, a stake driven horizontally and buried.
TL;DR: Call 811, look up, and test the soil with a stake before you commit to the spot.
Frame Tent vs. Pole Tent: The Setup That Splits
You pick a frame tent for hard surfaces like concrete or patios. You pick a pole tent for grass or soil. The difference is not just looks.
A frame tent stands on its own legs. You can install it on a driveway or a rooftop. The TentCraft 10×10 E-Series uses 113-inch Perimeter Poles and 3-Way Connectors. You assemble the entire frame flat on the ground, then lift it as one piece. The legs have adjustable feet for uneven surfaces.
A pole tent needs center poles and side poles to hold up the canopy. The American Tent 10′ x 10′ Pole Tent places its side poles 5 feet from the stake line. The center pole carries the load. You stake the corners first, then raise the center pole to create the peak.
| Aspect | Frame Tent | Pole Tent |
|---|---|---|
| Best Surface | Concrete, deck, rooftop | Grass, soil, sand |
| Key Part | Perimeter Poles & 3-Way Connectors | Center Pole & Side Poles |
| Anchoring | Concrete anchors or weighted footplates | 36-inch ground stakes |
| Squaring Method | Pre-assembled frame is square by design | Diagonal measurement (28’3″ for a 10×10) |
| Wind Resistance | Lower profile, less sail area | Higher profile, requires more guying |
Frame tents work for permanent installations like a market stall. Pole tents work for a weekend wedding. Mixing them, staking a frame tent in soft soil without extra anchors, or trying to erect a pole tent on concrete, guarantees a collapse.
TL;DR: Frame for hard surfaces, pole for grass. Staking a frame tent in soft soil is a weekend-long fight against sag.
The 7-Step Bump-Feed Replacement (and the One Step Nobody Skips)
This is for a 10×10 frame tent. Pole tents follow a different sequence, square the stake line first, then place poles.
Step 1: Lay Out Every Part
Unpack the bag onto a tarp. Count the Perimeter Poles, 3-Way Connectors, legs, and the cable assembly. Find the corner hooks and the canopy. Missing one connector means the frame won’t lock. You discover that when you’re holding a pole in one hand and the manual in the other.
Step 2: Assemble the Frame Flat
Connect the Perimeter Poles with the 3-Way Connectors on the ground. Get all joints finger-tight. Do not try to build the frame in the air. It twists. The joints bind. You spend twenty minutes wrestling a parallelogram.
Step 3: Raise the Frame and Attach Legs
Lift the assembled frame and walk it upright. Slot a leg into each corner. Hand-tighten the leg lock. Do not fully tighten yet. You need to adjust cable height first.
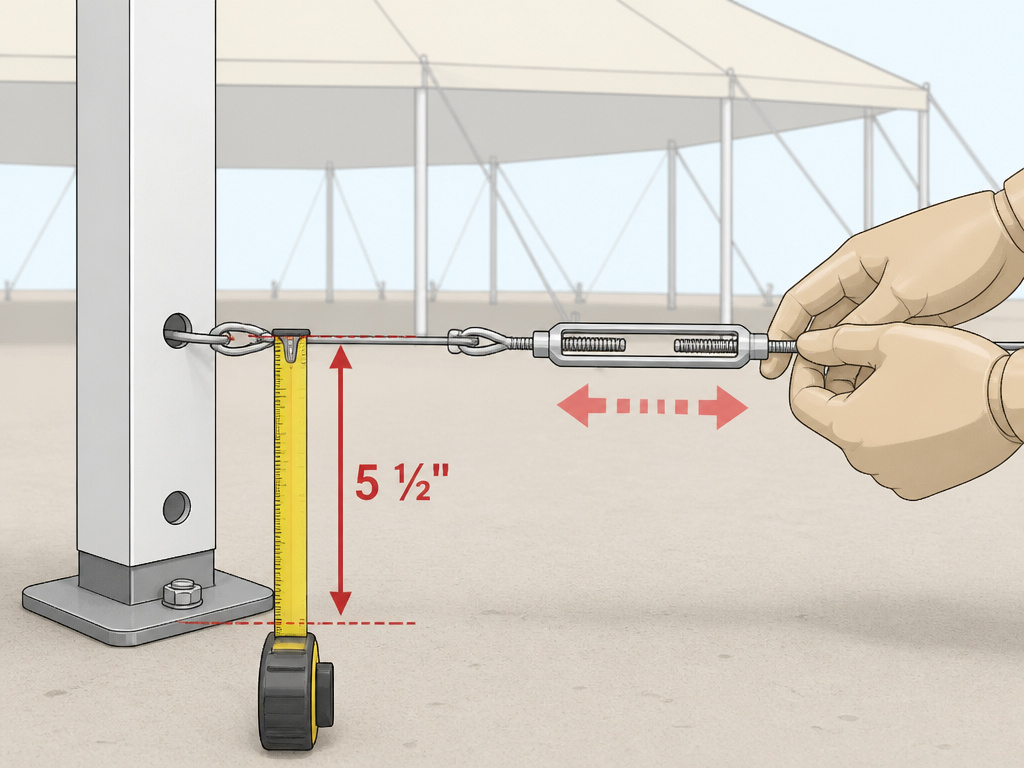
Step 4: Set the Cable Height Between 5 ¼” and 5 ¾”
Attach the cable assembly to the leg. Adjust the turnbuckle until the bottom cable sits 5 ¼” to 5 ¾” off level ground. Use a tape measure.
Over-tensioning the cables will cause the Perimeter Poles to bow inwards. The canopy stretches tight, but the frame is under permanent strain. First high wind, and a weld pops.
This is the step every video skips. They say “attach the cable” and move on. That half-inch window is the difference between a tent that stands for a season and one that sags by lunchtime. Lower than 5 ¼” and the peak sags. Higher than 5 ¾” and the legs splay outward.
Step 5: Stake at 45 Degrees, 3.6 Feet Out
Drive a 36-inch ground stake at least 3.6 feet away from the hole in each foot. Angle it away from the tent at 45 degrees. Sink it until less than 6 inches of the head is exposed.
Common mistake: Driving the stake straight down, the holding strength drops by half, and a moderate wind can lift it straight out.
The 3.6-foot distance is not a guess. It is the mechanical sweet spot where the stake pulls against the leg at the optimal angle. Closer, and the leverage works against you. Farther, and you waste rope.
For concrete, drill a 3/4-inch hole to a minimum depth of 1-1/4 inches and drop in a concrete anchor. The American Tent 10′ x 10′ Pole Tent Safety & Set Up Guide specifies that depth for a reason, shallower, and the anchor spins under tension.
Step 6: Drape and Hook the Canopy
Throw the canopy over the raised frame. Start with the corner facing the prevailing wind. Hook that loop first, then hook the opposite corner. Work diagonally to distribute tension.
In cold conditions, the last corner webbing loop is stiff. The TentCraft manual calls this out specifically. Warm the loop with your hands for thirty seconds before stretching it over the hook. Forcing it cold tears the stitch line.
Step 7: Walk the Perimeter and Re-Tension
Check every cable height again. Pull every strap hand-tight. A loose strap flaps in the wind. That constant abrasion wears through the canopy seam in one season. Look for wrinkles in the fabric, they mean uneven tension.
TL;DR: Assemble flat, cable height between 5 ¼” and 5 ¾”, stake at 45 degrees 3.6 feet out, hook the canopy diagonally, then walk the perimeter and tighten everything again.
How Do You Square a 10×10 Pole Tent Without a Builder’s Square?
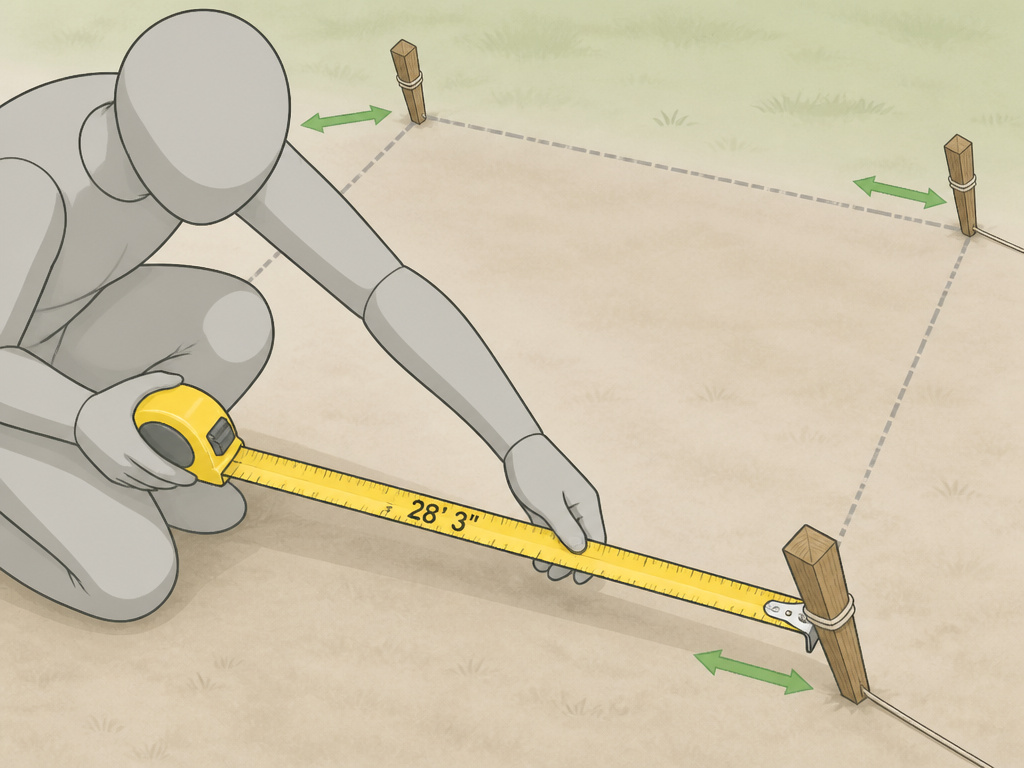
You use the 28-foot-3-inch diagonal. Mark your four corner stakes. Measure the diagonal between opposite corners. Adjust until both diagonals match that number.
The American Tent guide gives you that exact figure. It works because a 10×10 square has a diagonal of √(10² + 10²) = √200 ≈ 14.14 feet. But you are measuring from stake to stake, not from pole to pole. The stake is set 5 feet from the side pole. That extra distance changes the math to 28’3”.
I squared a 10×10 for a backyard party with a 50-foot tape and a helper. We got it within an inch. The center pole went up, and the peak was dead center. No guy lines needed.
If you are working alone, use mason’s line. Tie it between two stakes, then use a line level to keep it straight. This is slower, but it beats re-staking three times.
| Symptom | Likely Cause | Fix |
|---|---|---|
| Canopy sags in the middle | Bottom cable set below 5 ¼” off ground | Loosen turnbuckle, raise cable to 5 ½”, re-stake |
| Legs splay outward | Bottom cable set above 5 ¾” off ground | Lower cable to 5 ½”, add a second stake per leg for stability |
| Stake pulls out in wind | Stake driven straight down, not angled at 45° | Re-stake at 45° angle, bury until <6” of head exposed |
| Frame twists during raise | Frame assembled in the air, not on ground | Lower frame, disassemble, reconnect on ground, then lift |
| Corner loop won’t stretch | Cold weather stiffens webbing | Warm loop with hands for 30 seconds before stretching |
Square matters. An out-of-square tent wrinkles on one side and stretches tight on the other. The fabric wears unevenly. In wind, the loose side flaps hard enough to tear a grommet out.
TL;DR: For a 10×10 pole tent, measure the diagonal between opposite corner stakes and adjust until it reads 28 feet 3 inches.
Which Anchors Hold on Concrete or Soft Soil?
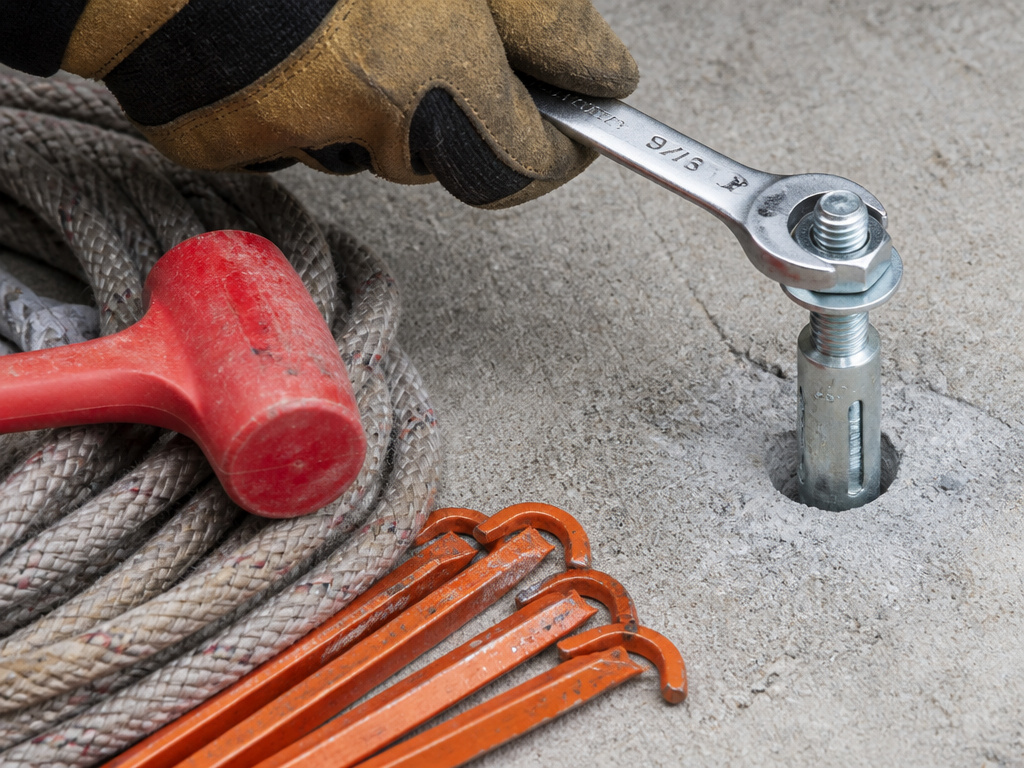
Concrete needs a drilled hole and a concrete anchor. Soft soil needs more stakes, sometimes a deadman.
For concrete, the American Tent manual says drill a 3/4-inch hole to a minimum depth of 1-1/4 inches. Drop in a concrete anchor and hand-tighten the nut. Do not use a power driver, you strip the threads. The anchor expands as you tighten, gripping the concrete. A shallower hole lets the anchor spin under load.
On sand or loose soil, one stake per leg pulls out. The Intentional Tents VISTA™ manual says to add stakes whenever the first set pulls up. Drive a second stake at a 90-degree angle to the first and tie them together with rope. Or use a deadman anchor, a stake driven horizontally, buried, and tied off.
Guy ropes add stability in high wind. Attach them approximately 4 feet out from the leg, per the VISTA™ manual. Angle the rope away from the tent. This spreads the load over a larger area of ground.
The VISTA™ Peak-Top Frame Tents are NOT engineered or wind-rated. That is a manufacturer disclaimer. It means in wind over 20 mph, you add guy lines or you take the tent down.
Heavy canvas tent setup needs more anchor points. The fabric weighs three times what polyester does. You use thicker stakes, deeper holes, and sometimes screw-in earth anchors.
TL;DR: Concrete gets a 3/4-inch drilled hole and an anchor. Soft soil gets double stakes or a deadman. High wind gets guy ropes 4 feet out from each leg.
Frequently Asked Questions
How long does it take to install a 10×10 tent?
Two people can do a frame tent in 45 minutes if the site is prepped. A pole tent takes an hour, mostly for staking and squaring. Alone, add thirty minutes. The first time you do it, budget two hours.
Can you install a tent on asphalt?
Yes, but you need weighted footplates, not stakes. Drive a frame tent leg into a footplate filled with sand or water. For a pole tent, you need a base plate and ballast. Stakes will not penetrate asphalt.
What is the biggest mistake first-timers make?
They ignore the cable height on a frame tent. They set it by eye. The poles bow, the canopy sags, and they blame the tent. Measure it. Keep the bottom cable between 5 ¼” and 5 ¾” off level ground.
How do you fix a tent that is not square?
For a frame tent, loosen the leg locks, adjust the frame on the ground, and re-tighten. For a pole tent, pull up the loose corner stake, re-measure the diagonal to 28’3”, and drive it back in. Do not just pull the canvas tight, that strains the seams.
Can you leave a tent up overnight?
Yes, if it is properly anchored and the weather forecast is clear. In wind over 15 mph, add guy lines. In rain, ensure the canopy is tensioned so water runs off and does not pool. Never leave a pop-up tent unattended in wind, they are not designed for it.
What is the one tool you absolutely need?
rubber mallet. Stakes do not go in by hand. A 5-pound sledgehammer works, but it bends stakes if you hit them off-center. The mallet gives you control. If you forget it, a smooth rock from the site works in a pinch.
Before You Go
Tent installation is a mechanical system. The cable height, the stake angle, the diagonal measurement, they are all numbers for a reason. Get one wrong and the structure fights itself.
Frame tents live and die by that 5 ¼” to 5 ¾” cable window. Pole tents stand square on a 28’3” diagonal. Stakes go in at 45 degrees, 3.6 feet out, with less than 6 inches of head showing.
The site survey is non-negotiable. Call 811. Look up. Test the soil. A weekend event is not worth a gas leak or a power line arc.
Keep the manual in your pocket. The numbers are in there. Your car camping tent might forgive a loose stake. A 10×10 frame tent will not.
