
How To Make A Blanket Tent With A Sturdy, Lasting Frame
This post contains affiliate links. As an Amazon Associate, we earn from qualifying purchases.
You make a blanket tent by building a stable frame from heavy furniture like a couch or dining chairs, draping blankets over it, and securing everything with clips and weights. The difference between a five-minute cave and a weekend fortress is tension, a taut roof won’t sag onto your head.
Most blanket forts collapse because people use flimsy frames. Cardboard boxes bend. Lightweight chairs tip. That sagging ceiling is a direct result of poor weight distribution.
This guide covers the frames that work, the clips that hold, and the small upgrades that turn a pile of blankets into a proper hideout. We’ll also cover what to do when a dog or a toddler decides your engineering masterpiece is their new jungle gym.
Key Takeaways
- A couch or sturdy dining chairs make the best frame; they’re heavy enough to anchor the blankets without tipping.
- Heavy-duty binder clips beat clothes pegs, safety pins, or tape for securing fabric to furniture.
- Battery-operated fairy lights are safer and brighter than candles or table lamps inside a fabric tent.
- Always put a sheet or a cheap blanket down first as a ground layer, it protects your good blankets from floor dirt and pet hair.
- For a tent that stays up for days, build the frame against a wall and use a pop-up canopy as the skeleton.
Why Blanket Forts Collapse (and How to Stop It)
The problem isn’t the blankets. It’s the physics. A loose drape over an unstable frame creates dead spots where fabric pools. That pooled fabric is heavy. Add the weight of a kid leaning against a wall or a cat jumping on the roof, and the whole structure buckles.
A blanket tent fails at the points of least tension. If the roof sags more than four inches from its peak, the walls will pull inward and the clips will pop off within an hour.
The fix is pre-tension. You need to stretch the primary ceiling blanket tight before you clip it. Start with your largest sheet. Drape it over the back of your couch, then walk to the front and pull it taut toward the floor. That creates a triangular pitch. Now clip it. The same principle applies to dining chairs, pull the fabric tight between the chair backs before securing.
TL;DR: Pull blankets tight before clipping. A sagging roof is a collapsing roof.
The One Frame That Never Sags
Forget stacking pillows and balancing books. The most reliable frame for a long-lasting blanket tent is a pop-up canopy. The ones made for beach days or tailgating. Unfold it in the middle of a room, lower the legs to a kid-friendly height, and drape your blankets over the top. The rigid aluminum frame won’t bend, and the square shape gives you maximum interior space.
It sounds like overkill until you’ve built one. The canopy holds the roof eight feet off the ground, perfectly taut. No amount of leaning, jumping, or dog-bumping will bring it down. When you’re done, you fold the canopy flat and stash it in a closet. It’s a single-purpose tool, but for a blanket tent that stays up all weekend, it’s unbeatable.
| Frame Type | Best For | Why It Works |
|---|---|---|
| Couch | Quick, sturdy builds | Heavy base, high backrest for a tall peak. Anchor points are solid. |
| Dining Chairs | Larger, multi-room forts | Lightweight but stable when clustered. Easy to rearrange. |
| Pop-Up Canopy | All-weekend, kid-party builds | Rigid frame, adjustable height, zero sag. |
| Cardboard Box | Small, contained play spaces | Walls are built-in, but the roof collapses under any weight. |
What You Actually Need (Not What the List Says)
You’ll see lists with twenty items. You need five.
- Blankets and Sheets: One large, flat bedsheet for the roof. Two or three heavier blankets or quilts for walls and floor. The floor layer gets dirty, use an old blanket you don’t mind getting dusty.
- Heavy-Duty Binder Clips: The medium or large size. The small ones don’t have enough grip. Clothes pegs slip. Safety pins tear fabric. Binder clips clamp onto table edges, couch cushions, and chair legs without damaging anything.
- A Stable Frame: A couch, a row of dining chairs, or a pop-up canopy. Nothing wobbly.
- Lights: Battery-powered fairy lights or a camping lantern. Never use a plug-in lamp with a cord running under a blanket, it’s a fire and trip hazard. A headlamp is a great interior option.
- Weights: Heavy books, couch cushions, or dumbbells (wrapped in a towel) to hold down the edges of your wall blankets.
Common mistake: Using masking tape or painter’s tape on walls and furniture, it either loses grip in an hour or peels paint when you remove it. Binder clips leave no mark.
The fairy lights are non-negotiable if you want the magical glow. A standard plug-in strand is a bad idea. The battery-operated LED strings are safe, cool to the touch, and you can weave them through the frame’s spine. For a more functional light, a small camping lantern provides enough brightness for reading without casting harsh shadows. It’s one of those tent lighting upgrades that feels professional.
Step-by-Step: Building a Weekend-Worthy Fort
Follow this sequence. Skipping the tension step is why most tents fail by bedtime.
Step 1: Clear and claim your space. Pick a corner of a room, ideally against a wall. Move coffee tables, lamps, and breakables out of the zone. A wall gives you a built-in back support.
Step 2: Build the skeleton. If using a couch, turn it to face the room. You’ll use the high back as the tent’s peak. If using dining chairs, line up four of them in a square, about three feet apart, with the seats facing outward. For the pop-up canopy, just unfold it and set the legs to your desired height right in the middle of the space.
Step 3: Lay the ground cloth. Spread an old sheet or a cheap blanket over the floor inside your frame area. This catches crumbs, dust, and pet hair, saving your nicer blankets. Tuck the edges slightly under the couch or chair legs.
Step 4: Drape and tension the roof. Take your largest, flattest sheet. Drape it over the highest point of your frame (couch back, chair backs, canopy top). Walk around to each side and pull the fabric downward and outward, creating a tight, sloping ceiling. Get it as taut as you can before you even think about clips.
Step 5: Clip it down. Attach your heavy-duty binder clips at every major anchor point: the corners of the couch cushions, the tops of the chair backs, the legs of the canopy. Pinch a generous fold of fabric and clamp the clip onto the furniture. The goal is to lock that tension in place.
Step 6: Add the walls. Drape your heavier blankets or quilts down from the secured roof to form walls. Let them pool on the floor a bit. Place your weights, heavy books, couch cushions, along the bottom edges to hold them down. This seals in warmth and keeps dogs from crawling underneath.
Step 7: Furnish and light the interior. Roll out sleeping bags or pile in pillows. Weave your fairy lights along the roof spine or frame. Bring in books, a board game, and a flashlight. If you’re allowing snacks, use sealed containers. Crushed crackers in a blanket fort feel like sand in a sleeping bag.
Step 8: The entrance. Leave one blanket-wall loose or folded back to create a door. You can clip it shut from the inside for privacy.
That’s it. A tight roof, secured clips, and weighted walls will keep it standing through a movie marathon.
Pro Upgrades for a Fort That Feels Like a Real Tent
The basics get you a cave. These upgrades get you a palace.
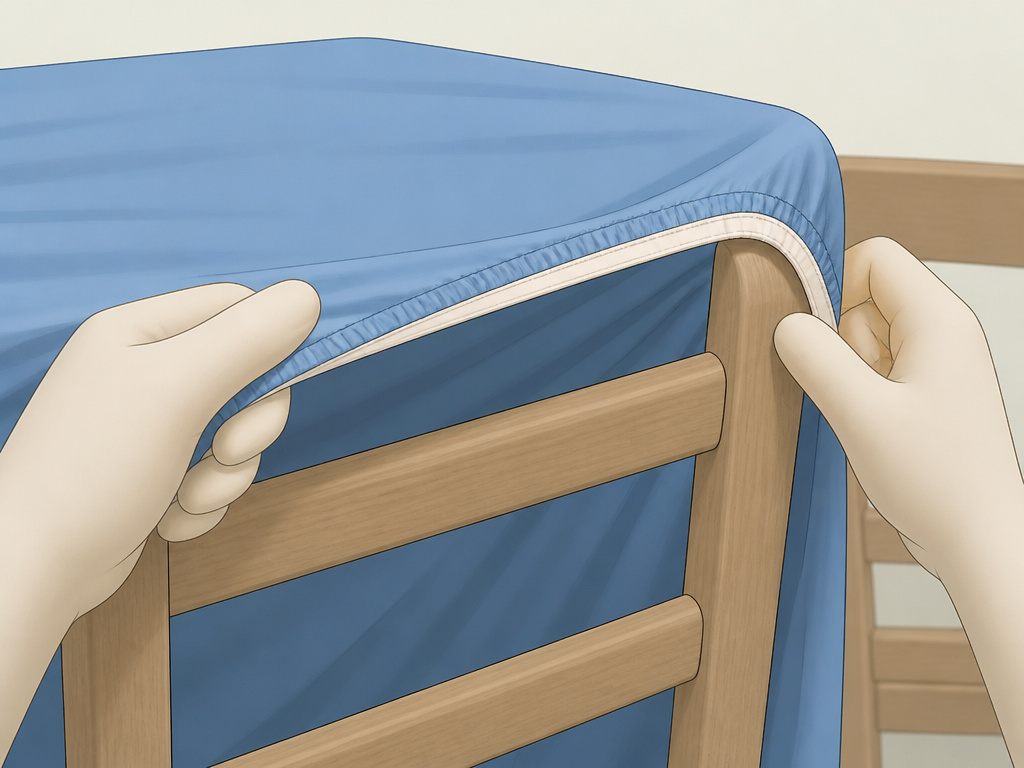
- Use a Fitted Sheet for the Roof: A queen or king-sized fitted sheet stretched over your frame creates a drum-tight ceiling with zero sag. The elastic corners hook over couch cushions or chair tops, acting as built-in clips.
- Create a “Porch” or Annex: Use a cardboard box as a tunnel entrance or a separate “storage room.” Cut a door in one side, drape a blanket over it, and connect it to your main fort with a blanket hallway.
- Install a Ventilation Flap: If it gets stuffy, use a binder clip to gather a corner of the roof fabric and clip it to a higher point on the frame, creating an air gap.
- Add a “Doormat”: Place a small, tough rug or a towel just outside the entrance. It gives kids a place to wipe their feet before crawling in, keeping the interior cleaner.
- Hang a “Sign”: Clip a piece of cardboard with the fort’s name to the outside. It’s a fun touch that makes it feel like a real campsite.
For the ultimate experience, look to real camping gear essentials. A camping lantern instead of a flashlight provides softer, ambient light. A pop-up beach tent frame is literally designed for this, it’s lightweight, sets up in seconds, and packs away small. If you’re building for a group, the principles of a six-person tent apply: you need clear “rooms” and traffic flow. Designate a sleeping area, a snack area, and a reading nook.
What About Pets and Toddlers?
They are the ultimate stress test. A dog will try to burrow under a wall. A toddler will treat the roof like a trampoline.
The solution is reinforcement, not prohibition. Weigh down every inch of the bottom edge of your wall blankets with heavy, soft objects. Couch cushions are perfect. For dogs, consider laying a spare blanket over the entire structure once it’s built. It adds a sacrificial layer they can dig at without collapsing the main tent. For a more durable, pet-resistant structure, building around a study car camping tent frame is a logical step up.
If you have a cat, run your fairy lights along the outside of the roof. A cat batting at dangling wires inside will bring the whole thing down. The guide from BikeHike blanket tent tutorial emphasizes planning for live-in creatures, and they’re right, assume something will climb on it.
Frequently Asked Questions
What’s the best blanket to use?
flat cotton bedsheet is the best roof layer, it’s light and doesn’t sag. For walls, use fleece blankets or quilts; they’re heavier, drape better, and are warmer. Avoid weighted blankets for the roof, they will pull any frame down.
How do I keep the roof from sagging?
Tension is everything. Pull the roof blanket tight in all directions before you clip it. If it still sags, run a string or a belt under the blanket along the peak of the frame, tying it off at both ends to lift the fabric from underneath.
Can I make a blanket tent without furniture?
Yes, but it’s harder. You can tape the roof blanket to the walls (use painter’s tape on clean surfaces), or build a frame from pool noodles taped together into a cube. The noodle frame is light and safe but much less stable than a couch or chairs.
How do I make it dark inside for sleeping?
Use darker-colored blankets for the walls. Layer two blankets in key areas. You can also clip a dark towel over the entrance once everyone is inside. For a truly dark experience, a canvas tent is built for that, but it’s overkill for the living room.
Is it safe to have lights inside?
Only use battery-operated lights. Fairy lights, camping lanterns, or flashlights are safe. Never use a plug-in lamp, a candle, or any heat-producing light inside a fabric tent. The risk of fire or overheating is real.
Before You Go
A great blanket tent isn’t about having the most blankets. It’s about smart tension and solid anchors. Start with a heavy furniture frame, clamp your sheets tight with binder clips, and weigh down the edges. Throw in some battery-powered lights and you’ve got a hideout that will last for days.
The real test is the morning after. If you wake up and the roof is still two feet above your head, you built it right. If it’s collapsed into a fabric puddle, you now know it was the tension, not the blankets. Go tighten the clips.
