
How to Make a Table Tent: A DIY Guide from a Gear Tester
This post contains affiliate links. As an Amazon Associate, we earn from qualifying purchases.
ARTICLE
To make a durable table tent, you need three things: heavy-weight material (110 lb cardstock minimum), a precisely scored center fold, and a reinforced flat base. Cut an 8.5″ x 11″ sheet, score the center at 4.25 inches, and glue a 1-inch flap at the bottom to create a stable, free-standing display. The fold is a structural spine, not just a bend.
I’ve pitched tents in howling wind and torrential rain, and I’ve made just as many table tents for trailhead events and outdoor pop-ups. The same principle applies to both: a weak foundation guarantees a collapse. Most DIY table tents fail because the fold is treated as a hinge. It’s not. It’s a spine, and like a spine, it needs to be created under compression, not tension. Scoring pre-breaks the surface fibers so they collapse neatly, instead of fighting the bend and creating a weak, rounded curve that can’t bear weight.
This guide pulls from my own messy learning curve, like the time I ruined 50 menus for a lakeside craft fair, to show you how to build a sign that stands tall, whether it’s on a calm dining table or a breezy patio next to your pop-up beach tents.
Key Takeaways
- Material is non-negotiable. Use 110 lb cardstock as an absolute minimum. Printer paper (20 lb) collapses instantly; lighter cardstock (65 lb) bows in humidity.
- Score every single fold. Use a metal ruler and a bone folder. Folding without scoring cracks the surface and creates a weak, rounded spine that can’t support weight.
- Build a flat base. Glue a 1-inch flap at the bottom interior. A simple V-shape rocks on any surface that isn’t perfectly level.
- Design for 360-degree viewing. Both sides of your tent are equally visible. Never leave the back blank.
- Outdoor use demands an upgrade. Standard cardstock wilts with dew. For durability, use synthetic paper or PVC-coated fabric and laminate the final piece.
What Exactly Are You Building?
A table tent is a self-supporting, folded information card designed to communicate without being held. The most common finished size is 4.25 inches wide by 11 inches tall, which is simply a standard letter sheet (8.5″ x 11″) folded in half vertically.
A table tent is a freestanding informational display, typically constructed from a single sheet of stiff paper or cardstock folded along a vertical centerline. Its stability relies on the material’s rigidity and the precision of the fold, creating a double-sided sign for tables at events, restaurants, or conferences.
The critical error is assuming any folded paper will work. It won’t. You are engineering a tiny, weight-bearing arch where the center fold is the keystone.
Common mistake: Using 20 lb printer paper because it’s handy, the tent will bow in the middle within minutes and topple over from a slight table bump or air current from a vent.
Your Toolkit: Don’t Skimp on the Basics
Gathering the right tools prevents frustration. Here’s what you actually need, with specific recommendations I swear by.
- Material: 110 lb Cardstock (like Neenah Bright White) is the baseline. For outdoors, consider Yupo Synthetic Paper.
- Cutting Tool: A sharp utility knife (Olfa XA-1) and a self-healing cutting mat (Alvin ProMat).
- Measuring & Scoring: A metal ruler with a cork back (Alvin Stainless Steel, model ALV1012) to prevent slips, and a bone folder.
- Adhesive: 3M Permanent Double-Sided Tape (1/4″ width) for clean edges or Elmer’s Craft Bond Spray Adhesive for full sheets.
- Software: Canva for easy templates or Microsoft Word with manual column setup.
Before you start: You’ll be using a sharp blade and spray adhesive. Always cut away from yourself on a stable surface, and use spray adhesive in a well-ventilated area to avoid inhaling fumes. A slip with the knife can cause a deep cut, and overspray creates a sticky mess on everything.
How Do You Construct a Perfect Table Tent? (Step-by-Step)
Follow this sequence. Rushing any step compromises the entire structure.
Step 1: Cut Your Blank with Precision
Your starting dimensions dictate the final size. For the classic tent, you need an 8.5-inch by 11-inch sheet. Place your cardstock on the cutting mat, align the metal ruler firmly, and make a clean cut with your utility knife. A ragged edge undermines stability.
TL;DR: Start with a perfectly cut 8.5″ x 11″ sheet of 110 lb cardstock.
Step 2: Score the Spine. This is Everything
This is the make-or-break moment. Do not just fold the paper.
Lay your cut sheet flat. Use your ruler to find the exact center of the 8.5-inch width, 4.25 inches. Hold the ruler firmly on this line. Take your bone folder and drag it along the edge of the ruler with firm, even pressure. You want to compress the fibers, creating a guided weak point.
Hold on, if you don’t have a bone folder, a dried-out ballpoint pen works in a pinch, but you’ll feel the difference. The bone folder’s rounded edge polishes the fibers; the pen tip just mashes them. I used a Bic Cristal for years before I realized why my folds always looked slightly crushed.
A clean score line creates a hinge that wants to fold sharply. Skipping this step forces fibers to break randomly, creating a weak, rounded spine that can’t support weight.
Now, fold the sheet along the score, matching the edges exactly. Run the bone folder along the folded crease on both sides to “set” it. This is your tent’s backbone.
Step 3: Create an Unshakeable Flat Base
A flat-folded tent has two feet forming a narrow “V” that rocks on uneven surfaces. The fix is to glue a flap to create a flat, wider base.
Open your folded tent. On one inner side, measure up 1 inch from the bottom edge and draw a light pencil line across. Apply a thin strip of 3M Permanent Double-Sided Tape just below this line. Fold the tent closed again, pressing this 1-inch flap onto the opposite inner panel. This creates a flat bottom, eliminating the rock.
For heavy materials or outdoor use, cut a separate cardstock gusset, a small triangle, and glue it into the inside bottom corner for military-grade rigidity, a trick I learned from reinforcing durable canvas tents.
Step 4: Apply Graphics and Final Touches
Your design should be printed to the final trim size. For a folded tent, you need two mirror-image panels, each 4.25″ x 11″.
The professional method is spray adhesive. Lay your printed sheet face down on scrap paper. Spray a light, even coat on the back. Wait 15 seconds for it to become tacky. Carefully align and lay it onto the tent blank. Use a credit card as a squeegee to burnish from the center outward.
At the 2023 Lakeside Craft Fair, I used 3M Super 77 spray adhesive straight from the can on Yupo synthetic paper. The solvent in the wet adhesive crazed the surface, leaving a permanent cloudy crackle pattern on all 50 menus. Now, I always let it tack up for 15 seconds and prefer Scotch Quick-Dry Spray Adhesive for synthetics because its lower VOC formula doesn’t attack the polymer coating.
Let the adhesive cure for a full hour. For outdoor or high-use settings, run the tent through a laminating pouch. This adds a waterproof layer and protects corners from fraying, much like a rainfly protects your essential camping gear.
Which Material Should You Choose?
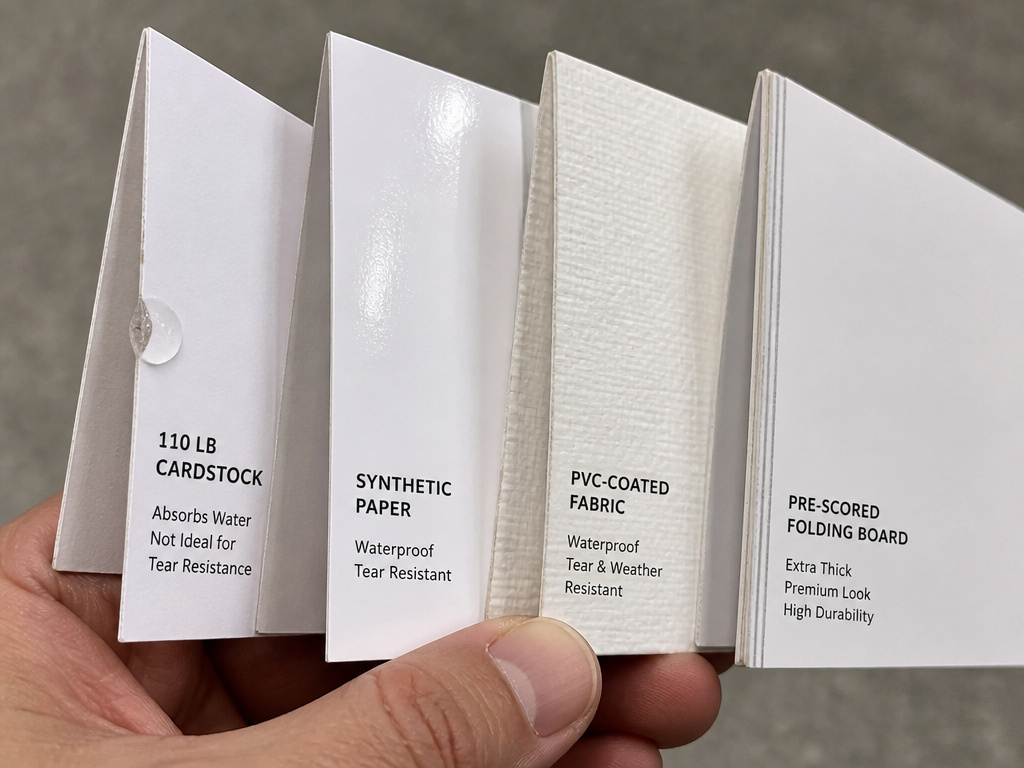
The venue dictates the material. Choose wrong, and your tent fails spectacularly.
| Material | Best For | Key Limitation |
|---|---|---|
| 110 lb Cardstock | Indoor menus, conference agendas, short-term displays. | Warps in high humidity; corners dent easily. |
| Synthetic Paper (e.g., Yupo) | Outdoor weddings, poolside bars, humid environments. | Slick surface can repel some inks; requires adhesive testing. |
| PVC-coated Fabric | Trade shows, long-term outdoor installations, windy areas. | Requires heavy-duty cutter; cannot be folded without scoring. |
| Pre-scored Folding Board | High-volume craft projects, student displays. | Often too thick for standard printers; graphics must be glued on. |
For most DIY needs, 110 lb cardstock is the sweet spot. If your tent will live outside, even for an afternoon, cardstock is a liability. Dew soaks through it in under an hour. Upgrade to a 10-mil PVC-coated fabric or laminated synthetic paper for true weather resistance.
What Are the Standard Table Tent Sizes?
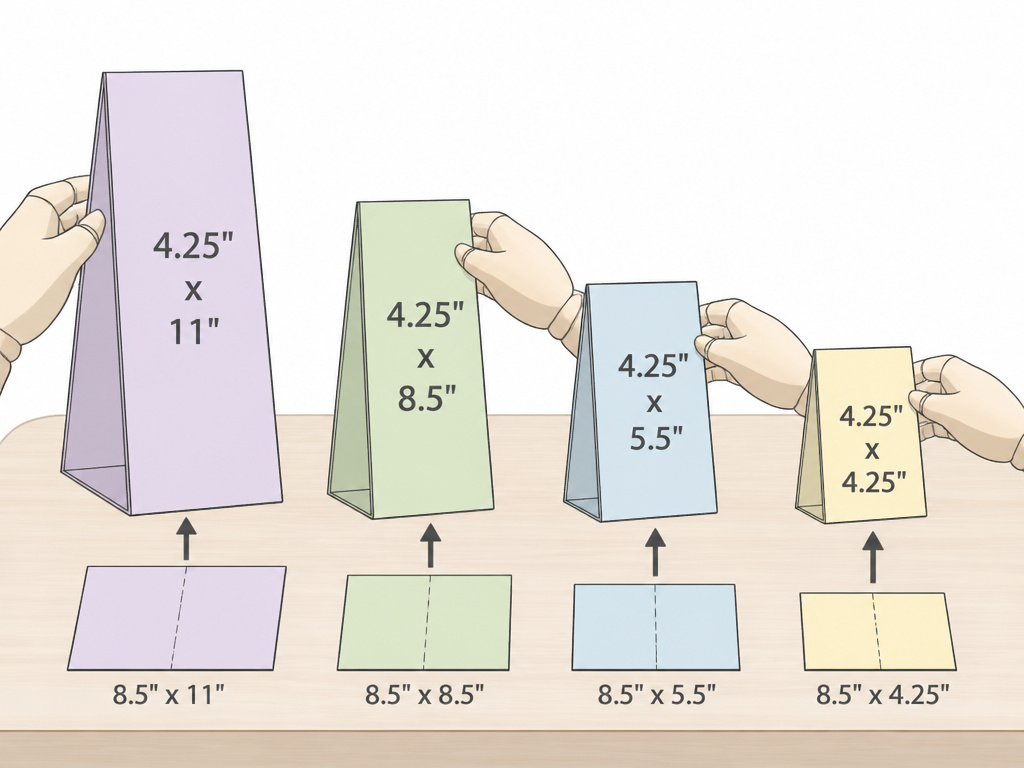
Size affects visibility and stability. A tiny tent gets lost; a huge one looks clumsy.
| Folded Size (W x H) | Primary Use Case | Starting Blank Size |
|---|---|---|
| 4.25″ x 11″ (Standard) | Restaurant menus, conference agendas, place cards. | 8.5″ x 11″ sheet, folded vertically. |
| 4″ x 6″ (Canva Vertical) | Product displays, countertop promos, wedding seating. | 4″ x 6″ vertical blank, needs separate base. |
| 5″ x 7″ (Portrait) | High-impact signage, detailed graphics. | 10″ x 7″ sheet, folded horizontally. |
| 3″ x 5″ (Compact) | Crowded trade show tables, small bistro tables. | 6″ x 5″ sheet, folded vertically. |
The 4.25″ x 11″ standard is popular because it uses a full sheet with no waste. The 4″ x 6″ size fits pre-made plastic holders, a great hack for reusable info cards at a campsite, similar to how you’d organize your tent camping accessories.
Common mistake: Designing for an 8.5″ x 11″ sheet but letting critical text straddle the fold. The spine will swallow it. Always keep a 0.75-inch gutter clear on both sides of the center line.
How Should You Design for Maximum Impact?
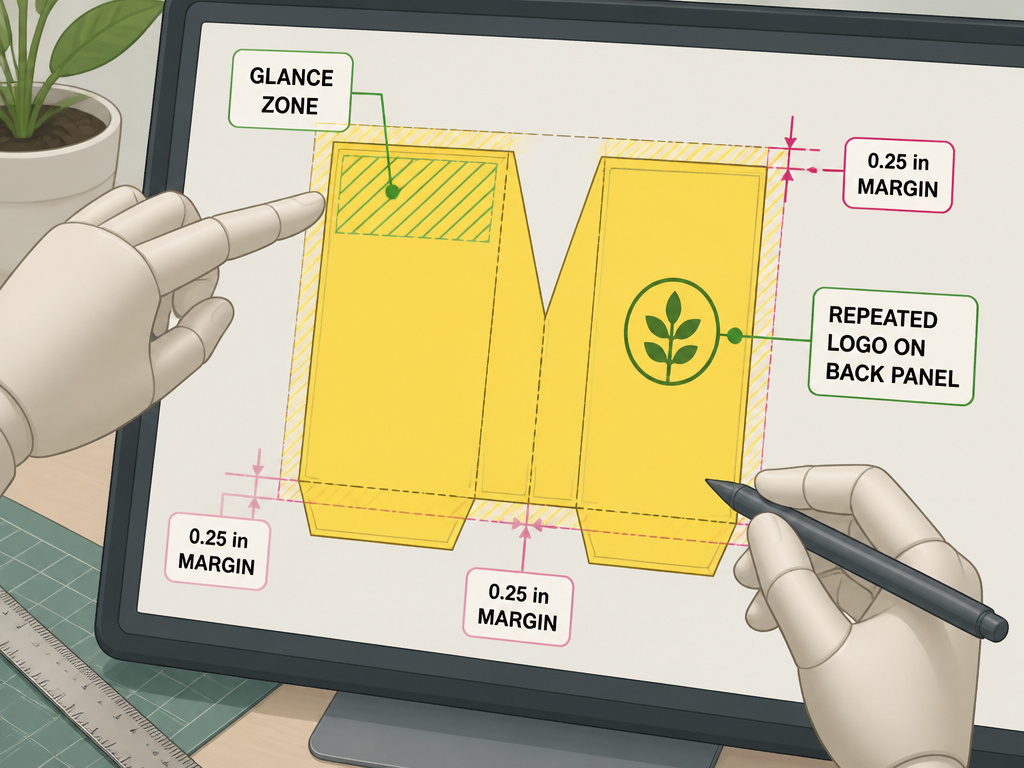
You have two panels people will see from different angles. Design with intent.
- Both sides are prime real estate. The back faces the other side of the table. Repeat your logo or core message there.
- Establish a clear hierarchy. The top third is the “glance zone.” Put the most critical info there: the event name, daily special, or speaker.
- Enforce generous margins. A 0.5-inch border on all sides protects text from trim errors. The inner gutter near the fold should be 0.75 inches.
- Prioritize high-contrast colors. Light gray on white vanishes in low light. Consider the ambient lighting as carefully as you would choose tent lighting solutions for evening use.
Software choice matters. Canva offers dedicated 4″x6″ table tent templates that are foolproof. For Microsoft Word, you must manually set the page to 8.5″ x 11″ Landscape, then create two 4.25″ wide columns via Layout > Columns, as detailed in their support guides. This is your design canvas.
Why Is My Tent Wobbly or Sagging?
Diagnose and fix common failures with this guide.
| Symptom | Likely Cause | Immediate Fix |
|---|---|---|
| Rocks side-to-side. | Base is a narrow V, not flat. | Open tent and glue a 1-inch (or wider) bottom flap. |
| Top leans forward/back. | Fold is off-center; weight unbalanced. | Cannot be fixed. Remeasure and start a new blank. |
| Middle bows outward. | Material too thin or environment humid. | Glue a thin cardstock strip along the inside spine. |
| Graphics are bubbling. | Adhesive applied too wet or not burnished. | For small bubbles, prick with a pin and press flat. |
Sometimes the surface is the enemy. A glossy table is like soft grass for a budget tent under $100. Apply a small piece of museum putty to the base for instant traction.
Frequently Asked Questions
What is the best paper weight for table tents?
110 lb cardstock is the minimum for a professional, rigid result. 65 lb text weight is too flimsy and will bow. While 130 lb cover stock works, it’s harder to fold without cracking the surface.
Can I make a table tent with just paper and tape?
You can, but it will look makeshift. Tape along the spine weakens the fold and creates a visible seam. For any event where appearance matters, use proper scoring and glue.
How do you make a table tent in Microsoft Word?
Create a new document. Set Page Size to Letter (8.5″ x 11″). Set Orientation to Landscape. Then, go to Layout > Columns and select “Two.” This creates two 4.25″ wide columns. Design your left panel in column one and your right panel in column two, remembering the center is the fold.
How long does adhesive need to dry?
Spray adhesive is touch-dry in minutes but needs a full 30-60 minutes to reach full bond strength before handling or stacking. Packing tents too soon can cause peeling.
Can table tents be used outdoors?
Yes, but you must upgrade materials. Standard cardstock wilts with moisture. Use synthetic water-resistant paper or PVC-coated fabric, and laminate the finished tent. Consider a wider base for stability in wind, akin to choosing wind-resistant pop-up tents.
The Bottom Line
A sturdy table tent is simple engineering: the right material, a sharp scored fold, and a flat base. Master that trio with 110 lb cardstock, a bone folder, and a glued bottom flap, and you’ve solved 90% of wobbly-tent problems.
Always design for both sides, people move around tables. If your sign is going outside, skip paper entirely. Use synthetic stock and laminate it. Your goal is for your message to stand up and stay up, as reliable as a well-pitched shelter among the quality tents under $200. Get the spine right, and everything else is just decoration.
