
What Is a Tent Footprint? A Complete Explanation for Campers
This post contains affiliate links. As an Amazon Associate, we earn from qualifying purchases.
A tent footprint is a separate groundsheet placed under your tent to shield its floor from abrasion, punctures, and ground moisture. It should be slightly smaller than the tent floor to prevent rainwater from pooling underneath and soaking you from below.
I learned the hard way that a footprint isn’t optional gear. On a trip to Joshua Tree, I pitched my ultralight Gossamer Gear “The Two” on what looked like smooth, compacted sand. I skipped the footprint to save a few ounces. By morning, a hidden, sharp quartzite flake had pressed a pinhole through the 10-denier floor. The repair cost $80, and the tent’s waterproof integrity was never quite the same. That mistake taught me that a footprint isn’t about adding comfort; it’s about protecting a major investment from the unseen.
This isn’t about selling you more gear. It’s about giving you the clarity to know when that extra layer is worth its weight and when you can safely leave it at home.
Key Takeaways
- A footprint’s primary job is to act as sacrificial armor against abrasion and punctures, preserving the tent floor’s waterproof coating.
- Sizing is critical: an oversized footprint that extends beyond the rainfly will channel water directly under your sleeping bag.
- Tents with low-denier floors (under 20D) and low waterproof ratings (under 1500mm) are fragile and make a footprint non-negotiable.
- You can save money and weight with DIY materials like Tyvek or polycryo window film instead of buying a branded model.
- Using a footprint correctly can significantly reduce interior condensation by creating a barrier from the cold, damp earth.
A tent footprint is a protective barrier that absorbs ground abrasion and prevents punctures, extending the functional lifespan of the tent floor’s waterproof coating. Proper sizing ensures it does not create a channel for rainwater, maintaining a dry shelter.
Do You Really Need a Tent Footprint?
The answer isn’t a simple yes or no. It’s a calculation based on your tent’s vulnerability and the ground’s hostility. My rule of thumb: if the ground feels rougher than your kitchen floor, use one.
For modern lightweight tents, the need is acute. The floors on models like the Big Agnes Tiger Wall (15D) or the Nemo Hornet (often 15-20D) are engineered for minimal weight, not maximal abuse. A footprint is essential insurance. Conversely, a burly car-camping tent like the Marmot Tungsten, with its 68-denier floor, can handle more punishment on a soft, grassy site.
Common mistake: Assuming a footprint is only for waterproofing, skipping it on abrasive granite scree because the forecast is clear. The unseen damage from grit grinding off the floor’s PU coating will cause leaks months later, long after that sunny trip.
There are times you can skip it. On a well-maintained, grassy campsite you’ve cleared of debris, the risk is minimal. The same goes for soft beach sand over a short weekend. For the infrequent car camper on such terrain, the tent floor will likely outlast other components. But for anyone pushing into the backcountry or using a premium lightweight shelter, a footprint shifts from optional to essential.
What Does a Footprint Actually Do?
Think of a footprint less as a piece of gear and more as a wear item. Its value compounds over years, not a single trip.
Abrasion Protection: Every shift of your body, every entry and exit, grinds the tent floor against the ground. On forest duff, it’s fine. On gravel, decomposed granite, or even coarse sand, it’s like using sandpaper on the tent’s waterproof coating. Once that polyurethane or silicone layer is worn through, water wicks straight through the fabric threads.
Puncture Resistance: You clear the visible sticks and rocks. It’s the hidden, pointed stone or buried root tip you miss. Under body weight, that single point can punch through a thin floor. A footprint, especially a tougher material like Tyvek, spreads that load.
Condensation & Cleanliness Barrier: A footprint creates a slight air gap, separating the tent from the cold, damp earth. This reduces the temperature differential that drives condensation inside the tent. It also keeps mud, pine sap, and dirt off your tent floor, making pack-up faster and preserving the fabric.
Site Selection Tool: Before wrestling with poles and stakes, lay your footprint flat. If it doesn’t fit or lie reasonably flat on your chosen spot, your tent won’t either. This simple step saves immense frustration.
TL;DR: A footprint is a multi-tool: it protects your tent’s longevity, improves your sleep climate, keeps things clean, and simplifies setup.
How to Choose the Right Footprint Material
Your choice trades dollars for ounces, durability for packability. The feel of the material in your hands tells you most of what you need to know.
Run your hand over new Tyvek, it crackles like a stiff grocery bag. Now feel silnylon: slick, almost cold, and whisper-quiet. That difference tells you everything about the trade-off you’re making between rugged affordability and sleek, lightweight performance.
| Material | Best Use Case | Approx. Weight (for 2P) | Key Trade-Off |
|---|---|---|---|
| Polycryo (Window Film) | Ultralight backpacking on known, soft terrain. | ~1.5 oz | Extremely fragile; tears easily on any debris. |
| Tyvek | Budget-conscious backpackers or rough, rocky terrain. | ~4 oz | Noisy and stiff until machine-washed (cold, no soap). |
| Silnylon | Ounce-counting backpackers willing to pay for premium packability. | ~2.5 oz | High cost for marginal weight savings over Tyvek. |
| Branded Polyester | Car camping or when convenience of perfect fit outweighs weight. | 7–16 oz | Heavy and bulky, but durable and often includes attachment points. |
I prefer Tyvek for most of my trips because that inherent stiffness translates to better puncture resistance on desert rock. For a known trail like a well-groomed section of the Appalachian Trail, I might gamble with polycryo. But after my Joshua Tree lesson, I always err on the side of durability for any remote trip.
The Critical Rule for Sizing Your Footprint
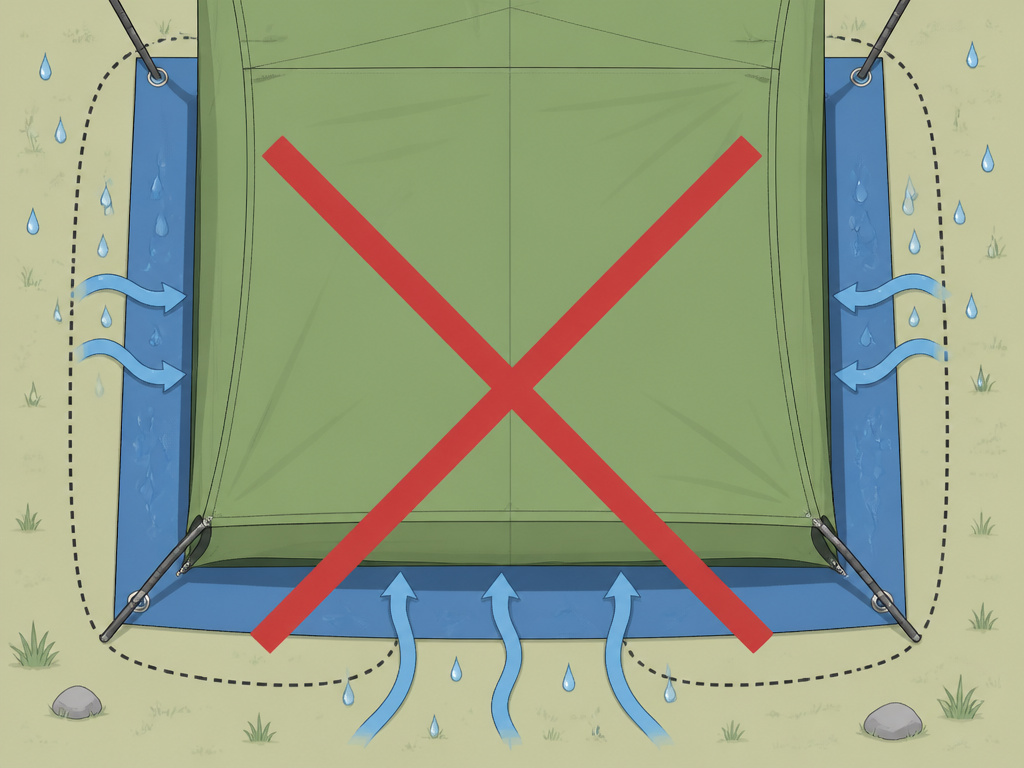
This is the single most important technical point, and getting it wrong creates the very problem you’re trying to solve.
Your footprint must be smaller than your tent’s floor. If it extends beyond the edges of the rainfly, rainwater running off the fly will land on the footprint, pool, and flow directly underneath the tent floor. You’ll wake up in a puddle that seeped in from below, not from above.
The pro move is the “two-inch rule”: your footprint should be at least two inches shorter in both length and width than the tent’s floor dimensions. For a tent with a 7’x5′ floor, your footprint should be no larger than 6’8″ x 4’8″.
| Your Tent’s Floor Size | Maximum Footprint Size | Consequence of Oversizing |
|---|---|---|
| 7 ft x 5 ft | 6 ft 8 in x 4 ft 8 in | Runoff water collects on the exposed footprint and channels under the tent. |
| 8 ft x 6 ft | 7 ft 8 in x 5 ft 8 in | Creates a hidden reservoir of moisture between footprint and tent floor. |
| 9 ft x 7 ft | 8 ft 8 in x 6 ft 8 in | Significantly increases the wet surface area contacting the tent bottom. |
If you’re using a generic tarp or sheet that’s too large, the solution is simple: before pitching the tent, fold the excess material under itself until it’s completely concealed by the tent body. Tuck it neatly so no part peeks out beyond the rainfly’s drip line.
A Step-by-Step Guide to Using a Footprint
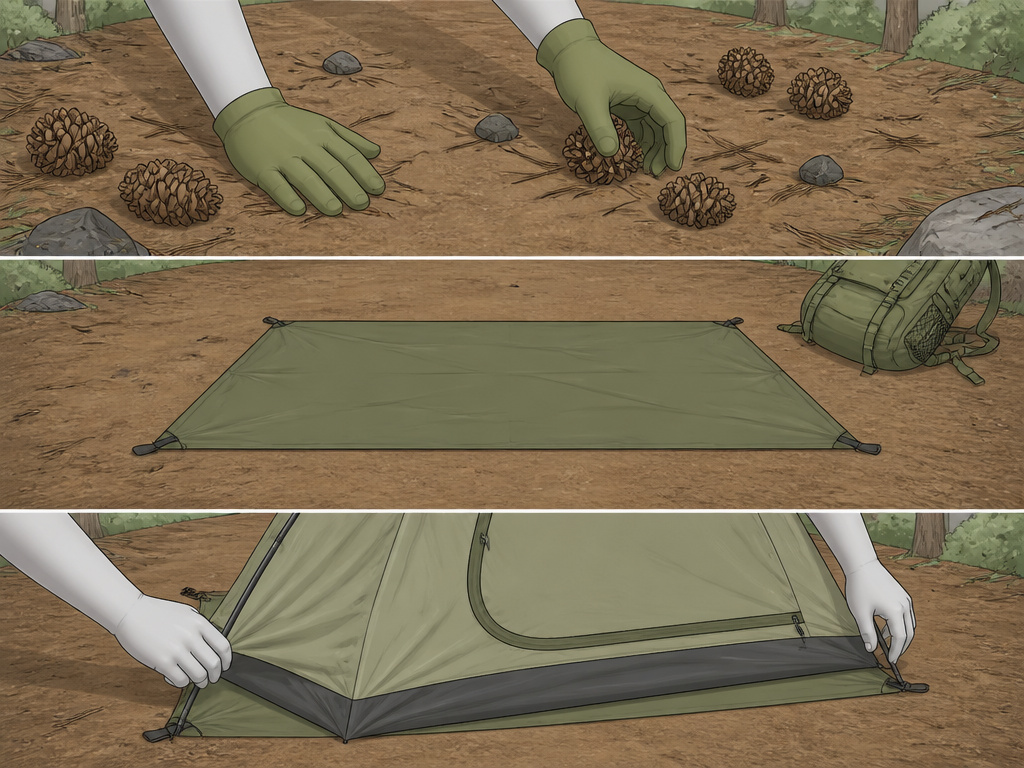
Integrating a footprint into your routine adds only seconds and prevents years of regret.
- Site Inspection & Clearance. Don’t just look, feel with your hands. Sweep away every pine cone, twig, and pebble larger than a pea. Move the loose top layer of duff. This step prevents 90% of punctures.
- Lay and Check. Unfold your footprint and lay it flat. This is your final fit test. If it doesn’t lie reasonably flat or fit within a clear space, your tent won’t either. This saves you from a half-pitched repack.
- Pitch on Top. Assemble your tent directly on top of the centered footprint. Ensure no part of the footprint is visible around the edges. If it is, fold it under.
- Secure if Possible. Many branded footprints have grommets or clips to attach to the tent pole ends or the base of the tent. This adds stability in wind and ensures perfect alignment.
Skipping the hands-on clearance is how a hidden, pea-sized rock creates a pinhole leak that soaks the corner of your sleeping bag liner by morning, a cold, miserable surprise that ruins your next night’s sleep.
Footprint Alternatives and DIY Solutions
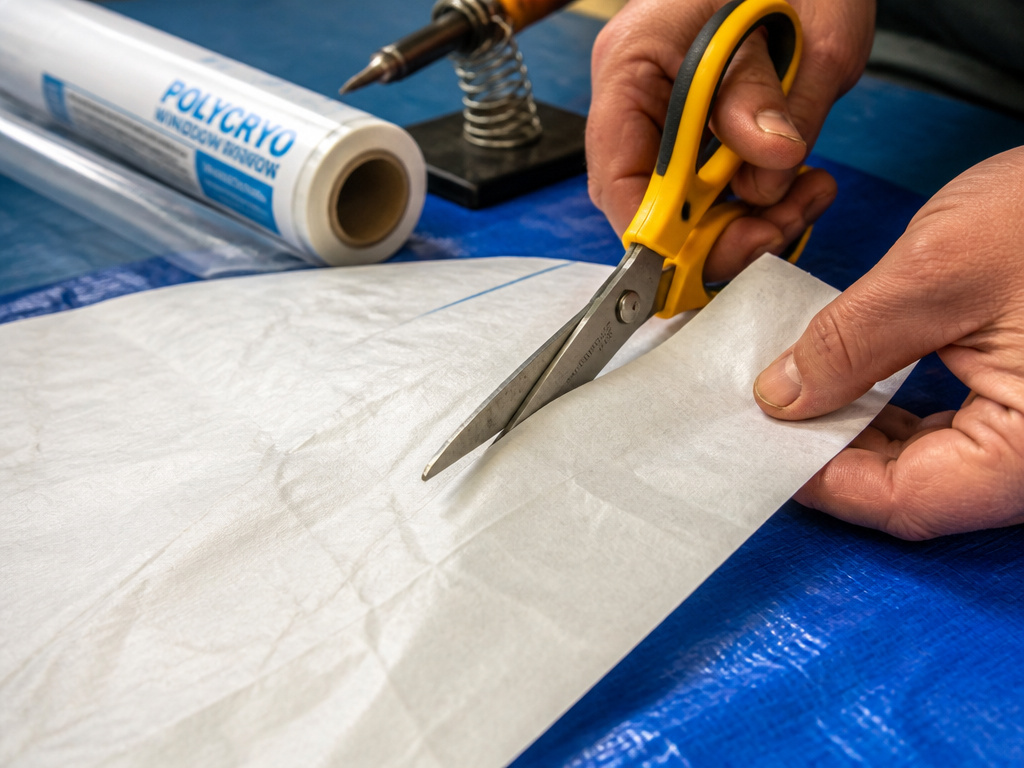
You don’t need to buy the manufacturer’s $70 accessory. Several effective, cheaper options exist, each with its own quirks.
- Tyvek: Buy a roll from a hardware store or a precut sheet online. Cut to size with heavy-duty scissors. Wash it once (cold water, no detergent, tumble dry low) to soften and quiet it. This is my recommended DIY option for its balance of toughness, weight, and cost.
- Polycryo Window Film: Sold in hardware stores for winterizing windows. It’s fantastically light and cheap. It’s also transparent, letting you check the ground beneath. It’s essentially a single-use item for a trip, as it will develop holes.
- Blue Poly Tarp: Bulky, heavy, and noisy, but effective and nearly free for car camping. Crucially, you must cut it to the correct size. An oversized blue tarp is a guaranteed water-collection system.
- Repurposed Materials: An old tent footprint from a larger tent can be cut down. Seal the cut edges with a soldering iron (for synthetics) or a product like Gear Aid Seam Grip WP to prevent fraying.
Before you start a DIY project: Cutting materials like Tyvek creates fuzzy, frayed edges. For a clean, durable finish on silnylon or coated polyester, use a soldering iron on a low setting to melt and seal the edge in one pass. For polycryo, which melts into a useless mess, apply a thin strip of seam sealant tape.
Integrating Footprints Into Your Gear System
A footprint isn’t an isolated item; it’s part of a system that protects your shelter investment. Pair it with good habits and complementary gear for the best results.
Always dry your tent and footprint completely before storage. Hang them in a garage or spread them in a living room. Storing them damp, even with a footprint in the mix, guarantees mildew that ruins fabric and coatings. For cleaning a branded polyester footprint with a DWR finish, use a technical cleaner like Nikwax Tech Wash to avoid stripping the coating.
Your footprint is a foundational piece of a larger shelter strategy. It works alongside other essential tent camping accessories like a proper tent lighting solution for safe after-dark movement. For those investing in a robust basecamp, pairing a footprint with a durable shelter from our list of canvas tent models or a stand-up height tent creates a comfortable, long-lasting home away from home.
If you’re budgeting carefully, a DIY footprint is a smart way to protect an affordable camping tent, whose floor is often the first place manufacturers cut costs. As you upgrade to more capable tents under $200, continuing to use a footprint will ensure that investment pays off for seasons to come.
Frequently Asked Questions
Can I use just a footprint and rainfly?
Yes, if your tent system supports “fast fly” or “footprint pitching.” Brands like Big Agnes and Nemo design some models for this. You use the footprint, poles, and rainfly, leaving the inner tent body behind. Check your manual; this saves weight and is great for fair weather or minimalist shelters like tarp tents.
Does a footprint make a tent warmer?
Only indirectly. The primary warmth gain comes from reducing ground-level condensation, which can dampen your sleeping bag and steal heat. The thin air gap provides negligible insulation.
How do I clean a tent footprint?
Shake or brush off loose dirt. For mud, rinse with water and air dry. Avoid machine washing branded footprints unless the care label explicitly permits it, as agitation can degrade waterproof coatings. DIY Tyvek can be machine washed (cold, no detergent) to soften it.
Is a footprint necessary for a new tent?
The need is determined by the ground, not the tent’s age. A new tent’s floor coating is pristine and most vulnerable to abrasion. Using a footprint from the first pitch on abrasive ground preserves that coating from day one.
What’s the lightest footprint option?
Polycryo window film is the lightest, at around 1.5 ounces for a two-person size. However, its extreme fragility means it’s best for experienced backpackers on very gentle terrain.
The Bottom Line
A footprint is the cheapest insurance policy you can buy for your tent. A $15 sheet of Tyvek can prevent a $300 tent floor failure. The logic is straightforward: if the ground is harder, sharper, or dirtier than your tent floor can handle, use one.
Size it correctly, smaller than the tent floor, tuck in the edges, and let it do its silent work. The alternative is discovering a damp patch in your tent that wasn’t there when you fell asleep, a lesson in value that, trust me, you only need to learn once.
