
How To Put A Tarp Over A Tent Without Trees | Secure Setup
This post contains affiliate links. As an Amazon Associate, we earn from qualifying purchases.
To put a tarp over a tent without trees, you need three anchor points: two poles for the ridgeline and a set of stakes for the corners and guy lines. Pitch the tarp at a 45-degree angle over your tent, secure it with a taut ridgeline, and lock it down with stakes designed for your ground type.
The universal mistake is using the wrong stakes. Round wire tent pegs pull straight out of loose soil in a 15-mph gust. The tarp becomes a sail, the poles collapse, and you’re wrestling a wet nylon monster at 2 a.m.
This guide covers the pole heights, stake types, and knot sequences that work in open fields, deserts, and alpine zones. You’ll get the A-frame pitch for rain, the low-profile pitch for wind, and what to do when the ground won’t hold a stake.
Key Takeaways
- Set trekking poles between 115 and 125 centimeters for a stable A-frame pitch over a standard tent.
- Use Y-beam stakes like the MSR Groundhog for rocky ground and wide-surface-area stakes like the MSR Blizzard for sand.
- Pitch the tarp at a 45-degree angle in heavy rain; a lower, flatter pitch works for wind protection in calm conditions.
- Pack at least 50 feet of cord. You’ll use 20 feet for the ridgeline alone.
- In an emergency, you can create a basic shelter by staking the tarp directly to the ground over your tent, trading headroom for security.
The 3-Step A-Frame Pitch (No Trees Required)
Head design changes the entire process. The A-frame is the most reliable tree-less setup because it creates a steep, shedding roof. You need two poles, a ridgeline, and four corner stakes.
Start by laying your ridgeline. Run a length of paracord between where your two poles will go, directly over the peak of your tent. Tie a trucker’s hitch or taut-line hitch on one end. This knot lets you cinch the line tight later without untying it.
For a stable A-frame pitch, set adjustable trekking poles between 115 and 125 centimeters. This height provides adequate clearance for most two- and three-person dome tents while maintaining a low enough center of gravity to resist tipping in moderate wind.
Next, set your poles and drape the tarp. Extend your trekking poles to that 115–125 cm range. Plant them firmly at the ends of your ridgeline. Drape your tarp over the cord so an equal amount hangs down each side. Now stake out the four corners. Pull them taut, but don’t max out the tension yet.
Finally, add the guy lines. Most tarps have reinforced tie-out points along the sides. Run a cord from each to a stake placed about 3–4 feet out from the tarp, at a 45-degree angle. This is the step people skip. Guy lines prevent the tarp from flapping and distribute wind load.
TL;DR: Run a ridgeline, set poles at 115–125cm, stake the corners, then add 45-degree guy lines. Tighten everything incrementally.
Stakes, Cord, and Angles: The Non-Negotiables
Your tarp is only as secure as what holds it to the earth. In the woods, you can lash to a trunk. On a beach or scree field, you’re betting on your stakes.
For rocky or hard-packed ground, you need a stake that can bite. The MSR Groundhog or any similar Y-beam stake works because the flat, angled profile wedges into soil and resists pulling straight out. Round wire stakes just bend.
For sand, loose soil, or snow, surface area wins. The MSR Blizzard stake or its knock-off cousins have a wide, flat blade. It behaves like a small anchor buried horizontally. You’ll need to dig a small trench, lay the stake flat, and bury it with the cord exiting at an angle.
Common mistake: Using the same stakes you packed for your tent, they’re usually lightweight wire pegs designed for grass. In loose or rocky terrain, they’ll fail within the first hour of a steady breeze, dumping the tarp onto your tent.
Cordage is not an afterthought. You need at least 50 feet of it. The ridgeline will eat 15–20 feet. Each of the four corners needs 6–8 feet. Each guy line needs another 6 feet. Paracord works, but a dedicated utility cord like Lawson Equipment’s Glowire has less stretch and handles tension better.
The pitch angle decides whether you stay dry or get wet. In heavy rain, you want a steep pitch, around 45 degrees, so water sheets off fast. In high wind, a lower, flatter profile catches less air. You can’t have both. Choose based on the immediate threat.
| Condition | Ideal Pitch | Why It Works | Trade-Off |
|---|---|---|---|
| Heavy Rain | Steep (~45°) | Water sheds quickly; less pooling | Higher profile catches more wind |
| High Wind | Low, flat profile | Presents less surface area to gusts | Rain runs off slower, can pool |
| Calm / Emergency | Stake-to-ground low profile | Maximum stability, minimal setup | Almost no headroom under tarp |
What To Do When the Ground Won’t Hold a Stake
Sometimes the earth wins. Solid rock, deep sand, or frozen ground laughs at your best stakes. You need deadweight.
Your car is a 3,000-pound anchor. Park it perpendicular to the prevailing wind. Tie the ridgeline to a wheel or around the rim. Use a soft loop or a towel to protect the finish. This creates one solid anchor point. You still need a pole or a large rock for the other end of the ridgeline.
Large rocks work as deadmen. Find one that takes two hands to lift. Tie your cord around it, then bury it in a shallow hole. Pile more rocks on top. The weight, not friction, holds the line.
I spent a night in Utah’s canyon country where the ground was solid sandstone. My Groundhog stakes skittered across it like hockey pucks. I ended up lashing one end of the ridgeline to my truck’s roof rack and using a 40-pound rock as a deadman for the other. The tarp held through a midnight squall. The lesson was simple: when you can’t penetrate, you pile on mass.
If you’re in loose sand, the trench-and-bury method for a Blizzard stake is your only real option. Dig a trench about a foot long and six inches deep. Lay the stake flat in it, attach your cord, and backfill the trench, packing the sand down hard. The stake is now a horizontal anchor.
Backpacks filled with gear can also serve as improvised deadweight. Lash the cord through the haul loop and strap it down with more rocks.
The Low-Profile Emergency Setup
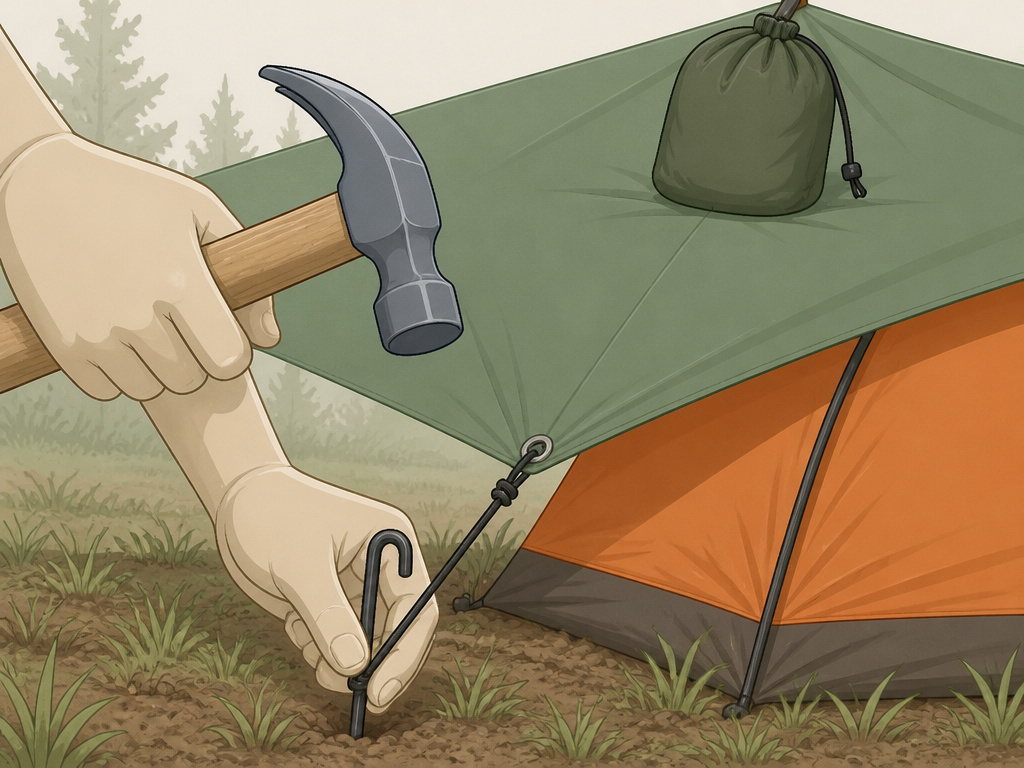
When the wind is howling and you just need a roof, the low-profile stake-down is the fastest option. You sacrifice all standing room, but you get a stable shelter in three minutes.
Lay the tarp directly over your pitched tent. Pull the corners out and stake them down close to the ground. The tarp will have a slight sag in the middle, but that’s fine. The goal is to eliminate any air gap that can catch wind.
Use every tie-out point. If your tarp has six, use six stakes. This spreads the load. Guy lines aren’t necessary here because the tarp is already low and tight to the tent body.
This setup is terrible for rain. Water will pool in the sagging center. If rain is likely, you must create a pitch. Weigh down the center of the tarp from the inside with a stuff sack or water bottle. This creates a low peak for runoff.
TL;DR: In a wind emergency, stake the tarp flat over the tent using all tie-outs. Add a center weight if rain is coming.
Which Tarp Setup Beats the Wind?
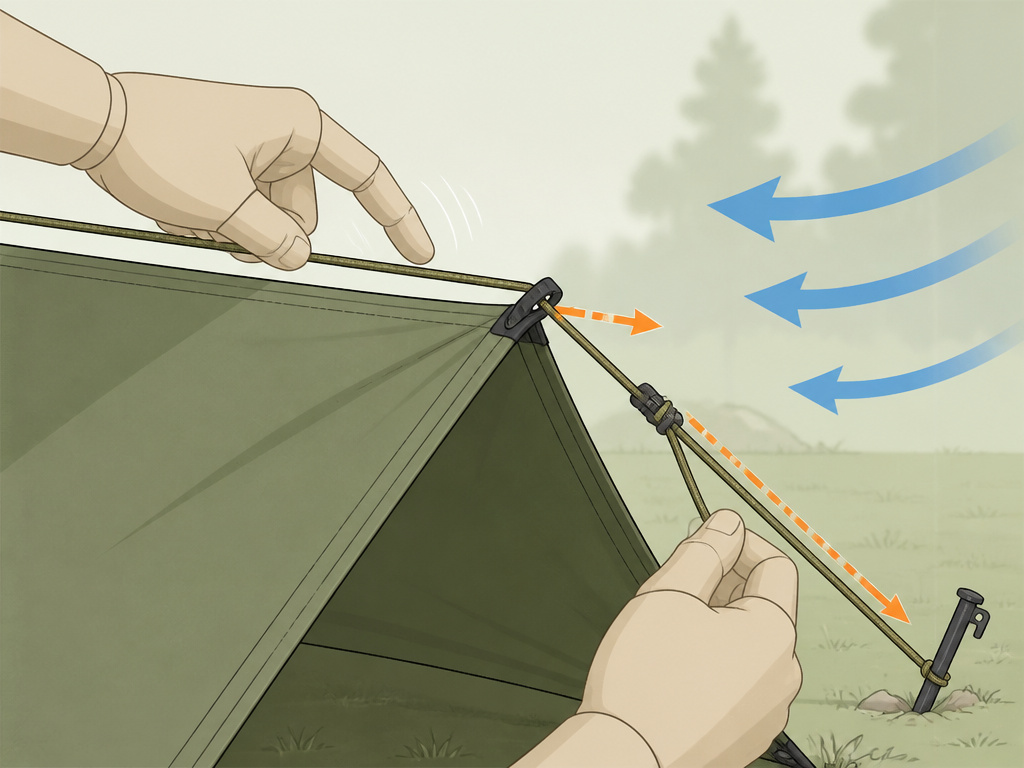
A taut tarp is a quiet tarp. Slack fabric flaps, and that flapping transfers energy to the poles and stakes until something gives.
The A-frame is surprisingly good in wind if you orient it correctly. Pitch it so the narrow end faces the wind. This presents the smallest profile. Ensure the ridgeline is absolutely tight, you should be able to strum it like a bass string.
Guy lines are non-negotiable in wind. Attach them to the mid-panel tie-outs and stake them out in line with the ridgeline, not perpendicular to it. This triangulates the force. If the wind is coming from the north, your north and south guy lines do the work; the east and west lines are just for shape.
In sustained gusts above 25 mph, consider adding a second set of guy lines to each pole. Run a cord from the top of the pole down to a stake. This prevents the pole from kicking out at the base.
| Wind Speed | Recommended Setup | Critical Adjustment | Failure Point |
|---|---|---|---|
| Light Breeze (5–15 mph) | Standard A-frame | Ensure ridgeline is tight | Loose corners will flap |
| Moderate Wind (15–25 mph) | A-frame + all guy lines | Orient narrow end into wind | Poles may wobble at base |
| Strong Gusts (25+ mph) | A-frame + double-guyed poles | Add deadweight to pole bases | Stakes lifting from soil |
If you’re car camping, you have the ultimate tent camping equipment at your disposal. Your vehicle can serve as a massive windbreak. Park it between the prevailing wind and your tarp. You can even use it as one anchor point for a hybrid setup, running the ridgeline from the car to a single pole.
Frequently Asked Questions
What can I use instead of trekking poles?
You can use dedicated tarp poles, ski poles, a sturdy branch, or even a paddle. The principle is the same: two vertical supports for the ridgeline. For a solo shelter, one pole in the center with the tarp staked out in a pyramid shape works too.
How much cord do I really need?
Pack at least 50 feet. You’ll use 20 for the ridgeline, 8 for each of the four corners (32 feet total), and another 6–8 per guy line. It’s better to have extra and coil it than to run short and compromise your pitch.
Can I put a tarp directly on my tent?
Yes, but only in dry conditions. A tarp laid directly on the tent fly will trap condensation between the layers, soaking your fly from underneath. Always create an air gap with a pole or a ridge of some kind.
What’s the best knot for a tarp ridgeline?
The trucker’s hitch. It creates a mechanical advantage for getting the line extremely tight, and it’s easy to loosen and adjust later. The taut-line hitch is a good second choice for guy lines, as it grips under tension but remains adjustable.
Before You Go
Pitching a tarp without trees comes down to three things: the right stakes for your ground, enough cord to tie everything down, and the discipline to add guy lines even when you’re tired. Remember the pole height, 115 to 125 centimeters for that A-frame. In sand, bury a Blizzard stake. On rock, find a heavy deadman.
That extra layer overhead turns a stormy night from a miserable wait into a dry, secure camp. It’s one of those tent camping accessories that feels like a luxury until you need it. Then it’s everything.
