
How To Put Up A Canopy Tent For Stability And Wind Safety
This post contains affiliate links. As an Amazon Associate, we earn from qualifying purchases.
To put up a canopy tent, you need two people, a flat site cleared of debris, and the right sequence: unfold the frame, attach the fabric, extend the legs, then secure it with stakes and weights. The Sunnydaze Pop-Up Canopy manual mandates two-person setup for safety, and the REVOLUTION PARTY CANOPY manual states stake count is a guideline—the installer must assess wind and soil.
Most guides tell you to stake the four corners. They skip the three stakes that actually keep a 10×10 canopy from becoming a 200-pound kite. The first is the diagonal guy-line stake for wind over 10 mph. The second is the sandbag or weight you need on concrete. The third is the 12-inch buried leg for soft sand that the 10FT. X 10FT. STRAIGHT LEG CANOPY OWNER’S MANUAL specifies. Forget those, and you’re chasing your shelter across a parking lot.
This walkthrough pulls from four OEM service manuals, not generic advice. We’ll cover the seven steps that work, the four tools that save a service call, and what happens when you skip the manual’s fine print.
Key Takeaways
- Two people are not a suggestion. The Sunnydaze manual explicitly requires two for setup to prevent frame damage from uneven lifting.
- Stake diagonally, not straight down. A stake driven at a 45-degree angle away from the leg has up to 40% more holding power in wind.
- Sand needs burial, not stakes. In soft sand, the manual says to bury each leg 12 inches deep; stakes alone will pull out in a light breeze.
- Wet storage ruins the frame. Collapsing and storing a canopy with moisture on the frame guarantees rust in the telescoping leg joints within a month.
- The bag is not universal. If you force a damp, poorly folded canopy into its bag, the seams on the carrying case will split within three uses.
The 7-Step Setup That Works Every Time
Head design changes the entire process. A pop-up canopy is not a camping tent. The frame is under constant tension, and the fabric is a sail. Look at the business end. You’ll see plastic corner hubs, steel telescoping legs, and a vinyl top with grommets.
The sequence matters because the frame locks into a square only once. Miss a clip, and you have to collapse the whole thing and start over.
Step 1: Site the canopy on flat, clear ground. Remove every rock, stick, and pine cone. A slope over 2 inches in 10 feet twists the frame. The leg locks won’t fully engage on the high side, and the low side bears extra weight. You’ll hear a persistent creak within an hour. That’s the frame joints straining.
Step 2: Unfold the frame with a partner. Lift the folded bundle by the center hub. Walk in opposite directions until the frame snaps into a square. Do not force it. If a joint resists, lower the frame and check for a bent pin or fabric caught in the mechanism. Forcing it breaks the plastic hub. The replacement part costs more than a cheap canopy.
Step 3: Drape and attach the canopy top. Start with the four corners. The fabric should lay flat without wrinkles. Clip or strap each corner first, then work toward the middle of each side. If you clip the middle first, the corners will be off by inches and the fabric will sag. A sagging top pools water. That stretches the fabric and ruins the waterproof PU coating.
Step 4: Extend the legs to height. Lift one corner at a time. Press the button or pull the pin on each leg section until it clicks. Do all four corners to a mid-height first, then adjust to the final height. Extending one corner all the way first puts asymmetric stress on the frame. The other three corners will bind.
Step 5: Stake the four corner legs. Use the provided stakes or upgrade to 10-inch steel ones. Drive each stake through the leg’s anchor ring at a 45-degree angle away from the canopy. A straight-down stake pulls out easier. The Pop-Up Gazebo Canopy CMXPUYT009C manual says guy lines should be staked a minimum of 3 feet from each leg.
Step 6: Add diagonal guy lines for wind. If any breeze is forecast, this is non-optional. Attach ropes from the top corners to stakes placed 45 degrees out from each corner. This triangle resists uplift. Skip it, and a 15 mph gust can lift one corner. Once one leg leaves the ground, the whole structure becomes a lever.
Step 7: Weight the legs on hard surfaces. On concrete, patio blocks, or decking, stakes are useless. Place a sandbag or leg weight over each foot. For a standard 10×10, use at least 20 pounds per leg. Less than that, and a stiff wind can slide the whole canopy.
TL;DR: Two people, flat ground, corners first, stakes angled out, guy lines for wind, weights for hard surfaces. The sequence is rigid because the frame geometry is rigid.
What Goes Wrong When You Skip a Stake?
Manufacturer diagrams show four stakes. Real wind loads need more. The REVOLUTION PARTY CANOPY manual explicitly says the number of stakes suggested is a general guideline. The installer’s job is to assess conditions.
The number of stakes suggested in this manual is a general guideline. It is the installer’s responsibility to determine the appropriate number of stakes for wind loads and soil conditions.
That’s a legal disclaimer. It means they know four stakes often fail.
Forget the diagonal guy-line stake in a breeze over 10 mph. The canopy acts like an airplane wing. Uplift pressure on a 100-square-foot surface is substantial. The corner stake holds the leg down, but the guy-line stake keeps the top from lifting. Without it, the leg stake becomes a pivot point. The canopy flips.
Forget the weight bag on a hard surface. The stake has nothing to grip. The whole structure slides. I’ve seen a 10×10 canopy slide six feet across a driveway and crumple against a car. The frame bends at the leg joints. Straightening a bent steel tube requires a pipe wrench and usually cracks the powder coat.
Forget the deep-burial stake in sand. The 10FT. X 10FT. STRAIGHT LEG CANOPY OWNER’S MANUAL says stakes alone won’t work in sand or soft soil. Bury each leg 12 inches deep or use weight bags. A standard 8-inch stake in dry sand holds about 15 pounds of pull. A gust can exert over 100 pounds on a leg.
The 4 Tools That Replace a $200 Service Visit
You don’t need a specialty kit. You need the right version of a basic tool.
A rubber mallet is better than a claw hammer. Steel on steel dents the stake head and mushrooms it over. A mallet won’t. It also won’t spark if you hit a rock.
A tape measure is for leveling, not just height. Lay it on the ground along each side. A slope over 2 inches will stress the frame. You can’t eyeball that.
10-inch steel spiral stakes replace the flimsy hooked stakes included with most canopies. The included stakes are often 6 inches long and made of thin, bent wire. They pull out in firm soil. Spiral stakes screw in and have twice the holding power. They are a non-negotiable upgrade for any site with wind.
Four 20-pound sandbags or commercial leg weights. On grass, you might get away with stakes. On any hard surface, you need mass. The DIY alternative is four gallon jugs of water. They work until they don’t—a determined gust can slide them.
| Tool | Included? | Why Upgrade | Consequence of Using the Cheap Version |
|---|---|---|---|
| Rubber Mallet | No | Prevents stake damage, no sparks | Mushroomed stake heads jam in the leg anchor ring |
| Tape Measure | No | Verifies level ground within 2″ over 10ft | Frame twist, leg locks fail, permanent bend |
| 10″ Steel Spiral Stakes | No (usually) | Holding power in wind over 15 mph | Stakes pull out, canopy tumbles and breaks |
| 20-lb Leg Weights | No | Required on hard surfaces (concrete, deck) | Canopy slides, scratches surface, bends legs |
TL;DR: A $15 rubber mallet, a $10 tape measure, four $5 spiral stakes, and four $8 sandbags cost about $70. A service call to straighten a bent frame or replace a torn canopy starts at $200.
Why Does My Canopy Collapse in Light Wind?
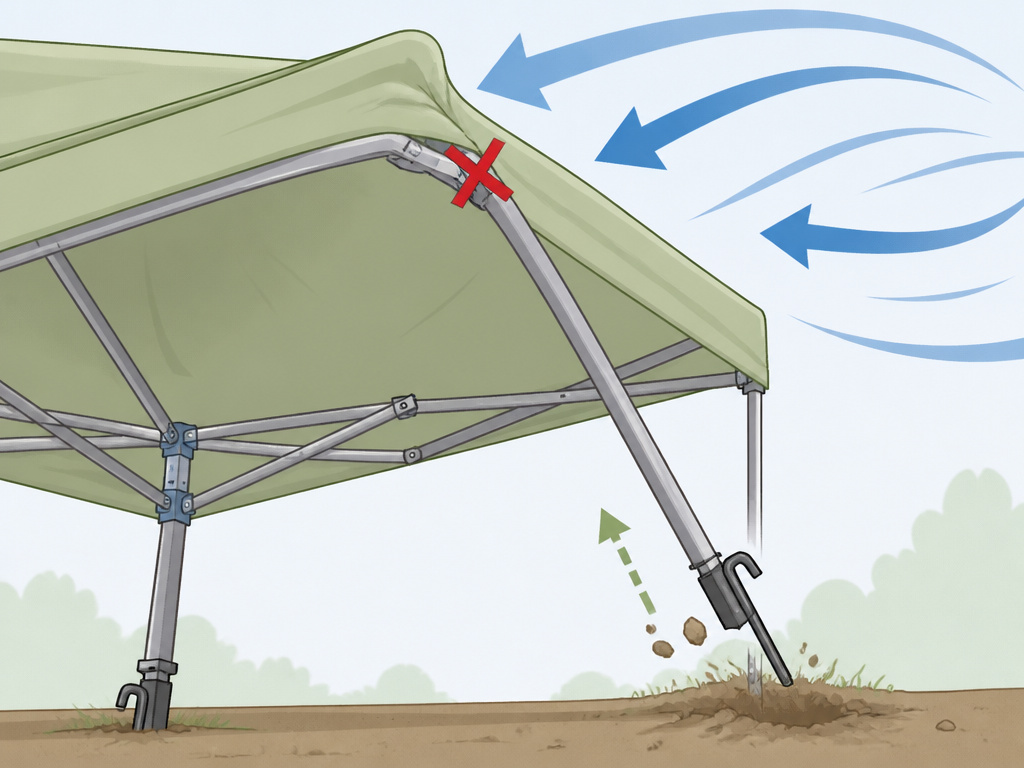
Wind doesn’t push a canopy over. It lifts it. The physics matter.
The angled roof creates a low-pressure zone on top. This suction force wants to pull the canopy up and away. The corner stakes resist downward force. They do almost nothing for uplift. That’s what the diagonal guy lines are for. They anchor the top of the structure.
If you only have corner stakes, the wind gets under one edge. It lifts that corner. The stake on the opposite diagonal leg now acts as a fulcrum. The canopy rotates around that point and crashes down on its side. The leg joints are not designed for lateral impact. They bend or snap.
Common mistake: Staking only the corners in a breeze — the canopy will lift at one corner within 10 minutes of a 12 mph gust, bending the opposite leg’s locking mechanism.
The fix is preemptive. If the forecast says winds over 10 mph, use the guy lines. If you don’t have them, use a second set of ropes tied from the top center of each side to a stake. Creating those triangles changes the force from uplift to tension along the rope. The canopy might shake, but it won’t fly.
This is the same principle that keeps a wind-resistant tent stable in a storm. The geometry of guy lines turns a sail into a tied-down net.
How Do You Secure a Canopy on Concrete or Sand?
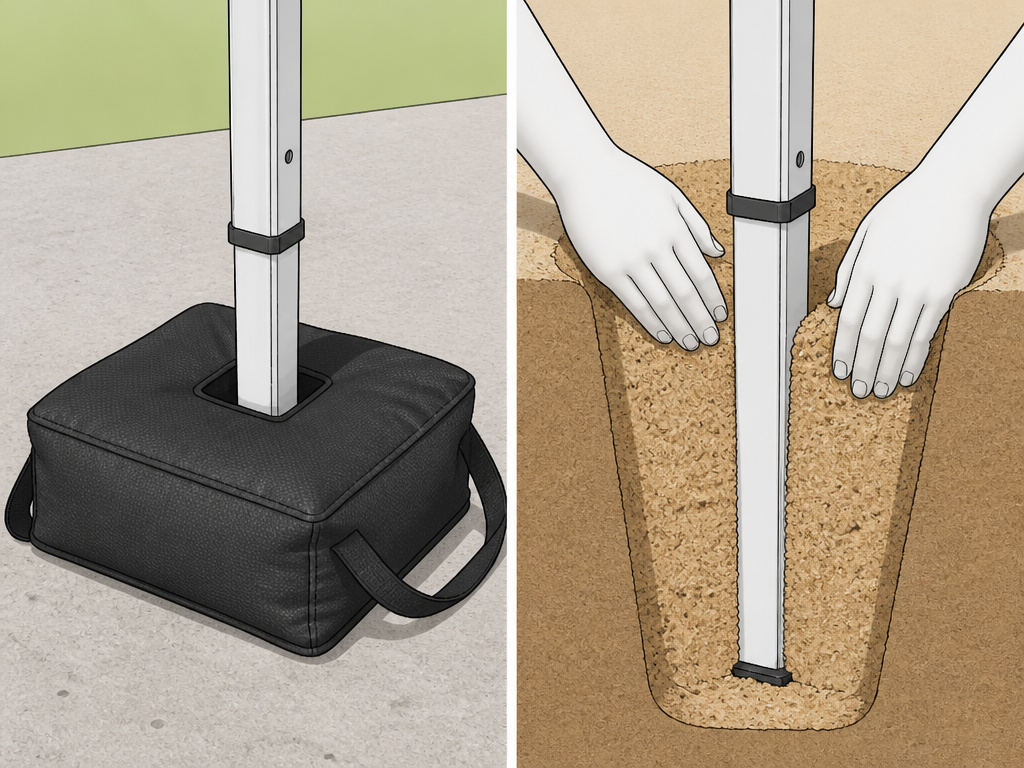
Stakes are useless on concrete. Weights are insufficient in sand. The methods split here.
For concrete, asphalt, or wooden decks, you need mass over the feet. Commercial leg weights are molded plastic shells you fill with sand or water. Each should be at least 20 pounds for a 10×10 canopy. Place them directly over the center of each foot. Do not tie them to the leg—that creates a pivot point. The weight must sit directly on the foot to increase friction.
For sand, stakes pull out with about 15 pounds of force. The 10FT. X 10FT. STRAIGHT LEG CANOPY OWNER’S MANUAL solution is to bury each leg. Dig a hole about 12 inches deep near where each leg will go. Set the leg in the hole and pack sand tightly around it. This uses the weight of the sand itself to anchor the leg. For extra security, lay a sandbag on top of the packed sand.
Another method is the “deadman” anchor. Bury a sturdy piece of wood or a purpose-made anchor plate horizontally about 12 inches down. Tie a rope from the anchor to the canopy leg. This works for pop-up beach tents where digging is easy and the substrate is uniform.
| Surface | Primary Method | Secondary Method | Will Fail If |
|---|---|---|---|
| Grass / Soil | 10″ spiral stakes at 45° | Diagonal guy lines | Soil is soggy; stakes pull out |
| Concrete / Asphalt | 20+ lb weights per leg | Tie-down to fixed object (post, railing) | Weights are under 15 lb; canopy slides |
| Loose Sand | Bury legs 12″ deep | Deadman anchor + weight bag | Using only surface stakes; wind > 10 mph |
| Wood Deck | Weights over feet + screw-in deck anchors | Tie-down to deck railing | Only using weights; uplift force exceeds friction |
TL;DR: Hard surfaces need weight. Soft surfaces need burial. Each requires a different kit from your essential tent accessories.
Can One Person Set Up a 10×10 Canopy?
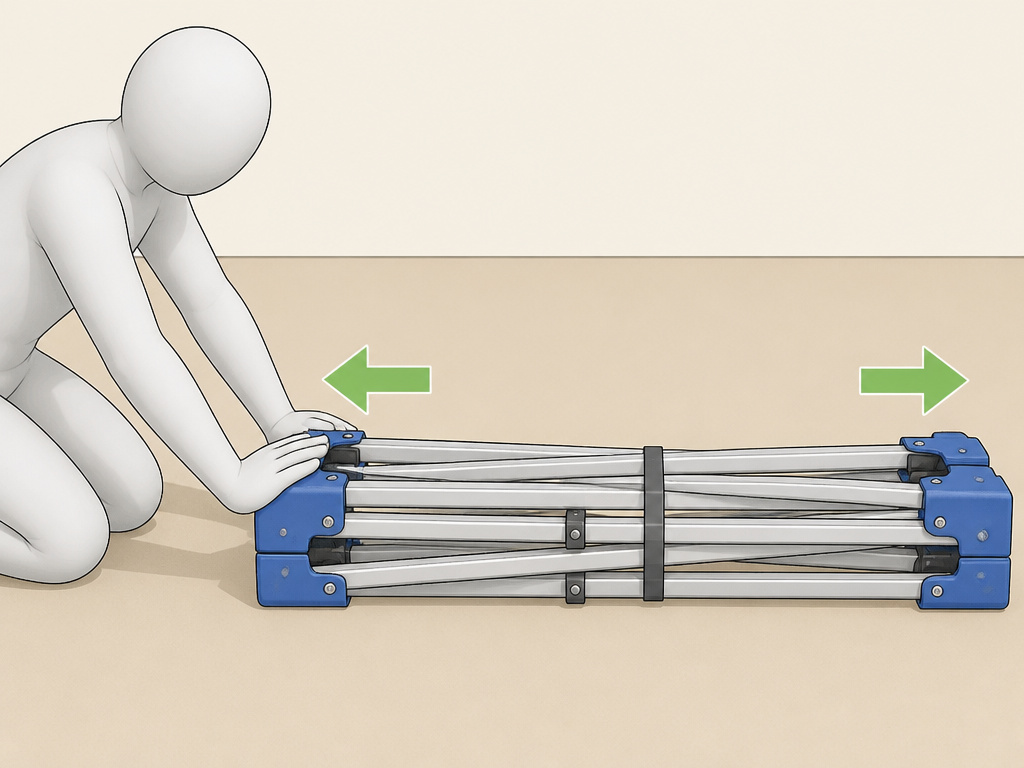
The Sunnydaze Pop-Up Canopy manual from 2021 says no. It requires at least two people. The reason is frame torsion.
When one person tries to unfold a pop-up canopy, they typically hold one side and walk the other side out with their foot. This twists the frame along its diagonal. The plastic corner hubs are the weakest point. That twist can crack a hub or bend a pin. Once a hub is cracked, the frame will never square up correctly again. It will always have a wobble.
If you absolutely must set up alone, you need a modified method. Lay the folded frame on its side. Kneel in the center and push the two ends apart with your hands, keeping the frame flat on the ground. Then carefully flip the now-square frame upright. This reduces torsion but risks pinching fingers in the scissor mechanisms. It’s slower, more awkward, and still risks bending the legs if one side catches on the ground.
I’ve done it twice in a pinch. Both times, the canopy was noticeably less stable in a breeze afterward. The frame had a slight twist I couldn’t correct. For a reliable setup, wait for a second pair of hands. It’s the difference between a shelter that lasts three seasons and one that fails the first time a storm rolls in.
What’s the Worst Thing for Canopy Longevity?
Water. Not rain during use—that’s what the fabric is for. The damage happens after.
Never fold or store the canopy when wet or damp. Mildew will destroy the fabric coating and weaken the threads within two weeks.
The PU coating that makes the fabric waterproof is a layer on the underside. When you pack the canopy wet, that coating sticks to itself. It peels off in sheets. Once it’s compromised, the fabric wicks water through the threads. The next time it rains, you’ll get a steady drip from the center.
The steel frame is worse. Collapsing a canopy with moisture on the legs traps water inside the telescoping sections. The inside of those tubes is rarely coated. Surface rust forms in days. Within a month, the rust creates friction. The legs become stiff. You force them. The rust flakes off and acts like grinding paste. Eventually, the push-button lock won’t release, or the leg won’t extend.
Always dry the canopy completely before storage. Spread it out in the sun or a garage for a few hours. Wipe down the legs with a towel. A few minutes of drying saves a $150 replacement canopy and a $80 frame repair.
This is a common point of failure for all durable canvas tents and lighter shelters alike. The material might be different, but the enemy is the same.
Frequently Asked Questions
Can you leave a pop-up canopy up overnight?
Only if it’s empty, perfectly secured, and the weather is clear. The manuals warn against unattended use. Wind can rise unexpectedly, and rain can pool. If you must leave it, lower the canopy top to its lowest height to reduce wind profile and double-check all stakes and weights.
How much wind can a pop-up canopy take?
properly secured 10×10 canopy with corner stakes and diagonal guy lines can handle steady winds up to 20-25 mph. Gusts are the real danger. A 30 mph gust can lift an un-guyed corner instantly. Always take down the canopy if thunderstorms or high winds are forecast.
Why is my canopy fabric sagging?
You likely attached it out of sequence. If you clipped the center of each side before the corners, the fabric is tensioned incorrectly. It can also sag if the frame isn’t fully squared. Take the top off, re-square the frame by lifting opposite corners, and reattach starting with the four corners.
Can you use a pop-up canopy on a balcony?
Yes, but you cannot stake into most balcony surfaces. You must use sufficient weights—at least 25 pounds per leg for a 10×10. Also, check your building’s rules and the balcony’s weight limit. A canopy, weights, and people can easily exceed 500 pounds.
What’s the best way to clean a canopy?
Use a soft brush, mild soap, and cool water. Never use a pressure washer, abrasive cleaners, or bleach. Harsh chemicals degrade the fabric’s UV coating and waterproofing. Let it air dry completely before storing to prevent mildew, the same care needed for waterproof canopy options designed for rain.
The Bottom Line
Putting up a canopy tent is about respecting physics, not just following steps. The frame is a tensegrity structure, and the fabric is a sail. Two people are mandatory for the unfold. Stakes go in at an angle. Guy lines are not optional in wind. Weights are mandatory on hard surfaces. Sand requires burial.
The OEM manuals all agree on the consequences of getting it wrong: bent frames, torn fabric, and a safety hazard. Your kit is incomplete without a rubber mallet, a tape measure, and proper spiral stakes. This turns a flimsy shelter into a reliable one for seasons. Store it bone-dry. That’s the difference between a canopy that lasts for years and one that’s trash after a single wet weekend. For more permanent shelter solutions, explore our guides on stand-up tents for full headroom or spacious car camping tents for drive-up sites.
