
Make a Christmas Tree Tent: Frame, Lights & Stability Tips
This post contains affiliate links. As an Amazon Associate, we earn from qualifying purchases.
To build a Christmas tree tent, you need a stable cone frame from 10-15 bamboo sticks or a vegie cage, a Super King flat sheet, 10-12 nine-foot garlands, and battery-powered fairy lights. Secure the base on a rug to prevent sliding, wrap garlands top-down for easy door placement, and weave lights from the inside using binder clips for a secure, magical finish.
I’ll be honest: the first time I tried this, my beautiful bamboo teepee scuttled across my polished floor like a startled crab. I’d just pulled the third garland taut when the whole frame lurched, twisting the bindings and nearly toppling the whole project. That’s the moment most pretty tutorials leave out.
This isn’t just craft glue and goodwill. It’s a structure. And after pitching countless tents from the Scottish Highlands to my own windswept garden, I know a thing or two about stability, tension, and making things weather a curious kid or a wagging tail. Let’s build a holiday hideout that holds.
Key Takeaways
- Defeat sliding first. Place a rug or spare sheet under your frame’s footprint before you start. On hardwood, friction is your best friend.
- Garlands go top-down. Starting at the peak lets you control the door opening precisely and prevents frustrating gaps.
- Buy twelve garlands, not ten. For a lush, “no-pole-visible” wrap on an 8-foot frame, twelve 9-foot garlands is the magic number.
- Pin the sheet from the inside. Secure the peak from within the frame first, then work down. It creates a sharp, taut teepee shape.
- Weave lights from the inside out. Use binder clips to secure the wire to the frame every foot, preventing sagging and tangles.
A Christmas tree teepee requires a stable conical frame, a non-slip base, and a methodical top-down wrapping sequence. Bamboo poles or a galvanized vegetable cage form the structure, which is then wrapped with garlands, draped with a flat sheet, and illuminated with interior-woven LED fairy lights for a cozy, enclosed holiday display.
Which Frame Is Right For You: Bamboo or Vegie Cage?
Your first decision sets the tone for the entire build. Both create a cone, but their personalities, and failure modes, are wildly different.
The Classic Bamboo Teepee uses 10-15 bamboo sticks, 6-8 feet tall, tied at the top and splayed at the base. It’s organic, flexible, and forgiving. You can adjust the door width, and the poles flex slightly under pressure, absorbing the odd bump. However, it requires more assembly and a meticulous approach to anchoring the covering.
The Hack-Ready Vegie Cage is a Whites Outdoor 120cm Black cage from Bunnings. It’s a pre-formed wire cone. You snip out the internal crossbars and start wrapping. It’s brutally fast. The trade-off is rigidity; the wire won’t flex, but it can dent, and the cut ends are sharp.
I learned the hard way that choosing your fasteners matters as much as the frame. On an early vegie cage attempt, I used flimsy 1.5mm cable ties. When I yanked a garland tight, one snapped. The recoiling wire whipped back and scored a two-inch gouge across my floorboard. Now, I only trust Crescent 2.5mm Black Cable Ties, they bite into the wire and hold.
| Frame Type | Best For | Biggest Headache | Pro Tip |
|---|---|---|---|
| Bamboo Sticks | A traditional look, adjustable door, play-tent durability. | Achieving initial stability; preventing poles from sliding on floor. | Keep the factory tie at the top of the bundle; it’s the perfect starting knot. |
| Vegie Cage | A speedy, weekend-afternoon project; a perfectly symmetrical cone. | Sharp wire edges; fixed, non-adjustable shape. | Wear gloves while wrapping. File down any jagged cut ends from the crossbars. |
For a project that blends DIY charm with the cozy enclosure of a real shelter, the principles here share some DNA with choosing sturdy family-sized tents, it’s all about a stable base and a reliable skin.
Before you start: This project involves working with wire (sharp edges), electrical components (lights), and a semi-stable frame. Wear gloves when handling the cut vegie cage. Use only cool-touch LED fairy lights inside the fabric tent. Ensure the frame is secure on a non-slip surface before climbing inside to pin the sheet.
Your Non-Negotiable Shopping List
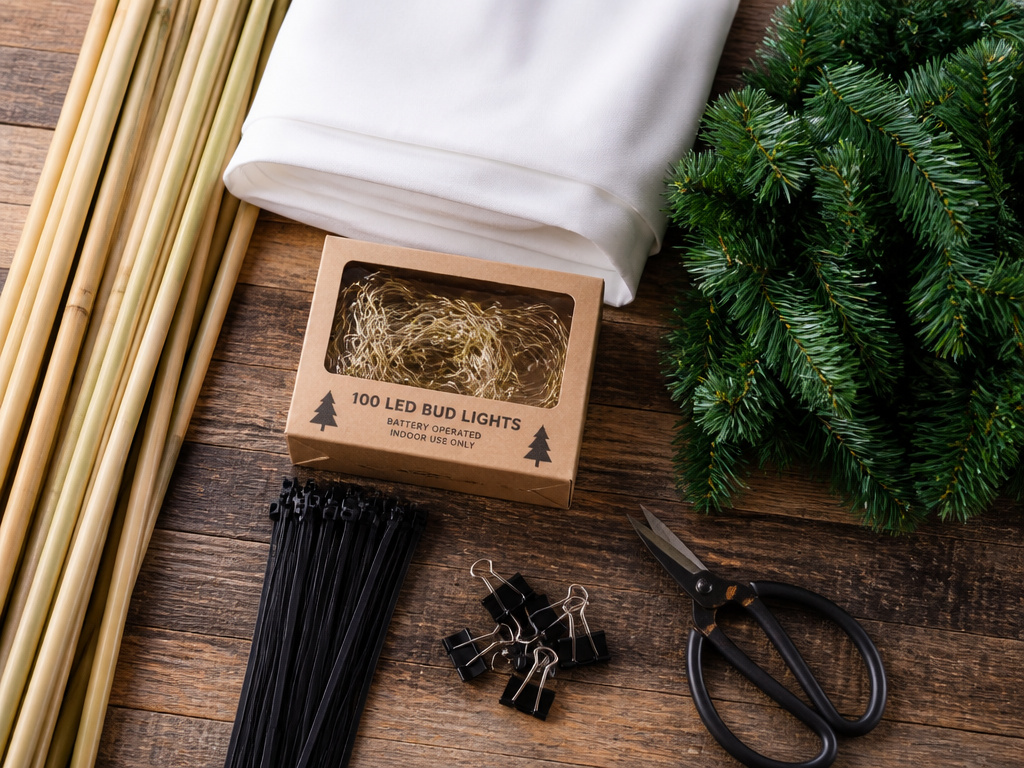
Generic lists lead to mid-build store runs. This list, honed from product codes and builder regrets, gets you from zero to cozy nook.
- Frame: Either 10-15 tall bamboo sticks or 1x Whites Outdoor Vegie Cage 120cm Black.
- Drape: 1x Super King flat sheet (fitted sheets won’t drape properly).
- Coverage: 12x nine-foot artificial garlands (10 is minimum, 12 is lush).
- Illumination: 3x sets of Lytworx Warm White Battery Operated Bud Lights (100/pack) for indoor use. Their thin, 22-gauge wire weaves seamlessly without bulging.
- Fasteners: Crescent 2.5mm Black Cable Ties (for vegie cage), a pack of binder clips, safety pins, and a roll of elastic string.
- Tool: Trojan 140mm Heavy Duty Stubby Scissors for clean cuts on wire and plastic.
TL;DR: Skimping on garlands is the top regret. Buy twelve. The Lytworx Bud Lights are ideal for their weave-able wire.
How To Build a Stable Bamboo Frame: A 7-Step Sequence
Most guides say “tie the sticks.” Here’s what that actually means, step-by-step, including the pivotal step every video glosses over.
- Prepare the bundle. If your bamboo came factory-tied in three places, cut the bottom and middle ties but leave the top one intact. It’s a perfect, tight starting point.
- Position on a non-slip base. Lay a rug or spare sheet down first. Place your tied bundle in the center and splay the bottoms into a circle. Pull two adjacent sticks forward to mark your door.
- Add internal support sticks. This prevents sag. Place extra bamboo sticks between the main outer poles around the circle. One builder I followed had to stop and buy more sticks mid-build because the sides billowed inward without them.
- Create an anchor grid. Wrap elastic string around each vertical pole, spacing bands 12-18 inches apart from bottom to top. This is critical. Without it, the sheet and garlands will slide straight down the smooth bamboo.
- Drape the Super King sheet over the entire frame.
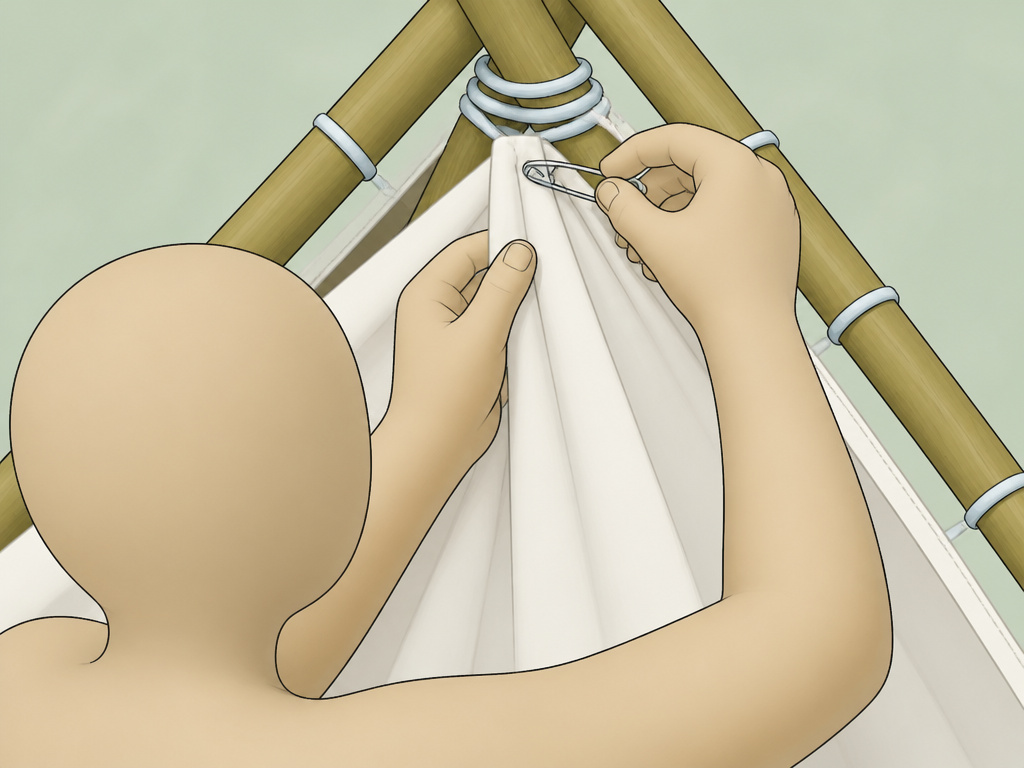
- Pin the peak from the inside. This is the game-changer. Have someone climb inside, locate the central peak of the sheet above their head, and secure it to the top tie-point with a safety pin or garden wire. This pulls the entire cover taut from the center.
- Work from the ground up. With the peak fixed, the person inside pins the sheet to the elastic string bands, starting at the bottom hem and moving upward, ensuring a smooth, wrinkle-free drape to the floor.
Common mistake: Pinning the sheet from the outside, working upward, this leaves slack at the top, creating a baggy, sad-sack shape instead of a sharp teepee silhouette.
The Great Garland Debate: Why Top-Down Wins
Look, I’ve pitched tents in howling wind, direction matters. Here, the garland debate is just as fierce: top-down or bottom-up?
Following one builder’s advice, I started at the bottom. It felt intuitive. An hour later, I’d accidentally wrapped over my planned door opening and had a glaring bare patch near the peak where my spirals didn’t meet. It was a frustrating mess.
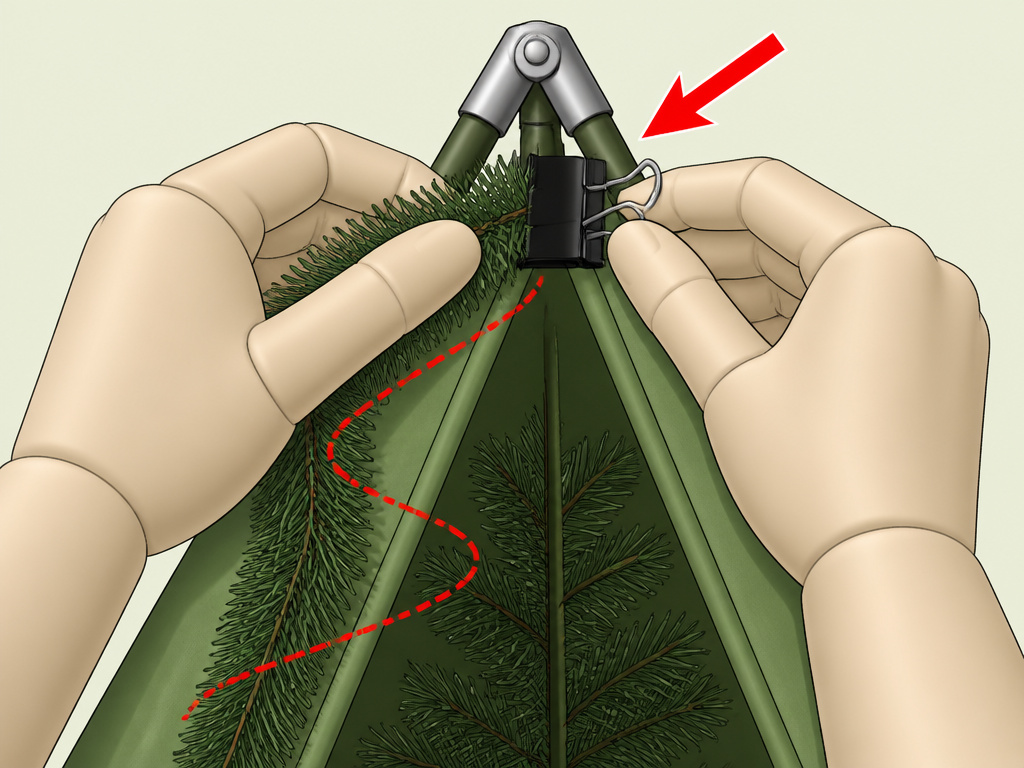
Another builder, after a similar ordeal, insisted on starting at the top. I tried it on my next build. You secure the first garland end at the peak with a binder clip, then spiral down. When you reach your desired door height, you just stop and clip the end. The door is perfectly defined, and coverage is even.
| Wrapping Method | Pro | Con | Best For |
|---|---|---|---|
| Top-Down | Precise door control; even coverage; faster overall. | Requires a tiny bit of forethought for length. | Everyone. Especially anyone with slippery floors or kids eager to “help.” |
| Bottom-Up | Feels immediately productive. | High risk of covering the door; creates gaps at the top. | Practiced builders who have measured their door zone perfectly. |
For a dense look, you’ll need all twelve garlands. Clip the end of each new strand where the last one finished, and spiral downwards, slightly overlapping the previous layer.
Securing Lights & Adding the Final Magic
Lights falling out mid-December? Infuriating. The secret isn’t more tape, it’s weaving from the inside and clipping as you go.
Take the battery pack inside the tent. Start weaving the Lytworx Bud Lights through the garlands, clipping the wire directly to the bamboo or vegie cage frame every 12 inches with a binder clip. This sandwiches the wire against the frame, preventing slippage. For a soft, ambient glow that doesn’t rely on mains power, this method is far superior to haphazardly draping them.
Clip first, then weave. Trying to clip a loose, already-weaved strand is a recipe for drooping loops and dislodged bulbs. Clip a short section to the frame, weave the next section through the greenery, then clip again.
Now for the interior magic, which borrows a page from creating a cozy base camp:
- Floor: Toss in a fluffy blanket over the sheet.
- Comfort: Add a few festive pillows.
- Ornaments (Lightly!): Hang only lightweight plastic baubles directly onto the garland wire. Never hang glass ornaments. The weight and risk of breakage inside a fabric tent isn’t worth it.
The final test is the evening sit. After dark, turn on the lights and get inside. This reveals any dark spots and, more importantly, lets you enjoy the soft, patterned light that makes all the work worthwhile. For other projects that blend structure with cozy illumination, the principles behind effective tent lighting solutions can be a great source of inspiration.
Frequently Asked Questions
How do I make a door in my Christmas tree tent?
When wrapping your garlands from the top down, simply stop wrapping when you are about two feet from the ground on the two front poles. Leave that section bare. The natural V-shape between the poles becomes the perfect doorway.
Can I build this outdoors?
Yes, but material choices are key. Use the galvanized vegie cage (it won’t rust) and solar-powered fairy lights. The sheet won’t withstand rain, so this is for dry weather, covered patios, or porches. Secure the base with tent pegs or weights if it’s windy.
Are fairy lights safe inside a fabric tent?
Modern LED fairy lights like the Lytworx models are cool to the touch and pose minimal fire risk. Always use battery-operated (not plug-in) lights inside the tent, place the battery pack on a hard surface, and never leave them on unattended or while sleeping.
What if my floor is too slippery, even with a rug?
If you’re on polished concrete or tile, create a wider, grippier base. Use a full-size non-slip rug pad under your rug, or build the frame on a large, coarse-weave outdoor mat. The goal is to increase the friction surface area for the poles.
Can I use a different frame, like PVC pipe?
Absolutely. A tomato cage, PVC pipe structure, or even a freestanding clothes airer can work. The core principles remain: create a stable cone, prevent base slip, wrap top-down, and secure coverings from the inside. For large, complex frames, the engineering behind spacious group tents offers insights into scalable stability.
How do I store this after the holidays?
Disassemble in reverse order. Carefully remove ornaments, unclip and coil lights, unwind garlands, and fold the sheet. Bundle bamboo sticks together and re-tie. Store in a dry place. The vegie cage can be flattened slightly for compact storage.
The Bottom Line
Building a Christmas tree tent isn’t about saving money on a pine. It’s about creating a secret glowing pocket of holiday atmosphere, a project that’s as much fun to build as it is to inhabit.
The three things that make or break it are a non-slip base, a top-down garland wrap, and interior-secured lights. Nail those, and you bypass the frustration that kills the holiday spirit. Skip them, and you’ll be wrestling a drunken spider frame.
So lay down that rug, clip your first garland at the peak, and weave those lights from the inside. Then, make a cocoa, climb inside, and look up. That constellation of light through the greenery, that’s your reward. Just don’t forget to enjoy the cozy shelter you’ve built.
