
How Do You Build a Tent | The Diagonal You Didn’t Measure
This post contains affiliate links. As an Amazon Associate, we earn from qualifying purchases.
To build a tent, you must create a perfectly square footprint, stake the corners without tension, then systematically tighten the structure from the windward side. The single most common failure point is ignoring the diagonal measurement, which guarantees a lopsided, unstable shelter that sags in the rain and flaps in the wind.
People think a tent is a tent. They unroll it, jam poles together, and hammer stakes anywhere. The shelter goes up, sure. But it sways in a light breeze, collects water in a sagging roof, and the door zipper binds by morning. The problem isn’t the tent. It’s the assumption that four corners and a rainfly make a structure.
This guide is about building a shelter, not just pitching a tent. We’ll cover the three-step sequence that keeps a 40-foot event tent standing for a week and a 10-foot backpacking tent dry in a storm. It starts with a tape measure.
Key Takeaways
- A square footprint is non-negotiable. Measure the diagonal of your tent’s base; if the two diagonal lengths don’t match, your tent is a parallelogram and will never tension evenly.
- Stake corners before you tension anything. Drive stakes at a 45-degree angle away from the tent, then tighten guylines in a cross pattern, starting on the windward side.
- Check tension every three to seven days for long-term setups. Fabric stretches, ground settles, and stakes creep. A loose guyline today is a collapsed pole tomorrow.
- The right stake depends entirely on ground conditions. Sand stakes are useless in hard clay; screw-in snow anchors melt out of slush. Match the stake to the dirt under your feet.
- For large tents or obstructed sites, use the pre-staking method. Lay out the perimeter with tape measures and square the corners before the tent fabric ever touches the ground.
The Three Non-Negotiable Steps for a Taut Shelter
Building a tent is a sequence, not a free-for-all. Skip a step, and the whole structure fights you. The goal is a geometric shape under even tension.
First, clear the site. Move every rock, pinecone, and twig larger than a marble. A lump under the floor feels like a boulder at 2 a.m. Lay your footprint or tarp, then find true square.
For a 40′ x 80′ tent, the diagonal (C) is calculated using A^2 + B^2 = C^2. Here, (40^2) + (80^2) = 1600 + 6400 = 8000. The square root of 8000 is 89.44 feet. If your two diagonal measurements aren’t within an inch of that 89.44-foot target, your rectangle is a rhombus.
That number is from the tent installation and maintenance handbook published by the Industrial Fabrics Association International. They don’t publish that formula for fun. They publish it because an unsquare tent cannot be tensioned correctly. The fabric pulls unevenly, stress concentrates on one pole, and the first stiff wind finds the weak seam.
Second, assemble the frame on the ground. Connect all pole sections before trying to raise anything. For dome tents, thread the poles through the sleeves or attach the clips while the tent is flat. For cabin-style or large pole tents, lay the poles out in their final configuration. Then, raise the structure slowly, walking each corner grommet onto its pin or stake. Do not force it. If a pole won’t seat, the footprint isn’t square.
Third, stake before you tension. This is the step everyone gets backwards. They pull a guyline tight, then hammer the stake. That locks in all the misalignment from steps one and two.
TL;DR: Clear, square, and measure the diagonal. Assemble the frame on the ground. Stake all corners loosely, then tension the guylines in a cross pattern starting upwind.
Why Your Tent Sags (and How to Fix It for Good)
Sagging fabric is a symptom, not a disease. The cause is always uneven tension. You see it in the drooping rainfly, the wall that leans inward, the puddle on the roof after a drizzle.
The fix is systematic tightening. Start on the side facing the wind. Tighten that guyline about halfway. Move to the opposite corner and tighten its line. Then do the two adjacent sides. Go around the tent again, taking up the remaining slack in the same order. Finish by going back to your starting point and giving each stake a final firm tap with the mallet.
Common mistake: Tensioning guylines in a circle around the tent — the fabric pulls to one side, the poles torque, and the door zipper jams by morning. You’ll spend the first night of your trip wrestling with a stuck zipper in the dark.
Wind direction decides your starting point. If you tension from the leeward side first, the tent gets pulled downwind and you’re fighting the breeze for every other stake. Start upwind. The tent wants to go that way anyway.
For large family tents or long-term setups, re-tension every three to seven days. The tentage safe setup manual is explicit about this. Fabric stretches. Soil compresses. Stakes work loose. A quick walk-around with a mallet and a pull on each line takes two minutes and prevents a midnight collapse.
The Right Tools for the Job (and What to Skip)
You can build a tent with the stuff sack it came in. You cannot build a good, safe tent without the right tools. This isn’t about brand loyalty. It’s about physics.
| Tool | Non-Negotiable Spec | What Happens If You Skip It |
|---|---|---|
| Mallet | Rubber or plastic head, 2+ lb weight | Bent stakes, split plastic stakes, bruised knuckles from using a rock. |
| Measuring Tape | 50-foot length, metal blade | Guessing the diagonal. Your “square” is off by a foot and the rainfly won’t clip. |
| Stakes | Match stake type to ground: sand, snow, screw, nail | Pull-out in a 15 mph gust. The tent becomes a kite. |
| Guylines & Tensioners | Reflective, 3+ mm diameter, adjustable tensioners | Lines that sag when wet, knots that freeze solid, no way to re-tighten later. |
| Footprint | Sized 2-3 inches smaller than tent floor | Moisture wicks up between tent and tarp, creating a puddle inside your shelter. |
A rubber mallet transfers force without mushrooming the top of your stake. A steel hammer does the opposite. The 50-foot tape is for the diagonal on tents larger than 10×10 feet. For a spacious car camping tent, that measurement is the difference between a weekend of comfort and a weekend of adjusting sagging lines.
Stake selection is not optional. The performance of tent stakes can differ significantly even for the same stakes on the same tent due to variable ground conditions. Sandy soil needs wide, plastic sand stakes. Hard clay needs needle-nose steel stakes you can drive with the mallet. Snow needs the large, plastic screw-in anchors. Using the wrong one is an exercise in futility.
Skip the fancy cordless impact driver for driving stakes. It over-torques, strips plastic threads, and offers zero feel for when the stake is seated. Your arm and a mallet provide better feedback.
Stake It Right: Distance, Angle, and the Industry Debate
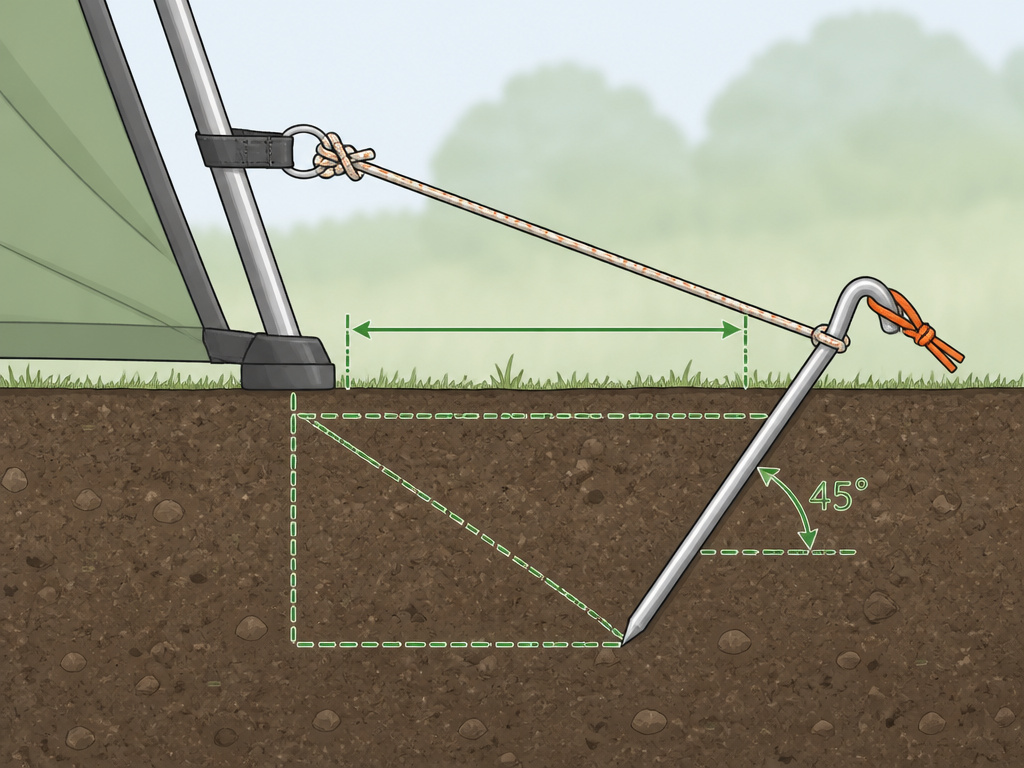
Where you put the stake matters as much as which stake you use. The goal is to transfer tension from the fabric, through the guyline, into the ground at the most efficient angle.
Drive every stake at a 45-degree angle away from the tent. A vertical stake pulls straight up under tension. An angled stake uses the soil’s shear strength to resist pull-out. Bury it until the eye is just above the soil.
Now, how far from the pole should that stake be?
Opinions vary widely on what the proper distance is from the base of the pole to the stake. Refer to the manufacturer’s instructions to determine the exact distances.
That’s from the same industry handbook. For most dome tents, 18 to 24 inches is the sweet spot. For larger pole tents, it can be 3 to 4 feet. The point is to create a triangle of support. Too close, and the angle is too steep and offers little lateral stability. Too far, and the line is too horizontal, putting massive upward pull on the stake. Find the manual for your specific model. If you lost it, a web search for “Eureka! Tetragon Two Pole” or “Coleman Montana 6 Tent” will usually turn up a PDF.
TL;DR: Stake at a 45-degree angle, 18-24 inches from the pole for dome tents. The exact distance is in your manual. Ignoring it means your tent is one strong gust away from a faceplant.
When the Standard Method Fails: The Pre-Staking Workaround
Sometimes you can’t just lay the tent out and go. A tree root runs through the perfect spot. The site is covered in large, immovable rocks. You’re setting up a 30×60 foot event tent with a crew of two.
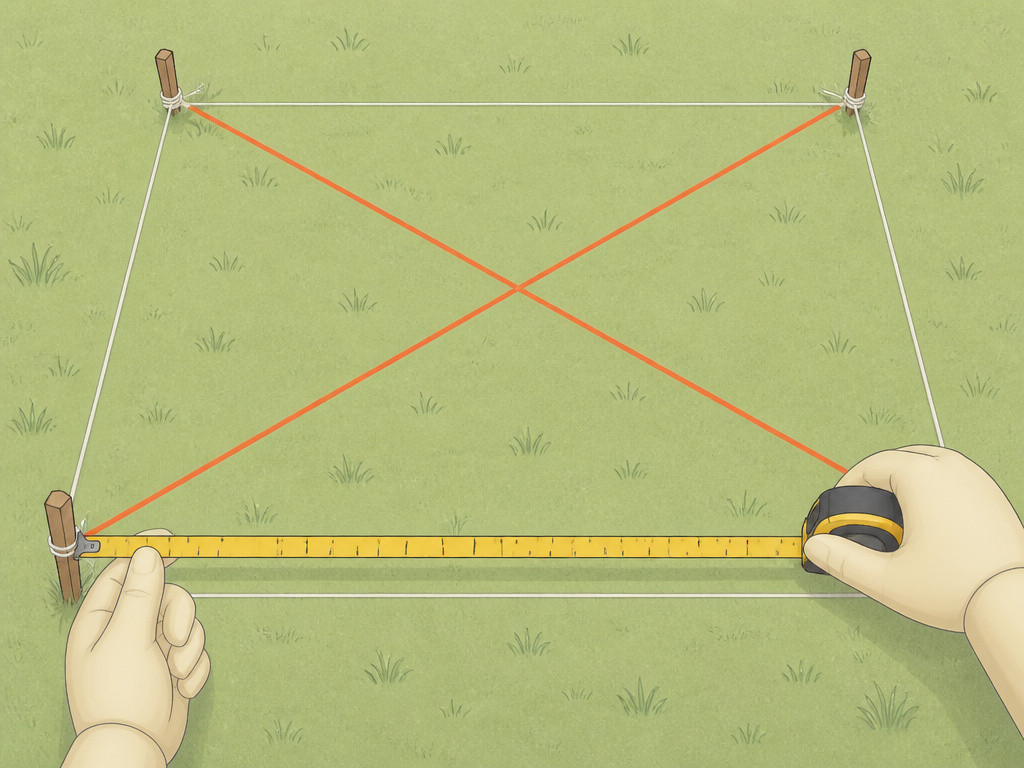
This is where the pre-staking method saves the day. You lay out the tent’s perimeter with tape measures and stakes before the canvas ever comes out of the bag.
- Mark your tent’s four corners with temporary stakes.
- Measure the length and width between them to ensure they’re correct.
- Measure the diagonals. Adjust the corner stakes until both diagonal measurements are equal. Your footprint is now a perfect square or rectangle.
- At each corner, replace the temporary stake with your final, heavy-duty stake at the correct 45-degree angle.
- Now lay out your tent, attaching each corner grommet directly to its pre-placed stake.
The tent goes up square because the hard part—the measuring—is already done. This method is mandatory for large family tents or any shelter where you can’t physically stretch the fabric to find the corners. Trying to muscle a big tent into square after it’s half-assembled is how poles snap.
Tarp Shelters: The Ultralight Alternative
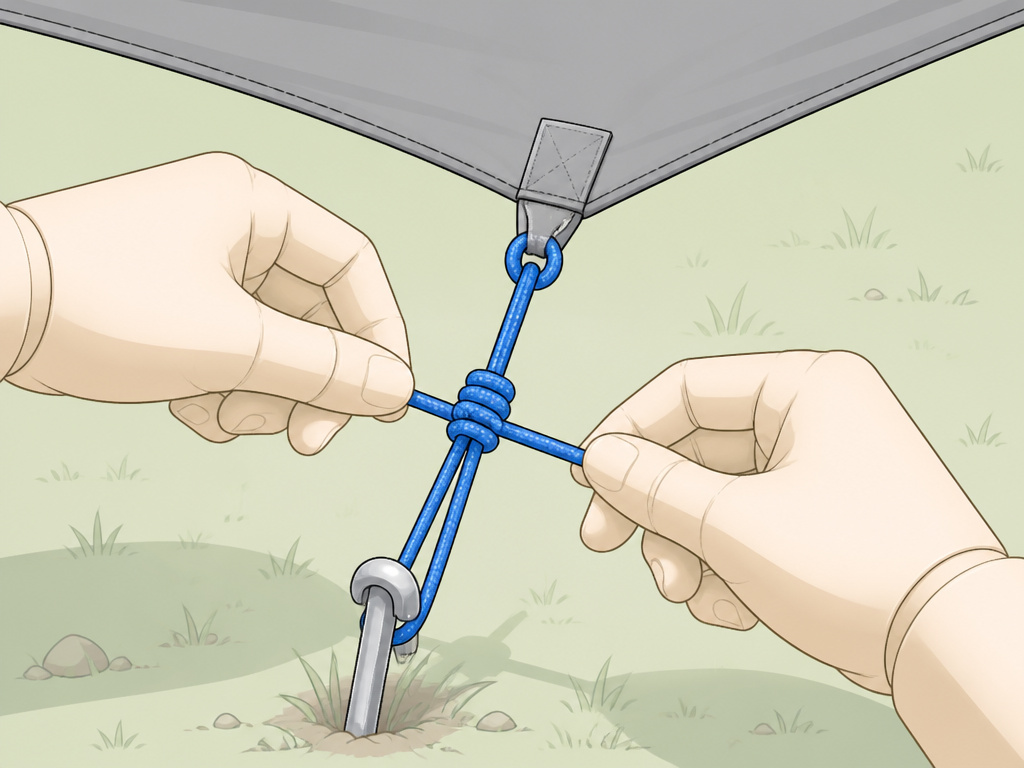
A tarp is a tent without walls. The principles are identical: a taut, squared shelter. The YouTube tutorials get one thing brilliantly right and one thing dangerously wrong.
The right part: using a square tarp. A 12×12 tarp is infinitely easier to pitch taut than a 16×20 rectangle. The equal sides mean your diagonals are equal by default. If you only have a rectangular tarp, you mimic a lightweight tarp tent by bringing two corners together to form a ridge line, like in the 16×20 tarp build.
The wrong part: staking tension. Most tarp tutorials show someone pulling a line tight and then staking it. That works for a five-minute video. It fails at 3 a.m. when the nylon has stretched and the stake pops. You must use a tensioning system. A simple trucker’s hitch knot on each guyline lets you cinch the shelter drum-tight and, more importantly, re-tighten it later without untying everything.
For a minimalist shelter, a trekking pole or a found stick makes a fine center pole. Pad the top with a hat or a shirt so it doesn’t punch through the fabric. The key is to pre-stake the two rear corners, prop the center, then walk the front line out and tension it last. Any other order and you’re chasing sag across the whole structure.
Long-Term and Event Setup: The Rules Change
A weekend camping trip forgives a lot. A tent that stays up for a week at a festival or a month as a basecamp does not. The forces are cumulative.
The industry standard safety factor for staking is between 1.5 and 2.0. If a stake is rated for 100 pounds of pull-out force, you design the system so it only experiences 50 to 66 pounds of actual force. You achieve this by using more stakes, better stakes, and wider angles. For a group camping shelter that will house eight people for a week, you don’t use the skinny stakes that came in the bag. You buy a set of 12-inch steel nail stakes and use every guyline point the tent offers.
Wind is a dynamic load. It doesn’t push constantly; it gusts. Each gust applies a shock load that can be double the steady pressure. Your guylines must have shock absorption. Either use line with a little stretch (like nylon, not polyester) or add a rubber tensioner like those found on durable canvas models. This turns a sharp jerk into a gentle pull.
Finally, schedule a tension check. Walk the perimeter every three days. Tighten every guyline. Tap every stake. Look for fabric stress points or bent poles. This five-minute ritual is cheaper than replacing a collapsed tent.
Frequently Asked Questions
Do I really need to measure the diagonal for a small tent?
Yes, but you can do it by eye. Lay the footprint flat and look at it. If it looks like a perfect rectangle, it probably is. For any tent larger than a standard two-person tent—roughly 5×7 feet or bigger—a 10-second diagonal check with a tape measure prevents hours of frustration trying to get a square peg into a round hole.
What’s the single biggest mistake first-time campers make?
Staking the rainfly directly to the ground with the same stakes as the inner tent. This removes the critical air gap between the fly and the tent body. Condensation soaks the inner tent walls instead of dripping harmlessly to the ground. Always use the dedicated fly guylines and stakes that create a 4-6 inch gap.
Can I build a tent by myself?
You can pitch most solo camping tents and dome tents alone. For larger cabin tents or spacious car camp setups, a second person is not just helpful—it’s necessary to hold poles upright while the other person stakes. Trying to do it solo often results in the structure collapsing mid-pitch, which can bend poles.
How tight should guylines be?
Tight enough to strum like a low guitar string. If you can easily push a fistful of slack into the line, it’s too loose. If the fabric is visibly straining at the seam and the pole is bowing inward, it’s too tight. The sweet spot is firm, with no visible sag, but without putting the structure under extreme stress.
What if the ground is too hard for stakes?
Use deadman anchors. Bury a sturdy stick, log, or rock a foot deep, tie your guyline to it, and cover it with dirt. Or, tie off to large, stable objects like trees, boulders, or picnic tables. For established campgrounds with concrete pads, many best stand-up tent models come with or have available freestanding kits that use weighted bags instead of stakes.
Before You Go
Building a tent is a mechanical puzzle. The pieces only fit one way. Square the footprint first. Assemble the frame on the ground. Stake corners before applying tension. Work from the windward side.
The difference between a shelter and a liability is a 50-foot tape measure and five minutes of patience. That diagonal check is the step every manual assumes you’ll skip. Don’t. Your dry sleeping bag and intact poles depend on it.
For a weekend, you can get away with guesswork. For a week-long basecamp with a nine-person camping tent, or for a quick pitch shelter you need to trust in a storm, the rules are not suggestions. They’re the difference between a great story and a trip cut short. Measure twice, stake once, and sleep through the wind.
