
How To Decorate A Wedding Tent On A Budget With DIY Magic
This post contains affiliate links. As an Amazon Associate, we earn from qualifying purchases.
To decorate a wedding tent on a budget, focus on three cost-saving layers: overhead fabric draping (sheer chiffon at $2-5/yard), ambient lighting (solar string lights and LED lanterns), and rented foundational items like flooring. A complete 20×40-foot DIY setup runs $367–$631 in material costs, skipping professional decorator fees.
Most people blow the budget on flowers and chair rentals before they even look at the tent ceiling. The empty space above your guests is the cheapest canvas you have. Drape it with fifty dollars of fabric and a hundred dollars of lights, and the whole room changes.
This guide walks through the material math, the permit triggers you must know, and the order of operations that keeps a DIY tent from looking homemade. We will cover lighting strategies, weather reinforcements, and how to repurpose your ceremony decor for the reception to stretch every dollar.
Key Takeaways
- A 20×40 foot tent needs 6–8 strands of cafe lights and about 4800 square feet of fabric for full draping, but partial draping cuts material costs in half.
- Polyethylene (PE) tarpaulin costs as low as $0.50 per square foot and is waterproof to ISO 811 standards, making it a smart backup for sidewalls.
- In areas with forecast winds over 25 mph, double your anchor points and use 24-inch stakes, 18-inch stakes pull out within minutes in soft soil.
- Always check local permit requirements; most cities require a permit for tents over 400 square feet, and a 20×40 tent (800 sq ft) will almost certainly need one.
- Repurpose ceremony aisle markers, arches, and large floral arrangements as reception centerpieces and photo booth backdrops to avoid duplicate decor costs.
Start With the Right Tent and Permits
Headroom and wall options decide your decorating cost before you buy a single string light. A frame tent with high peaks accepts draping easily. A pop-up canopy with a low center sag swallows fabric and creates a claustrophobic feel.
Tent size dictates your guest capacity and your material budget. The International Association for Event Safety (IESA) uses a per capita space standard. For a seated dinner with round tables, plan for 18 square feet per person. A 40×60 tent (2400 sq ft) comfortably seats 120–150 guests. For a cocktail layout, that same tent holds up to 240 people. A 20×40 tent (800 sq ft) works for 50–65 seated guests or up to 80 for standing.
The NYC Department of Buildings noted in 2026 that most cities trigger permit requirements for tents exceeding 400 square feet. A 20×40 tent (800 sq ft) almost certainly requires a permit in most U.S. jurisdictions.
Permits are not just bureaucracy. They often mandate compliance with NFPA 701 flame resistance standards for fabrics and ANSI/NFPA 101 Life Safety Regulations for exit widths. Your rental company usually handles this, but if you’re sourcing a DIY frame, the responsibility is yours. Factor in a few hundred dollars and a few weeks of lead time.
TL;DR: Rent a frame tent with high peaks for easy draping. Calculate your size based on 18 sq ft per seated guest. Assume a permit is needed for anything over 400 sq ft and budget for flame-resistant materials.
The $367–$631 DIY Material Breakdown
You can transform a basic rental tent with a targeted list of materials. The numbers below are for a 20×40 foot setup, drawn from supplier price lists.
| Material | Purpose | Approximate Cost | Source / Note |
|---|---|---|---|
| Sheer fabric (chiffon/voile) | Ceiling draping, wall softening | $2–$5 per yard | Fabric store, 108-inch wide bolts |
| Polyethylene (PE) tarpaulin | Backup sidewalls, waterproofing | $0.50 per sq ft | Waterproof to ISO 811 standard (≥3000mm) |
| Heavy-duty 18-inch zip ties | Securing fabric to frame | $15 for pack of 100 | Hardware store |
| Solar string lights (50 ft strands) | Overhead ambient lighting | $20 per strand | Need 6–8 strands for 20×40 tent |
| UL-certified LED lanterns | Table & safety lighting | $10 per piece | Look for UL safety certification |
| IKEA gauze curtains | Sidewall accents | $15 per piece | Used in place of custom fabric panels |
| Battery-powered LED uplights | Floor wash, accent lighting | $15–$25 each | Place at base of tent poles |
The total lands between $367 and $631. The wide range depends on how much ceiling you drape. Full draping for a 40×60 tent requires upwards of 4800 square feet of fabric. Draping just the central aisle and the head table area cuts that by two-thirds.
Why-layer: Sheer fabric diffuses light and hides the industrial frame. Polyethylene tarpaulin provides a waterproof barrier for a fraction of the cost of custom vinyl walls, its ISO 811 certification means it can withstand a hydrostatic pressure of 3000mm, which translates to heavy rain without seepage.
Common mistake: Buying fabric by the yard without calculating square footage first, you’ll run out before covering half the ceiling, and the dye lot won’t match for a second purchase. Measure the tent’s interior surface area, then add 20% for draping slack.
Your largest single decor expense is lighting, not fabric. The good news is most of it is reusable for future events or can be sold afterward.
Lighting Is Your Secret Weapon
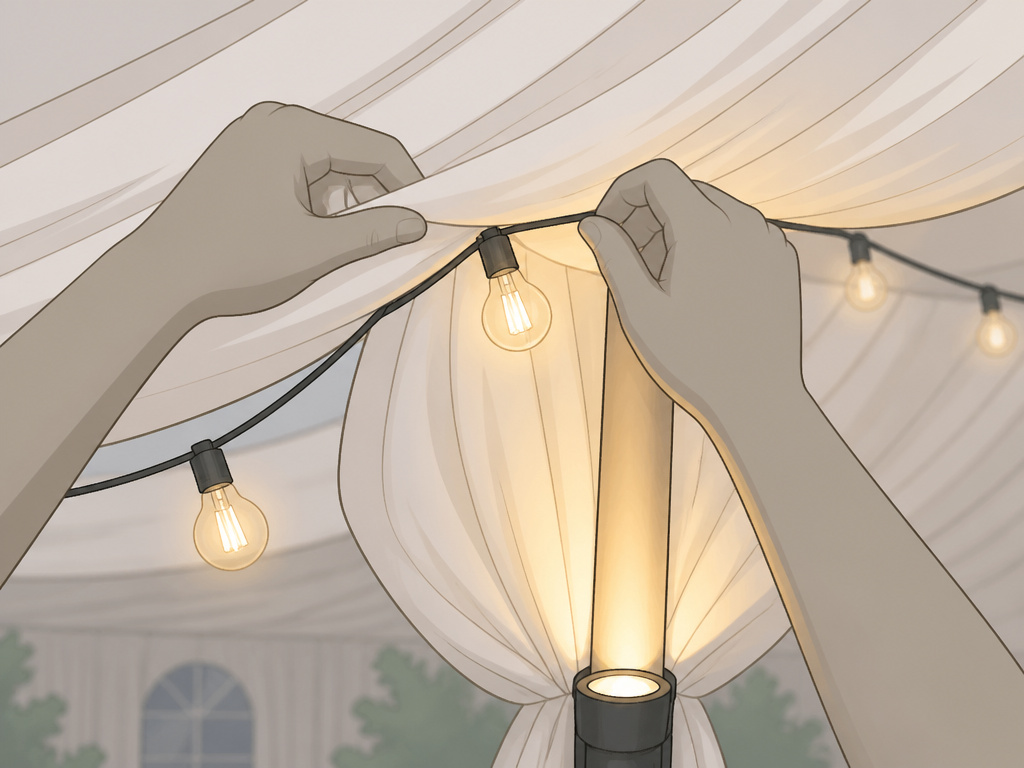
Lighting defines mood more than any other element. It also covers a multitude of sins, like uneven draping or a plain tent wall. Use a mix of overhead, ambient, and safety lighting.
Overhead lighting means string lights woven into the ceiling draping. Cafe-style Edison bulbs on 48-foot strands cost $15–$30 each. For a 20×40 tent, you need 6–8 strands. Weave them through the fabric before you finalize the zip ties, trying to wrap them around installed draping is a two-person, ladder-tipping nightmare.
Ambient lighting includes lanterns and uplights. Place UL-certified LED lanterns ($10 each) on guest tables and along pathways. Set battery-powered LED uplights ($15–$25 each) at the base of tent poles to wash the fabric with color. Warm white is universally flattering; avoid cool tones that feel clinical.
Safety lighting is non-negotiable. You need enough path lighting so no one trips over a guide wire. Those same LED lanterns double as safety markers. Check their battery life; a solar string light set offers about 8 hours, but a cheap battery pack may die in three.
Consider renting one statement piece, like a battery-powered decorative chandelier ($30–$80 rental). It becomes the focal point over the dance floor or sweetheart table, drawing the eye upward. This is where the tent lighting solutions you use for camping can cross over, many portable camping lanterns are perfect for this.
TL;DR: Layer cafe lights in the draping, LED lanterns on tables, and uplights at the poles. Warm white is key. Never rely on a single type or source.
Draping and Fabric Installation Order
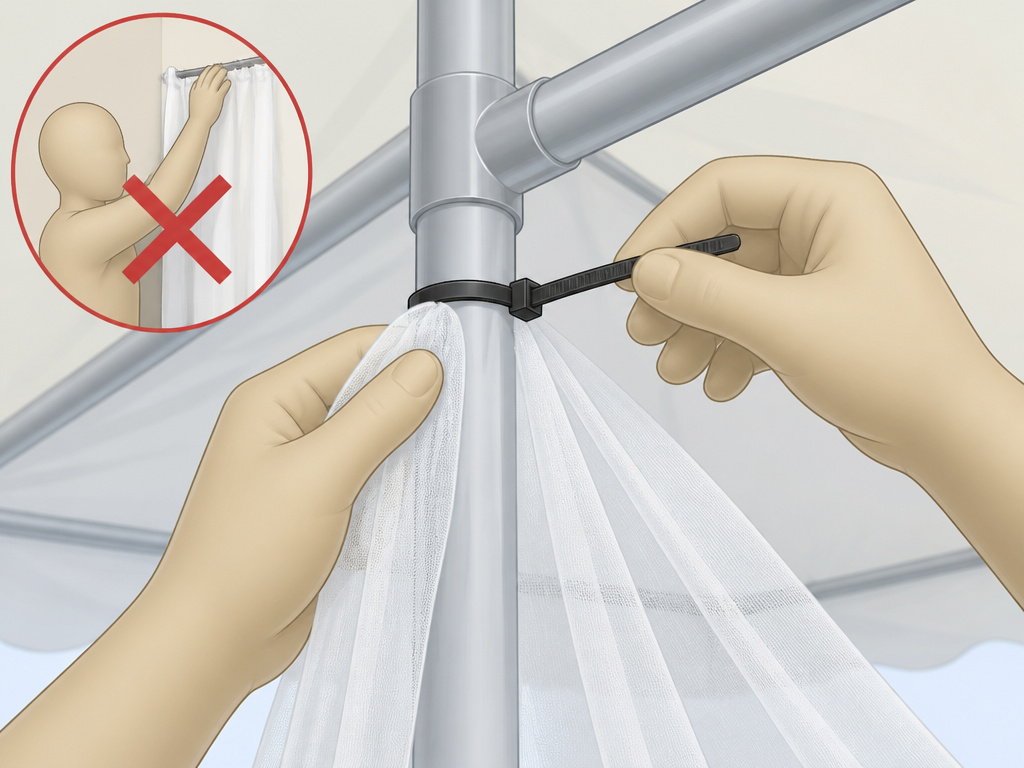
Installing fabric out of sequence wastes hours and tears material. The correct order is: ceiling first, then walls, then lighting integration, then final trim.
-
Start at the center peak. Drape your main sheer fabric from the highest point of the tent out toward the sides. Secure it to the frame poles with heavy-duty zip ties every 3–4 feet. Leave generous slack for soft swoops, pulling it taut looks like a stretched tarp.
Consequence of skipping: If you do walls first, you block your ladder access to the ceiling. You’ll end up with a poorly secured center section that sags by midnight. -
Add sidewall accents. Hang IKEA gauze curtains or transparent PVC sidewalls ($3/square foot). Attach them at the top with zip ties and let the bottom pool slightly on the ground for a luxurious look. For a large-capacity tent for events, this step visually breaks up the long wall expanse.
Consequence of skipping: Bare tent walls feel like a warehouse. The space lacks intimacy and the lighting has nothing to reflect off of. -
Weave in lighting. Before you finalize all the zip ties on the ceiling, weave your string lights through the fabric. This locks them in place and prevents tangling later. Plug them in for a test before you finish.
-
Trim and hide mechanics. Use spare strips of fabric or ribbon to wrap over the zip ties, hiding the plastic connections. This is the detail that makes DIY look professional.
For a tent you can stand in with high peaks, this process is straightforward. For lower budget tents under $100, the frame might not support heavy draping, use lighter fabrics and less of them.
Flooring, Anchor Points, and Weather Proofing
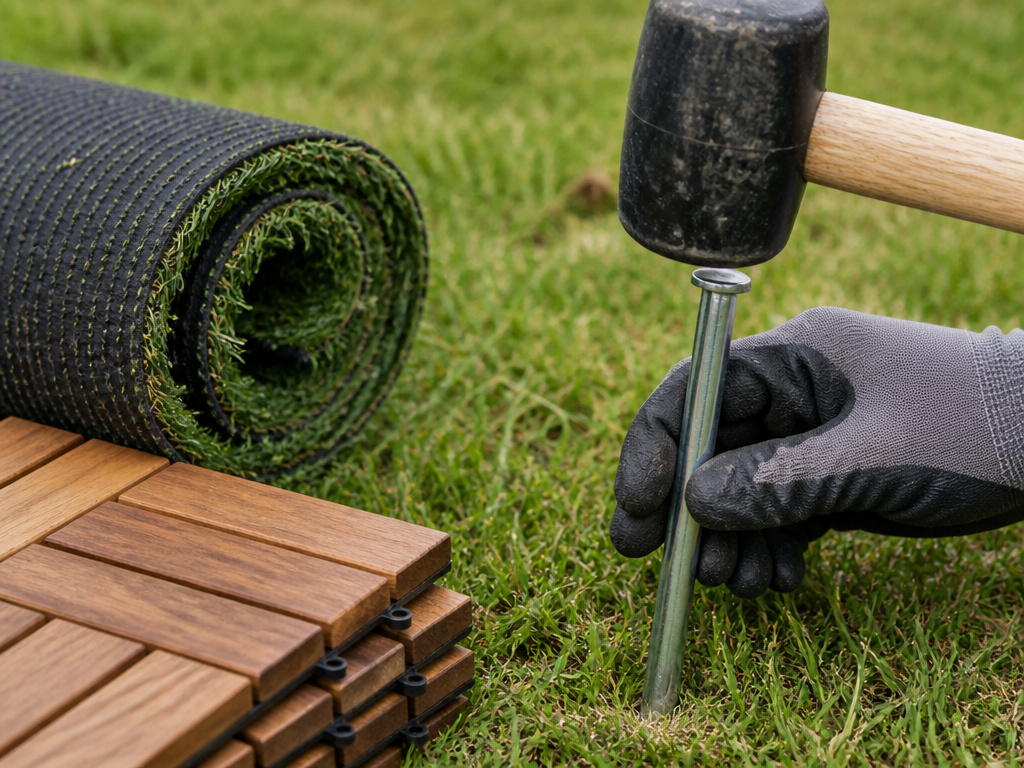
A beautiful tent can be ruined by a muddy floor or a sudden gust. Your foundation and anchors are where you cannot cut corners.
Flooring options scale with budget. The cheapest is to manicure the natural grass and hope for no rain. The next tier is moisture-proof wooden flooring rental at $1.5/square foot. For a dance floor, interlocking dance floor tiles rent for $1.50–$3.00 per sq ft. A 12×12 floor costs $200–$450 for a weekend. An artificial turf overlay ($0.50–$1.50 per sq ft) is a great middle ground, it looks lush and hides minor ground imperfections.
Anchoring is a safety issue. OSHA guidelines for temporary structures emphasize that anchoring systems must be rated for local wind speed.
– On grass: Use 18-inch steel stakes for calm weather. In areas with regular winds above 25 mph, switch to 24-inch stakes and double the count.
– On hard surfaces (concrete, asphalt): Use water-ballast weights (8.3 lbs per gallon) or concrete block anchors. Each anchor point needs a minimum of 100 lbs.
Before you start: Wind can collapse an improperly anchored tent. Check the ASTM F3018 wind resistance standards your tent frame meets. Never rely on the tent’s own weight. Always have spare transparent tarpaulin ($0.8/sq ft) and additional ground studs ($2/piece) on hand for emergency reinforcement if the forecast changes.
Weather proofing means having a plan for heat and rain. Industrial fan rental ($25/day) moves air and is 80% more energy-efficient than air conditioning. For cold evenings, propane heaters ($50/day rental) are about 30% more energy-efficient than electric ones, according to EPA data. Your portable air conditioners for camping might not cut it for a large event, rental units are built for the load.
TL;DR: Anchor for the worst-case wind. Choose flooring that matches your venue’s ground conditions. Rent fans or heaters based on the season, not the forecast.
Repurposing and Renting vs. Buying
Maximize your decor budget by using items in multiple ways and knowing when to rent.
Repurpose ceremony decor. The arch from your ceremony becomes the photo booth backdrop. The large floral arrangements from the altar move to the buffet table or the bar. The aisle lanterns line the path to the restrooms. This isn’t just frugal, it creates a cohesive visual story throughout the event.
Rent foundational items. You should rent anything bulky, single-use, or expensive to store. This includes tables, chairs, linens, and that statement chandelier. Rental companies also carry specialty tent camping accessories like vintage trunks or faux greenery walls that would be costly to buy.
Buy consumable and reusable decor. Buy your fabric, string lights, and zip ties. You can reuse the lights for years, and the fabric can be cut down for future crafts or sold. This is where knowing your essential camping supplies pays off, you’re investing in gear with a long afterlife.
For the tent itself, weigh rental against purchase. A 30′ x 40′ tent rents for $800-1200 per week. A comparable galvanized steel framework tent has a lifespan of 8-10 years. If you host multiple events, buying a durable canvas tent might break even after three uses. For a one-time event, rental is always cheaper when you factor in storage and maintenance.
Frequently Asked Questions
What is the cheapest way to decorate a wedding tent?
Focus on lighting and fabric. Use solar string lights ($20/50 ft) and sheer chiffon fabric ($2-5/yard) from a fabric store. Drape the fabric from the center peak and weave the lights through it. This combination softens the industrial frame and creates atmosphere for under $200.
How much fabric do I need to drape a wedding tent?
For full ceiling coverage, you need fabric to cover the tent’s interior surface area. A 40×60 foot tent requires upwards of 4800 square feet of fabric. Most people drape only the central aisle and the head table area, which can cut the needed fabric by half or two-thirds. Always buy 20% extra for slack and draping.
Can I use a camping tent for a wedding reception?
You can, but capacity and aesthetics are limiting. Even the most spacious family-sized tents are designed for sleeping, not socializing. The ceiling will be too low for draping, and the lighting options are limited. It’s better for a very small, ultra-casual gathering. For groups over 20, a proper frame rental tent is worth the cost.
How do you secure decorations in a windy tent?
Use heavy-duty 18-inch zip ties to secure all fabric to the frame poles, not just the corners. For hanging items like paper lanterns, use fishing line instead of string, it’s stronger and less visible. If winds over 25 mph are forecast, reinforce every anchor point and consider taking down lightweight hanging decor until the wind passes.
What is the best lighting for a wedding tent?
Use a warm-white layered approach. Weave cafe-style string lights through the ceiling draping for overhead glow. Place UL-certified LED lanterns on tables for ambient light. Set battery-powered LED uplights at the base of poles to wash the walls with light. Avoid cool-white or blue-toned lights, as they create a harsh, unflattering atmosphere.
Do I need a permit for a wedding tent in my backyard?
Likely yes, if the tent exceeds 400 square feet. Most municipal codes adopt the International Building Code or similar standards, which trigger permit requirements for temporary structures over that size. A common 20×40 tent (800 sq ft) will almost certainly require a permit. Contact your local building department, the penalty for skipping it can be a forced teardown on your wedding day.
The Bottom Line
Decorating a wedding tent on a budget is a logistics project, not an art project. Your sequence matters: secure the structure, drape the ceiling, integrate lighting, then add wall accents. The numbers are knowable, a 20×40 DIY setup runs $367–$631 in materials if you source PE tarpaulin, IKEA curtains, and solar lights.
Your biggest leverage points are lighting and repurposing. Fifty dollars of fairy lights does more than five hundred dollars of flowers when the sun goes down. That ceremony arch should see double duty as a photo backdrop. Anchor for the wind you hope won’t come, and always have a roll of spare tarpaulin and extra stakes.
The goal isn’t to hide that you used a tent. It’s to make the tent feel intentional. With the right layers, your guests will remember the ambiance, not the aluminum poles holding it all up.
