
How to Fix a Tent: Expert Repair Guide for Campers
This post contains affiliate links. As an Amazon Associate, we earn from qualifying purchases.
To fix a tent, you match the repair to the specific failure: a splint for broken poles, Tenacious Tape for fabric holes, and seam sealer only for leaking seams. The critical step is identifying your tent’s fabric coating, silicone vs. polyurethane, before choosing a sealer, as using the wrong one creates a permanent, greasy mess.
You unroll your shelter after a long winter and find a tear. Or worse, you wake up to a drip during a downpour. The instinct is to grab whatever adhesive is handy and hope for the best. I’ve been there, and that approach usually buys you one more soggy trip.
Real repairs require a bit of detective work and the right stuff. I learned this through costly mistakes, like slathering the wrong sealer on my MSR Hubba Hubba NX and ruining a perfectly good rainfly. This guide walks you through the five most common failures with fixes that last, drawing on manufacturer secrets and hard-won lessons from the trail.
Key Takeaways
- Sealer must match fabric. Silicone-treated fabric needs a silicone-based sealer; polyurethane-coated fabric needs a urethane-based sealer like McNett Seam Grip. Getting this wrong creates a non-drying, greasy patch.
- Clean with isopropyl alcohol first. Any patch or sealer applied over dirt, sunscreen, or old adhesive will fail. The bond needs a perfectly clean, dry surface.
- Storage is a silent killer. The MSR manual states storing a wet tent for just 24 hours in warm weather can initiate mildew, leading to staining, odor, and coating breakdown.
- Factory-taped seams only need spot repairs. Don’t reseal the entire seam on tents like MSR models. Apply sealer only to the specific leaking section on the inner, coated side.
- A replacement pole segment isn’t perfect. The Tatonka manual notes a standard replacement segment won’t match the original arch’s pre-bend, but it will function.
Where Is That Leak Actually Coming From?
Find the exact leak point before you touch any adhesive. Set the tent up indoors on a sunny day or in a garage. Get inside, close the door, and use a flashlight to scan every seam, corner, and the entire floor. Look for pinpricks of light, peeling seam tape, or areas where the waterproof coating has worn thin and looks shiny. Mark each spot with painter’s tape.
Water ingress in shelters is most frequently traced to compromised seam integrity or localized abrasion, not singular puncture events. Diagnosis requires systematic interior inspection under controlled, dry conditions.
The most common leak isn’t a dramatic hole. It’s a seam where the factory tape has lifted at the end, or a floor corner abraded by grit. Fixing the wrong spot guarantees the leak returns.
Common mistake: Sealing the entire rainfly after one leak, this adds weight, creates sticky zones that attract dirt, and can trap moisture against the fabric if too thick.
TL;DR: Find the exact leak with a flashlight from inside the dry tent. Seal only that spot.
Can You Patch a Tent Rip Without Sewing?
For clean tears and punctures, a self-adhesive nylon patch like Tenacious Tape is a permanent field fix. Cut a patch extending at least an inch beyond the damage. Round the corners so they don’t peel. Clean the area thoroughly with isopropyl alcohol and let it dry completely.
Apply the patch to the outside, smoothing from the center outward. For a bomber repair, apply a second, identical patch to the inside, directly over the first. This “sandwich” seals the tear and distributes stress. Never use duct tape, it leaves a gummy residue that degrades fabric within weeks.
| Patch Type | Best For | Key Application Tip |
|---|---|---|
| Tenacious Tape | Clean punctures, slash tears | Round the corners and press firmly for 30 seconds. |
| Self-adhesive Nylon Patch | Larger tears, abrasion damage | Ensure the area is bone dry before application. |
| Seam Grip + Patch Material | Reinforcing high-stress points (pole sleeves) | Apply Seam Grip first, let tack, then apply patch. |
If the tear runs along a major seam, the structural integrity is compromised. A patch might hold temporarily, but this is when you consider a professional repair or retiring the tent for lighter duties.
How Do You Seal a Leaking Seam Correctly?
This is where DIY repairs fail permanently. Your rainfly has a waterproof coating, either silicone-treated or polyurethane-coated. The sealer must match.
Silicone-treated fabric feels slightly slicker. It requires a silicone-based sealer. Polyurethane-coated fabric, more common in three-season tents, needs a urethane-based sealer like McNett Seam Grip. If unsure, check the manufacturer’s tag or website. Guessing wrong makes a greasy, non-drying mess.
Apply seam sealer to the coated, shiny side of the fabric, the side facing you inside the tent. Sealing the outside is far less effective.
The MSR owner’s manual specifies their tents are factory seam-taped. You should not seal these seams initially. Only if a specific taped section fails do you apply Seam Grip directly to that spot, as detailed in their official manual.
Work outside or in a ventilated area. Apply a thin, even bead. Use a gloved finger or a spreader tool to smooth it. Let it cure for a full 24 hours before packing.
What’s the Best Way to Fix a Broken Pole?
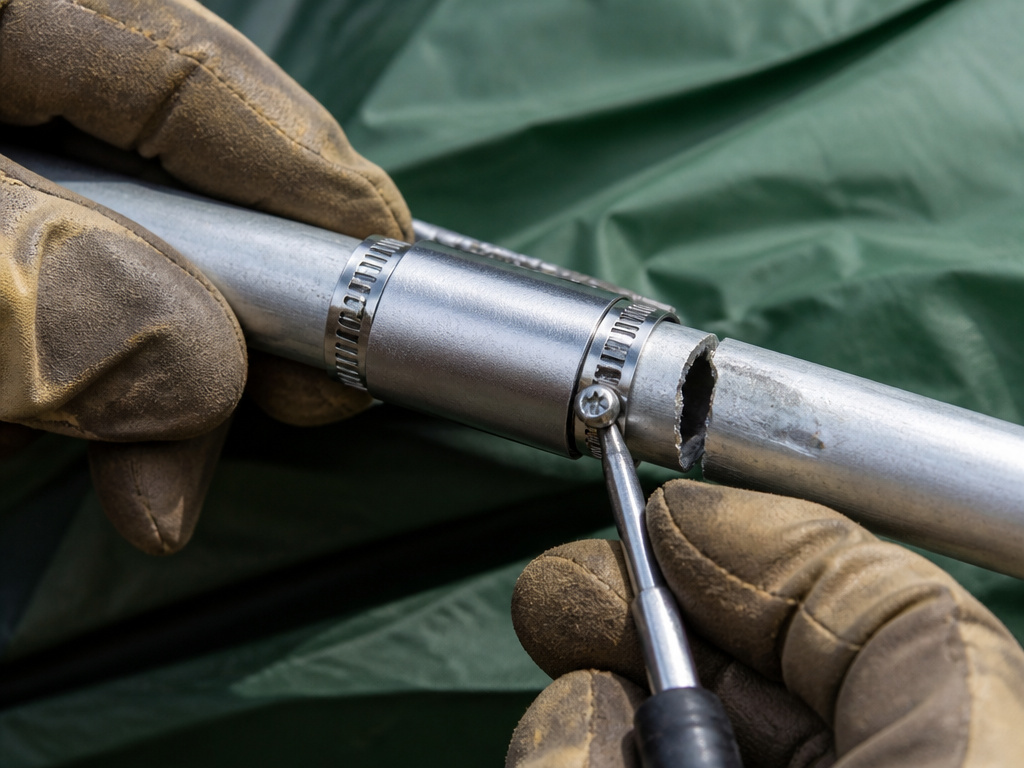
A snapped pole section doesn’t spell doom. Every Big Agnes tent includes a 6-inch metal repair splint for this. Slide it over the broken aluminum, center it on the break, and tighten the hose clamp snugly, not overtightened, as that crushes the aluminum.
| Symptom | Immediate Field Fix | Permanent Solution |
|---|---|---|
| Clean break in one section | Pole splint + hose clamp | Order exact replacement section from maker. |
| Bent but not broken section | Carefully straighten by hand | Section remains weakened; carry a splint. |
| Shattered section | Splint pieces together tightly | Replace entire pole segment. |
| Loose shock cord | Pull sections quickly to tension | Untie end knot, pull cord, re-tie. |
For shock cord that’s lost its spring, the MSR manual advises pulling each pole section quickly back and forth along the cord; friction can temporarily restore tension. If that fails, unscrew an end tip, pull out cord, tie a new knot, and trim.
The Tatonka manual adds nuance: replacing a single segment with a standard one means it won’t have the original arch’s pre-bend. The tent will stand, but the pitch might be off. A complete arch replacement is the only way to restore the perfect “optimally adjusted pole arch.”
How Do You Clean a Moldy Tent or Fix a Sticky Zipper?
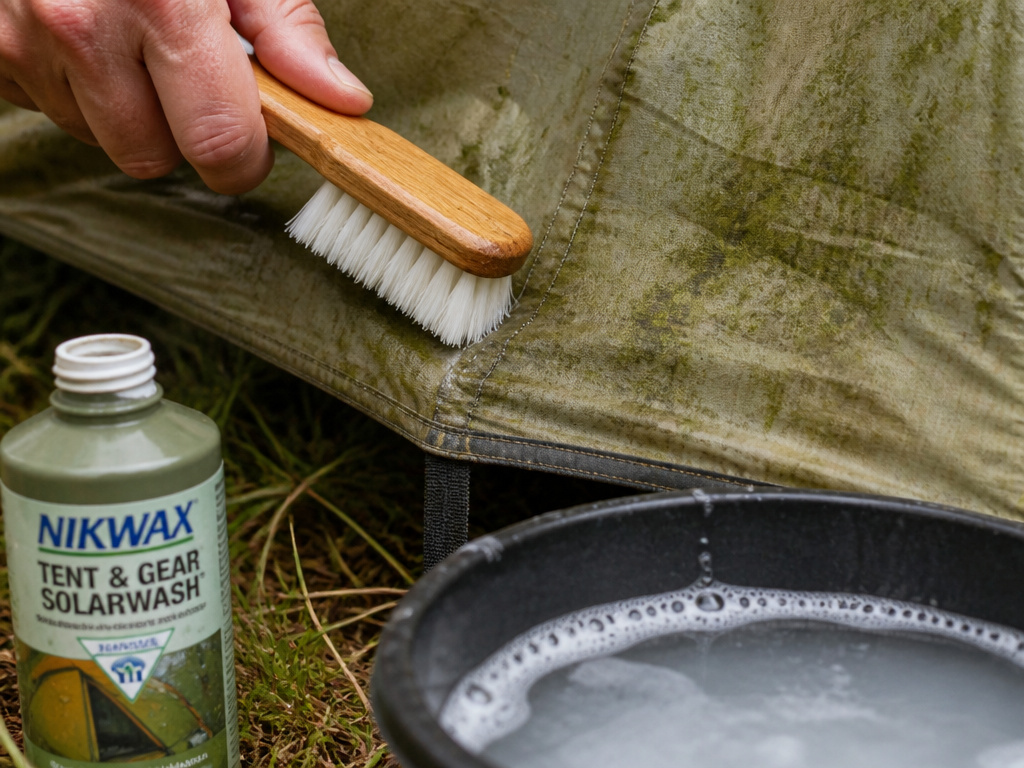
The sour smell of mildew means you stored the tent damp. To clean it, pitch the tent and scrub affected areas with a soft brush and a solution of technical fabric cleaner like Nikwax Tech Wash and lukewarm water. Rinse thoroughly. Let it dry completely in the sun before packing. Sunlight helps kill spores.
Before you start: Using bleach or vinegar can degrade waterproof coatings and weaken fabric threads. Stick to products designed for technical fabrics like Grangers Performance Wash.
Zippers, the bane of a quiet campsite. That gritty, sticking grind at 2 AM. I ruined the main zip on my old Vango by forcing it. Don’t force it. Run a dedicated lubricant like McNett Zip Tech or a plain paraffin wax candle along the teeth. Work the zipper slowly. Never use oil-based WD-40; it attracts dirt and gums up faster.
Groundsheet wear is a slow death. Small holes can be patched from both sides with Tenacious Tape. For widespread wear, using a footprint is the real fix, it’s cheaper than a new tent floor. If the coating is flaking off in sheets, the waterproof integrity is gone. It might be time to explore new heavy rain tents or high wind tents better suited to your adventures.
What Tools Do You Really Need for Tent Repair?
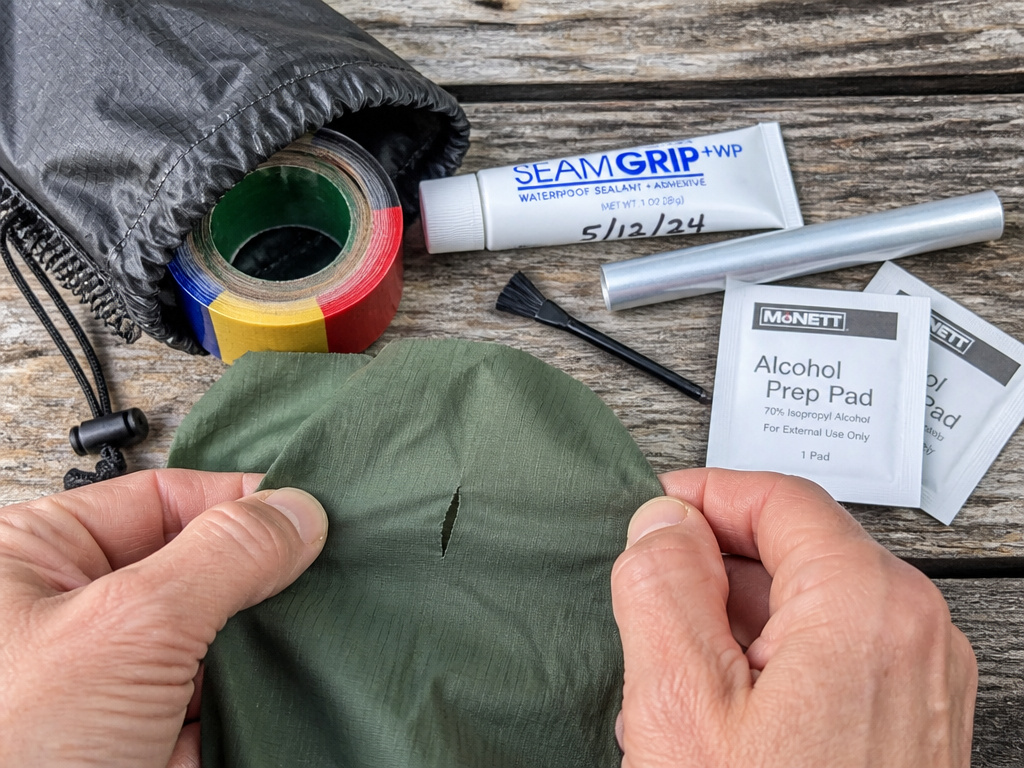
You don’t need a pro shop for most issues. This compact kit handles 95% of field failures. I keep mine in a small stuff sack with my essential camping gear.
- Tenacious Tape or a nylon repair patch kit. This fixes holes, tears, and worn floor spots. I prefer the multi-colored kits for better camouflage.
- McNett Seam Grip (TF for Silicone, Original for PU). This is the sealer for most common tent fabrics. Write the date you open it on the tube; it cures inside within months.
- Tent pole repair splint. The one from Big Agnes is perfect. A generic 6-inch aluminum sleeve works too, but wrap the pole with electrical tape first to shim a loose fit and prevent re-breaking.
- Isopropyl alcohol wipes and a small brush. Cleaning is non-negotiable. The wipes prep the area; the brush scrubs off old sealant residue.
Add a mini roll of duct tape only for temporary, emergency fixes. Plan to properly clean and patch that spot as soon as you get home.
When Is a Tent Beyond DIY Repair?
Sometimes fixing a tent costs more than replacing it. Here are the hard stops where your effort is better spent on new tent camping accessories for a fresh shelter.
- Multiple pole breaks on one trip. The poles are fatigued. Replacing three or more sections approaches the cost of a new, entry-level tent.
- Large sections of peeling waterproof coating. If the inner coating flakes off like old paint, the fabric’s waterproof layer is gone. No sealer will restore it.
- Rotted fabric from long-term mildew. Fabric that tears with gentle finger pressure has been weakened at the fiber level. It’s unsafe in wind.
- Major seam failures at critical stress points. If seams along the ridge line or pole connections are splitting, the tent’s structural integrity is compromised.
In these cases, salvaging the good tent camping equipment like stakes makes sense. Then start researching new shelters, whether that’s durable canvas tents for basecamp or versatile tarp tents for fast pack trips.
Frequently Asked Questions
Can you fix a tent pole without the repair sleeve?
Yes, but it’s strictly temporary. You can use a strong stick, a tent stake, or a rolled-up magazine secured with duct tape as a splint. This might get you through one calm night but will fail under wind stress. Replace it with a proper metal splint immediately.
Does seam sealer expire?
Yes, rapidly. An unopened tube lasts years. Once opened, the sealer reacts with air moisture and will cure in the tube within 6–12 months. Always write the opening date on the tube with a marker.
How do you remove old, cracked seam sealer?
Peel off what you can by hand. Use a soft-bristle brush and isopropyl alcohol to scrub away the remaining residue. Be gentle to avoid damaging the underlying fabric coating. Let the area dry completely before applying new sealer.
Can you wash a moldy tent in a washing machine?
Never. The agitation will destroy seam tapes, delaminate waterproof coatings, and can tear fabrics. Always clean a tent by hand using a soft brush, a mild technical cleaner, and plenty of lukewarm water. Rinse thoroughly and air dry.
Why did my patch fall off after one use?
You likely didn’t clean the area. Dirt, oils from your skin, or insect repellent prevent adhesion. Always clean the repair site with isopropyl alcohol and let it dry fully before applying any patch or sealer.
Before You Go
Fixing a tent is about precision, not brute force. Match the sealer to the fabric, clean the area until it’s sterile, and use patches bigger than the damage. The manufacturer’s manual, like those from MSR or Tatonka, often holds the specific trick that makes the repair last.
Most tents die from neglect, not accidents. Storing them wet guarantees mildew. Failing to clean before repair guarantees failed patches. Do the job once, with the right materials, and your shelter will see many more seasons. And if the damage is too great, knowing when to retire a tent is the final, responsible repair.
