
How To Make A Name Tent In Word: A Step-by-Step Tutorial
This post contains affiliate links. As an Amazon Associate, we earn from qualifying purchases.
To make a name tent in Word, create a landscape document, insert a table with cells sized to your tent card dimensions, format your text with a large font, and print double-sided. For bulk creation, use Word’s mail merge feature with a data source like Excel, ignoring the default Avery templates and using a specific four-column table setup for cards like the Avery 5305.
Most guides tell you to use a simple text box. That works for a handful of tents. It falls apart when you need fifty for a conference and each one has a different name. You waste an hour copy-pasting, and the alignment drifts by the tenth card.
This guide covers the manual method for small batches and the mail merge workflow for large events. We’ll also walk through the specific, non-obvious tricks that make Word cooperate, like the “Labels” ritual to enable mail merge for tent cards and how to handle its complaints about printable area.
Key Takeaways
- Use a four-column table with cells set to 2.5 inches wide by 7.5 inches tall for Avery 5305-style tent cards, not the default Avery template.
- For mail merge, you must first select Start Mail Merge > Labels and then cancel the dialog to activate the “Update Labels” button.
- Set page margins to 0.5 inches on top and sides, 0 inches on the bottom to maximize printable area; ignore Word’s warning if it appears.
- Font size of 24pt or larger is mandatory for readability from across a table.
- Manually remove mail merge fields from the even-numbered table columns after using “Update Labels,” or you’ll get duplicate names on the same side.
The Avery 5305 Mail Merge Workaround
Word’s built-in templates for products like Avery 5305 tent cards often misalign. The official Avery wizard can place your text a millimeter off, and that adds up over a hundred cards. The fix is to build your own template from scratch.
You start by ignoring the template gallery. Open a blank document and set it to Landscape orientation. Next, set your page margins: 0.5 inches on the top, left, and right, and 0 inches on the bottom. Word will likely complain that these margins are outside the printable area. The advice from the tallcoleman source is to just select ‘ignore’. This gives you the full page real estate.
To create two tent cards per page in a mail merge for products like Avery 5305, insert a four-column, one-row table. Set each column width to 2.5 inches and the row height to 7.5 inches. The first and third cells hold the name for the front and back of the first card; the second and fourth cells are for the second card. This structure allows mail merge to populate each card position correctly when using the Update Labels function.
Now, insert a table. You need four columns and one row. In the Table Layout tab, set the width of each column to 2.5 inches. Set the row height to exactly 7.5 inches. This creates two tall, narrow slots per page, each slot will become one tent card once folded. Your text will live in the first and third cells (for the front and back of the first card) and the second and fourth cells (for the second card).
This is your blank canvas. It is more reliable than any pre-made template because you control every dimension. If you’re using different tent cards, like St. James Overtures or JAM Paper, adjust these cell dimensions to match your product’s specs. The principle is the same: a table defines the rigid print areas.
TL;DR: Ditch Word’s built-in Avery template. Build a four-column table with cells sized to your specific tent card dimensions for perfect mail merge alignment.
Step-by-Step: The Manual Method
If you only need five or ten name tents, mail merge is overkill. The manual text-box method is faster. The catch is in the alignment and the double-sided print.
Open a new Word document. Go to Layout > Orientation and select Landscape. Then, go to Layout > Margins and choose Narrow. This gives you half-inch margins all around, which most printers can handle without clipping.
Click on the Insert tab and select Text Box > Simple Text Box. A box will appear. Click inside and type the first name. Select the text and use the Home tab to set the font. Use a bold, sans-serif font like Arial Bold. Set the size to at least 24pt. For a large conference tent, go up to 36pt. Click the Center Align button.
Now, resize the box. Drag the corners until the box is about 3.5 inches wide and 2 inches tall. You don’t need to be exact, but this gives the text room to breathe. To position it, click the box’s border and drag it to the top-left quadrant of the page. You want to leave enough space below it for a second, identical box.
Here is the crucial part for double-sided printing. Copy this text box (Ctrl+C) and paste it (Ctrl+V). Drag the new copy to the lower half of the page, directly below the first. This second box will print on the same side of the paper as the first. When you print the second side, these positions will be reversed.
Before printing, do a test on plain paper. Load a sheet, print side one, then manually flip it and print side two. Check if the names align. If they are off, you may need to adjust your printer’s duplex alignment settings or nudge the text box positions slightly in Word. This test sheet saves your expensive cardstock.
Common mistake: Assuming automatic duplex printing will align perfectly, most consumer printers have a slight shift. Always run a test on scrap paper first, or you’ll waste a pack of cardstock.
| Step | Action | If Skipped |
|---|---|---|
| 1. Set Landscape & Narrow Margins | Defines page canvas for tent shape. | Portrait orientation wastes space; wide margins clip text. |
| 2. Create & Format First Text Box | Establishes font, size, and alignment standard. | Inconsistent styling makes the set look unprofessional. |
| 3. Copy & Position Second Text Box | Creates the mirror for double-sided printing. | You cannot print the reverse side; you have two separate single-sided cards. |
| 4. Print Test on Plain Paper | Verifies duplex alignment before using cardstock. | Misalignment ruins all your cards, wasting time and materials. |
How Do You Mail Merge Names for a Big Event?
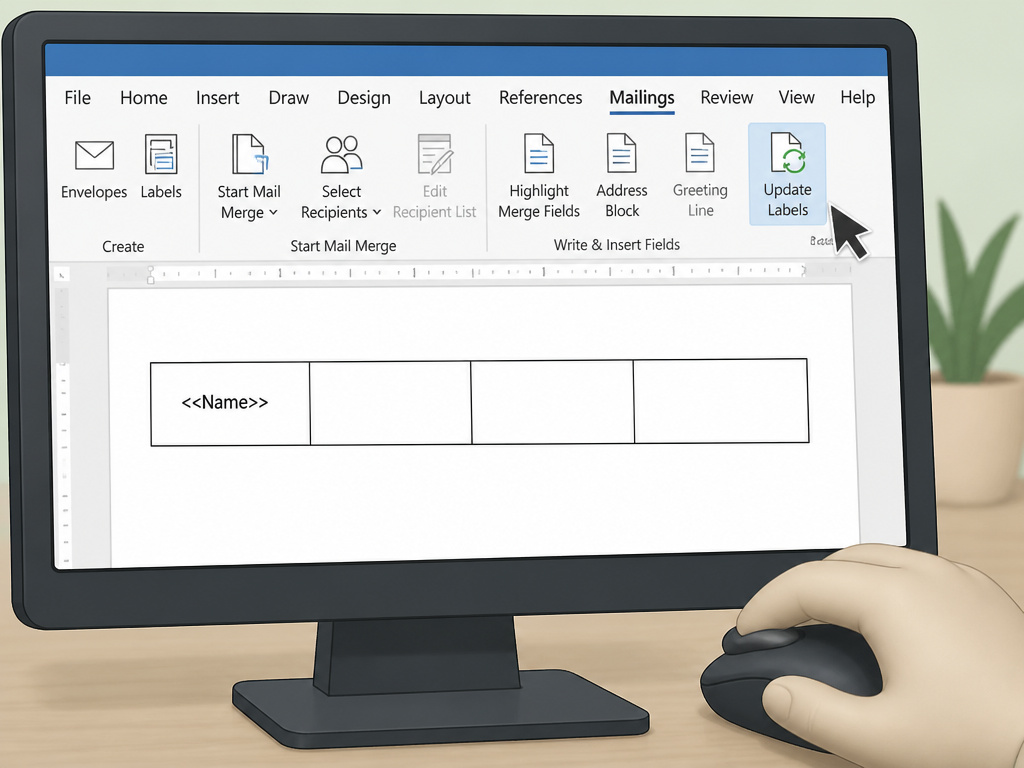
Mail merge is the only sane way to produce fifty or a hundred personalized name tents. The process feels backwards because Word treats tent cards like sheet labels. You have to trick it.
First, prepare your data. An Excel spreadsheet or a Word table with a single column titled “Name” is perfect. Save and close it.
In your Word template document (the four-column table you built earlier), go to the Mailings tab. Click Start Mail Merge. Here’s the ritual: select Labels from the dropdown. A dialog box appears. This is where you would normally pick a label vendor. Instead, find and select Avery US Letter 5305 Tent Cards. Click OK. The document will fill with a grid of label placeholders. Immediately click Cancel. This seemingly pointless step is what activates the “Update Labels” button and puts Word into the correct mail-merge-for-labels mode, which works for tent cards.
Now, click Select Recipients and choose Use an Existing List. Navigate to your saved Excel file. Your data is now connected.
Click inside the first cell of your table (top-left cell). Click Insert Merge Field and choose “Name”. The field will appear, looking like <<Name>>. Format this field: apply your large font (24pt Arial Bold) and center it. This formatting will apply to every merged name.
This is the moment most guides miss. Click Update Labels. Word will populate the <<Name>> field into every single cell of your four-column table. You don’t want that. You only want a name in the first and third cells (for the front and back of card one) and the second and fourth cells (for card two). You must manually delete the merge fields from the cells where they shouldn’t be. If you leave them, each card will have the same name printed twice on the same side.
I once rushed a merge for a 100-person workshop and forgot to delete the extra fields. The print job spat out cards where “Dr. Evans” appeared twice on the front, stacked on top of itself. We had to reprint the entire batch during the lunch break. Now I check the preview obsessively.
After cleaning up the fields, click Finish & Merge > Edit Individual Documents. This generates a new document with all the names placed. Scroll through. This is your final chance to catch errors before printing.
TL;DR: Use the Start Mail Merge > Labels ritual to activate the feature, then manually clean extra merge fields from your table cells after clicking Update Labels.
Which Paper Weight and Printer Settings Work Best?
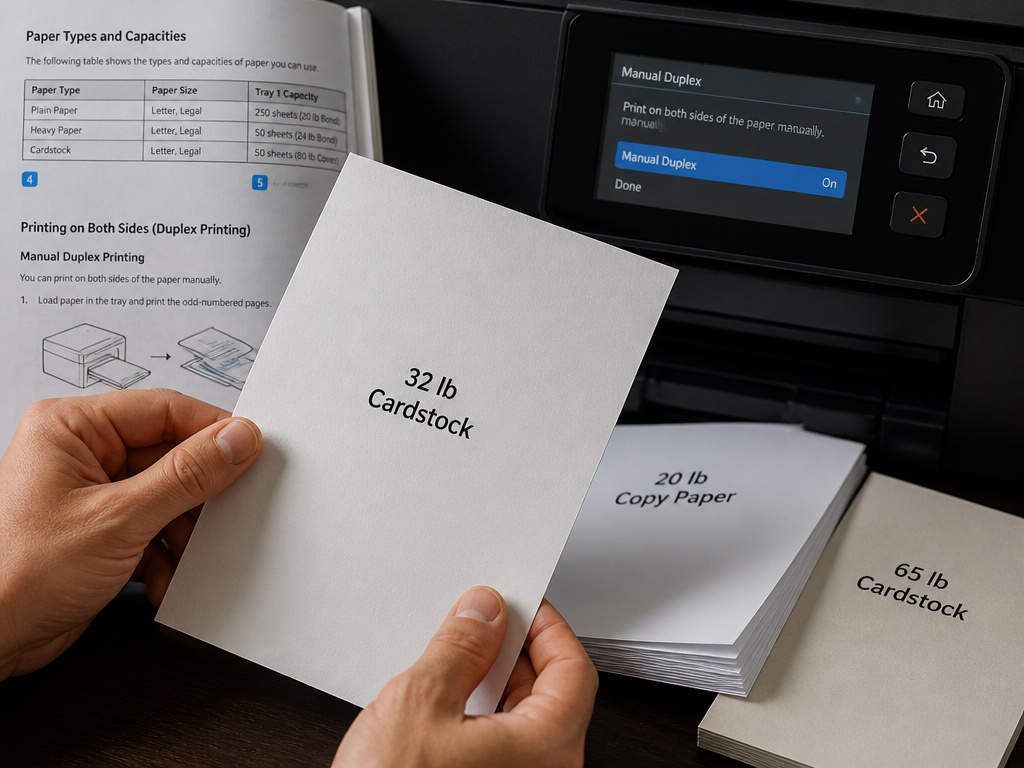
Regular 20 lb copy paper makes a flimsy name tent that droops. For anything formal, you need cardstock. A 32 lb weight is the sweet spot, sturdy enough to stand, thin enough to feed through most printers. Heavier 65 lb cardstock feels premium but often jams in desktop printers.
Check your printer’s manual for its maximum paper weight. An inkjet printer usually handles up to 65 lb cardstock if you feed sheets singly through the manual feed tray. Laser printers are more forgiving with weight but can overheat and curl very thick stock.
Your print settings are critical. In the Word print dialog, under Settings, select Manual Duplex. This tells the printer to print all the odd pages first. It will then prompt you to flip the stack and reinsert it to print the even pages. Follow the diagram on your printer’s screen exactly. If you flip the stack incorrectly, the backs will be upside-down relative to the fronts.
If your printer doesn’t have a duplex unit, you are printing side one, manually flipping each sheet, then printing side two. This is tedious but precise. For this, ensure the paper orientation icon in the Word print preview matches how you will load the paper. A common trick is to mark a small arrow in pencil on the top edge of your test stack before the first print run, so you know exactly how to flip it.
| Paper Type | Best For | Printer Consideration |
|---|---|---|
| 20 lb Copy Paper | Practice runs, disposable internal meetings. | Feeds easily; any printer handles it. |
| 32 lb Cardstock | Standard conferences, workshops, client meetings. | Use manual feed tray; check printer weight limit. |
| 65 lb Cover Stock | High-end events, executive retreats, weddings. | Feed singly; high risk of jam in older printers. |
| Pre-scored Tent Cards (Avery 5305) | Largest events; ensures uniform fold. | Requires precise template alignment; minimal margin for error. |
Solving Common Word Formatting Headaches
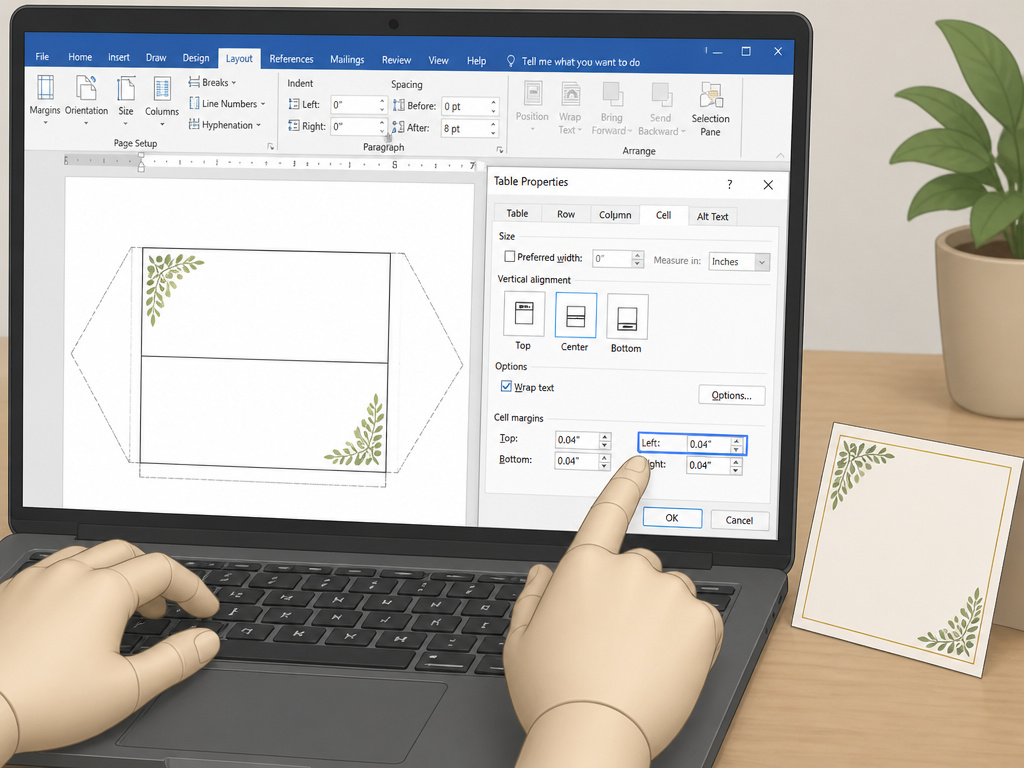
Word fights you on tent cards. Knowing the workarounds saves an hour of frustration.
Problem: Text prints upside-down on one side. Word can rotate text 90 degrees left or right via Text Box Format > Rotate. It cannot flip text 180 degrees (upside-down) within a mail merge field. The tallcoleman source confirms this “doesn’t seem to play well with the mail merge feature.” The solution is architectural: design your template so the text on the “back” of the tent is right-side-up when viewed from the opposite side of the table. This often means the text on the back is typed normally, not rotated.
Problem: Text runs to the edge of the table cell. Your beautiful 36pt name is cut off by the cell border. The fix is cell margins. Right-click inside your table cell, select Table Properties > Cell > Options. Reduce the left and right cell margins from the default 0.08″ to 0.04″. This gives your text a tiny buffer of white space. For multi-line text (like a name and title), also adjust the top and bottom margins.
Problem: “Update Labels” re-inserts merge fields everywhere. Each time you click Update Labels, Word refreshes the entire table with merge fields. If you’ve already cleaned up the even columns (2 and 4), it will fill them again. You have two choices: clean them up one final time after your last update, or use a more advanced workaround involving creating a two-cell template and using the “Catalog” merge type. For most people, the manual delete is faster.
Problem: The font looks blurry or pixelated on print. This is usually a printer driver issue, not Word’s fault. In the Word print dialog, click Printer Properties. Look for a setting called Print Quality or Resolution. Change it from “Draft” or “Economy” to Best or Photo. This forces the printer to use more ink and finer dots, sharpening text edges on cardstock. It also slows the print job and uses more toner, but the result is worth it for a professional look.
Common mistake: Using fancy script fonts below 28pt, they become an illegible blob from three feet away. Stick to bold, simple sans-serif fonts for readability.
Frequently Asked Questions
Can I use Google Docs instead of Word to make name tents?
Google Docs lacks a true mail merge feature and precise layout tools for table cell dimensions. You can manually create text boxes in Docs for a small batch, but for any event requiring more than 20 tents, Word is the superior tool due to its mail merge integration and finer control over printer settings.
Why does my printer cut off the bottom of the tent card?
Your page margins are likely too small. Most printers have a non-printable zone of about 0.2 inches at the very bottom edge. If you set your bottom margin to 0 inches, part of your content falls into this zone. Increase the bottom margin to 0.3 inches and see if the cutoff disappears. You may need to slightly reduce your text box height or table row height to compensate.
How do I add a company logo to the name tent?
Insert the logo as a picture into the text box or table cell with the name. Place it above the name. Right-click the picture, select Wrap Text > In Front of Text or Square, and resize it so it doesn’t dominate the card. For mail merge, you must insert the picture into the template cell before inserting the merge field. It will then repeat on every merged card. Ensure the logo is high-resolution (300 DPI) so it doesn’t print pixelated.
What’s the fastest way to make 100+ name tents?
The absolute fastest method is to use a dedicated tent card service online. For a DIY approach in Word, master the mail merge process with a pre-formatted table template. Have your name list ready in a clean Excel file. The entire process, from blank document to print-ready merged file, should take under 20 minutes after your first successful run. The time sink is always in fixing alignment and formatting, not the merge itself.
Can I print on pre-folded tent cards?
Yes, companies like Avery sell pre-folded, pre-scored tent cards. The process is identical, but your template dimensions must match the product’s flat layout exactly. You often print on one side only, as the card is folded into a triangle. Consult the product’s specification sheet for the correct cell width and height, as they differ from flat sheet products.
The Bottom Line
Making name tents in Word is a battle against default settings. The manual text-box method is fine for a dozen cards, provided you run a duplex test first. For any real volume, mail merge is non-negotiable, but you must bypass Word’s built-in Avery wizard and build your own four-column table template. Remember the strange Start Mail Merge > Labels ritual to activate the feature.
Your choice of 32 lb cardstock and a 24pt minimum font size matters more than any font style. Printer settings, especially manual duplex alignment, make or break the job. The goal is a professional, readable tent that stands up on its own. Skip the fancy formatting that only looks good on screen. Prioritize clarity and structural integrity, just like you would when choosing essential camping gear for a reliable shelter.
Keep a pack of budget tents in your mind as a metaphor: sometimes the simple, affordable, and well-executed solution outperforms the over-engineered one. A clean, bold name on a sturdy card always wins.
