
How to Set Up a Pop-Up Tent Without the Fight
This post contains affiliate links. As an Amazon Associate, we earn from qualifying purchases.
To put up a pop-up tent, lift the folded unit from its bag, let the spring-loaded frame expand outward, then push the center hub downward until the legs lock. Immediately stake all four corners at a 45-degree angle. Done right, it takes about three minutes on flat, clear ground.
I’ve watched more than one pop-up tent become a runaway kite. The magic of these shelters is their speed, but that speed relies on a specific, almost choreographed sequence. Fighting the frame’s natural tension or skipping a step is how you end up with a pretzel-shaped pile of poles and a very expensive lesson.
This isn’t just about following steps. It’s about understanding why the steps exist, why that center hub push matters, why staking comes before admiring your work, and why the warranty won’t cover a leg bent by a gust you ignored. I’ll walk you through the setup, the crucial folding technique most people get wrong, and how to secure your shelter when the weather turns.
Key Takeaways
- Lift from the center, push the hub. Grabbing the leg ends and pulling stresses the scissor hinges. Let the frame do the work, then lock it with a firm downward press on the central junction.
- Stake first, admire later. An unsecured corner is a collapse trigger waiting for a stray foot or breeze. I learned this after a gust sent my tent, and a bag of snacks, tumbling across a field.
- Never assemble in wind. Manufacturer manuals are blunt. The 8 FT x 10 FT POP-UP TENT manual from Lowe’s explicitly warns against setup in any wind or rain. The sail effect can torque joints past their yield point in seconds.
- Folding is a twist, not a crush. The dreaded pack-up fails when you try to force a large circle into a small one. The secret is a knee-and-twist motion that coils the frame springs evenly.
- Hydrostatic head is your weather gauge. A 2000mm rating handles a brief shower; for all-day rain, you need 3000mm or higher. Don’t trust a cheap tent’s “waterproof” claim without this spec.
Before You Start: Read This, Not Just the Manual
You skimmed the manual. I get it. But the difference between a smooth setup and a broken tent is often buried in those dry PDF pages. For instance, the POP-UP TENT 2.1 manual states its 3-year warranty becomes void if the product is damaged or used improperly. “Improper use” includes assembly in strong wind.
Before you start: The sudden deployment of a large fabric surface acts as a sail. In winds over 15 mph, the torque can bend leg joints before you can stake it down. The manual for the 8 FT x 10 FT model explicitly says, “Never set up or continue to use in any rain, wind or storm conditions.” A bent leg assembly (part #600937 or #600938) costs more than the tent to replace out-of-warranty.
Clear your site meticulously. A single pinecone under a leg can prevent it from locking fully. The tent will seem fine until someone leans on it, then it buckles.
Have your stakes ready. If you forgot a mallet, use a smooth, heavy rock like granite (sandstone can shatter) or the heel of your boot. Avoid hitting plastic stake heads directly with metal; I’ve cracked two Coleman stakes that way.
Check the forecast one last time. These are fair-weather shelters. Their warranties, often as short as 30 days for the frame, specifically exclude damage from wind, rain, or snow.
What’s the Correct Way to Unfold a Pop-Up Tent?
The goal is to guide the frame’s stored energy, not wrestle it.
Step 1: Unpack with Intent
Lay the carry bag on its side on your cleared ground. Unzip it completely, reach in, and slide the folded tent out, keeping it in its compact disc shape. Do not let it spring open inside the bag; that’s a sure way to snag fabric on a zipper.
Orient the bag so the tent’s door will face your desired direction. This small forethought saves you from having to rotate a fully popped, staked tent later.
Step 2: Find Your Grip Point
The folded tent will look like a tangled circle. Find the center, it’s usually a plastic Center Junction (part #600926 in some models) where all the frame poles converge. This is your control point.
Step 3: Lift and Let Go
Grip the frame near this center hub with both hands. Lift the entire mass up and away from the bag. As you lift, the frame will naturally begin to unfurl. Guide it outward, but don’t force it open.
Common mistake: Pulling the legs apart from the ends. This strains the scissor-hinge joints at the center and can dislocate them. The correct motion is a lift from the center, letting the legs drop open by their own design.
Step 4: The Locking Push
Once the frame is mostly open but still leaning upward, place one hand on the center hub and push straight down toward the ground. You should feel and hear a series of clicks as each leg segment locks into place.
TL;DR: Lift from the center, let the frame expand, then push the hub down to lock the legs. Pulling from the ends is a shortcut to broken hinges.
Step 5: Walk and Click
The tent is now a wobbly rectangle. Walk to each corner and firmly pull the leg outward to its fullest extension. Listen for a final, distinct click confirming the internal locking pin has engaged. A leg without that click will collapse under weight.
Step 6: The Non-Negotiable Stake Down
Take a stake and drive it through the reinforced corner loop at a 45-degree angle away from the tent. Do all four corners before you unload gear or attach a rainfly.
A vertical stake pulls straight up out of soft ground. A 45-degree stake resists upward pull from wind lifting the corner. It’s a simple vector trick that keeps your tent rooted.
Step 7: Add the Rainfly (If You Have One)
If your model includes a separate rainfly, drape it over the frame now, aligning doors and windows. Attach all clips or buckles at the corners and along the eaves. A properly attached fly should be taut, not saggy. Sagging fabric collects pools of water that eventually leak through seams.
How Do You Secure a Pop-Up Tent in Wind?
Staking the corners is just the start. If the breeze picks up after setup, you need a more robust strategy.
First, deploy all guy lines. Many pop-up tents include them, stored in a small pocket. Run each line out at a 45-degree angle from the tent’s corners and center of each side. The goal is to create a network of opposing tensions that stabilizes the whole structure.
Second, upgrade your anchors. The thin, hooked stakes that come with most tents are fine for hard-packed dirt. For soft ground, sand, or wind, you need better gear.
| Anchor Type | Best For | Why It Works |
|---|---|---|
| 8-inch Steel Screw Stake | Grass, soft soil, wind | The screw design bites deep and holds against strong upward pull. I carry these for any trip with wind forecast. |
| Sandbag Anchor | Beach, loose sand | Fill provided bags with sand, rocks, or your own gear. The weight provides hold where a stake would just pull through. |
| MSR Groundhog Stake | Rocky or hard-packed ground | Its wide, angled blade and tough alloy can be driven into challenging soil where a cheap stake would bend. |
For a real edge case, I once saved a tent in a sudden Lake District squall by guying a critical corner to my car’s tow hitch with a climbing sling. It’s a hack, but it held.
If you’re shopping for a tent for consistently breezy locations, like the coast, prioritize models designed as wind-resistant pop-up tents with robust frames and multiple guy-out points.
Which Pop-Up Tent Is Right for Your Trip?
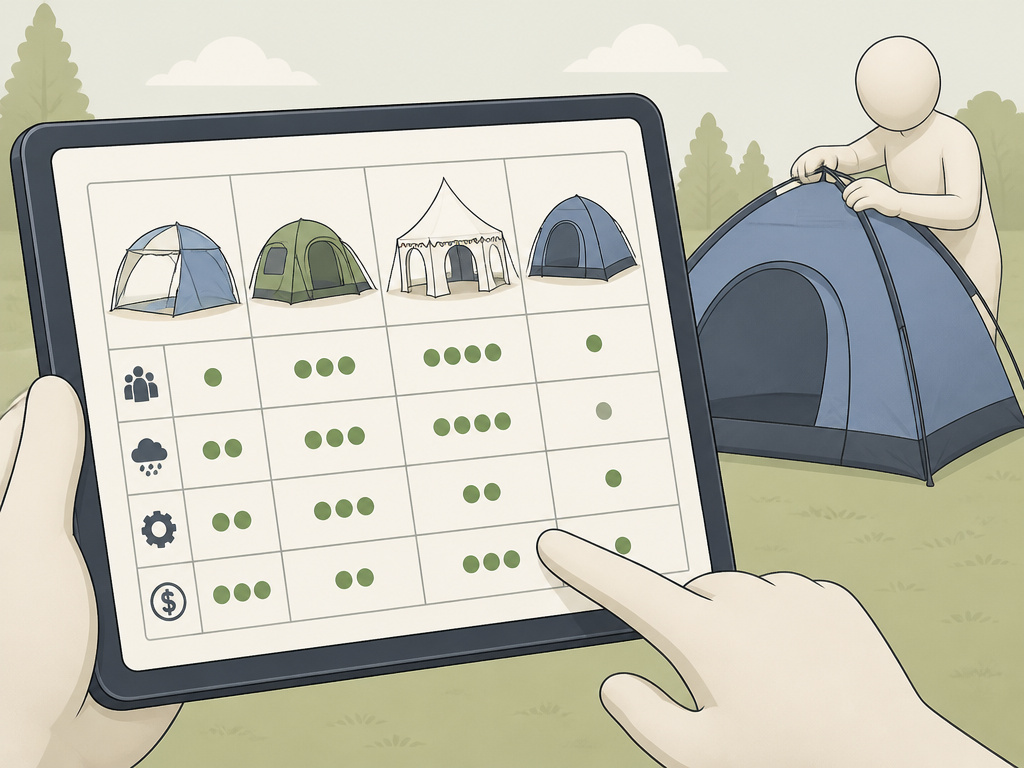
Not all pop-ups are created equal. The right one for a quick market stall is wrong for a weekend camping trip.
| Use Case | Critical Spec to Check | What to Look For |
|---|---|---|
| Beach Day | UV Protection & Sand Pockets | Look for a UPF 30+ rating and built-in sand pockets to weigh down the legs. A mesh door helps with ventilation. |
| Family Camping | Hydrostatic Head & Size | For rain, you need 3000mm+. For space, look for tents with standing room so you’re not always crouched. |
| Backyard / Festival | Assembly Time & Flame Rating | A 5-minute setup is key. A CPAI-84 flammability rating adds safety near grills or festival crowds. |
| Budget-Conscious Trip | Warranty & Build Quality | Even among budget tents under $100, check for reinforced corners and a center hub that doesn’t feel flimsy. |
For a family needing more space and weather protection, investing in quality tents under $200 often gets you better materials, higher waterproof ratings, and a more durable frame than the absolute cheapest options.
Why Is Folding a Pop-Up Tent So Hard?
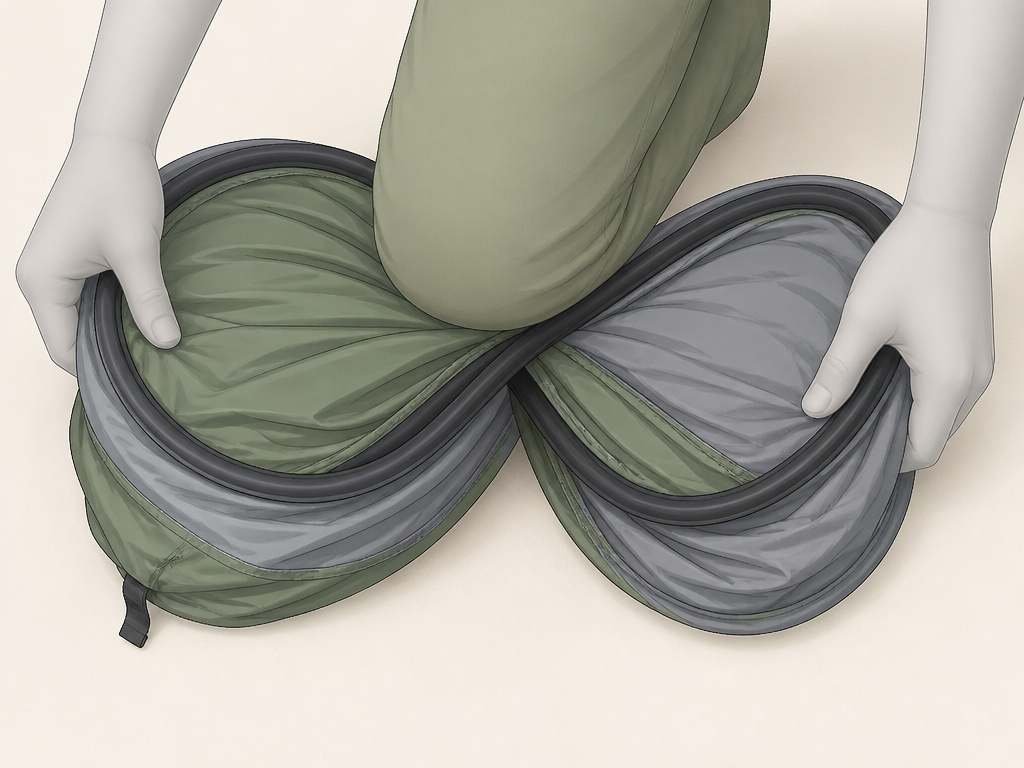
Folding feels impossible until the moment it clicks. The failure point is almost always missing the twist.
First, remove all stakes and the rainfly. Shake debris off the floor. Ensure the door zipper is fully open. A caught zipper will tear under folding pressure.
Stand beside the tent. Grab the frame at the midpoint of one long side and pull it toward the center. The tent will collapse into a large, flat circle.
I fought with a festival tent for twenty minutes once, sweating and swearing, trying to muscle the circle into a smaller circle. The problem was a single, kinked wire from a previous bad fold. That kink created a hard spot that wouldn’t bend with the others. I had to identify it, straighten it gently, and only then could the twist work.
Place the flat circle on the ground. Find the two opposite points where the fabric naturally wants to fold. Bring those together, creating a figure-eight. Put your knee on the center of that figure-eight and twist the two loops in opposite directions. As you twist, the frame coils into a tight, flat disc.
Wrap the strap around the disc and buckle it. If the disc is too big for the bag, you didn’t twist tightly enough. Do not sit on it, that stresses the plastic hubs.
TL;DR: Collapse to a circle, fold into a figure-eight, knee the center, and twist the loops. Force creates permanent kinks.
What Breaks and How Do You Fix It?
Pop-up tents are simple, but a few parts bear the brunt of stress and misuse.
- Center Junction (Part #600926): This plastic hub connects all the scissor arms. Cracks here cause overall wobble and are often from forcing the fold.
- Leg Assemblies (#600937 / #600938): Bent legs are typically from wind during setup or someone tripping over an unstaked corner.
- PP Cap (#141434): The small plastic cap on the leg ends. Losing one lets dirt into the tube, which can jam the locking mechanism.
Warranties are notoriously short. Many big-box store models offer only a 30-day limited warranty on the frame, explicitly excluding wind or rain damage. Some European models offer 3-year coverage, but even those state zippers are “wearing parts” and aren’t covered.
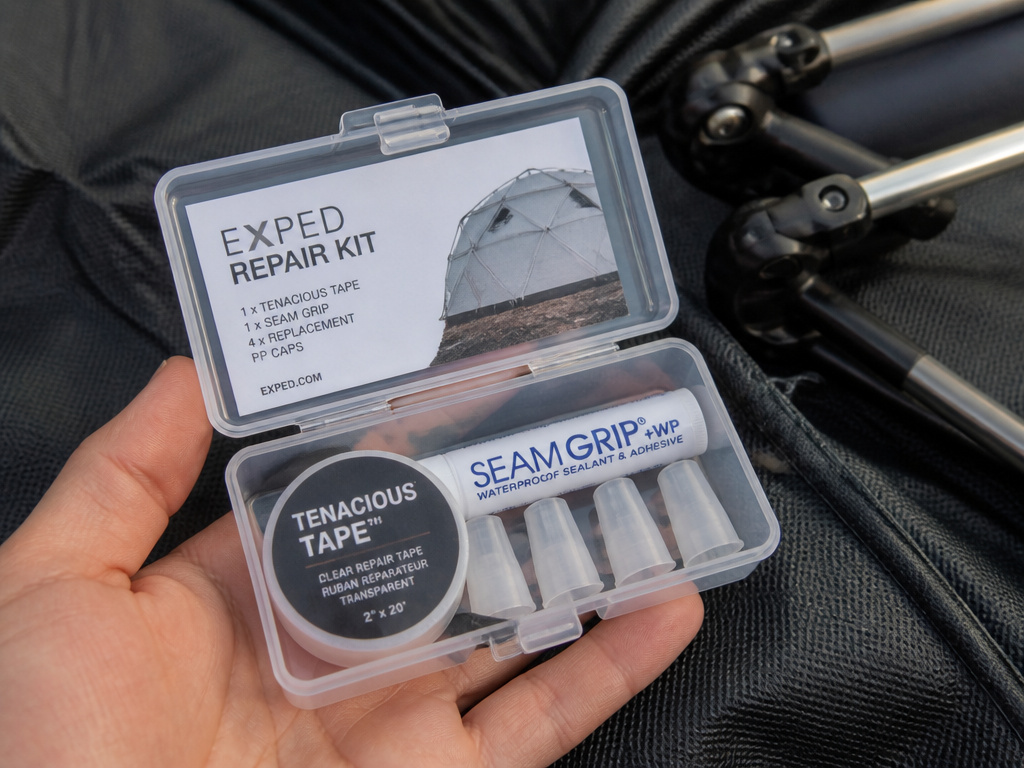
A small repair kit extends your tent’s life. Mine includes:
* Gear Aid Tenacious Tape: The clear, 2-inch version. Its aggressive adhesive holds on wet nylon, unlike generic duct tape that peels off.
* A Seam Grip FL glue pen: For resealing leaky rainfly seams.
* A spare PP Cap or two: Ordered directly from the manufacturer using the part number.
Keeping your tent clean and dry before storage prevents mildew. A simple kit of essential camping gear like a brush, repair tape, and spare stakes solves most field problems.
How Do You Maintain a Pop-Up Tent for Longevity?
Maintenance is about prevention. After each use, especially at the beach or in dusty conditions, shake out the tent thoroughly. Wipe down the frame poles with a damp cloth to remove grit and salt, which can corrode springs and joints over time.
Always ensure the tent is completely dry before storing it long-term. Even a little dampness trapped in a bag for weeks can lead to mildew stains and a permanent musty smell. If you must pack it away damp, unpack and dry it as soon as you get home.
Before storage, inspect the frame for any small bends or kinks. Gently straighten any minor deformities to prevent them from worsening. Check all plastic hubs for cracks and all fabric loops and seams for tears. Addressing small issues immediately with a patch or replacement part prevents a total failure later.
Investing in a few key camping tent add-ons can make a difference. A fitted ground footprint protects the floor from abrasion. A set of heavy-duty steel screw stakes provides security no matter the soil. And for organization inside, consider LED lights for tents and storage pockets to keep the space tidy and functional.
Frequently Asked Questions
Can one person set up a large pop-up tent?
Yes, absolutely. The design is intended for solo setup. The key is managing the initial lift and push from the center hub. For larger models (like a 10×10 foot canopy), having a second person to walk the opposite corners out simultaneously is helpful, but not required. I’ve set up my 8-person model alone many times.
How do you fold a pop-up tent back into its original bag?
The challenge is getting the coiled frame small enough. After performing the knee-and-twist coiling motion, you should have a tight disc. If it’s still too wide for the bag, you likely didn’t twist tightly enough. Unbuckle it, re-form the figure-eight, apply more pressure with your knee, and twist the loops again with more force. Never force the disc into the bag; that damages the frame.
Are pop-up tents actually waterproof?
They are water-resistant, not inherently waterproof. The metric is hydrostatic head (HH), measured in millimeters. A 2000mm HH rating will withstand light rain for a couple of hours. For prolonged or heavy rain, you need a rating of 3000mm or higher and must ensure the rainfly is taut and all seams are sealed. Always check this spec; “weatherproof” marketing claims are meaningless without it.
What is the warranty on a typical pop-up tent?
Warranties vary wildly. Many inexpensive models from large retailers come with a very limited 30-day warranty covering only defects in materials or workmanship, explicitly excluding damage from wind, rain, or misuse. Some higher-end or European brands offer 1-3 year warranties, but these often still exclude “wear parts” like zippers. Always read the specific manual, like the POP-UP TENT 2.1 manual, which outlines its 3-year coverage and exclusions.
Can you use a pop-up tent on the beach?
You can, but you need the right model and technique. Look for tents specifically marketed as pop-up tents for the beach, which often feature sand pockets on the legs and higher UV protection ratings. Always use sandbag anchors or specially designed beach stakes, as standard stakes are useless in loose sand. The salt and sand are tough on the frame, so rinse the tent with fresh water after your trip.
Before You Go
A pop-up tent is the ultimate shortcut to shade and shelter, but its simplicity is deceptive. Success hinges on respecting its mechanics: a controlled release of energy, immediate anchoring, and a patient, practiced pack-down. The difference between a tent that lasts for seasons and one that fails on trip two often comes down to those three principles.
Match your tent to the mission. A low-cost shelter is fine for a single afternoon in the park. For a season of camping or frequent beach trips, invest in a model with robust specs and pair it with the right tent camping equipment, proper stakes, a mallet, and a repair kit. That combination turns a fair-weather gadget into reliable gear.
Finally, practice the fold in your backyard before you need to do it in a dark, rainy parking lot. That moment of frustration, when the tent seems to defy physics, is almost a rite of passage. But once you master the knee-and-twist, you’ve unlocked the true freedom these tents promise: quick shade, quick shelter, and more time for everything else.
