
Setting Up Your Tent In The Rain: Expert Techniques To Stay Dry
This post contains affiliate links. As an Amazon Associate, we earn from qualifying purchases.
To set up a tent in the rain, you pitch the rainfly first to create an instant dry shelter, then assemble the inner tent underneath it. The critical details are a footprint cut 2 inches smaller than the tent floor, guylines tensioned to create a 4–6 inch air gap, and a campsite at least 200 feet from any water source.
Most people get this wrong because they follow the fair-weather manual. They stake the footprint, then the inner tent, then wrestle a wet rainfly over the top. By then, the inner tent fabric is soaked, the floor is a puddle, and you’re already losing the fight.
This guide covers the sequence that actually works, the gear prep that happens before the first drop falls, and the one mistake that floods your floor even if you do everything else right.
Key Takeaways
- Pitch the rainfly first to create a dry assembly area. Never let the inner tent fabric touch wet ground.
- A footprint must be 2 inches smaller than the tent floor on all sides. An oversized footprint channels water directly under your sleeping bag.
- Tension guylines to create a 4–6 inch air gap between the rainfly and inner tent. Contact points wick condensation inside.
- Camp at least 200 feet (70 adult paces) from lakes and streams per Leave No Trace. It’s not just ethics; it avoids ground saturation and morning floods.
- Each sleeper exhales 200–300 ml of water vapor overnight. Without ventilation, that moisture condenses on cold tent walls and rains inside.
Gear Prep Before the Storm Hits
Your success is decided before you unzip the stuff sack. In a downpour, fumbling with packed gear guarantees a wet interior. Organize everything into waterproof stuff sacks or heavy-duty ziplocks before you leave the car. Keep the rainfly in the most accessible pocket. Stakes and guylines go in another. The inner tent and poles stay bundled together but dry.
Have a tarp or emergency blanket ready. If the rain is relentless, you can rig a quick roof between two trees about 7–8 feet high using a paracord ridgeline. REI’s method suggests wrapping the cord around a trunk two or three times for a secure anchor without complex knots. This gives you a dry staging area to sort gear without the clock ticking. It’s a trick worth practicing once in your backyard.
Check your tent’s footprint. If it’s a custom model from the manufacturer, it’s likely sized correctly. If it’s a generic or DIY footprint, it must be cut 2 inches smaller than the tent floor on each side. An edge peeking out becomes a rainwater funnel. I learned this the hard way on a trip where my oversized footprint channeled a night’s worth of rain under my tent. The floor was dry, but the groundsheet beneath was a lake by morning.
Before you start: A slipping mallet on a metal stake can shear a finger tendon. Use a rock or the heel of your boot instead. Wet guylines are trip hazards that can snap back — keep them brightly colored and clearly staked.
The 4-Step Rainfly-First Pitch
The printed manual assumes sunny skies. Toss it. This sequence keeps the inner tent dry from second one.
Step 1: Stake the rainfly corners.
Unfold the rainfly and identify its four corner grommets. Stake them directly into the ground, pulling the fly taut but not drum-tight. You now have a low, sloping dry shelter. If your rainfly has a sleeve or clip system, don’t connect it to poles yet. Just get it off the wet earth.
Step 2: Assemble poles under cover.
Slide the pole segments together underneath the raised rainfly. Keep the poles off the wet ground by resting them on your pack or a stuff sack. Connect them to form the main structure. This is where a freestanding tent design pays for itself ten times over in the rain.
Step 3: Clip the inner tent to the poles.
Unroll the inner tent body under the rainfly shelter. Attach its clips or sleeves to the assembled pole structure. The inner tent fabric should never touch the ground during this step. If it’s a non-freestanding tent, you’ll need a partner to hold the poles upright while you make the connections.
Step 4: Lift and secure the rainfly.
With the inner tent now on the poles, lift the entire structure. Walk the rainfly up the poles and secure it using its intended attachment points — clips, buckles, or sleeves. Finally, stake out the rainfly’s vestibule and any additional guylines.
TL;DR: Rainfly first creates the dry bubble. Poles go up inside it. Inner tent clips on last. The tent never touches wet ground until it’s a sealed system.
Why Your Footprint Size Matters More Than You Think
A footprint’s job is to protect the tent floor from abrasion, not to be a perfect ground clone. The moment a footprint extends beyond the tent’s floor, it becomes a water-collection device. Rain hits the footprint, runs to its edge, and pools directly underneath your sleeping area. The tent floor’s waterproof coating can handle moisture from below, but not a constant puddle.
The fix is simple: a footprint should be 2 inches smaller than the tent floor on every side. If your tent floor is 7 feet by 5 feet, the footprint should measure 6’8″ by 4’8″. This creates a gutter-free perimeter. Water that lands on the footprint runs off its edge and continues away under the tent’s rainfly vestibule, not under your pad.
| Footprint Status | Effect in Rain | Timeline to Wet Floor |
|---|---|---|
| Correctly sized (2″ smaller) | Water sheds away from tent floor | Floor stays dry indefinitely |
| Same size as tent floor | Water pools at seam between footprint & ground | Puddles form within 1-2 hours of steady rain |
| Larger than tent floor | Acts as a funnel, channeling water under tent | Soaking occurs within 30 minutes |
Common mistake: Using a blue poly tarp cut to the exact dimensions of your tent floor — the edges channel water underneath, and you’ll wake up on a damp sponge even if no rain fell after midnight.
If you’re buying a footprint, get the manufacturer’s specific model. If you’re making one, measure your tent floor, subtract 4 inches total (2 inches per side), and cut. Seal the edges with a waterproof seam sealer. This isn’t a minor detail. It’s the difference between a dry night and a mandatory bail-out at 3 a.m.
Managing Condensation: The Invisible Rain
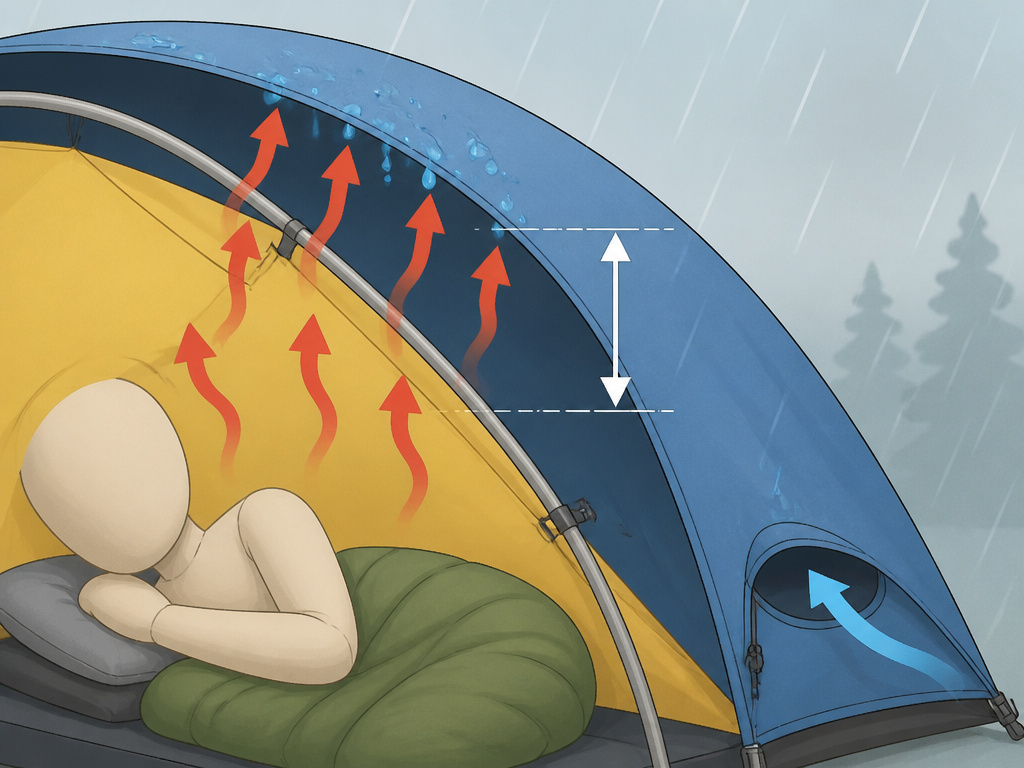
You can have a perfectly pitched tent and still wake up wet. Condensation isn’t a leak; it’s physics. Each person exhales 200–300 ml of water vapor during an 8-hour sleep. In a cold, sealed tent, that vapor hits the cold rainfly wall and turns to liquid. If the rainfly is touching the inner tent, that moisture wicks right through to your gear.
The solution is a 4–6 inch air gap between the rainfly and the inner tent walls. You create this gap by tensioning the guylines. Most rainflies have multiple guyout points. Use them all. Pull each line taut until the fly stands away from the inner tent. On a dome tent, this often means staking lines perpendicular to the tent body, not straight out.
Ventilation is non-negotiable. Always open the rainfly vents, even in a downpour. Position them on the leeward side (the side sheltered from the wind and rain) to allow moist air to escape without letting in precipitation. If your tent has a double-door design, crack the lee-side door an inch at the top.
I once sealed a tent completely during a storm on the Oregon coast, fearing the wind-driven rain. By morning, the inside of the rainfly was dripping, and my down bag had soaked up enough moisture to lose its loft. Now I always sacrifice a little potential spray for a lot of guaranteed airflow.
What happens if you skip the gap? Condensation beads on the rainfly, touches the inner tent, and soaks through the mesh or fabric by capillary action. You’ll see damp patches on the inner wall within two hours. By dawn, your sleeping bag’s footbox is damp.
Site Selection: The 200-Foot Rule Isn’t Just Polite
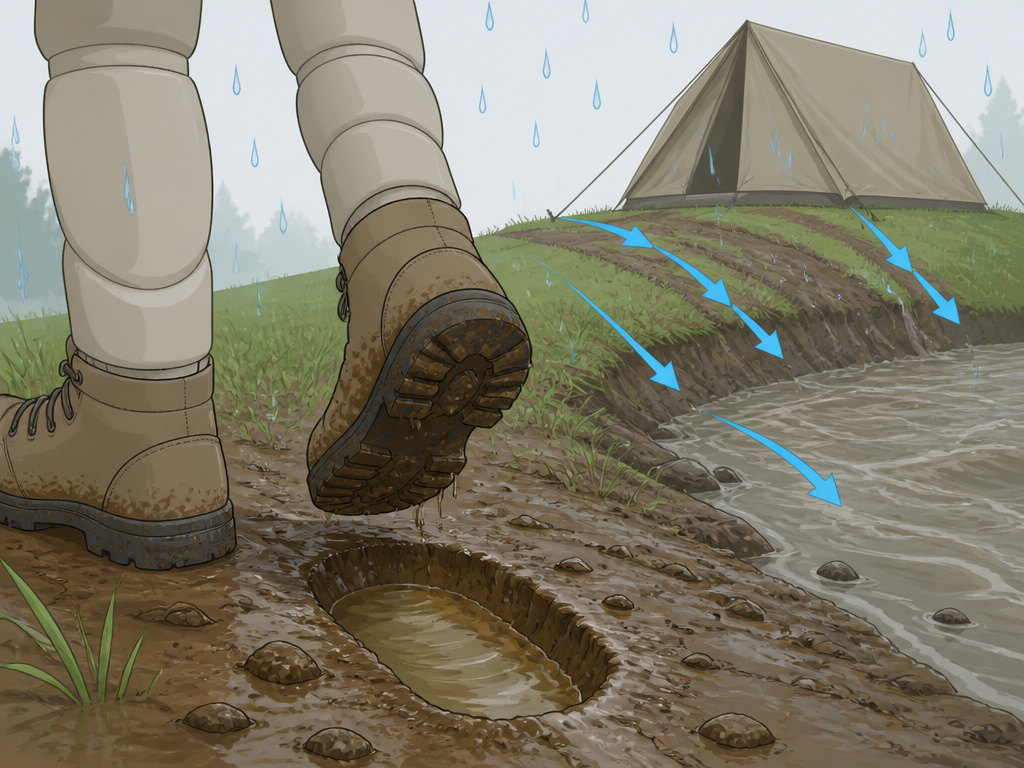
The Leave No Trace guideline says to camp at least 200 feet from any water source. That’s about 70 adult paces. In the rain, this rule is about self-preservation, not just ethics. Ground near streams and lakes is almost always softer and more saturated. It will pool water faster. Furthermore, a night of rain can raise the water level of a creek or pond, turning a cozy spot into an island — or a bathtub.
Look for a natural slight incline. A few degrees of slope ensures water runs away from your tent, not under it. Avoid depressions, even shallow ones, that can become sumps. Kick away surface debris like leaves and pine needles; they hold water against the groundsheet. Feel the soil with your hand. If it squishes, move on.
If you’re in a designated campground, you might not have perfect choices. Look for the highest spot within your site, even if it’s only a few inches higher. That small elevation difference is your main defense against ground seepage.
Common mistake: Pitching in a beautiful, flat clearing right next to a stream — the ground is a sponge, and the stream’s banks overflow by midnight, leaving you on a newly formed sandbar.
When to Bail and Rig a Tarp Shelter
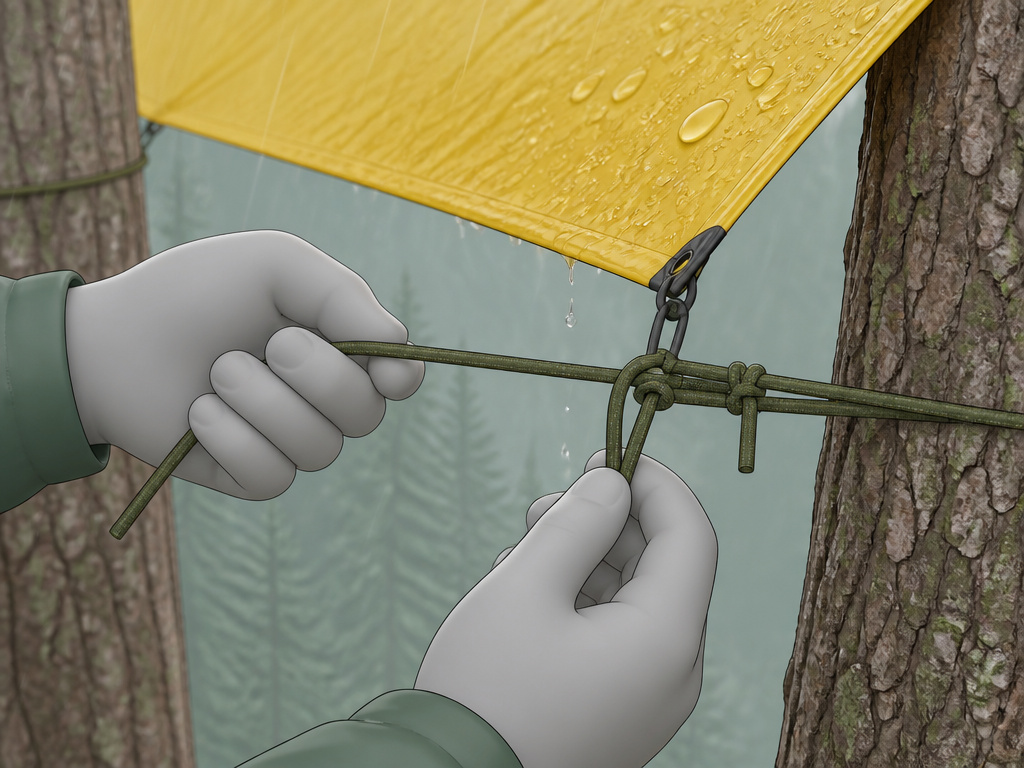
Sometimes, the rain wins. If you’re facing horizontal sheets of water and your tent is threatening to become a kite, consider a tactical retreat. A lightweight tarp and paracord in your pack can become an emergency shelter faster than you can pitch a tent in those conditions.
The classic A-frame tarp setup needs two trees roughly 15-20 feet apart. Run a paracord ridgeline between them at 7–8 feet high. Drape the tarp over the line. Stake the four corners down at a steep angle to shed water. You now have a dry(ish) zone to wait out the worst, repack your gear, or even sleep if you have a groundsheet and pad.
This is also the moment your essential tent camping gear list proves its worth. A headlamp with a good beam, a quick-access knife for cutting cord, and extra stakes are the difference between a managed situation and a miserable one. Having practiced this once in fair weather means you’re not learning knots in a thunderstorm.
How to Dry Wet Gear Overnight
You will get wet. Your pack, your jacket, your boots will be damp. Bringing that moisture into the tent guarantees a humid, miserable night. Here’s the drill.
First, wring out any soaked clothing outside. Then, place damp items in a stuff sack or plastic bag before bringing them into the vestibule. The vestibule is your airlock. Inside the main tent, change into dry sleep clothes. Hang the damp items in the vestibule, using a gear loft or a piece of cord strung between the tent poles.
Body heat and the tent’s limited airflow will slowly dry things overnight. Focus on socks, gloves, and baselayers. A soaked down jacket will not dry; it needs a real dryer. For that, keep it in its stuff sack until you can deal with it properly. The goal is damage control, not miracles.
Frequently Asked Questions
Can you set up a tent in the rain without getting the inside wet?
Yes, by pitching the rainfly first. It creates a dry canopy under which you assemble the poles and clip the inner tent. The inner fabric never touches wet ground or rain.
How do you prevent condensation in a tent when it’s raining?
Maximize ventilation. Open all rainfly vents on the sheltered side. Most importantly, tension every guyline to create a 4–6 inch air gap between the rainfly and inner tent walls. This gap breaks the capillary action that wicks condensation inside.
Is it okay to put a tarp under your tent in the rain?
Only if the tarp (footprint) is cut 2 inches smaller than the tent floor on all sides. A tarp that extends beyond the tent collects rainwater and channels it directly underneath you, guaranteeing a wet floor.
What is the best tent for heavy rain?
Look for a tent with a full-coverage rainfly, sealed seams, and a high hydrostatic head rating (1500mm minimum). Storm-resistant tent designs with multiple guyout points and robust poles handle wind-driven rain better than basic dome models. Our guide to the best tents for heavy rain breaks down the specs that matter.
Before You Go
Setting up in the rain is about inverting the fair-weather routine. The rainfly leads. The footprint follows the 2-inch rule. The guylines get pulled until the fly stands off the tent body. And you camp 200 feet back from that picturesque stream.
The difference isn’t just staying dry. It’s waking up warm, with gear that’s ready for another day, instead of packing up a sopping mess at first light. It turns a miserable necessity into a manageable skill. Next time the forecast turns, you won’t dread the pitch. You’ll have a sequence, and it works.
Pack a lightweight tarp tent as a backup on serious trips. Know how to tie a trucker’s hitch for a tight ridgeline. And always, always check your footprint size before you go. That’s the edge that keeps your sleeping bag lofted and your spirits high, even when the sky won’t stop falling.
