
What Is A Tent Card? Sizes, Uses, and How to Make Your Own
This post contains affiliate links. As an Amazon Associate, we earn from qualifying purchases.
A tent card is a piece of sturdy cardstock, folded to stand on its own, used to display information like menus, prices, or directions on tables and counters. Common sizes are 4×6 inches, 5×7 inches, and the A5 standard (5.8×8.3 inches). They are typically made from 14 pt uncoated cardstock for durability.
Most people think a tent card is just a folded piece of paper. They grab whatever scrap is nearby, fold it, and wonder why it slumps over after ten minutes or bleeds ink from a spilled drink. The difference between a pro setup and an amateur one is knowing the three things that matter: weight, size, and orientation.
This guide covers the standard sizes you can buy, the exact steps to design your own in Word, and how to pick the right cardstock so your message stands up, literally.
Key Takeaways
- Tent cards are not just paper; they are 14 pt cardstock folded into a standing triangle, A-frame, or pyramid shape.
- The most common finished size is A5 (5.8 x 8.3 inches), but 4×6 and 5×7 are also standard for different table settings.
- Design in Word by using 3.75-inch tall text boxes and 150 pt font, then duplicate and rotate the second box for two-sided printing.
- Water-resistant lamination is non-negotiable for any event where drinks are present; a single spill ruins uncoated paper.
- Lifespan varies wildly: thin paper lasts an afternoon, while thick, laminated cardstock can survive a multi-day trade show.
What Is a Tent Card?
A tent card, also called a table tent, is a self-standing information display. You fold a single sheet of cardstock down the middle so it forms a peak, like the roof of a house. This creates two visible panels that sit on a table or counter without any holder or stand.
A tent card is a folded piece of cardstock, typically 14 pt weight, designed to stand upright on a surface. Standard sizes range from 4 by 6 inches to 8.5 by 11 inches, with the A5 dimension (5.8 × 8.3 inches) being a common average. When assembled, it occupies about 5.8 × 1.75 inches of table space.
Their job is to be seen without being held. In a busy restaurant, a diner glances down and sees the daily special. At a conference, an attendee finds their table number. The design forces a viewer to engage with two sides, which is why they are so effective for promotions or directional signage.
The physical experience matters. A flimsy tent card feels cheap. It wobbles with the vibration of a closing door. A proper one has a satisfying snap when you fold it and stays rigid. You can pick it up by the peak and move it without it collapsing. That tactile confidence translates to how people perceive the information on it.
TL;DR: A tent card is a folded, freestanding sign made from heavy paper. Its purpose is passive communication on tabletops, and its effectiveness hinges on the sturdiness of the material.
Standard Tent Card Sizes and Shapes
You cannot just cut any rectangle and expect it to work. The ratio of height to width dictates stability and readability from a seated position. Standard sizes exist because they have been tested on real tables.
The most referenced size is A5 paper dimensions: 5.8 by 8.3 inches. When folded, this creates a tent card roughly 8 inches tall. It is large enough to read from across a table but not so large it dominates a place setting. Other popular cuts are 4 by 6 inches (better for crowded bars) and 6 by 9 inches (for more prominent floor displays).
Shape changes the profile. The classic is the standing triangle, but pyramid and A-frame shapes are common for specific uses.
| Shape | Common Size (Flat Sheet) | Best For | Stability Note |
|---|---|---|---|
| Standing Triangle | 4″ x 6″, 5″ x 7″, A5 (5.8″x8.3″) | Menus, table numbers, price lists | Most common; moderate stability on flat surfaces. |
| Pyramid Tent | 3.4″ x 3.9″, 5″ x 5.7″ | Centerpiece displays, product samples | Very stable base; uses more material for a 3D shape. |
| A-Frame | 4″ x 6″, 8″ x 4″ | Directional signage, longer text blocks | Presents a wider, sloped reading surface. |
Common mistake: Using 20 lb printer paper for an all-day event, the cards will curl from humidity within two hours and look discarded by the third.
Material is the other half of the equation. The industry standard is 14 pt uncoated cardstock. The “pt” stands for point, a thickness measurement. 14 pt is about the thickness of a postcard. It is heavy enough to stand, yet still easy to fold cleanly by hand or with a scoring tool. Thinner paper (like 65 lb text weight) will buckle. Heavier stock (like 80 pt chipboard) is overkill for most table uses and is harder to fold without cracking the surface.
For outdoor use or anywhere drinks are served, you need a laminate. A gloss or matte laminate adds a water-resistant layer. A spill beads up and can be wiped off. Without it, a coffee splash causes the ink to run and the paper to warp immediately. This is a non-negotiable upgrade for wedding receptions, beer festivals, or poolside bars.
TL;DR: Stick to standard sizes like A5 or 5×7 inches cut from 14 pt cardstock. For wet environments, laminate the sheet before folding.
What Are Tent Cards Used For?
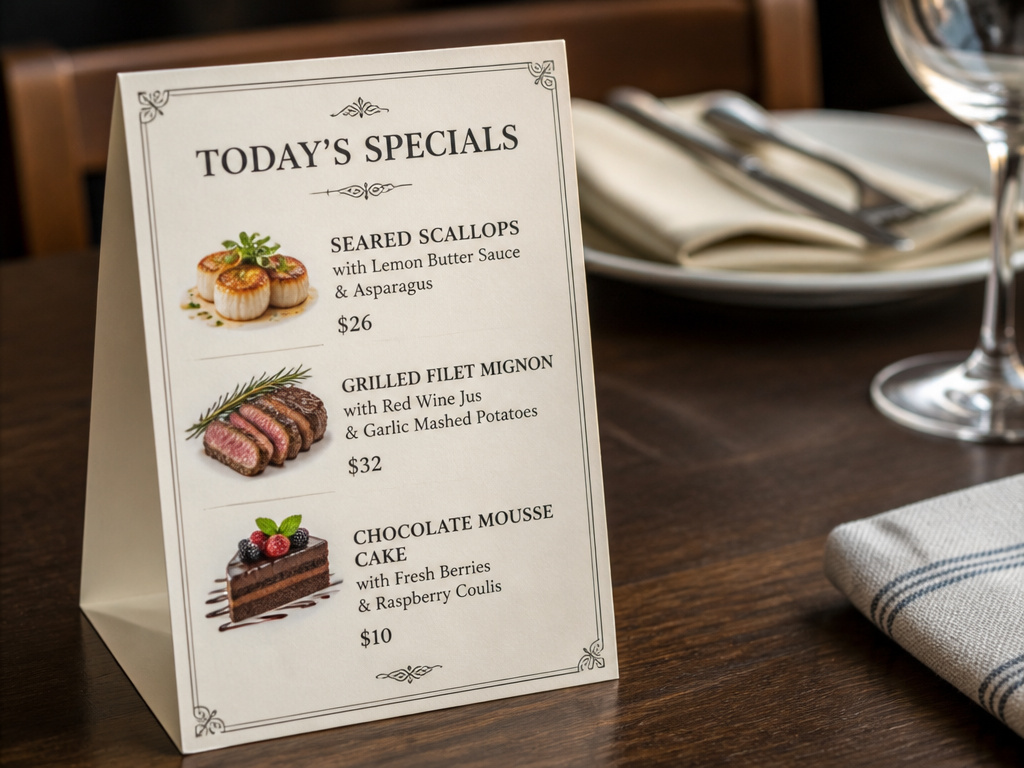
Their versatility is their strength. Anywhere you have a flat surface and a need to communicate, a tent card can do the job. They bridge the gap between a permanent sign and a handheld flyer.
In hospitality, they are ubiquitous. Restaurants use them for daily specials, wine promotions, or dessert menus. Hotels place them in lobbies for event directions or in rooms for WiFi passwords. The benefit is immediacy and easy updates. A manager can swap out a tent card in seconds between lunch and dinner service.
For events and retail, they become miniature billboards. At a conference, they mark reserved seating or sponsor tables. In a store, they can highlight a sale item on a shelf. Their small footprint lets them fit in spaces where a standing sign would be obtrusive. They are a core piece of essential camping equipment for organizing group meal areas or marking different activity stations.
The psychological effect is subtle. Because a tent card is physically on the table, it feels more personal and direct than a wall poster. It enters the customer’s immediate space. This makes them highly effective for calls to action like “Try Our Signature Cocktail” or “Ask About Our Rewards Program.” They are a silent salesperson.
TL;DR: Tent cards are used for menus, promotions, directions, and labeling. Their placement within a person’s immediate space makes them a powerful tool for direct communication.
How to Make a Tent Card in Microsoft Word
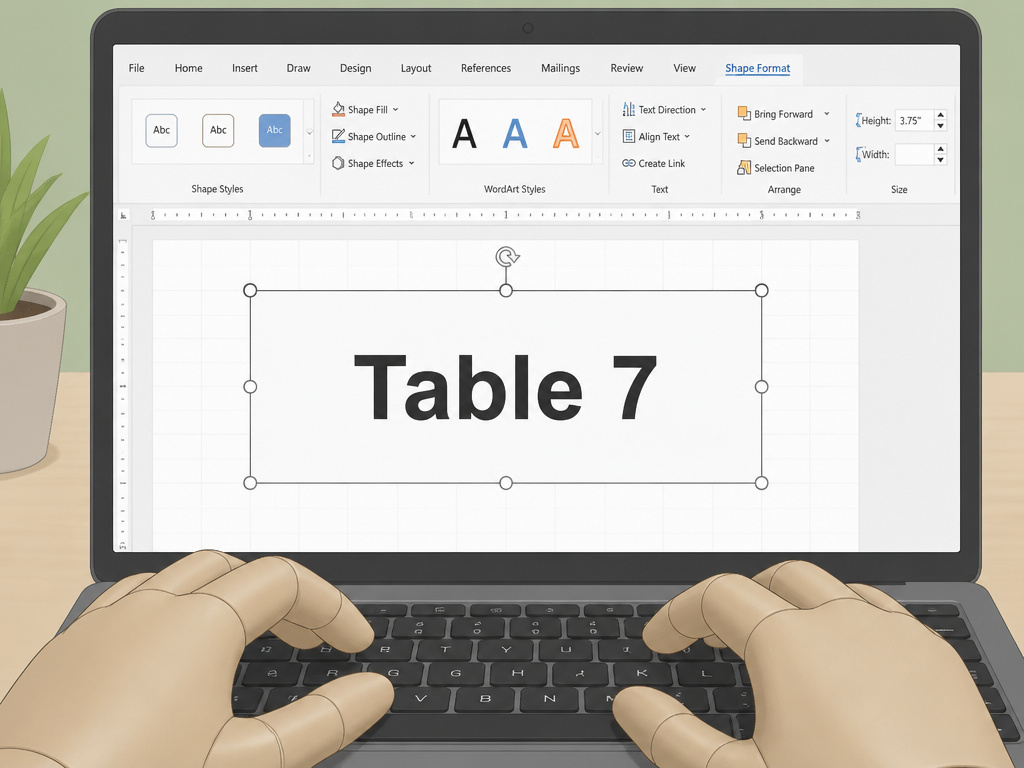
You do not need expensive design software. Microsoft Word has all the tools to create a clean, printable tent card template. The process is about precision, not artistic skill.
First, set up your document. Open a new blank document. Navigate to the Layout tab (called Page Layout in older versions). Click Margins and select “Narrow.” This gives you half-inch margins all around, maximizing the printable area on a standard sheet of cardstock. Verify the Orientation is set to Portrait.
Now, insert your text box. Go to the Insert tab, click Text Box, and choose “Simple Text Box.” A box will appear on the page. Click inside and type your text, “Table 7,” “Today’s Special,” etc. This is where you must be specific. Under the Shape Format tab that appears, set the Height to exactly 3.75 inches. This height ensures your text will sit correctly in the final folded card.
Width is trickier. Go to the View tab and check the “Gridlines” box. A faint grid will cover your page. Resize the text box by dragging its sides so it fits within the center gridlines, leaving a clear margin. This visual guide prevents your text from being cut off during printing.
I set the first text box perfectly, then rushed the duplicate. The second one was a pixel off-center, and when I folded the cardstock, the front and back panels were misaligned by an eighth of an inch. It looked sloppy. Now I use the gridlines for both boxes every single time.
Format your text. Select it and use the Home tab. Center it using the paragraph alignment button. For font size, a good starting point is 150 pt. This seems huge on screen, but it is necessary for readability from a few feet away. Choose a bold, sans-serif font like Arial Bold for maximum clarity.
The final step is duplication for two-sided printing. Copy your formatted text box (Ctrl+C). Paste it (Ctrl+V). A duplicate appears, likely on top of the first. Drag this duplicate to the lower half of the page. Here is the critical part: click the green rotation handle at the top of the new box and rotate it 180 degrees. This ensures the text on the back side of your tent card will be right-side-up when the sheet is folded. Turn off the gridlines in the View tab, print a test page on regular paper to check alignment, then load your 14 pt cardstock.
TL;DR: Use Word’s Narrow margins, a 3.75-inch tall text box, and 150 pt font. Duplicate and rotate the second box 180 degrees so your final folded card reads correctly on both sides.
Tent Card Design and Material Tips
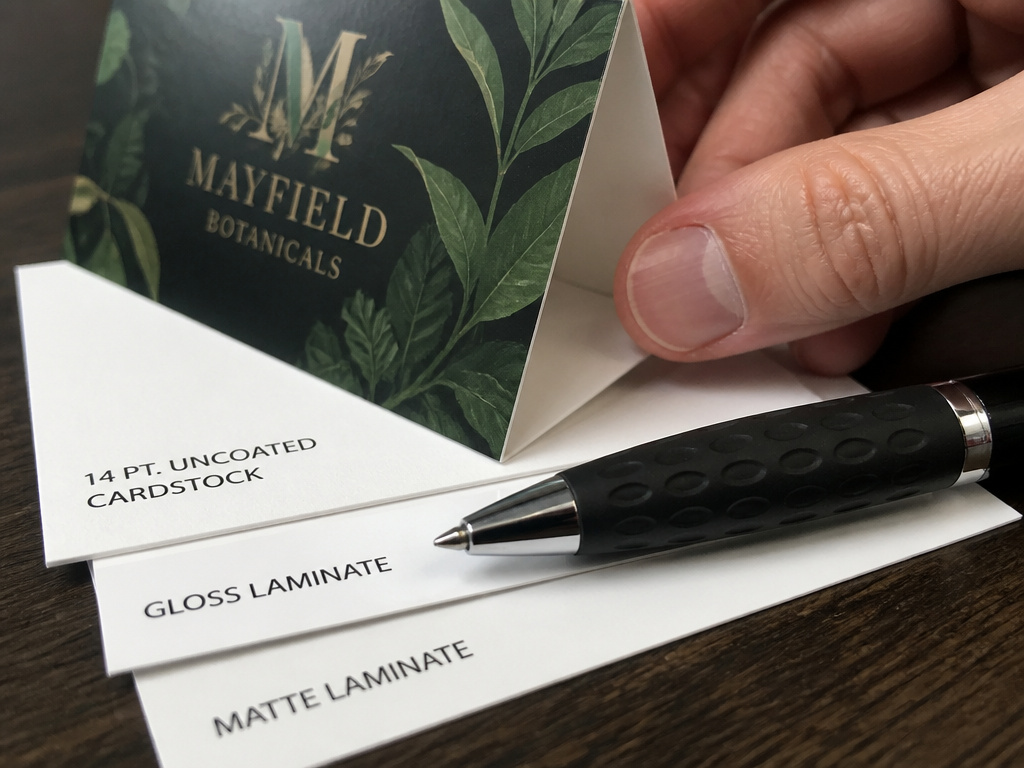
Design keeps someone looking. Material keeps the card standing. Ignoring either gives you a failed piece of communication.
Start with contrast. Dark text on a light background is the most readable formula. Avoid busy patterns or low-contrast color pairs like grey on white. Use your brand colors, but ensure the text color has a stark difference from the background color. White space is not your enemy; it frames your message and makes it easier to digest quickly.
Common mistake: Designing a tent card on a computer screen without printing a test, screen colors often print darker and murkier, especially on uncoated cardstock.
For materials, 14 pt cardstock is the baseline. If your tent card will be handled frequently or needs to last more than a day, move to a 16 pt or even a coated stock. Coated stock (like C2S, coated two sides) gives a smoother, more professional finish and makes colors pop. However, it can be harder to write on with a ballpoint pen if you need to make last-minute changes.
If your event is outdoors, laminate. A 3mm gloss laminate is standard. It protects against moisture, UV fading, and general wear. A spill wipes right off. For a premium feel, a soft-touch matte laminate is excellent. It resists fingerprints and has a sophisticated texture. Remember, the laminate is applied to the flat sheet before it is folded. Folding after laminating can cause the plastic layer to crack along the crease if not scored properly.
Consider your entire camping gear list when planning an outdoor event; durable, laminated tent cards are as crucial as reliable tent lighting options after dark. For long-term indoor use, like a permanent menu in a diner booth, a rigid plastic or acrylic tent card holder might be a better investment than paper.
| Scenario | Recommended Material | Expected Lifespan | Why It Works |
|---|---|---|---|
| Indoor, single-day event | 14 pt uncoated cardstock | 8-12 hours | Cost-effective; stands well in climate-controlled rooms. |
| Bar or restaurant (spill risk) | 14 pt cardstock with gloss laminate | 1-3 months with wiping | Laminate creates a wipeable, water-resistant barrier. |
| Outdoor festival (sun, wind) | 16 pt coated stock with matte laminate | 2-5 days | Heavier stock resists wind; laminate protects from sun and dew. |
| Permanent table number | Plastic or acrylic stand | 1+ years | Not a paper tent card, but a durable solution for daily use. |
TL;DR: Design for high contrast and large type. Choose 14 pt cardstock as a minimum, and always laminate for any environment with moisture, spills, or extended use.
Frequently Asked Questions
Are tent cards and table tents the same thing?
Yes. “Tent card” and “table tent” are interchangeable terms for the same product, a folded, self-standing display. The terminology varies by industry, but the object is identical.
What is the best paper weight for tent cards?
14 pt cardstock is the professional standard. It is thick enough to stand firmly without assistance but still thin enough to run through most standard office printers and fold cleanly. Heavier 16 pt stock is better for premium uses or outdoor conditions.
Can I make tent cards at home?
Absolutely. Use the Word tutorial above, purchase 14 pt cardstock, and ensure your printer can handle the thicker paper. For a crisp fold, score the center line first using a blunt tool like a butter knife and a ruler before folding.
How long do tent cards last?
Lifespan depends entirely on material and environment. A thin paper tent card might last only a few hours. A laminated 14 pt cardstock tent card can last for several months of indoor use or a multi-day outdoor event if kept dry. They are not designed to be permanent fixtures.
What size should I choose for a dinner table?
The A5 size (5.8 x 8.3 inches) is ideal for standard dinner tables. It is visible without overwhelming the table setting. For larger round tables or buffets, a 6×9 inch size provides greater visibility from a distance.
Before You Go
A tent card is more than folded paper. It is a tool that puts information directly in your line of sight. The right size, like the common A5, and the right material, 14 pt cardstock, make the difference between a sign that works and one that ends up in the trash.
Skip the flimsy paper. Use the gridlines in Word to get your alignment perfect. And if there is any chance of a spilled drink, laminate the sheet. Your message deserves to stand up straight. For other ways to improve your outdoor setup, explore our guides on portable air conditioners for summer camping or canvas tents with stove jacks for winter adventures.
