
How To Waterproof A Tent DIY: Complete Step-By-Step Guide
This post contains affiliate links. As an Amazon Associate, we earn from qualifying purchases.
Waterproofing a tent yourself requires matching three things: the tent’s fabric coating (silicone or polyurethane), the correct liquid sealant for that coating, and a full 24-hour dry time between each step. The process has three tiers: sealing seams, refreshing the Durable Water Repellent (DWR) on the outside, and recoating the interior waterproof layer if it’s worn.
Most people grab the first spray-can they see and hose down their tent. That puts a fresh water-repellent coating over seams that are already leaking and a fabric interior that’s lost its waterproofing. You get a damp floor and a false sense of security.
This guide walks through the diagnostic check, the product choice that actually sticks, and the sequence that keeps a tent dry for another two seasons. We’ll cover the difference between a leak and condensation, when to walk away from a cheap tent, and why you should never iron seam tape at home.
Key Takeaways
- Tent fabric is either silicone-treated nylon or polyurethane-coated polyester/nylon. Using the wrong sealant (silicone on PU or vice versa) creates a non-sticking, peeling mess.
- The Hydrostatic Head (HH) rating printed on your tent’s tag tells you its waterproof ceiling. A rating under 1,500mm means the fabric itself wets out quickly; recoating the interior is mandatory.
- Seam tape degrades from UV exposure and flexing. Liquid seam sealant is the reliable fix. Attempting to re-tape seams with a household iron melts the fabric more often than not.
- If the inside of your rainfly is wet with fine droplets, that’s condensation from trapped breath. Opening vents fixes it. If water drips in a steady stream from a seam, that’s a leak.
- A full reproofing job needs three separate products: seam sealant, DWR spray, and tent fabric sealant. Let each layer dry for a full day before moving to the next.
The 3-Tier Process for a Dry Shelter
Think of your tent’s waterproofing as a three-layer system. The exterior has a Durable Water Repellent (DWR) finish that makes water bead up. The fabric itself has a waterproof coating (usually polyurethane) on the inside. The seams are sealed with tape or glue. A DIY refresh targets each layer in order.
A tent’s waterproofness is measured by its Hydrostatic Head (HH) rating in millimeters. A 3,000mm HH rating means the fabric can support a three-meter column of water before penetration. Most backpacking tents start at 1,500mm; family car-camping tents often rate between 2,000mm and 5,000mm.
TL;DR: Clean the tent, seal the seams, refresh the DWR, then recoat the interior fabric if it wets out. Let each layer dry for a full day.
Tier 1: Seam Sealing – The Non-Negotiable
All needle holes from stitching are potential leak points. Factory seam tape fails after a few seasons of UV exposure and packing/unpacking. You must seal them with a liquid product.
First, know your fabric. Check the manufacturer’s tag or website.
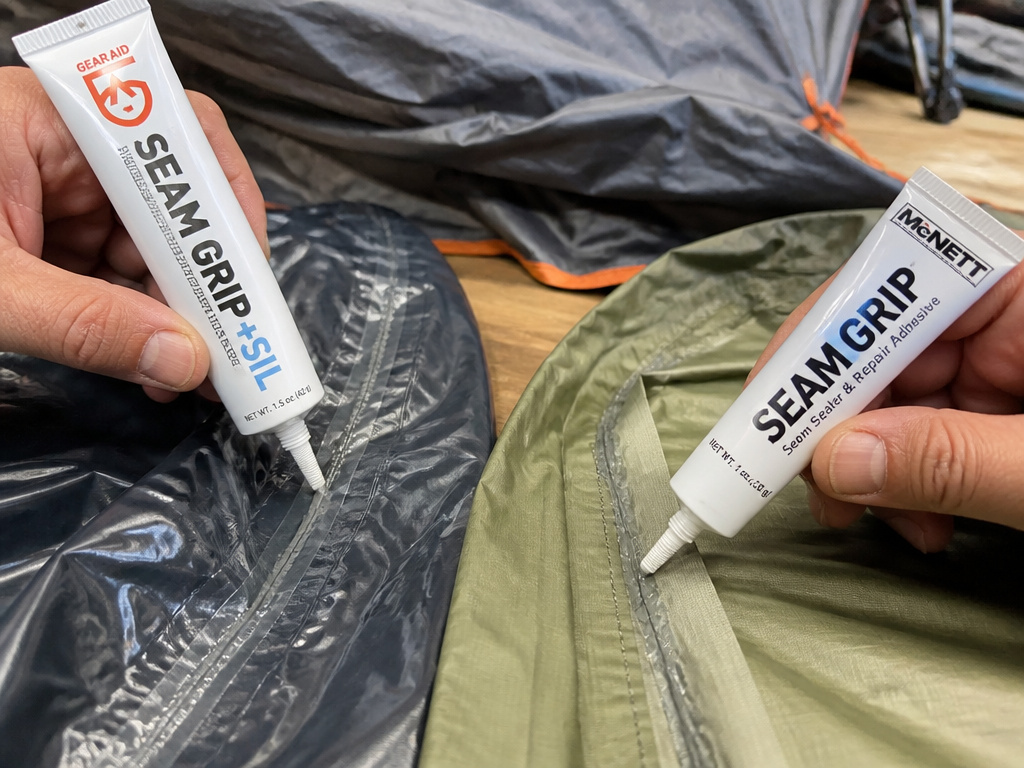
* Silicone-treated nylon: Feels slippery and somewhat shiny. Requires a silicone-based sealant like Gear Aid Seam Grip SIL.
* Polyurethane-coated polyester or nylon: Feels more like a standard fabric with a slightly tacky interior coating. Requires a PU-based sealant like McNett Seam Grip.
Using silicone sealant on PU fabric is the most common error. It will not bond. It peels off in sheets the first time you pack the tent.
- Set up the tent or lay the rainfly flat in a well-ventilated area, ideally outside on a dry day.
- Apply a thin, continuous bead of the correct sealant along both sides of every seam on the rainfly and the tent floor. Use a small brush or the applicator tip.
- Smooth it with a fingertip (wear a glove) to push sealant into the stitch holes.
- Let it cure for at least 24 hours, 48 if humidity is high.
Common mistake: Using generic clear silicone from a hardware store — it contains acetic acid that degrades nylon fibers over time. Tent-specific sealants are pH-neutral.
Tier 2: DWR Refresh – Making Water Bead Again
The DWR finish on the outside of your rainfly causes water to bead up and roll off. When it wears out, the fabric “wets out”—it soaks through, becoming heavy and potentially leading to seepage. You restore this with a spray-on product.
| DWR Spray Type | Best For | Application Note |
|---|---|---|
| Standard Spray | Most polyester/nylon tents | Easy to apply; may require two coats on older fabric. |
| Wash-In Solution | Entire tents or jackets | Used in a washing machine; provides even coverage but can be messy. |
| Silicone-Specific Spray | Silicone-treated nylon tents | Must match the fabric; standard DWR will not adhere. |
- Ensure the tent is clean and dry.
- Hang the rainfly in a shaded, breezy area. Direct sun causes the spray to dry too fast and spot.
- Spray evenly from about 6-8 inches away, covering the entire surface. The fabric will darken.
- Let it dry completely. This usually takes 2-4 hours.
If water still soaks in instead of beading after this, the interior waterproof coating (Tier 3) is gone.
Tier 3: Interior Fabric Recoating – The Last Resort
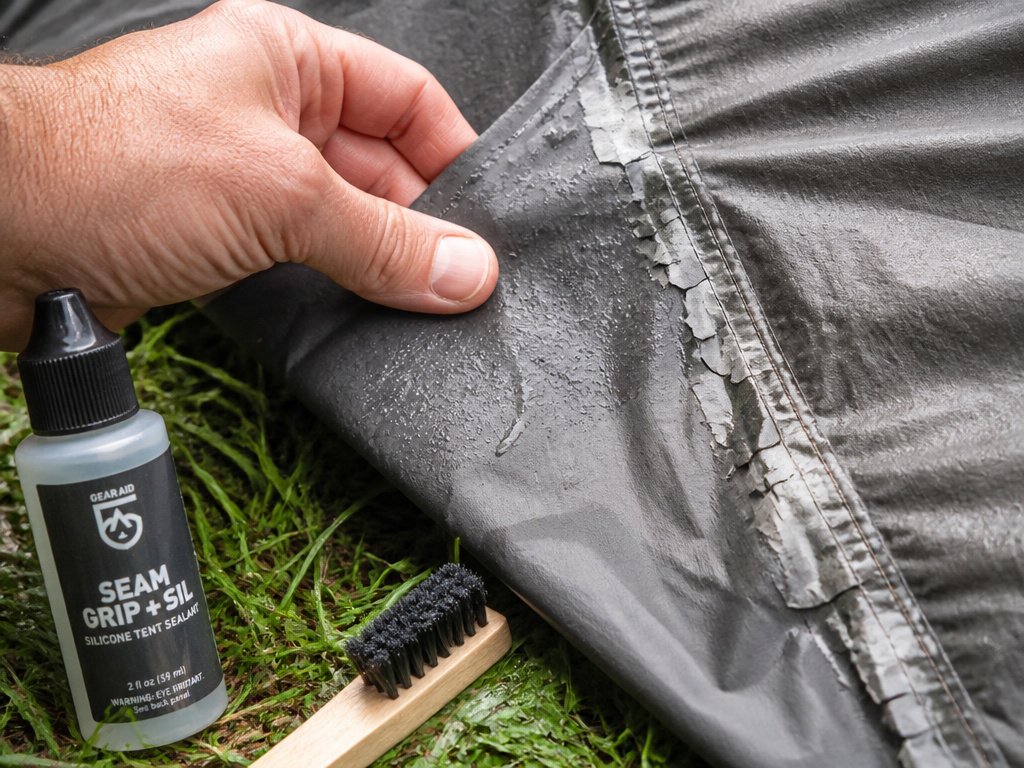
The waterproof layer is a urethane or acrylic coating on the inside of the rainfly and floor. It delaminates with age, turning sticky or flaky. When this happens, the fabric loses its HH rating.
Recoating is a messy but effective fix. You need a product like Nikwax Tent & Gear Solarproof or Gear Aid Tent Fabric Sealant.
- Lay the rainfly interior-side up.
- Brush or sponge on a thin, even coat. Avoid puddles.
- Dry for a full 24 hours in a ventilated space. The smell is strong.
This adds slight weight and stiffness. For a badly delaminated, inexpensive tent, the labor and cost of sealant often outweigh the tent’s value. Knowing when to upgrade is part of the process.
What’s Leaking? Condensation vs. Waterproof Failure
A wet tent interior doesn’t always mean a leak. Breath moisture condensing on the cold inner surface of the rainfly is the usual culprit. The fix is airflow, not sealant.
Condensation forms as a mist of fine, even droplets across the entire ceiling. It happens on cool, humid nights when the tent is fully sealed. A leak shows as a distinct drip, a trail of water, or a damp spot originating from a specific seam, zipper, or fabric flaw.
If your tent interior is wet, open all vents and partially unzip the door before blaming the waterproofing. Condensation will clear in 20 minutes; a leak will continue dripping.
Test your tent’s waterproofing with a garden hose. Set up the tent on a dry day. Spray the rainfly systematically, section by section, for 5-10 minutes. Go inside with a flashlight and look for drips or dark spots. Mark them with chalk. This test shows you exactly where to focus your sealing work.
The Tools and Sealants You Actually Need
You don’t need a garage full of gear. This kit covers every scenario.
- Garden hose with spray nozzle (for the leak test and rinsing)
- Soft-bristled brush and mild soap (like Nikwax Tech Wash)
- Lint-free cloths (for drying and smoothing sealant)
- Small paintbrush or applicator bottle (for seam sealant)
- Seam Sealant (Gear Aid Seam Grip SIL or McNett Seam Grip)
- DWR Spray (Nikwax TX.Direct Spray-On)
- Tent Fabric Sealant (for interior recoating)
Skip the hardware-store silicone. Skip the “waterproofing” sprays sold at general stores. The chemistry is wrong for technical fabrics. Using the right tent camping accessories for maintenance extends the life of your shelter more than any gadget.
Investing in quality tent camping equipment starts with a good shelter, but maintaining it is what saves money long-term.
When to Waterproof (And When to Replace)
Reproofing is periodic maintenance, not an annual chore. If you camp regularly in varied weather, check your tent’s performance before each season. For occasional use, a refresh every two years is sufficient.
Signs your tent needs reproofing:
* Water no longer beads on the rainfly.
* The interior fabric feels damp during a light rain.
* Seam tape is flaking or peeling.
* The inside coating is sticky or has white, chalky patches.
Signs you should replace the tent instead:
* The fabric has multiple tears or broken poles.
* The floor has a permanent, musty mold smell.
* The HH rating was low (under 1,000mm) to begin with. No amount of sealant will turn a sunshade into a storm-resistant tent design.
* The cost of sealants and your time approaches half the price of a new, better tent.
This is especially true for budget tents under $100. Their thin coatings fail quickly, and the fabric often can’t handle a recoating. It’s more economical to step up to a tent under $200 with a robust build.
Silicone vs. Polyurethane: The Sealant Choice That Matters
This is the decision that determines whether your work lasts one trip or two seasons. The fabrics are chemically different and require specific adhesives.
| Fabric Type | Identification | Correct Sealant | What Happens If You Use the Wrong One |
|---|---|---|---|
| Silicone-Treated Nylon | Slick, shiny feel; often used in ultralight two-person tents. | Gear Aid Seam Grip SIL | PU-based sealant will not cure properly; it remains tacky and peels. |
| Polyurethane-Coated Polyester/Nylon | Standard fabric feel; interior has a visible coated layer. | McNett Seam Grip | Silicone sealant forms a non-sticking layer that flakes off when flexed. |
If you don’t know your tent’s type, contact the manufacturer. Guessing wrong wastes a product and a weekend. This specificity is what separates a proper repair from a hack job. The same principle applies when choosing a tent for severe weather—materials are engineered for a purpose.
Frequently Asked Questions
Can I use a waterproofing spray on the entire tent?
general DWR spray only refreshes the exterior water-repellent finish. It will not seal leaking seams or restore a delaminated interior waterproof coating. You need a three-product approach for a complete fix.
How long does DIY waterproofing last?
thorough job with the correct products should last 12 to 24 months of regular use. The seam sealant is the most permanent part; the DWR exterior will wear faster, especially with UV exposure and abrasion.
Is it cheaper to waterproof a tent or buy a new one?
For a quality tent that originally cost over $150, waterproofing is far cheaper. For a cheap department-store tent with a low HH rating, buying a new one is often better. The labor and $30-$50 in sealants won’t improve its fundamental weatherworthiness.
Can I waterproof a tent in cold weather?
No. Most sealants and coatings require temperatures above 10°C (50°F) to cure correctly. Applying them in the cold leads to poor adhesion, longer cure times, and a compromised finish. Wait for a warm, dry weekend.
My tent floor is leaking. What should I do?
The floor gets the most abrasion. First, clean it thoroughly and inspect for punctures. Patch any holes. Then, apply a coat of tent fabric sealant to the entire interior floor surface, focusing on the corners and seams. For durable canvas tent materials, a different, heavier-duty sealant is required.
Before You Go
Waterproofing a tent is a straightforward afternoon project if you follow the sequence: clean, identify the fabric, seal the seams, refresh the DWR, and recoat the interior if needed. The critical step is matching the sealant to your tent’s fabric coating—silicone for silicone, polyurethane for polyurethane.
Store your tent loosely in a cool, dry place. Never pack it away damp. That single habit does more to preserve its waterproofing than any spray. A well-maintained shelter is the cornerstone of any comfortable camp, letting you focus on the trail, the fire, and the stars instead of a slow drip on your forehead. Good interior tent illumination and a solid shelter make all the difference.
