
How To Use Tent Pegs | The 45-Degree Rule That Broke on Us
This post contains affiliate links. As an Amazon Associate, we earn from qualifying purchases.
To use tent pegs correctly, drive them at a 45-degree angle away from the tent with the hook facing out, burying all but the last inch. The right peg for your soil. V-shaped for sand, shepherd’s hook for rocks, matters more than force. Getting the angle and depth wrong is why tents collapse.
Most people hammer pegs straight down or at a shallow angle. The tent seems fine until the first gust hits. Then the stake acts like a lever, pries itself out, and your shelter folds.
This guide covers the three things that decide if your pegs hold: the angle, the depth, and the specific peg for your dirt. We’ll walk through standard ground, then the edge cases that break the rules, sand, rock, and wind.
Key Takeaways
- The 45-degree angle is for holding power, but in pure sand, a vertical stake buried deeper often works better.
- Bury the peg until only the hook or tie-off loop is exposed. Leaving more than an inch above ground turns the stake into a lever.
- Match the peg to the ground. Wide V-shaped or screw-in pegs for sand, thin shepherd’s hooks for rocky gaps, and heavy-duty spikes for hard pack.
- Stake the windward corner first before your tent becomes a sail. Add all guylines, then tension them evenly after the structure is up.
- A bent peg is a weak peg. Straighten minor bends with a rock or mallet between uses, but replace any with a sharp kink.
The 45-Degree Angle Rule (and When It’s Wrong)
Head to any campground and you’ll see it. Pegs driven straight down, or angled toward the tent. They look fine in the calm evening.
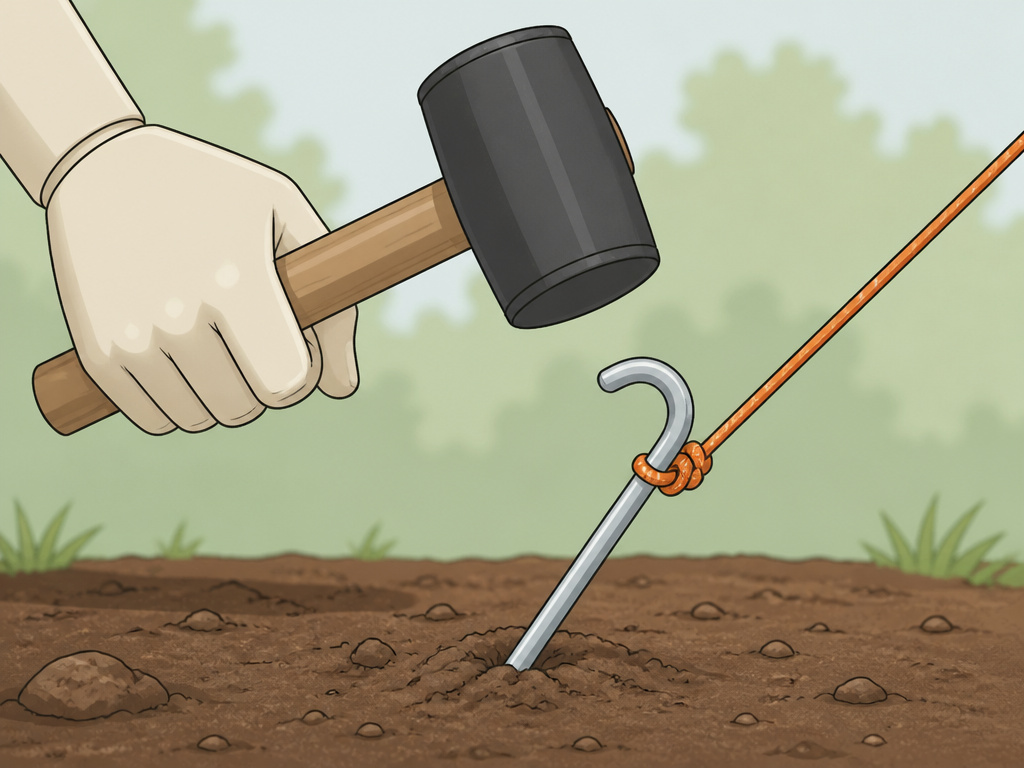
Drive tent pegs at a 45-degree angle away from the tent, with the hook or tie-off loop facing outward. This geometry uses the soil’s shear strength along the peg’s length to resist pull-out force, turning a vertical yank into a lateral hold.
The physics are simple. A straight-down stake relies on friction between the metal and the dirt. A 45-degree stake uses the weight and compaction of the soil above it as a counterweight. When the guy line pulls, it tries to lift the stake. The overlying soil has to be displaced upward first, which takes more force than sliding metal through dirt.
The hook facing out is non-negotiable. If the hook faces the tent, the line can slip off. If it faces the ground, you can’t attach the line. This seems obvious until you’re tired and working in low light.
But the 45-degree rule has one famous exception.
TL;DR: Use a 45-degree angle in most soil. In very soft sand or silt, a vertical stake buried deeper often provides more holding power.
What Happens When You Get the Angle Wrong?
Drive a peg straight down on a windy night. The first strong gust pulls the guy line at a 30- to 45-degree angle relative to the ground.
That force now acts on the top few inches of the stake. It creates a massive bending moment right at the soil surface. The stake doesn’t pull out cleanly. It bends.
Common mistake: Hammering pegs straight down in hard ground, the top 2 inches bend on the first serious gust, and the peg is useless for the rest of the trip.
I learned this on a coastal bluff. The ground was hard-packed clay. I was in a hurry and drove eight pegs straight in. A front rolled in around midnight. The wind hit the rain fly broadside. I heard a sharp ping from one corner, then another. Two pegs had bent over at 90 degrees, their tops now pointing at the tent. The fly sagged, slapped against the inner tent, and let a fine mist of rain inside for the next five hours.
The bend always happens in the same spot: the transition point between the buried shaft and the exposed hook. That’s where the metal is under maximum stress. Once bent, the peg loses almost all its holding power. You can straighten a slight bend with a rock, but a sharp kink weakens the metal. It will bend again more easily.
Matching the Peg to Your Dirt
Tent pegs are not universal. The skinny wire pegs bundled with most tents are a compromise for average grass and loam. They fail everywhere else.
Your soil type dictates the tool.
| Ground Type | Best Peg Type | Why It Works | What Fails |
|---|---|---|---|
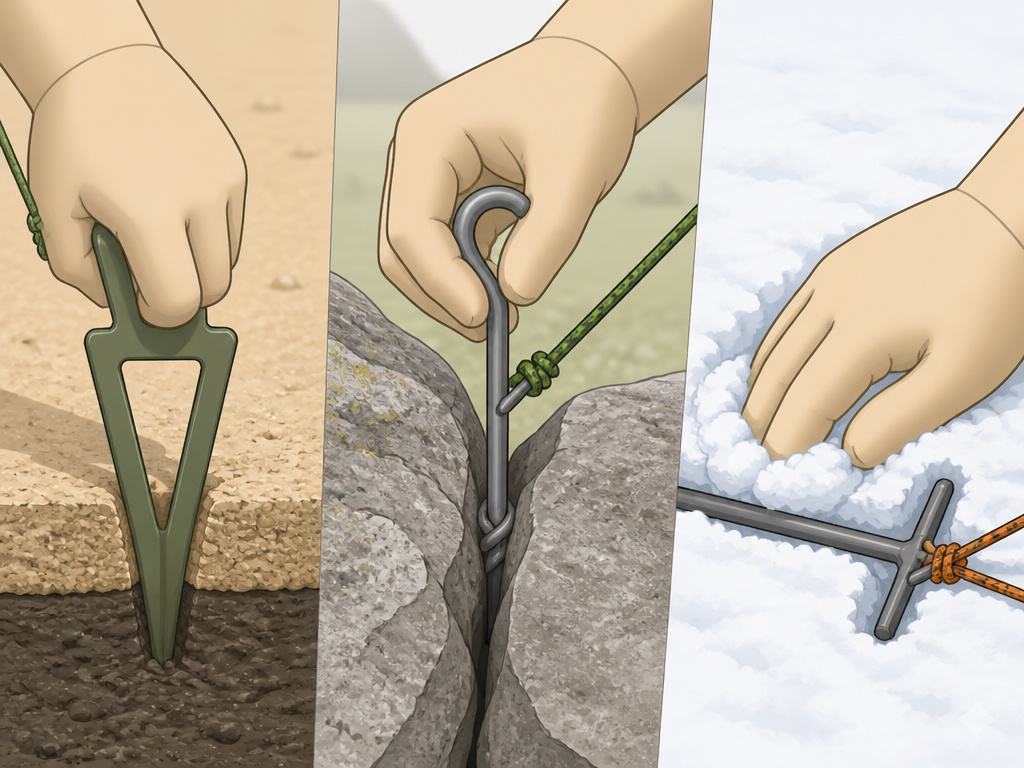
| Soft Sand / Beach | Wide V-shaped (sand peg) or Screw-in | Increased surface area resists pull-out in granular soil. Screw-in types thread into sand like an auger. | Thin shepherd’s hooks pull straight out with zero resistance. |
| Rocky Soil | Thin Shepherd’s Hook (nail peg) | Slim profile fits between stones; can be twisted to find a gap. | V-shaped pegs hit rocks and bend; standard spikes can’t penetrate. |
| Hard Pack / Clay | Heavy-duty Steel Spike (galvanized) | Mass and a sharp point fracture the crust to reach deeper, stable soil. | Lightweight aluminum pegs bend on impact or won’t penetrate. |
| Snow | Long, Wide Snow Stake | Extra length and surface area distribute load in low-density snow. | Any standard peg will pull through like butter. |
The bundled pegs are usually made of thin, coated steel or brittle aluminum. They work for a season on perfect ground. For anything else, upgrade before you leave home. I pick up 10-inch galvanized steel spikes from the hardware store for most car camping. They cost a few dollars each and last for years.
The shape matters as much as the material. A Delta (or dog-leg) peg is designed to always orient its hook toward the tent when installed correctly, and its offset shape provides more rotational resistance. Better pegs have symmetrical V-shaped tips that drive straight without veering off-course. Some include a hook extension, a second notch lower on the shaft, so you can drive the hook into the ground for a second anchor point on critical guylines.
For a deep dive on peg engineering, the Wikipedia entry on tent pegs covers the history and mechanics of these designs.
How Deep Is Deep Enough?
A peg’s holding power comes from the length buried, not the force you used to hammer it.
The rule from The Home Depot’s guide and REI is the same: drive the stake until only the hook or tie-off loop is exposed. For a standard 10-inch peg, that means 8 to 9 inches are in the ground.
Common mistake: Leaving 3-4 inches of peg above ground, the exposed shaft acts as a lever, multiplying the wind’s force on the bend point. The stake fails in half the time.
Why? Soil strength increases with depth. The top few inches are dry, loose, and root-bound. The deeper you go, the more compact and cohesive the soil becomes. A deeply buried peg also engages more surface area along its shaft, increasing friction.
In sandy soil, you might need to bury the entire peg and then some. Use a deadman anchor: tie the guy line to the middle of a spare peg or a stout stick, bury it horizontally a few inches down, and pile rocks on top. The holding power comes from the weight of the sand and rocks above, not the peg’s friction.
Step-by-Step: Securing Your Tent for Real
- Lay out the tent and identify all points. Don’t start hammering. Unfold the tent, locate every grommet and guy-line attachment. Count the pegs you need. This prevents the classic “one peg short” scenario at the last corner.
- Stake the windward corner first. Before you raise the tent, look at the wind direction. Stake the corner that will face the wind. This gives you a fixed point to pull the structure taut against as you erect it. If the tent acts like a sail during setup, you’re fighting it.
- Insert peg at 45 degrees, hook out. Place the tip, angle it away from the tent, and ensure the hook faces outward. For hard ground, use a rock or mallet to start the hole.
- Drive it until only the hook shows. Use firm, controlled blows. If the peg starts to bend, stop. Pull it out, move an inch over, and try again. Hitting a rock dead-on will ruin the peg.
- Attach the guy line or tent loop. For guy lines, use a taut-line hitch or a line-lock. For tent corners, simply loop the webbing over the hook. The connection should be secure but not straining.
- Apply tension, then move to the next point. Pull the line or fabric snug. You should see the tent wall or rain fly tighten slightly. Overtightening can rip seams or deform poles.
- Re-tension after the tent is fully up. Once the tent is pitched and all pegs are in, walk the perimeter. Re-tension each line. The structure will settle, and initial tension will relax.
Skip step 2 and you’ll chase a flapping tent around the site. The windward corner is your anchor. Everything else builds off that stability.
Beating Bad Ground: Sand, Rock, and Snow
The standard playbook fails when the ground isn’t a soft lawn.
For sand or silt, surface tension is a lie. The top layer is loose. Your goal is to get to the wet, compacted sand underneath. Sometimes that’s 6 inches down. A wide V-shaped sand peg provides surface area. A screw-in peg works like a beach umbrella anchor. If you only have skinny pegs, bury them vertically and put a flat rock on top of the buried portion. The rock’s weight adds the holding power the sand lacks.
In rocky ground, finesse beats force. Use a thin shepherd’s hook peg. Probe for gaps between stones with the tip. You can often twist it back and forth to work it deeper. If you hit a solid slab, move the stake point. Don’t hammer. For a truly rocky site, use the rock girth hitch method from the YouTube transcript: loop the guy line around a solid, fist-sized rock, bury the rock, and stake the line down nearby.
For snow, length and surface area are everything. Snow stakes are long and often have fins or a T-shape. Bury them completely. Pack the snow down around them. In deep powder, you may need to create a “deadman” by burying a stick or stuff sack filled with snow perpendicular to the pull.
I won’t recommend the bundled pegs for anything beyond a backyard test. After bending three on a single rocky weekend in Joshua Tree, I swapped to heavy-duty spikes. The difference isn’t subtle.
The Wind and Rain Adjustments Nobody Makes
Pitching in calm weather is one skill. Keeping the pitch through a storm is another.
Wind changes load. A gust hitting the broadside of a rain fly can multiply the tension on two guy lines by a factor of four. If those lines were just “snug,” they’re now loose. The fly flaps, the poles shock-load, and a peg pops.
Stake the windward corner first, then add all guylines before applying final tension. A loose guy line is easier to adjust than a taut one on a flapping tent.
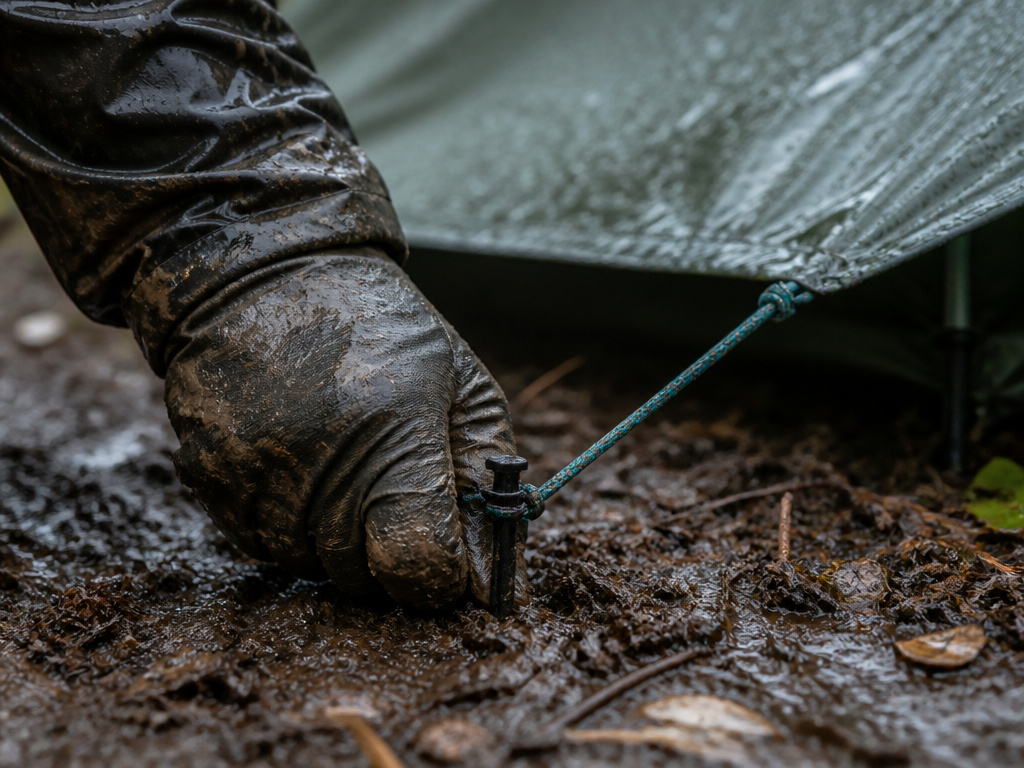
Rain does two things. It softens the ground, reducing friction on your pegs. And it makes nylon or polyester fabric stretch. A fly that was tight at setup will sag after 20 minutes of downpour, creating pockets that collect water and strain seams.
The fix is simple but most campers skip it. After the first heavy rain or a period of strong wind, walk the perimeter. Re-tension every guy line. Push down on any pegs that have loosened in softened soil. This five-minute check is the difference between a dry night and a midnight repair in a storm.
It’s part of a broader set of skills for storm-worthy tent models, where every component from pole geometry to stake type is chosen for severe weather.
Maintaining Your Pegs (Straightening a Bend)
Tent pegs are consumable. But you can extend their life.
After each trip, clean off dried mud. It holds moisture against the metal, speeding up corrosion, especially on cheap coated steel. A quick brush or rinse does it.
Straighten minor bends immediately. Place the bent section on a flat rock or log. Use another rock or the heel of your boot to gently hammer it straight. The goal is to restore the straight line, not to forge new metal. Work slowly.
A peg with a sharp kink or crack is trash. The metal is fatigued and will fail at that spot next time. Replace it. Carrying a few extra heavy-duty spikes in your essential tent camping equipment kit is cheaper than a collapsed tent.
This maintenance habit is as crucial for longevity as knowing how to set up durable canvas tents or selecting the right tent lighting solutions for night.
Frequently Asked Questions
What angle should tent pegs be?
For most soil, use a 45-degree angle away from the tent. In very soft sand or silt, a vertical stake buried deeper can provide better holding power than an angled one near the surface.
How far should you hammer a tent peg in?
Hammer the peg until only the hook or tie-off loop is exposed. For a standard peg, this leaves about 1-2 inches above ground. The goal is to bury the entire shaft for maximum friction and leverage resistance.
Which way should the hook face on a tent peg?
The hook must always face away from the tent, toward the direction the guy line is pulling. This keeps the line securely in the hook and applies force along the peg’s axis, not sideways against it.
Can you use tent pegs on concrete?
No. Tent pegs require soil to grip. For hard surfaces like concrete, asphalt, or wooden decks, you need a freestanding tent or aftermarket weights like sandbags or gallon jugs filled with water to anchor the guy lines.
What are the best tent pegs for sand?
Wide, V-shaped “sand pegs” or screw-in auger-style pegs are best for sand. Their increased surface area resists pull-out in loose, granular soil where skinny pegs fail instantly.
Before You Go
Pegs are the only thing holding your shelter to the planet. Get three things right: the 45-degree angle in most dirt, the depth that buries the shaft, and the peg type that matches your ground. Skip the flimsy ones that come in the bag. Upgrade to spikes for hard ground, screw-ins for sand, and snow stakes for winter.
Remember the windward corner first. Re-tension after rain. And bend a peg back as soon as you see the curve. Your tent doesn’t care about the view. It cares about geometry and soil mechanics. Give it that, and it’ll stand through the night.
