
How to Set Up a Beach Tent That Won’t Fly Away
This post contains affiliate links. As an Amazon Associate, we earn from qualifying purchases.
To set up a beach tent, lay it flat, anchor it with sandbags filled to a 20-pound basketball size, then insert support poles 1-2 feet from the corners before tensioning the structure. Success hinges on matching your technique to the tent model and wind conditions, as a generic approach guarantees a fight with the elements.
I’ve lost count of the tents I’ve seen take flight. It starts with a hopeful flapping, then a sudden lurch, and finally a chaotic cartwheel down the sand. The culprit is never the wind itself, it’s the assumption that beach setup is intuitive.
The truth is, sand is a terrible anchor. Wind is unpredictable. And your tent’s manual contains lifesaving specifics most people never read. After seasons of testing from Camber Sands to the Gower Peninsula, here’s how to pitch a shelter that actually stays put.
Key Takeaways
- Anchor sandbags must be filled to the size and weight of a basketball, roughly 20 pounds. Anything less becomes a projectile in a stiff breeze.
- Pole placement is dynamic: 1-2 feet from corners in calm weather, but 2 feet out and 6 inches in from the stitching when wind picks up.
- Most pop-up and canopy-style beach shelters are not waterproof; packing one away wet invites mold within 48 hours.
- UV degradation is a silent killer. A fabric like the Malamoo Rapid Hub’s 190T polyester with UPF 50+ will still become brittle after a summer of full sun exposure without protectant.
- Never store a tent with poles left telescoped. Salt crystallization can fuse aluminum sections solid, as I learned with a costly Malamoo pole replacement.
Fill anchor bags to the size of a basketball, weighing approximately 20 lbs. Position poles 1-2 ft from corners, and for windy conditions, 2 ft from corners and 6 inches from edge stitching.
Why Does a 20-Pound Sandbag Matter?
The single most common failure point is an underfilled anchor. Your tent’s manual says “fill the sandbags,” but Neso’s setup instructions give the critical metric: a basketball, roughly 20 pounds. This isn’t arbitrary.
Dry, loose sand has almost no shear strength. A light bag skims across its surface when lateral force, wind hitting your tent’s broad side, applies pull. Twenty pounds is the threshold where the bag’s mass, combined with being buried, creates enough displacement and friction to resist. On a breezy day in Brighton, I watched a neighbor’s half-filled bag drag six feet before their pop-up canopy inverted. My own 20-pound anchors didn’t budge.
The right process is non-negotiable:
- Fill your bag at the damp sand near the waterline for better packing.
- Carry the heavy bag back (this is the workout part).
- Attach it securely, threading the toggle through the grommet on the stake loop as shown in the Coleman Road Trip Beach Shade manual.
- Bury it completely. A visible bag is a failing bag.
If your tent uses stakes, the standard 6-inch peg is useless. You need long, broad-surface anchors. My upgrade kit always includes REDCAMP 15-inch screw-in sand anchors. The wide spiral thread grips deep sand that a straight stake would just pull through.
Common mistake: Filling sandbags only halfway, the bag will skid across dry sand after two strong gusts, collapsing the tent onto your belongings.
TL;DR: Twenty pounds of sand per bag, buried fully, transforms your tent from a kite into a stable shelter.
Which Tent Do You Have? Match the Setup to the Model
Treating all beach shelters the same leads to frustration. Each type has a unique anatomy and a specific failure point if you ignore its manual.
Frame Tents (e.g., Coleman Road Trip Beach Shade)
These use a rigid pole structure. The weakness isn’t the frame, it’s assuming the fabric is indestructible. The Coleman manual notes the material meets CPAI-84 flammability standards, but warns that tree sap, bird droppings, or dripping moisture can damage the coating and void that resistance. Never pitch under trees. Assemble the frame on the ground first, then drape the fabric over it. Reversing this order means a ten-minute fight with tangled sleeves.
Hub-Style Tents (e.g., Malamoo Rapid Hub)
These pop open via a central hub. The packed size is long (43.3” for the Malamoo) because poles don’t break down. The failure point is forcing the hub. If it doesn’t snap open easily, a fabric tag is likely caught. Forcing it can snap a plastic joint. Lay it flat, find the obstruction, and clear it.
Pop-Up Canopies (e.g., IAN 96793 model)
These spring open violently from a tight circle. The critical step is gripping the apex firmly when releasing the tension band. Let go wrong, and metal joints hyper-extend, bending the frame permanently. A bent frame means a saggy, unstable roof that no amount of guying will fix.
| Tent Type | Core Setup Principle | Primary Risk of Ignoring It |
|---|---|---|
| Frame Tent | Assemble the rigid pole frame completely before draping the fabric. | Fabric binds on poles, straining seams and risking a torn grommet or panel. |
| Hub-Style Tent | Ensure all fabric is clear of the central hub mechanism before applying pressure to “pop” it open. | A trapped tag or seam can snap a critical plastic joint, rendering the hub useless. |
| Pop-Up Canopy | Maintain a firm grip on the tent’s apex (top center) when releasing the constraining band. | The frame can spring open with uncontrolled force, hyper-extending and permanently bending the joints. |
You know what? I used to think all pop-ups were created equal. Then, on a trip to Northumberland with my @dacia_uk Adventure crew, a friend’s generic IAN model cartwheeled into the surf in a squall my Coleman Road Trip shrugged off. The fixed, aerodynamic frame of a quality shelter simply transfers wind force better. For consistently windy spots, I lean toward wind-resistant tent features over pure convenience.
TL;DR: Find your model’s manual online. The five minutes spent reading it prevents an hour of battling a broken shelter.
What’s Your Strategy When the Wind Swirls?
Forecasts lie. Calm can become swirling 25-mph gusts in minutes. Your standard setup will fail without a wind-specific strategy.
Neso’s instructions for heavy wind are precise: move poles 2 feet from the corners and 6 inches in from the edge stitching. This reduces the “lip” of fabric that acts like a sail and angles the pole to brace the side panel directly, transferring force down into the anchor.
For truly swirling wind, I use three poles even if the tent is designed for two, forming a stable triangle. This “tripod” method has held through erratic North Sea gusts that would have collapsed a standard two-pole setup. If the tent still shudders, the advice is blunt: take poles down and add more sand to the bags. No re-angling compensates for an underweight anchor.
Guy lines are force multipliers when used correctly. The Coleman manual shows a smart method: tie the line to a sandbag, extend it to tension, then bury the bag. For stakes, I use a trucker’s hitch, it cinches down and holds tension as sand shifts. Skip the basic overhand knot; it loosens within an hour.
If the tent is unstable, take poles down and repeat steps with more sand in the bags.
A final sensory tip: listen to your tent. A low hum means it’s shedding wind smoothly. A violent, repetitive flap-snap means a corner is lifting. That sound is a seam starting to tear. Immediately add weight to that corner or adjust the pole.
TL;DR: In wind, move poles out and in, use more anchors than you think you need, and bury bags deeper. Stability is bought with weight, not cleverness.
What Actually Ruins a Beach Tent? (The Silent Killers)
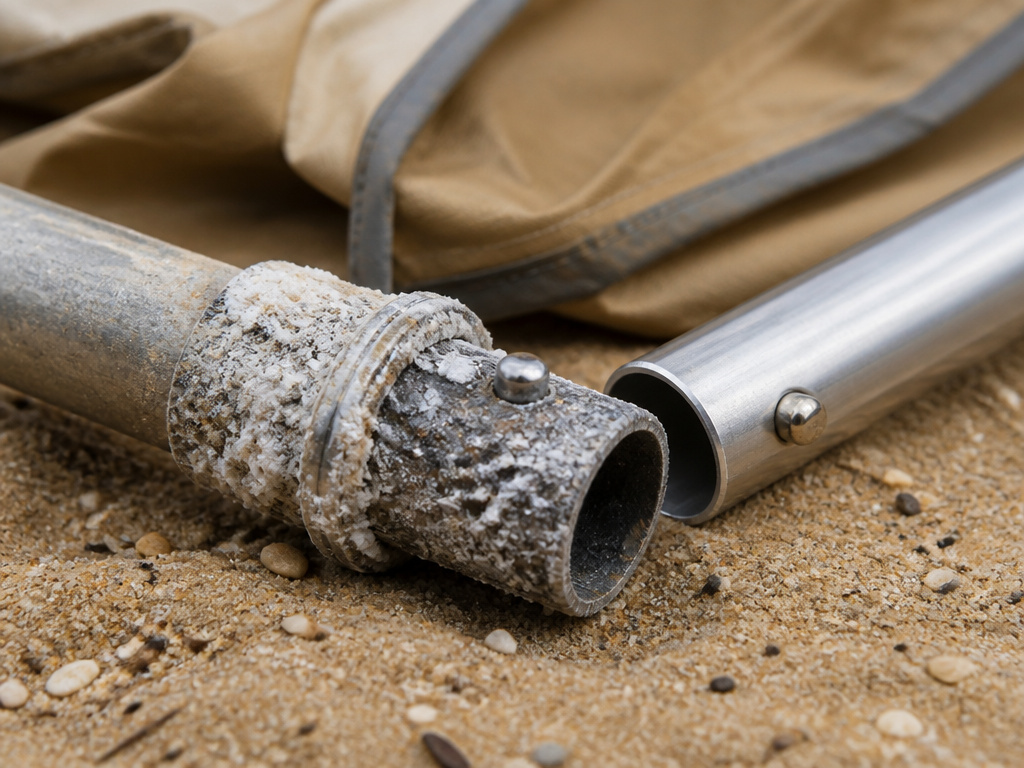
You can repair a torn seam. You cannot fix the three enemies that destroy a tent permanently: embedded moisture, UV degradation, and corrosive storage.
Condensation vs. Leaks
Beads of water inside on a sunny day signal condensation, not a leak. The Coleman manual calls this out: vapor from breath, sweat, or wet clothing hits the cooler fabric and condenses. The fix is ventilation. Open vents and remove wet items. If you see beads, you’ve waited too long, wipe it down before packing.
UV Radiation: The Invisible Breakdown
Prolonged UV exposure breaks down polyester and nylon molecules. The Malamoo Rapid Hub uses 190T polyester with UPF 50+, but that coating degrades. After 90 days of full sun, fabric feels brittle and fades. Its strength is gone. I treat my shelters annually with 303 Aerospace Protectant, a sacrificial UV layer that’s added a full season of life compared to an untreated panel.
Storage: The Final Test
This is where my most expensive lesson lives. Last summer at Camber Sands, I left the poles on my Malamoo collapsed overnight after a damp evening. By morning, salt had begun to crystallize. By the next trip, the aluminum sections were fused solid, a £40 replacement part. Always dry your tent completely, brush off grit, and store poles separately, fully extended.
| Threat | Immediate Symptom | Long-Term Consequence if Ignored |
|---|---|---|
| Condensation | Beads of moisture on the interior fabric, localized damp spots. | Mildew growth and persistent odor can begin within 24 hours of packing the tent away damp. |
| UV Degradation | Fabric fading (often to a greyish-white) and a noticeable stiff, brittle texture. | Significant loss of tensile strength, leading to seam splits or panel tears in moderate wind, typically after one season of heavy use. |
| Salt Corrosion | A gritty, crystalline feel on poles/fabric, and stiff patches near seams. | Metal pole joints seize; fabric coatings delaminate and wear thin, often rendering the tent unusable the following season. |
TL;DR: Dry it thoroughly, protect it from sun, and store it smartly. Damage from these factors is terminal, not repairable.
What Gear Solves Problems Before They Start?
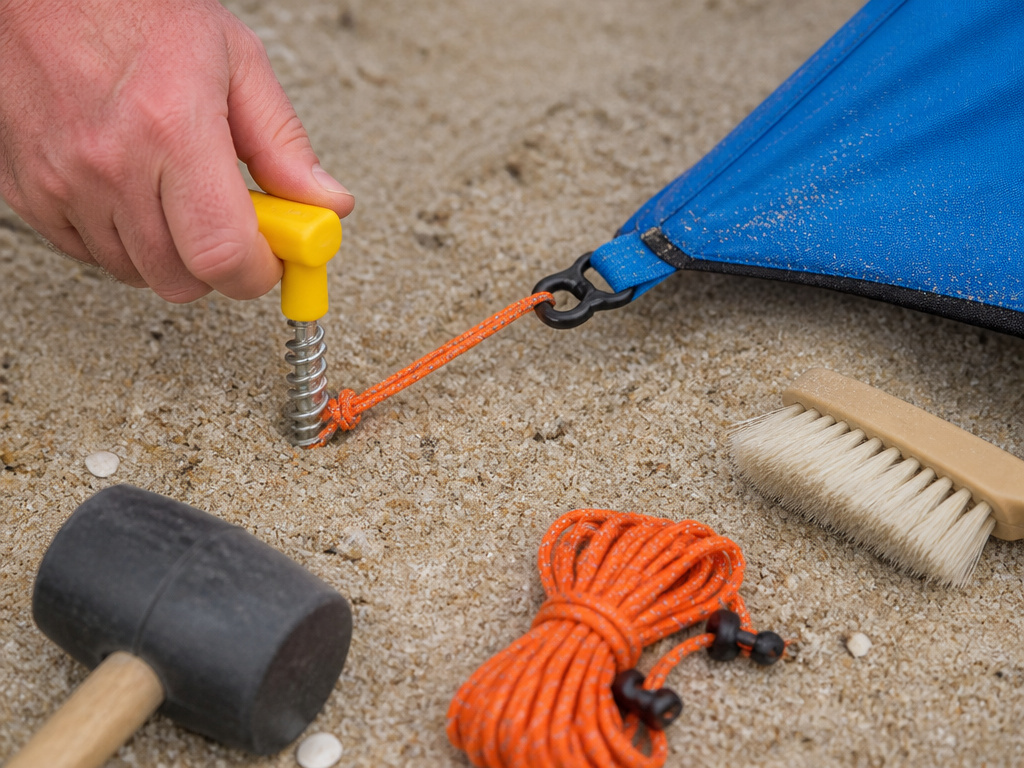
You don’t need a full toolkit. You need the right few items that prevent the most common failures. This list is curated from my own essential tent camping accessories kit.
- A Rubber Mallet. Forget using rocks or your foot. The thud of a rubber mallet driving a stake is satisfyingly firm, and the bounce-back is gentle on your wrists. It won’t damage plastic stake heads or pole tips.
- Extra Guy Line. The included cord is often just long enough. I carry 50 feet of 2.5mm Dyneema “Glowire” from Lawson Equipment. It’s thinner, stronger, doesn’t stretch when wet, and glows at dusk so no one trips.
- Screw-In Sand Anchors. The REDCAMP 15-inch anchors I mentioned earlier are a game-changer for dry, loose sand. The yellow top is easy to grip and twist in, providing hold where straight stakes instantly fail.
- A Soft-Bristle Brush. A cheap paintbrush knocks abrasive sand off the fabric before packing. Those grains act like sandpaper inside your storage bag during the drive home.
If you’re shopping, consider your typical conditions. For family comfort, a spacious car camp tent offers room but demands more anchoring points. If storms are a concern, understanding storm-resistant tent designs is wise. And if budget guides you, there are reliable budget tents under $100, but inspect the pole joints and seams, that’s where cost-cutting shows.
Common mistake: Storing a tent with the poles still telescoped together, salt and moisture trapped between the sections will corrode and fuse the joints, often within a few months, as I discovered the hard way.
TL;DR: This small kit costs less than replacing a single bent pole or torn canopy. It’s the difference between solving a problem on the beach and driving home with a broken shelter.
Frequently Asked Questions
How do you anchor a beach tent with no stakes or sandbags?
In a true pinch, use your gear. Fill tote bags, coolers, or even a bundled-up towel with sand, tie your guy lines to them, and bury them completely. The principle remains: you need weight and displacement. It’s less elegant but can work.
Can you use a beach tent in light rain?
Most are water-resistant, not waterproof. They’ll handle a brief sprinkle, but the Pop-Up Beach Shelter (IAN 96793) manual explicitly states the “material is not permanently waterproof.” Sustained rain will soak through seams. If rain is forecast, take it down.
Why won’t my pop-up beach tent fold back down?
Walk away for 60 seconds. Seriously. The tension in the frame (and in you) needs to reset. Then, find the joint that’s binding, often it’s the one you’re leaning on, and lift it slightly before attempting the figure-eight fold again. Forcing it is how my first Malamoo got a permanent crease.
How do you prevent a beach tent from blowing away when you leave it for a swim?
Use every anchor point. Fill bags to the full 20 pounds, deploy all guy lines, and angle the shelter’s lowest side into the prevailing wind. For extra security, twist screw-in anchors deep into the sand at each corner.
Is a more expensive beach tent worth it?
Often, yes. Investment typically buys better materials (like heavier-duty fabrics), more robust pole joints, and a design refined for stability. It translates to less time wrestling the tent and more time relaxing under it.
What’s the best way to clean sand off a beach tent before packing?
Shake it vigorously first. Then, use a soft brush to sweep the fabric, focusing on seams and folds. Never rub sand in, as it grinds against the coating.
The Bottom Line
Beach setup isn’t about complexity; it’s about respecting physics. Sand is a fluid, wind is a force, and your tent is caught between them. The solution is always weight, placement, and following the model-specific script.
Fill those bags like they’re basketballs. Bury every single one. Move the poles when the breeze stiffens. And never, ever zip a damp tent into its bag for the journey home. These aren’t just tips, they’re the lessons learned from watching shelters fail and from the one that finally held.
Your perfect beach day shouldn’t end with a sprint down the sand. With the right technique, your tent will be the last one standing when the wind picks up. For your next adventure, whether you need a quick pop-up beach tent or a full-height camping tent for the campsite, choosing the right tool is half the battle. Now you know how to use it.
