
How To Repair Tent Rip | The Glue That Failed on Night Two
This post contains affiliate links. As an Amazon Associate, we earn from qualifying purchases.
To repair a tent rip, you need three things: the correct patch material for your tent fabric, the right adhesive, and a clean, dry surface. Match silicone sealant to silicone-coated nylon and polyurethane sealant to PU-coated fabrics. A proper patch extends at least one inch beyond the tear and cures for a full day before facing rain.
Most people grab the first roll of duct tape they see. It sticks for an afternoon. Then the first night of condensation loosens the adhesive, the patch peels at 3 AM, and you’re mopping up a puddle with your spare socks. The fix isn’t about stopping the tear. It’s about surviving the next storm.
Here is how to match your repair to your tent’s material and the tear’s location, with the steps that keep the patch on through wind, sun, and rain.
Key Takeaways
- Glue beats tape for longevity. Fabric glue forms a flexible, permanent bond; most tapes fail after a few temperature cycles.
- Sealant type is non-negotiable. Silicone sealant (like McNett SilNet) only bonds to silicone-coated fabric. Polyurethane sealant (like Gear Aid Seam Grip) is for everything else.
- Reinforce high-stress tears. A rip near a pole or guy-line point needs a patch on both sides, or it will reopen under tension.
- Let it cure for 24 hours. Rushing the process is the most common reason repairs fail. No rain tests until the next day.
- A pole sleeve is a field fix, not a forever solution. It gets you through the trip but can prevent the pole from folding neatly later.
The 4-Step Patch Process That Actually Sticks
Clean the area first. Any dirt, oil, or old waterproofing residue will break the adhesive bond. Use a cloth soaked in rubbing alcohol. Scrub until the cloth comes away clean. Let the spot dry completely. A damp patch won’t stick.
Cut your patch material at least one inch larger than the tear on every side. Round the corners with your scissors. Sharp corners catch on stuff sacks and peel up. For small holes, pre-cut repair tape like Gear Aid Tenacious Tape works. For larger rips or durable canvas tents, you need a scrap of matching fabric.
Apply adhesive to both the patch and the tent fabric, not just one surface. Fabric glue manufacturers specify this for a reason — the double coat creates a chemical bond that survives flexing. A single-sided application just sits on the surface and cracks apart.
Press the patch down firmly, starting from the center and working out to the edges to push out air bubbles. Burnish the surface with the back of a spoon. Then walk away for a full 24 hours. Do not pack the tent. Do not test it with a spray bottle after two hours. The glue needs a full day to reach its maximum strength.
TL;DR: Clean with alcohol, cut a big round patch, glue both sides, and wait a full day before you call it done.
Which Glue or Tape Holds in the Rain?
Your adhesive choice decides whether the repair lasts one trip or ten. The wrong pick fails predictably.
Duct tape is a terrible idea. The adhesive dissolves in sunlight and turns gummy in heat. After a single day in direct sun, it will slide right off your rainfly. Electrical tape has no UV resistance and shrinks. Gorilla Tape is stronger, but its thick adhesive doesn’t breathe, trapping moisture that rots the fabric underneath within a season.
Fabric-specific repair tapes are better. Gear Aid Tenacious Tape and Tear-Aid Type B have acrylic adhesives designed for outdoor fabrics. They stay flexible from freezing to about 80°C. Tenacious Tape is best for nylon and polyester. Tear-Aid Type B is formulated for vinyl, PVC, and polyurethane coatings, common on affordable tent models. The limitation is size. For tears longer than six inches, a sewn or glued fabric patch is more reliable.
Fabric glue creates the most permanent bond. It soaks into the fabric fibers and cures flexible. Use it with a spare piece of tent fabric for large repairs. The best options are clear, waterproof, and remain flexible when cold. Apply it in a thin, even layer on both surfaces. The dry time is the trade-off.
| Adhesive | Best For | Field-Friendly? | Risk If Wrong |
|---|---|---|---|
| Gear Aid Tenacious Tape | Small punctures, nylon/polyester | Yes, instant | Peels in heat >30°C on silicone fabric |
| Tear-Aid Type B | Vinyl floors, PU-coated fabrics | Yes, instant | Won’t adhere to silicone coatings |
| Fabric Glue + Patch | Large rips, high-stress areas | No, 24-hr cure | Can stiffen fabric if applied too thick |
| McNett SilNet Seam Sealer | Sealing edges on silicone-coated fabric | Semi, 4-hr touch-dry | Beads up and fails on PU fabrics |
When a Simple Patch Isn’t Enough
Some tears need more than a sticker. If the rip is in a high-tension spot — right next to a pole sleeve, a guy-line attachment, or a zipper — the patch will experience constant pulling. A single exterior patch will fatigue at the edges and reopen.
The fix is a double-sided repair. Apply one patch to the outside, following the standard process. Then apply a second, slightly larger patch to the inside of the tent wall. This sandwiches the torn fabric. The inner patch distributes the stress over a wider area. This technique is critical for high-wind resistant tents where panel tension is extreme.
Common mistake: Patching only the outside of a tear near a pole sleeve — the constant flapping motion will work the patch edges loose within three or four pitches, and the tear will propagate.
Another complex case is a split seam. If the threads are ripped but the fabric is intact, you need needle and thread. Use a heavy-duty nylon thread and a curved upholstery needle. Do a simple backstitch along the original seam line. After sewing, you must seal the new stitches. If you skip this, water will wick through the needle holes. Apply a bead of the correct seam sealer over the stitching and let it cure.
Silicone vs. Polyurethane: The Sealant Rule You Can’t Break
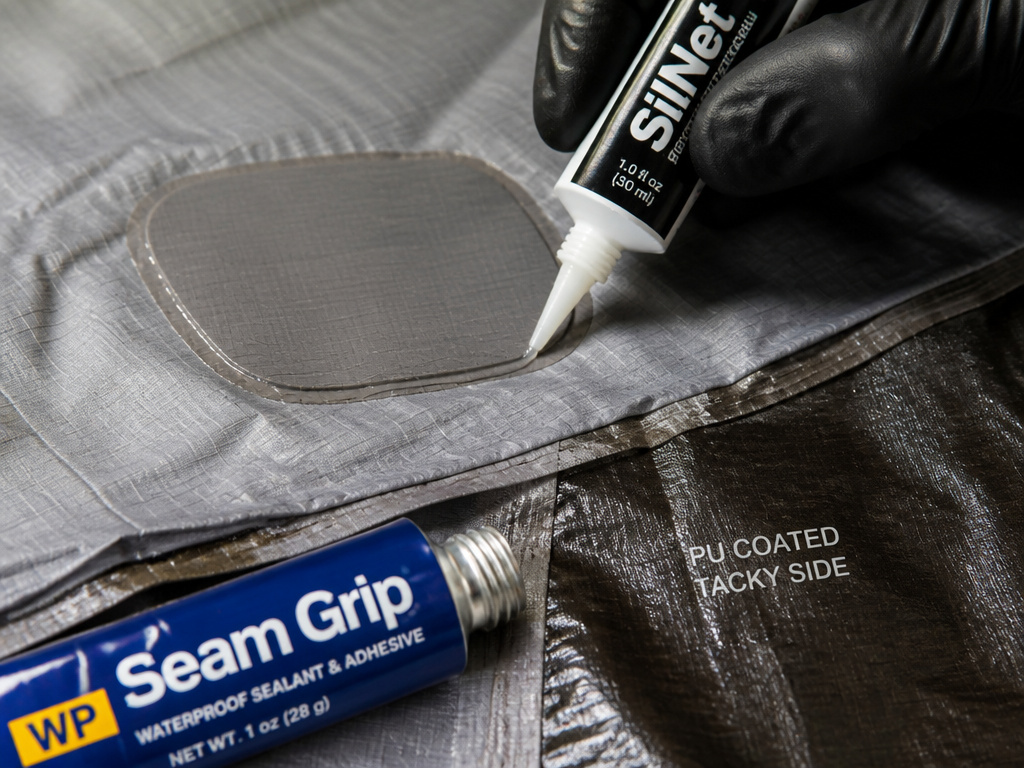
This is the most frequent point of failure. Using the wrong sealant guarantees a leak.
Tent fabrics have a waterproof coating. Two types dominate: Silicone (often called “silnylon” or “silpoly”) and Polyurethane (PU). You identify them by touch. Silicone-coated fabric feels slick and almost dry. Polyurethane-coated fabric feels slightly tacky or rubbery.
Silicone sealant, like McNett SilNet, only chemically bonds to silicone coatings. It beads up and slides off polyurethane. Polyurethane sealant, like Gear Aid Seam Grip, bonds to PU coatings, vinyl, and most other materials, but it will not properly adhere to silicone. Applying PU sealant over silicone is like spreading butter on Teflon. It just sits there and rubs off.
| Fabric Type | Touch Test | Correct Sealant | Wrong Sealant Consequence |
|---|---|---|---|
| Silicone-coated Nylon | Slick, dry, lustrous sheen | McNett SilNet | Sealant rubs off; repair leaks immediately |
| Polyurethane-coated Polyester | Slightly tacky, matte finish | Gear Aid Seam Grip | Sealant never fully cures; stays sticky |
| Canvas (waxed or treated) | Rough, thick, waxy feel | Wax re-treatment or PU sealant | Silicone won’t penetrate; water soaks through |
After patching, you often need to seal the patch’s edges to restore waterproofing. Apply a thin bead of the correct sealant around the perimeter. Smooth it with a gloved finger. The cure time is crucial. It may feel dry in a few hours, but full waterproofing takes at least 12. Plan accordingly. This is a key step when repairing tents for heavy rain.
Fixing Broken Poles and Stuck Zippers
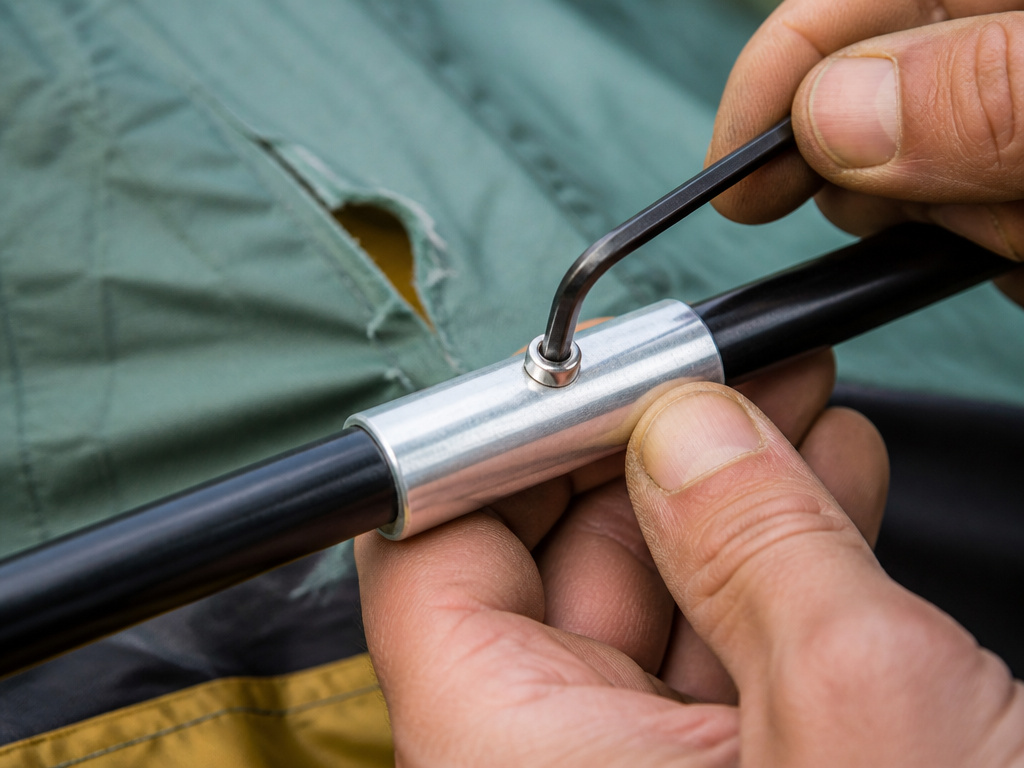
Poles snap. The field repair is a pole repair sleeve. This is a hollow aluminum tube that slides over the broken section. You need to match the diameter. The sleeve should be just slightly larger than your pole so it doesn’t move around too much. Slide it over the break and tighten the included set screws.
It works. I’ve used one after a wind gust snapped a segment on a Colorado ridge. It got the tent up for two more nights. But it’s a temporary fix. The sleeve makes that pole segment rigid, so it won’t fold into the pole bag without removing the sleeve each time. It also adds a pressure point that can stress the adjacent segments.
A pole sleeve gets you through the trip. When you get home, order the exact replacement section from the tent manufacturer. Riding home with the sleeve still on often bends the pole ends.
Zippers stick for two reasons. The first is fabric caught in the teeth. Gently work it free. The second is dirt or sand in the slider. For this, you need a lubricant. Do not use WD-40. It attracts more dirt. Use a dry silicone lubricant or a graphite pencil. Run the pencil tip along the zipper teeth, then work the slider back and forth. For a zipper that separates completely, check if the slider is damaged. A bent slider will never work correctly and must be replaced. Keeping a small repair kit with these items is part of smart tent camping equipment planning.
What Your Repair Kit Must Have
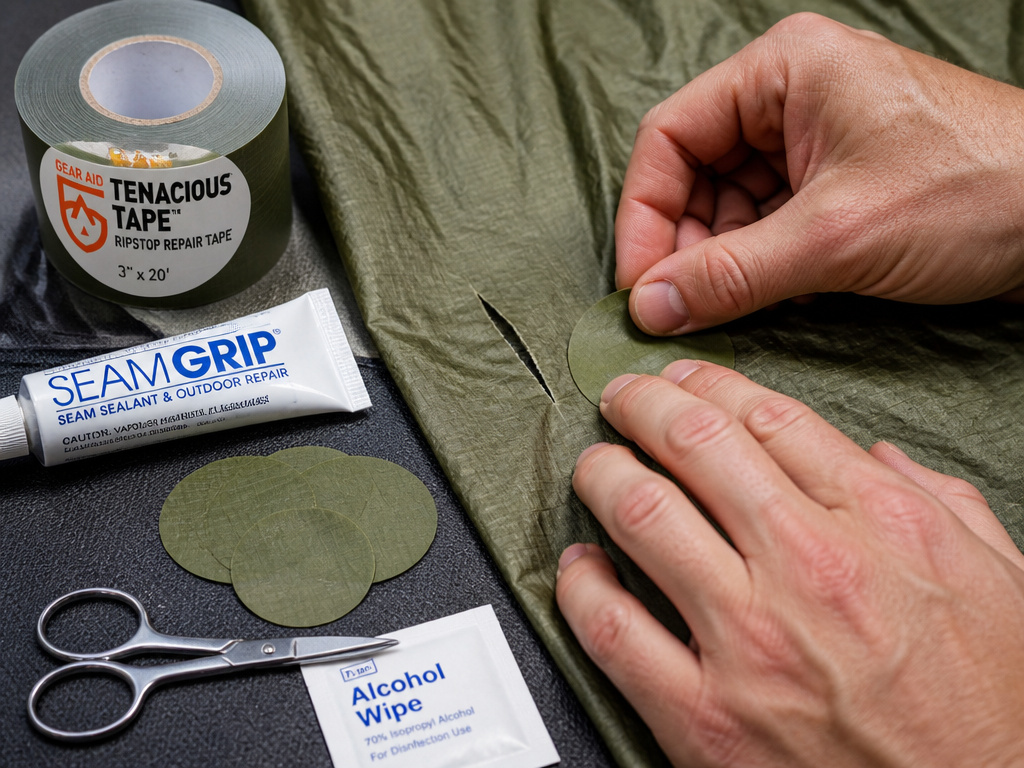
You can fix almost anything in the field with a small, curated kit. Don’t just throw random tape in a bag.
Essential Items:
- Gear Aid Tenacious Tape: Multiple colors and sizes. For instant nylon/polyester patches.
- Tear-Aid Type B: For tent floors and any vinyl/PU surfaces.
- Small tube of McNett SilNet: For silicone fabric seams and patch edges.
- Small tube of Gear Aid Seam Grip: For everything else.
- Pre-cut repair patches: Several round patches in various sizes.
- Alcohol wipes: For cleaning surfaces before repair.
- Mini scissors: Sharp, small scissors for cutting tape and trimming threads.
Nice-to-Haves:
- Pole repair sleeve: Match it to your tent pole diameter.
- Spare zipper slider: Know your zipper size (#5, #8, #10).
- Curved needle and heavy-duty thread: For seam repairs.
- Small piece of spare tent fabric: For major panel repairs.
Assembling this kit is more valuable than buying the latest tent camping accessories. It turns a trip-ending disaster into a 20-minute delay. Store it in a ziplock bag at the top of your pack.
Frequently Asked Questions
Can you use duct tape to repair a tent?
You can, but you shouldn’t. Duct tape adhesive breaks down under UV light and heat. It will lose its grip after a day or two of sun exposure, often at the worst possible moment. It also leaves a horrible sticky residue that is difficult to remove later.
How long does tent repair glue take to dry?
Fabric glue is often dry to the touch in 2-4 hours. However, full curing and maximum waterproof strength takes 24 hours. Do not expose the repair to rain or pack the tent away until a full day has passed.
Can you repair a tent mesh?
Yes. Use a specific mesh repair patch, which is a soft, flexible nylon mesh with adhesive backing. Cut a patch larger than the hole, apply it to one side, and burnish it well. For large mesh tears, you may need to sew the edges first before applying the patch.
How do you fix a leaking tent seam?
First, clean the seam thoroughly with rubbing alcohol and let it dry. Then apply a bead of the correct seam sealer (silicone for silicone-coated fabric, polyurethane for PU-coated) directly over the leaking stitches. Smooth it with a gloved finger and allow at least 12 hours to cure fully before testing with water.
Is it worth repairing an old tent?
It depends on the fabric’s overall condition. If the rip is isolated but the rest of the tent’s waterproof coating is intact and the poles are sound, a repair is cost-effective. If the fabric is brittle all over, the waterproof coating is flaking off, and multiple poles are damaged, it’s likely time to replace it. Repairing budget-friendly tents is often worthwhile to extend their life.
The Bottom Line
A good tent repair doesn’t look pretty. It looks functional and slightly rugged. The goal is to restore integrity, not aesthetics. Match your materials: tape for small holes, glue and fabric for big rips, silicone sealant for slick fabrics, polyurethane for tacky ones. Give every adhesive the full cure time it demands.
That patched spot will be a weak point forever. Treat it gently when packing. But with the right process, it will hold. It will get you through the next downpour, the next gust of wind, and the next season of weekends under the trees. Then you can focus on the important stuff, like whether the coffee water is boiling yet.
