
How to Make a Name Tent & Avoid the Common Cardstock Mistake
This post contains affiliate links. As an Amazon Associate, we earn from qualifying purchases.
You make a name tent by printing your text on a sheet of heavy cardstock, cutting it in half, and folding each piece precisely in half to create a self-standing display. The critical detail everyone misses is the paper weight: standard 20lb printer paper will flop forward on the table every time.
Most tutorials focus on the software steps in Word or Google Docs. They skip the part where you print on flimsy paper, watch the tent sag, and spend the rest of the event nudging it upright. The tent fails before the first handshake.
This guide covers the physical build that actually works—cardstock choices, printer settings that don’t jam, and reinforcements for windy rooms. We’ll run through the software methods in Word and Google Docs, but the real focus is on the craft table, not the computer screen.
Key Takeaways
- Use 65lb or 110lb cardstock. Standard 20lb paper is too flimsy and will not stand.
- Test a single sheet in your printer first. Heavy paper can jam, and inkjet ink needs time to dry.
- Set your document to landscape orientation with 0.5-inch margins for maximum printable space.
- A font size of 36pt or larger is the minimum for readability from across a table.
- For outdoor events or slippery surfaces, add a strip of clear packing tape along the inside fold or use adhesive putty on the base.
The Cardstock Mistake That Flops Every Time
The paper is the foundation. Get this wrong and nothing else matters.
Standard 20lb copy paper is designed for documents, not structures. A name tent cut from it might stand for a minute on a perfectly level surface. Add a slight table tilt, a breeze from the HVAC, or the vibration of someone placing a coffee cup, and it folds. It’s a subtle failure—the tent doesn’t collapse, it just leans forward until the text faces the tablecloth.
65lb cardstock is the baseline. It has enough rigidity to hold a crisp 90-degree fold. 110lb cardstock is better for outdoor events or situations where the tent might be handled repeatedly. Thicker than 110lb and most home printers will struggle to feed it, leading to jams.
Common mistake: Using standard printer paper for name tents — the tent will sag within five minutes on anything but a perfectly level, static surface, forcing constant readjustment.
You must test your specific printer. Load one sheet of your chosen cardstock into the manual feed tray, if your printer has one. Print a simple test page. Listen for grinding or hesitation. If the sheet feeds through cleanly, you’re good. If it jams, your printer might top out at 65lb. Some older inkjets also lay down wet ink that can smear on glossy cardstock unless you let it dry fully.
TL;DR: 65lb cardstock is the minimum weight for a tent that stands. Test one sheet in your printer first to avoid jams.
Software Smackdown: Word vs. Google Docs
You have two real options for a clean template. Online generators are a third, but they lock you into their layouts.
Microsoft Word gives you pixel-level control. You set the exact table dimensions, cell padding, and font positioning. The trade-off is more steps. Google Docs is faster for collaboration and has built-in template access, but fine-tuning dimensions is clunkier.
For a one-off event where you just need a dozen tents and don’t care about perfect alignment, the UD5 Name Tent Generator works. You type names into a web form, it generates a PDF. The downside is you’re stuck with their font and layout choices. If you need a specific corporate typeface or branding colors, it won’t work.
| Software | Best For | Biggest Limitation |
|---|---|---|
| Microsoft Word | Precision control, brand compliance, high-volume batch printing | Steeper learning curve for table and text box formatting |
| Google Docs | Quick collaboration, using pre-made templates, speed over precision | Difficult to set exact cell dimensions; relies on template defaults |
| Online Generator (e.g., UD5) | One-click PDFs for simple, one-off events | No customization of fonts, colors, or layout; output quality varies |
Your choice depends on control versus speed. Word wins on control. Google Docs wins on speed. The online generator is for when you have five minutes and zero design requirements.
Step-by-Step: Microsoft Word Method
Open a new, blank document. This is where most people open a template and fight it. Start from zero.
First, change the page layout. Go to the Layout tab (or Page Layout in older versions). Click Orientation and select Landscape. Click Margins and select Narrow (this sets 0.5-inch margins on all sides). These two changes give you the maximum printable area for your two tents.
Now, insert a table. Go to Insert > Table and create a table with 1 row and 2 columns. This table will become your two tents side-by-side on one sheet.
Here are the precise dimensions that most guides get wrong. Click the table selector (the small square at the top-left corner of the table) to select the entire table. Right-click and choose Table Properties. Under the Row tab, check “Specify height” and set it to 4.25 inches. This is half the height of a letter-size page in landscape, minus the margins. Under the Column tab, set the width for each column to 5.5 inches. This centers your content.
To create two name tents on one letter-sized sheet in landscape orientation, set the table row height to 4.25 inches and each column width to 5.5 inches. This maximizes the printable area within standard 0.5-inch margins.
Type the attendee’s name into the left cell. Use a clean, bold font. Arial Black, Calibri, or Gill Sans MT work well. Set the font size to 36pt or larger. This is not a suggestion. Anything smaller becomes hard to read from three feet away.
Center the text both horizontally and vertically. For horizontal centering, use the standard center-align button. For vertical centering, go to the Layout tab under Table Tools, find the Alignment section, and click the “Center Vertically” icon (it looks like lines centered in a box).
Copy the entire left cell, including its formatting. Click inside the left cell, use the table selector to highlight the cell contents, and copy (Ctrl+C). Click into the right cell and paste (Ctrl+V). Now you have two identical panels on one sheet.
Print a test page on regular paper first. Check the alignment and that the fold line will be exactly between the two panels. Only when it looks right do you load your 65lb cardstock.
TL;DR: Set page to landscape with narrow margins. Insert a 1×2 table, set row height to 4.25″ and column width to 5.5″. Use 36pt+ font, center text vertically and horizontally, copy/paste between cells, print a test first.
The Google Docs Shortcut (And Its Limits)
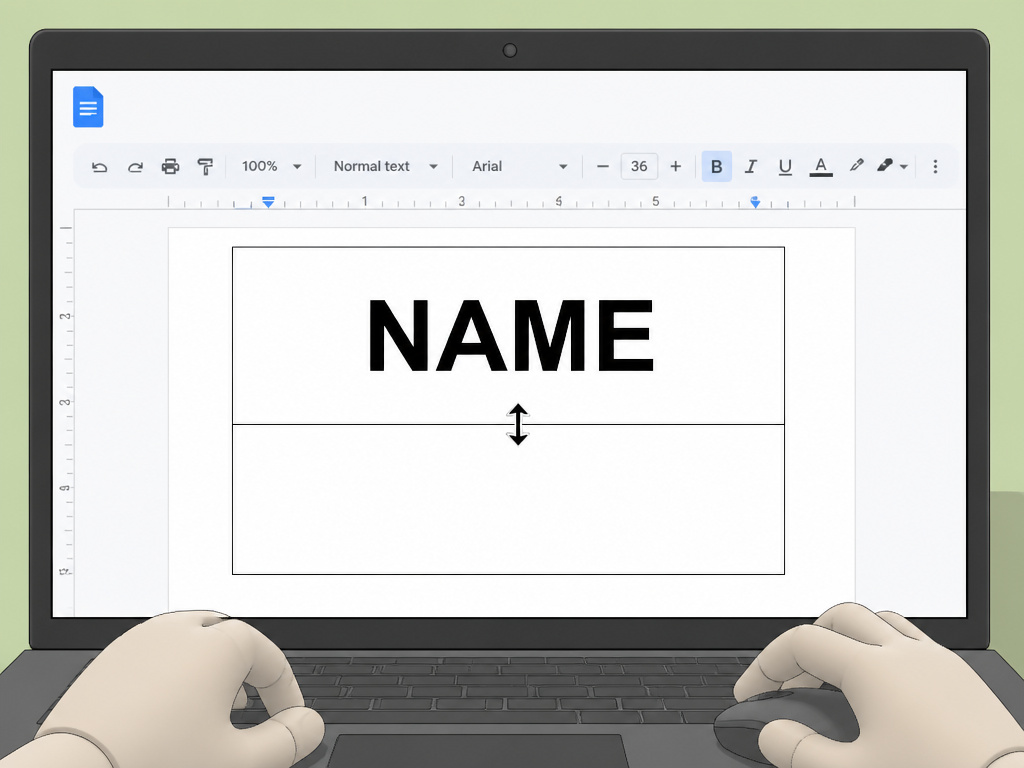
Open Google Docs and start a new document. The first step is the same: go to File > Page setup. Set Orientation to Landscape and Margins to 0.5 in on all sides.
Google Docs doesn’t have native table height control like Word. You have two paths here. The first is to use a built-in template. Click Template Gallery (usually visible on the docs.google.com homepage). Search for “name tent”. You’ll find several basic designs. They work, but you’re locked into their layout and font choices.
The second path is to manually create a two-column layout using a table, just like in Word. Insert > Table > 1×2. The problem is you can’t set an exact row height in inches. You must eyeball it by dragging the bottom border of the row until it looks like it fills about half the page. Use the ruler guides to estimate.
Type your name into the first cell. Format the text: a bold font like Arimo or Roboto, size 36pt or larger. Use the alignment buttons to center the text horizontally. Vertical centering is trickier; you may need to add line breaks above and below the text to push it toward the middle of the cell.
Copy the first cell, paste into the second. The formatting should carry over.
The real advantage of Google Docs is sharing and collaboration. You can share the document with an event organizer or assistant, and they can fill in names directly on their own device. For a large conference where multiple people are managing the list, this beats emailing a Word file back and forth.
I built a 150-person conference set in Google Docs once. Three of us edited the same document from different hotels the night before. It saved hours, but the printed tents weren’t as uniformly aligned as the Word batch. That’s the trade.
Printing, Cutting, and the One Fold That Matters
Your document is ready. Your cardstock is loaded. Hit print. If you’re using an inkjet printer with heavy paper, let the sheet sit for a full minute after it exits. The ink needs to dry, or it will smudge when you handle it.
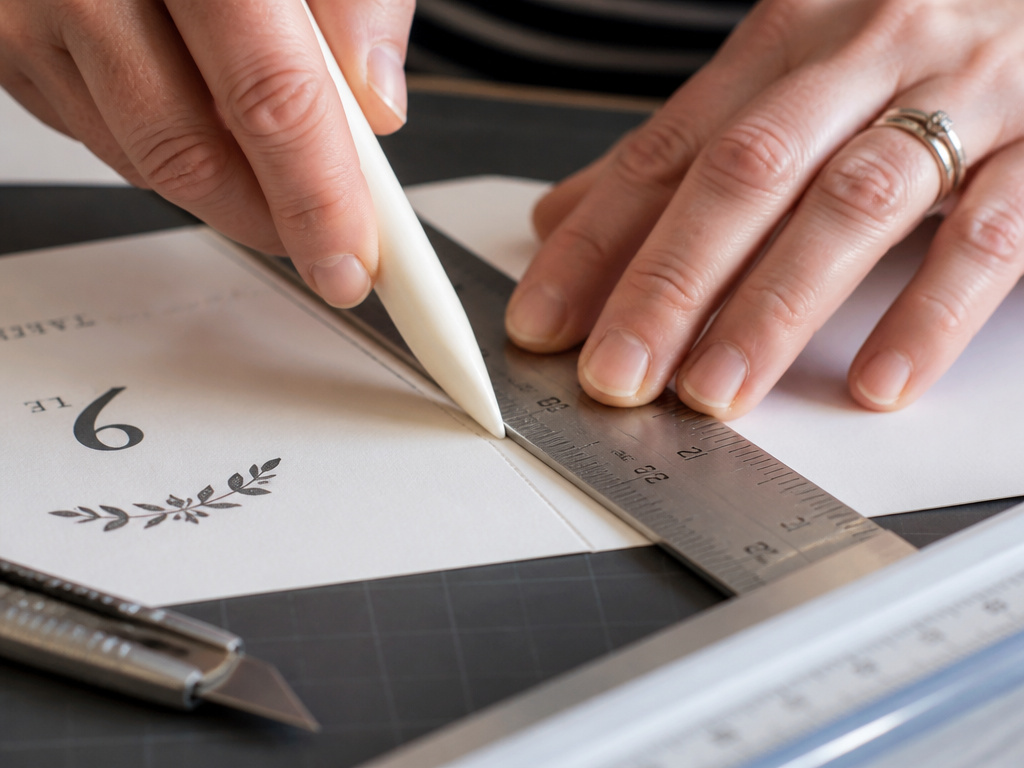
Grab a metal ruler and a sharp utility blade or a paper cutter. A paper cutter gives you a perfectly straight edge every time. Scissors introduce wobble. Cut along the vertical center line of your page to separate the two tents. You should now have two identical rectangles.
This is the critical moment. Find the exact midpoint of the long side of one rectangle. Use a ruler to measure and make a light pencil mark. Place a bone folder or the dull back of a butter knife along that line. Press down firmly and drag it along the line to score the cardstock. Do not fold it yet.
Scoring creates a weak point in the fibers so the cardstock folds crisply along the intended line, not somewhere random. If you skip scoring, the fold will be ragged and the tent may not stand straight.
Now fold the piece precisely in half along the score line, bringing the two printed sides together. Press the fold flat with your fingers or the bone folder. The goal is a sharp, 90-degree crease. A rounded fold makes the tent rock.
Repeat for the second piece.
Reinforcements for Real-World Conditions
A bare cardstock tent works on a dry, level conference table. Real events are messier.
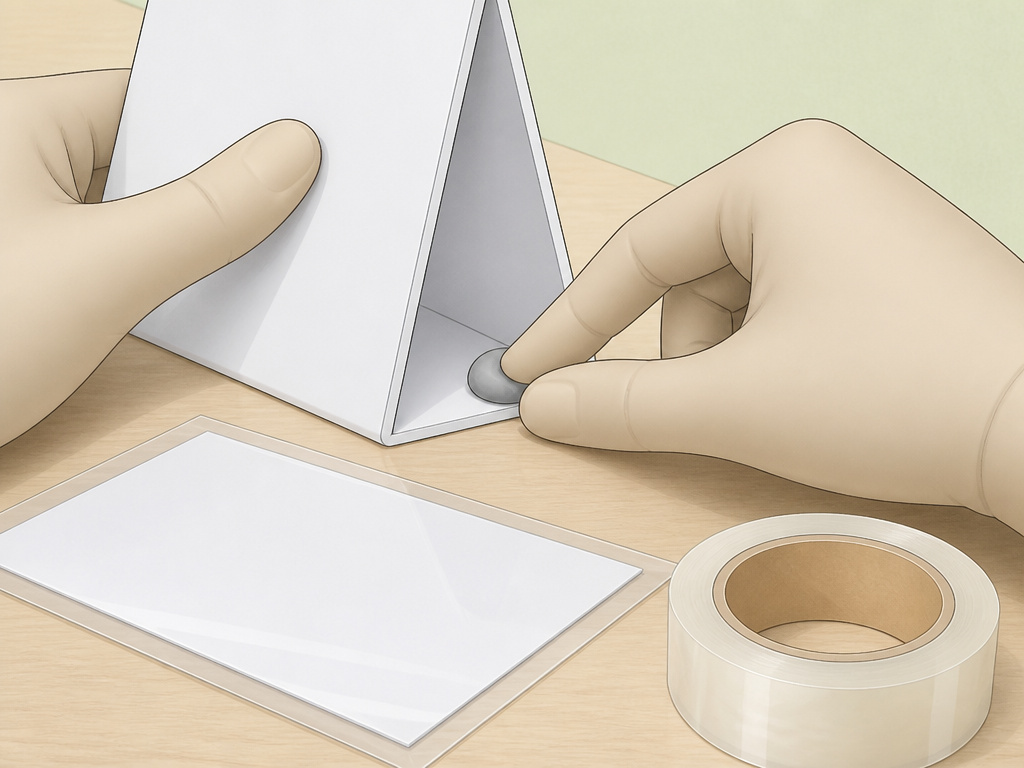
For outdoor events or windy indoor halls, the tent needs ballast. Cut a 1-inch wide strip from scrap cardstock. Fold it into a narrow “U” shape and tape it to the inside bottom edge of your tent, creating a wider base. It’s ugly but effective.
A cleaner solution is adhesive putty. A pea-sized blob pressed onto the bottom inside corner of each leg adds enough grip to resist a casual bump or a breeze from an open door.
For spills and reuse, laminate. Run the full, uncut sheet through a laminating pouch before you cut and fold. The plastic adds rigidity and makes the tent wipeable. If you don’t have a laminator, clear packing tape applied smoothly over the entire printed surface works almost as well. Seal the edges.
Common mistake: Laminating after cutting and folding — the sealed edges prevent a crisp fold and create a bulky seam that makes the tent rock on the table. Always laminate the flat sheet first.
Consider accessibility. High contrast (black text on bright white or yellow) is easier to read for people with low vision. Avoid script fonts. Stick to simple, bold sans-serif typefaces. If you’re handwriting names, use a broad-tip black marker, not a fine-point pen.
TL;DR: Score before folding for a crisp edge. Use adhesive putty on the base for windy rooms. Laminate the full sheet before cutting for spill-proof, reusable tents.
Why Your Event Needs Name Tents (And When to Skip Them)
Name tents are a social lubricant. They eliminate the awkward “I forgot your name” moment five minutes into a conversation. In meetings, they help remote participants on video calls identify speakers. For training sessions, they let the facilitator call on people by name, increasing engagement.
They’re not just for corporate events. A family reunion with distant cousins, a wedding reception with two sides of the family, a large dinner party—anywhere people might not know each other’s names benefits from a simple tent on the table.
But there are times to skip them. A very small, intimate gathering where everyone knows each other makes them redundant. A standing cocktail hour with no tables has no place for them. An event with a highly mobile audience, like a trade show floor, is wrong for table tents.
For large, multi-day conferences, consider reusable tents with insertable cards. You print the generic tent structure once on thick, laminated stock. Then you print attendee names on slips of cardstock that slide into a sleeve on the tent. It’s more upfront work but saves material and allows for last-minute changes.
Whether you’re organizing a casual meet-up or a formal conference, having the right tent camping accessories on hand, like a good light source, can enhance any group setting. The same principle of preparation applies to your tent camping equipment checklist—knowing what you need and how to use it prevents problems on the day.
Design Choices That Actually Work
Keep it simple. A name tent has one job: display a name clearly from a few feet away.
Font choice is everything. Fancy script fonts fail at distance. Stick to bold, sans-serif fonts like Arial Black, Calibri, Gill Sans, or Roboto. If you must use a serif font, make it something chunky like Rockwell. Font size is non-negotiable. 36pt is the absolute minimum. For larger tables or rooms with lower light, go to 48pt or even 72pt. The name should be the largest element on the tent.
Color contrast is next. Black text on a white or bright yellow background offers the highest legibility. White text on a dark blue or black background can look sleek but is harder to read in dim light. Avoid light grey text on white.
Graphics and logos should be small and placed in the corners or below the name. They should never compete with the name for attention. If you’re adding a company logo, keep it to a maximum height of about 0.5 inches.
For a professional look, align everything to a grid. The name should be centered both horizontally and vertically in its panel. If you have a logo and a title (e.g., “Jane Smith / Project Manager”), center the block of text as a whole.
Just as the right tent lighting is crucial for atmosphere and function at a campsite, the right visual design is crucial for a name tent’s function. It’s not about being flashy; it’s about being seen. Similarly, choosing a pop-up beach tent prioritizes quick, reliable function over complex setup—the same philosophy applies here.
Troubleshooting Floppy, Crooked, or Unreadable Tents
The tent won’t stand. This is almost always the paper. If you used 65lb cardstock and it’s still flopping, the fold is likely rounded, not sharp. Re-fold it along the same crease, but this time press it firmly against the edge of a table to get a true 90-degree angle. If it persists, your cardstock might be lower quality or have a grain direction that fights the fold. Try a different brand.
The text is blurry or pixelated. You likely designed the template in a low resolution or stretched a small image. In Word or Docs, always use text boxes or table cells for text, not embedded images of text. Set the font size using the font menu, not by dragging a text box corner, which scales pixels.
The printer jams with cardstock. You’re probably loading it into the standard tray. Most printers have a manual feed slot or a straight-through path for heavy paper. Consult your printer manual. Also, fan the stack of cardstock before loading to prevent sheets sticking together. If you’re looking for gear that performs reliably under specific conditions, the principles are the same whether it’s a printer handling cardstock or a wind-resistant beach tent handling a breeze.
The ink smears. This is common with inkjet printers on glossy or coated cardstock. After printing, let the sheet dry completely—lay it flat for several minutes. For high-volume jobs, consider a laser printer, which uses dry toner that doesn’t smudge.
The tents rock on the table. The bottom edge isn’t cut straight. Use a paper cutter, not scissors. If they still rock, the floor surface might be uneven. Add small self-adhesive felt pads to the two bottom corners.
For events where environmental conditions are a factor, just as you’d choose a stand-up tent for comfort in camp, choose your name tent materials for stability in the event space. Sometimes the simplest solution, like a dab of adhesive putty, is the most effective.
Frequently Asked Questions
What is the best paper weight for name tents?
65lb cardstock is the reliable standard. It’s thick enough to stand firmly but thin enough to feed through most home printers. 110lb cardstock offers more rigidity for outdoor or high-handling events but may jam in some printers. Always test a single sheet first.
Can I make name tents with Google Docs?
Yes. Set the page to landscape with 0.5-inch margins. Use a 1×2 table to create two panels on one sheet. The main limitation is precise dimension control; you’ll need to visually estimate the row height. For simplicity, use the built-in template gallery by searching “name tent” when creating a new document.
How do I prevent name tents from falling over?
Use 65lb or heavier cardstock and make a sharp, scored fold. For additional stability on slippery surfaces or in drafty rooms, apply a small piece of adhesive putty to the inside bottom corner of each leg. For a clean, permanent solution, laminate the entire sheet before cutting and folding.
What font size should I use?
Use a minimum of 36 points. For larger tables or rooms with poor sightlines, increase to 48 or even 72 points. The name must be legible from at least three feet away. Always choose a bold, simple sans-serif font like Arial Black or Calibri.
Can I reuse name tents?
Yes, with planning. Laminate the printed sheet before cutting and folding to create a wipe-clean surface. For conferences, create a generic tent structure with a slot or sleeve, and print attendee names on inserts that can be swapped out for each event. This saves material and allows for last-minute changes.
How do I print two names on one tent?
In your Word or Docs table, put the primary name (e.g., “JANE SMITH”) in the top half of the cell. On the next line, in a smaller font size (e.g., 24pt), add the secondary text (e.g., “Project Lead” or “Acme Corp”). Center the entire block of text vertically within the cell.
Before You Go
A name tent is a simple piece of event infrastructure, but its failure is glaring. The difference between a professional setup and a makeshift one is a few deliberate choices: 65lb cardstock over printer paper, a scored fold over a bent one, and a 36pt font over a timid 24pt.
Skip the online generator for anything beyond a last-minute panic. The fifteen minutes you spend in Word or Google Docs setting up a proper template pays off in crisp, uniform, stable tents that actually work. Test your printer with the cardstock. Cut with a paper cutter. Fold with a bone folder.
Then forget about them. A good name tent does its job silently, leaving people to talk to each other, not fiddle with a piece of paper.
