
How to Seam Seal a Tent: A Pro’s Guide to a Dry Shelter
This post contains affiliate links. As an Amazon Associate, we earn from qualifying purchases.
Seam sealing a tent means applying a liquid sealant to the exterior stitching of its seams to waterproof the needle holes. You must use a urethane-based sealant for polyurethane-coated fabrics or a silicone-based one for silicone-treated nylon. The process involves cleaning the seams, applying a thin bead, feathering it with a brush, and allowing a full cure. Get any step wrong, and water will find its way in.
I learned this the brutal way on a soggy Pacific Crest Trail section. My brand-new, unsealed ultralight tent, a popular cottage brand model, let in a fine mist that soaked my sleeping bag by midnight. A $30 mistake cost me a miserable, shivering night. Since then, I’ve sealed everything from a family car-camping beast to my go-to backpacking shelter, and I’ve seen every common error in the field.
This isn’t about generic advice. It’s the specific, often-overlooked details that make the difference between a job that lasts a decade and one that fails on the next trip. Let’s get your shelter bombproof.
Key Takeaways
- Seal from the outside. Water hits the exterior first. Sealing the inside lets threads wick moisture right through the stitch holes.
- Fabric chemistry is law. Polyurethane (PU)-coated nylon needs urethane sealant (like Gear Aid Seam Grip +WP). Silicone-treated nylon (silnylon) needs silicone sealant (like Gear Aid Seam Grip + SIL). Mixing them guarantees failure.
- Ditch the kit brush. A curved-tip syringe and a cheap acid brush give you surgical control, preventing the gloopy mess that plagues most DIY attempts.
- Cure time is not a suggestion. Urethane needs about 2 hours; silicone needs 8–12. Packing a tacky tent will ruin the seal and potentially fuse your rainfly layers together.
- Factory tape changes everything. Tents from brands like MSR or Big Agnes come with taped seams. Don’t seal over good tape. If it’s flaking, you must remove all residue before applying liquid sealant.
Which Tent Sealant Should You Use?
Using silicone sealant on a PU-coated tent creates a bead-up, non-sticking mess that peels off in one rubbery sheet after the first downpour. The chemistry is incompatible.
Your tent’s fabric coating dictates your sealant choice. This isn’t a preference; it’s a chemical bond. Most mainstream tents use PU-coated nylon. Many ultralight and tarp shelters use silicone-treated nylon (silnylon or silpoly). Check your tent’s manual or spec sheet. If you’re unsure, do a water test: place a drop on the rainfly. On PU, it beads. On silnylon, it soaks in and darkens the fabric almost instantly.
| Fabric Type | Common In | Required Sealant | Example Product | Typical Cure Time |
|---|---|---|---|---|
| Polyurethane (PU) Coated Nylon | Most budget to mid-range tents, family camping shelters | Urethane-based | Gear Aid Seam Grip +WP or +FC | ~2 hours |
| Silicone-Treated Nylon (Silnylon/Silpoly) | Ultralight tents, tarps, many cottage-brand shelters | Silicone-based | Gear Aid Seam Grip + SIL | 8–12 hours |
| Dyneema Composite Fabric (DCF) | High-end, ultralight shelters | Silicone-based (optional fortification) | Seam Grip + SIL | 8–12 hours |
TL;DR: Match your sealant to your fabric’s coating. PU gets urethane. Silicone gets silicone. Never cross them.
Why the Chemistry Matters
Urethane sealants cure by reacting with moisture in the air, forming a flexible, clear bond that chemically links to the PU coating. Silicone sealants cure into a rubbery layer that adheres to the slippery silicone finish. Gear Aid notes their Seam Grip +WP can last “many years, we’ve heard decades” on a proper application. Using silicone on PU (or vice versa) is like trying to glue glass to wood with school glue, it just won’t stick.
An important note for silnylon users: some manufacturers, like Six Moon Designs, explicitly instruct sealing from the exterior only, stating that sealing the underside “won’t produce a reliable result.” This contrasts with general advice but is critical for their specific seam construction.
What You Need: The Right Tools for a Clean Job
The seam-sealing kits with a brush built into the cap are infamous for creating a sticky disaster. A method refined by seasoned repair techs, and demonstrated in detailed YouTube tutorials, uses two cheap, precise tools.
The core of a clean job is a curved-tip plastic syringe (no needle) and a small, cheap acid brush. The syringe gives you fingertip control over a thin bead. The brush instantly spreads and feathers that bead over the stitching. This system uses less sealant and creates a thinner, stronger, better-looking bond.
Your full kit should include:
* Latex or nitrile gloves. Urethane sealant bonds to skin proteins; it’s notoriously difficult to remove without a solvent like acetone.
* Two clean, lint-free cotton rags. One should be slightly damp for cleaning, the other bone-dry.
* A drop of mild dish soap (like Dawn) for cutting through any body oils or factory residues on the seams.
* A well-ventilated workspace sheltered from wind and dust. A garage or under a covered patio is ideal.
How Do You Properly Seal Tent Seams?
The actual application takes about 20 minutes. The setup and, crucially, the cure time are what require patience. Rushing leads to the most common failures.
Step 1: Pitch and Prep Your Tent
Pitch only the rainfly, inside-out so all the seams are exposed and taut. Do this in your sheltered workspace. Any breeze can blow dust onto your wet sealant.
Before you start: Seam sealant fumes are potent. Work in a ventilated area. Wear gloves, the sealant is incredibly sticky and bonds to skin. Have acetone or nail polish remover on hand for accidental clean-up.
Wipe every inch of seam you plan to seal with the damp rag and a tiny bit of soap. This removes mold release agents, dirt, and skin oils. A clean surface is non-negotiable for adhesion. Dry thoroughly with the second rag.
Step 2: Load Your Syringe
Puncture the sealant tube and draw about 5-10ml into the syringe, you don’t need it full. Recap the tube immediately; it’s under pressure and will ooze. Insert the plunger, point the tip up, and gently push to purge air until a tiny bead of sealant appears. Wipe the tip clean. You can now set the syringe down without leaks.
Step 3: Apply a Thin, Precise Bead
Start at one end of a seam. Holding the syringe like a pen, run a continuous, thin bead directly on top of the exterior stitching. Cover every stitch line, paying extra attention to saturate high-stress areas like webbing loops, guy-out points, and vent flaps.
Common mistake: Getting sealant in the zipper teeth, it will gum up the mechanism permanently. Be meticulous around zippers.
The goal is to bridge the needle holes, not to paint the fabric. A thin bead is stronger and more flexible than a thick glob.
Step 4: Immediately Brush and Feather
This is the secret to a professional finish. Within seconds of laying the bead, take your acid brush and drag it along the seam. Spread the sealant so it feathers about a quarter-inch onto the fabric on both sides, fully encapsulating the thread.
This action pushes sealant into the holes and creates a smooth, monolithic layer bonded to both thread and fabric. Switch to a clean part of the brush as it loads up. Skipping this step leaves a raised “rope” of sealant that can peel off in one piece.
Step 5: Walk Away and Let It Cure
This is the hardest part for many. Leave the tent pitched and completely undisturbed. Refer to your sealant’s cure time: about 2 hours for urethane (like Gear Aid Seam Grip +FC), 8–12 hours for silicone under normal conditions. Cold or humid weather can double these times.
The tent is ready only when the sealant is completely dry to the touch and no longer tacky. Packing it early will stick the fly to itself, tearing the fresh seal. I ruined a silnylon tarp this way, creating a permanent crease that leaked forever after.
TL;DR: Clean seams, apply a thin bead with a syringe, brush it flat immediately, and let it cure untouched. That’s the sequence.
When Is Seam Sealing Unnecessary or a Bad Idea?
Not every tent needs this. Applying sealant incorrectly can void warranties or create bigger problems.
Many tents from major brands come with factory-taped seams. Brands like MSR, with its Hubba series, and Terra Nova, with its Laser Compact tents, use precise machinery to apply tape. MSR spent a decade researching tape adhesion before launching its current Xtreme Shield system. Adding liquid sealant over intact factory tape is redundant and can prevent proper future repairs.
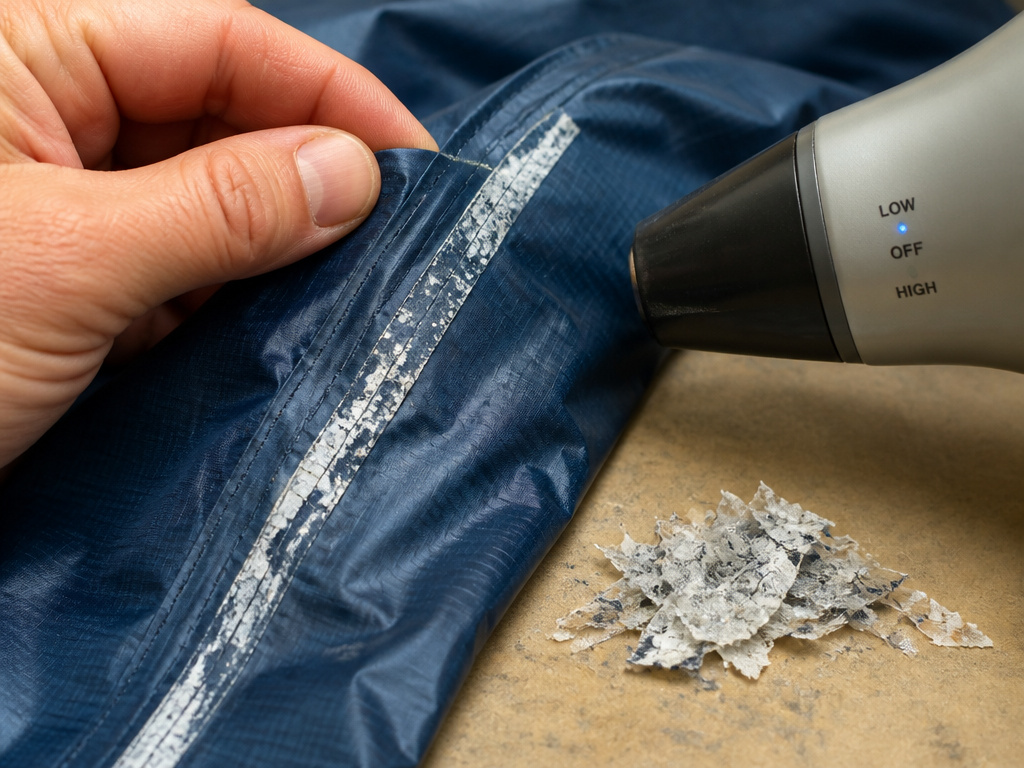
If factory tape is flaking, you have a different task. You must carefully remove all loose tape residue, a hairdryer on low heat can help soften the adhesive, before applying liquid sealant. The old tape will prevent a proper bond.
Also, know that tape degrades faster on lightweight fabrics (below 68 Denier). This is why many ultralight tarp tents and cottage-brand shelters skip factory taping altogether and require home sealing. A heavier, more durable canvas tent might hold tape for a decade, while a 15D nylon fly might show failure in a few seasons.
Troubleshooting: Fixing Mistakes and Pro Tips
Even with careful work, issues pop up. Here’s how to handle the curveballs.
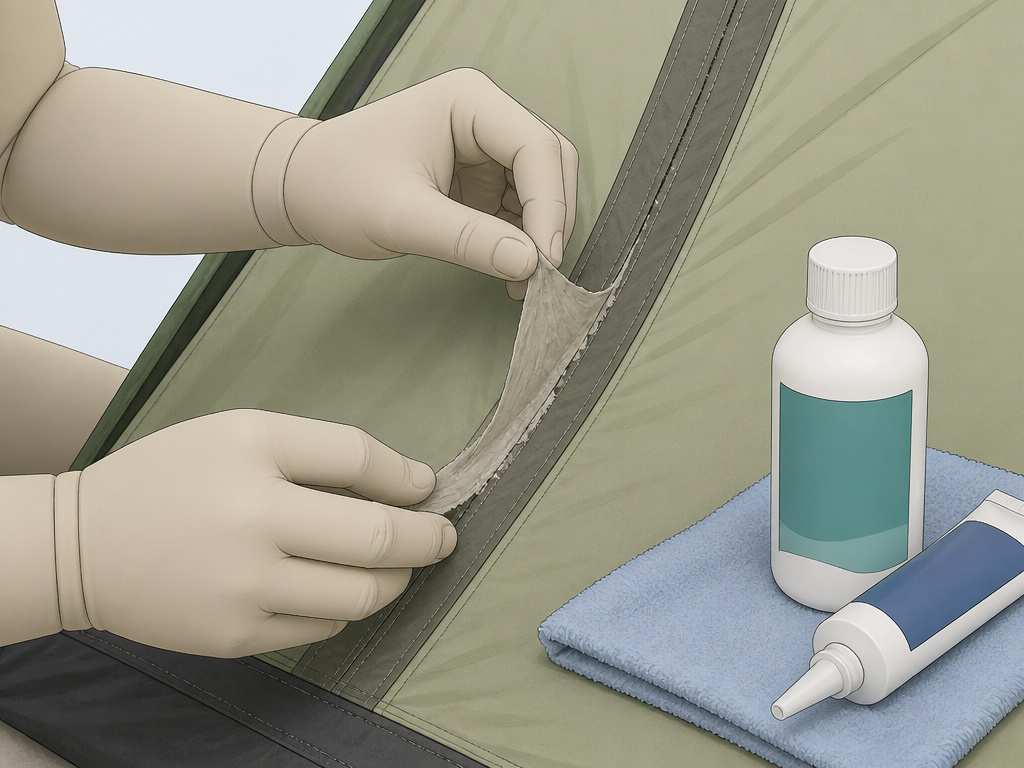
- You used the wrong sealant. If you put silicone on PU, you must remove it. Silicone doesn’t chemically bond; you can often peel it off in a sheet. For urethane on silicone, or old, cracked sealant, use a dedicated remover like Gear Aid’s Seam Grip Remover & Cleaner, not harsh solvents that can damage fabric coatings.
- The sealant is too thick or cold. Warm the tube in a pocket for 15 minutes before use. Cold sealant is viscous and hard to apply thinly.
- You’re sealing in cold, humid conditions. Cure times will balloon. If possible, bring the work inside to a climate-controlled space. If not, plan for at least double the stated cure time.
- Should you dilute the sealant? Some experienced users thin silicone sealant with mineral spirits for a penetrating first coat on thirsty silnylon thread. This is an advanced technique. For most jobs, using it straight from the tube is perfectly effective and far less error-prone.
Seam sealing is a foundational skill for any camper, right up there with knowing how to select reliable tents for heavy rain or essential tent camping equipment. It turns a leaky liability back into a trustworthy shelter. For those venturing into harsh conditions, this knowledge complements choosing high-wind tents or specialized canvas tents with stove jacks.
Frequently Asked Questions
How long does a seam sealing job last?
properly applied seam sealant job with a quality product like Gear Aid Seam Grip can last for many years, the manufacturer cites reports of decades. You should inspect your seams annually for any cracking or peeling, especially before a major trip. Reapplication is only necessary when you see visible degradation.
Do all new tents need to be seam sealed?
No. Most tents from major brands like REI, Big Agnes, and MSR come with factory-taped seams and do not require additional sealing. However, many smaller “cottage” brands and some budget models do not factory-seal their tents. Always check your tent’s specifications. Some brands even offer a factory sealing service for an additional fee (often around $30).
Can I use Flex Seal or duct tape instead of proper sealant?
Do not do this. These are temporary, crude fixes that will fail quickly, leave a horrific residue that damages your tent’s coatings, and make a proper repair later much more difficult. They lack the flexibility, adhesion, and longevity required for tent seams.
What’s the difference between seam sealing and waterproofing?
Seam sealing targets only the stitched seams, plugging the needle holes where water can ingress. Waterproofing (or re-waterproofing) involves applying a Durable Water Repellent (DWR) treatment to the entire fabric surface to make water bead up and roll off. A tent often needs re-waterproofing every season or two, while a well-done seam seal can last for many years.
How do I know if my factory tape is failing?
Look for whitish, flaky residue along your seams or small sections where the tape has peeled back, revealing the bare thread underneath. On lightweight fabrics, tape failure often starts at high-stress points like corners and guy-line attachments.
What Actually Matters
Seam sealing is a simple, satisfying skill that extends the life of your shelter and guarantees dry nights. The rules are clear: match the chemistry, work on the exterior, use precise tools, and respect the cure time. Ditch the messy kit brush for a syringe and acid brush. The confidence of having a bombproof shelter is worth the afternoon of effort.
Mastering this skill means you can trust your gear in any weather, whether you’re fine-tuning your setup with the best tent camping accessories for comfort or researching tent lighting solutions for those long summer evenings. A dry shelter is the cornerstone of every great adventure.
