
How To Patch Tent Trailer Canvas: A Complete Repair Guide
This post contains affiliate links. As an Amazon Associate, we earn from qualifying purchases.
To patch a tent trailer canvas, you need a flexible, waterproof adhesive like Bish’s Tear Mender, a canvas patch cut at least one inch larger than the tear, and a sewing awl for tears over half an inch. The process fails if you skip cleaning the area first or if you use a rigid glue that cracks when the canvas flexes.
Most people grab whatever adhesive they have in the garage. That’s the mistake. A standard super glue or epoxy dries rigid. The first time you fold down the trailer, that rigid spot flexes. A hairline crack forms along the edge of the patch. Water finds it by the next rainstorm.
This guide walks through the five steps that actually last, the one product Snowtrekker Tents recommends over everything else, and what to do when the tear is in a seam or on the floor. It also covers the emergency field fix that takes less than a minute.
Key Takeaways
- Use only flexible, waterproof fabric adhesives like Bish’s Tear Mender. Household glues crack within two camping seasons.
- For holes in the tent floor, skip glue and patches. Gear Aid Tenacious Tape is a faster, more reliable field repair.
- Clean the area with a 1:10 vinegar-to-water solution before applying anything. Mold spores under the patch will bleed through.
- Sew any tear longer than half an inch before patching. A Speedy Stitcher lock-stitch prevents the tear from running.
- Waterproof coatings degrade in about five years. Reapply 303 Fabric Guard or Star Brite after a repair to seal the work.
What You’ll Need (And What You Should Skip)
Grab the wrong tube from your toolbox and the patch will last one trip. The right kit fits in a small bag and handles ninety percent of canvas damage.
You need a flexible adhesive. Snowtrekker Tents specifically recommends Bish’s Tear Mender for most uncomplicated repairs. It stays pliable as the canvas moves. A tube of super glue sets like glass. The first time you crank the trailer roof down, that glass-like bond shatters.
Before you start: Wear gloves when handling adhesives and cleaning solutions. Work in a well-ventilated space. If using a sewing awl, keep fingers clear of the needle path, a slip drives the needle through canvas and into skin.
For the patch material, use spare canvas from a repair kit or an old tent bag. Denim or heavy cotton duck cloth works in a pinch. The key is matching the weight and weave as closely as possible. A heavy canvas patch on a light wall will create a stiff spot that catches and tears again.
Cut your patch with rounded corners. Sharp corners peel first. Extend the patch at least one inch beyond the tear in every direction. A half-inch margin frays open by the end of the season.
Here’s what not to bother with:
| Skip This | Use This Instead | Why |
|---|---|---|
| Super Glue (Cyanoacrylate) | Bish’s Tear Mender | Super glue dries brittle and cracks under canvas flex. Tear Mender stays flexible. |
| Duct Tape | Gear Aid Tenacious Tape | Duct tape adhesive fails in sun and rain within weeks. Tenacious Tape is designed for outdoor gear. |
| Regular Sewing Thread | Waxed Nylon or Polyester Thread | Regular thread rots. Waxed nylon holds up to UV and moisture. |
| Power Washer | Soft Brush & Vinegar Solution | A power washer strips waterproofing and forces water behind seams. |
You’ll also need a small paintbrush or disposable foam brush for adhesive, scissors, a clean rag, and a flat board. That last item is non-negotiable. You see it in the YouTube walkthroughs, a board slid under the repair area creates a firm, flat backing. Without it, you press the patch into a hollow and get poor contact. The edges lift.
TL;DR: Bish’s Tear Mender glue, a canvas patch with rounded corners, a board for backing, and Gear Aid Tenacious Tape for floor holes. Skip anything that dries hard.
The 5-Step Patching Process (And the Step Nobody Skips)
Lay the canvas flat on a clean, dry surface. Slide that board underneath the damaged area. Now you have a stable workbench.
Step 1: Clean the Area. Really Clean It
Mix a solution of one part white vinegar to ten parts water. Stout Tent recommends this ratio for killing mildew spores. Scrub the area around the tear with a soft brush. Rinse with clean water and let it dry completely. Any dirt or mildew left under the patch will stain through the canvas within a month. It looks like a shadow around your repair.
If the canvas has old, flaky waterproofing, you might need to gently scrape it. Don’t gouge the fabric. The goal is a clean, sound surface for the adhesive to grip.
Step 2: Cut and Shape the Patch
Cut your patch material so it extends a full inch beyond the tear in all directions. Round the corners with your scissors. A sharp corner is a stress point. It will catch on a pole or a zipper and start to peel.
Test-fit the patch over the tear. Make sure it lies flat with no wrinkles. If the canvas is curved, you might need to make small relief cuts around the perimeter of the patch, but don’t cut into the one-inch margin.
Step 3: Apply the Adhesive and Press
Apply a thin, even layer of Bish’s Tear Mender to both the back of the patch and the damaged canvas area. Don’t glob it on. A thick layer takes days to cure and can ooze out the edges.
Wait one minute. The glue needs to become tacky. If you press too soon, the patch slides. If you wait too long, the glue skins over and the bond weakens.
Place the patch carefully, starting from one edge and rolling it down to avoid air bubbles. Press firmly over the entire surface, especially the edges. Put a weight on top, a book, a brick, and leave it for at least two hours. Twenty minutes is not enough.
I once patched a small tear on a bunk end without weighting it. A week later, a corner had lifted. I had to peel the whole patch off, re-sand, re-glue, and this time I used a concrete block for three hours. The second repair held for three seasons.
Step 4: The Step Everyone Skips. Sew It
This is the divider. Some guides say glue is enough. For a pinhole, maybe. For any tear longer than half an inch, you must sew it. Stout Tent advises sewing larger tears shut before adding a patch. MerchantCircle argues that sewing compromises waterproof fabric. They’re both right, but for different reasons.
Sewing a tear without a patch does puncture the fabric. But sewing a patch on after gluing it doesn’t compromise anything, it locks it down. Use a Speedy Stitcher sewing awl and waxed nylon thread. Run a simple lock-stitch around the entire perimeter of the patch, about a quarter-inch from the edge.
Skipping this step means relying entirely on the adhesive bond. Canvas tents flex in the wind. That flexing works the patch edges loose over time. The stitching takes the mechanical stress, leaving the glue to just seal out water.
Step 5: Waterproof the Repair
Your patch is on. The glue has cured for 24 hours. Now you have to restore the water barrier. The original factory waterproofing is gone where you cleaned and patched.
Spray a water repellent like 303 Fabric Guard or Star Brite evenly over the patched area, extending a couple of inches beyond the repair. Follow the can’s instructions for drying time. One coat is usually enough for a patch, but if you’re in a heavy rain region, a second coat won’t hurt.
Waterproof coatings on tent trailers generally last about five years. If your canvas is older than that, consider treating the entire roof and walls after you fix the tear. Areas under constant stress, like where bungee cords hook, may need reapplication every two or three seasons.
TL;DR: Clean, cut, glue, weight, sew, seal. The sewing step is what makes a repair permanent instead of temporary.
When Glue Isn’t Enough: Sewing, Tape, and Professional Help
A simple patch works for a clean, isolated tear. Three situations break that rule.
Tears longer than half an inch. As mentioned, glue alone isn’t enough. You need the mechanical hold of stitches. Use the Speedy Stitcher to close the tear first, then patch over it. This creates a reinforced area that won’t propagate.
Holes in the tent floor. Stout Tent has clear advice here: skip glue and canvas patches for floor damage. The constant abrasion from feet and gear will peel a glued patch. Instead, use Gear Aid Tenacious Tape. Clean the area, cut a piece of tape larger than the hole, round the corners, and press it on. It’s a super-fast repair that takes less than a minute and outlasts glue on high-wear surfaces.
Damage across a seam. If a tear runs through a sewn seam, like a corner or where two fabric panels join, ShunAuto suggests consulting a professional. Home repairs here often misalign the tension and cause the entire panel to pucker. The cost of a pro fix is usually less than the cost of replacing the whole canvas panel you might ruin.
Common mistake: Using a household glue like Gorilla Glue on a floor hole, the patch hardens, foot traffic cracks it within a week, and the hole reopens larger than before.
Emergency Field Repairs and Stopping Leaks Now
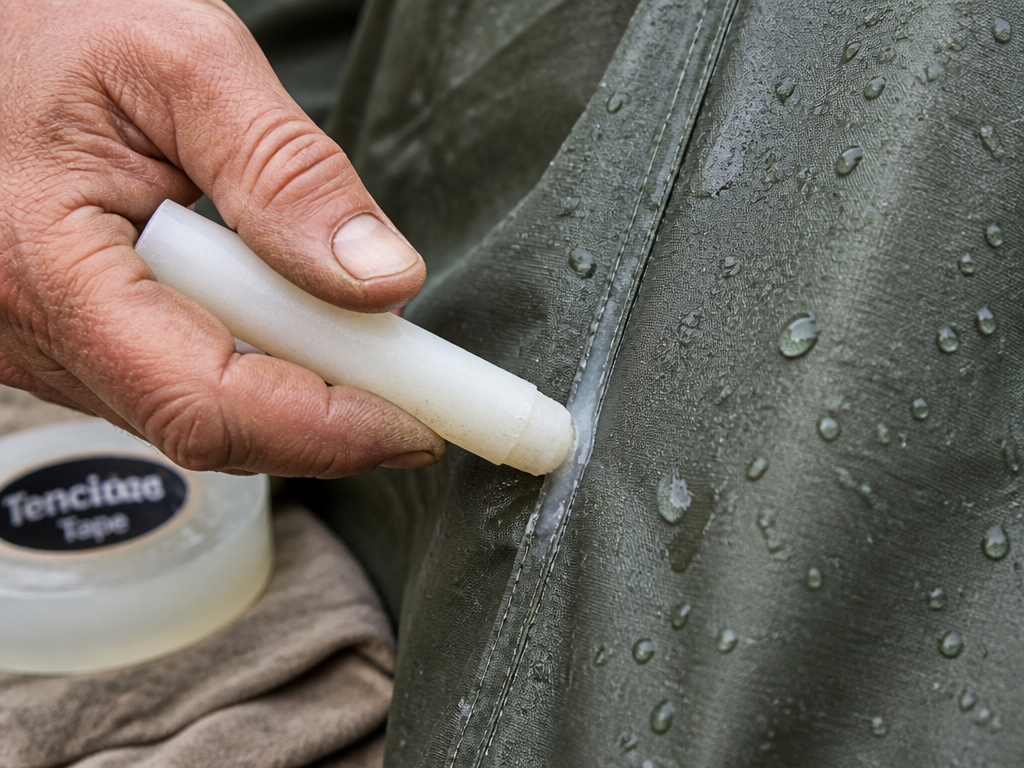
You’re on a trip. Rain is forecast tonight. A new drip appears at a seam. You don’t have your repair kit.
A wax stick is the field fix. Rub a plain candle or a dedicated wax stick along the leaking seam. The wax fills the needle holes and temporarily waterproofs the thread. It’s not pretty, but it stops the drip long enough to get you through the storm. One wax stick in your kit handles a dozen such emergencies.
For a fresh tear, Gear Aid Tenacious Tape is your best friend. It sticks to wet fabric if you dry the area as best you can with a cloth first. Keep a roll in your tent camping equipment kit. It peels off cleanly later when you’re home and ready for a proper patch.
If you must strike the tent while it’s wet, Stout Tent advises setting it back up at home within 24 hours to air out. Trapped moisture during storage is the single biggest threat to canvas. Mildew sets in fast.
Cleaning and Maintenance: Making Your Repair Last
A repair is only as good as the canvas around it. Neglect the rest and you’ll be patching again next season.
For general cleaning, use that 1:10 vinegar solution. For tougher grime, Stout Tent recommends specialized solutions like Iosso or a very diluted mixture of OxiClean. The keyword is diluted. Straight OxiClean can strip dyes and waterproofing.
Common mistake: Using a power washer or harsh detergent like dish soap, these strip the waterproof coating right off, leaving the canvas thirsty for the next rain.
After cleaning and patching, the final step is re-waterproofing. Spray-on products like 303 Fabric Guard are easiest. Brush-on products like Star Brite give a heavier coat for extreme weather. Pay extra attention to areas under tension, where guy lines attach, around windows, and under any strapping.
Consider the entire system. A well-maintained canvas tent with a sound roof is part of a larger set of tent camping accessories that make trips comfortable. A leaky patch compromises everything inside.
Frequently Asked Questions
Can I use duct tape for a temporary patch?
No. Duct tape adhesive breaks down in sunlight and moisture within days. It will leave a sticky residue that’s harder to clean than the original tear. Use Gear Aid Tenacious Tape instead.
How long does a patched area last?
properly glued and sewn patch can last the remaining life of the canvas, often 5-10 more years. A glue-only patch on a high-flex area may fail in two or three seasons.
My patch is lifting at the corners. Can I re-glue it?
Not really. You must remove the old patch completely, sand off the old adhesive, and start fresh with a new patch. Trying to glue down a lifted corner just creates a thicker, stiffer spot that lifts again faster.
Will sewing holes make my tent leak more?
Sewing a tear before patching does create needle holes. But those holes are sealed when you apply the patch and waterproofing over them. An un-sewn tear will continue to rip open, creating a much larger leak.
Can I patch a vinyl or nylon tent trailer canvas the same way?
The process is similar, but you must use an adhesive formulated for that specific material. Bish’s Tear Mender works on many synthetics, but check the label. For a detailed, manufacturer-specific walkthrough, the BikeHike tent trailer repair guide covers material compatibility.
The Bottom Line
Patching a tent trailer canvas isn’t about slapping on glue and hoping. It’s a system: the right flexible adhesive, a generous patch, mechanical stitching for anything beyond a pinhole, and a renewed waterproof layer. Skip any piece and the repair becomes temporary.
Keep a roll of Gear Aid Tenacious Tape in your gear box for floor holes and field emergencies. Remember that a repaired canvas is only one part of a reliable shelter; pairing it with robust tents for heavy rain or high wind tents ensures you’re covered when the weather turns. For larger projects, like adding a stove jack, the principles are the same, clean, seal, and reinforce. Invest the hour now. It beats a weekend trip cut short by a drip over your sleeping bag.
