
How To Prevent Condensation In A Tent: The Ultimate Guide
This post contains affiliate links. As an Amazon Associate, we earn from qualifying purchases.
Preventing tent condensation requires managing two things: the humidity inside your tent and the temperature difference between the warm air inside and the cold tent fabric. Ventilation is the primary tool, but site selection and moisture discipline matter just as much. The goal is to move that warm, moist air out before it touches a cold surface and turns to water.
Most people focus only on opening vents. They miss the fact that a single person exhales and sweats out 1 to 2 pints of moisture overnight. If you don’t move that volume of water vapor out, it will find the coldest surface in your shelter, usually the tent wall or the foot of your sleeping bag, and turn back into liquid. This guide covers the physics, the mistakes, and the non-negotiable steps to wake up dry.
Key Takeaways
- Double-wall tents win. The air gap between the inner mesh and the rainfly is a built-in condensation trap. Single-wall shelters put that water right on your gear.
- Site selection beats gear. A tent pitched under tree cover, at mid-slope, and 200 meters from water will have half the condensation of one in an open field by a lake.
- Vestibules are for airflow, not storage. Blocking the gap under a vestibule with your backpack cuts ventilation by more than half. Store wet gear outside.
- Your breath is the main culprit. Breathing through your mouth releases roughly 40% more moisture than nasal breathing. One sleeper can humidify a six-person tent’s air volume overnight.
- Polycotton tents have a hidden flaw. Touching the wall causes water to seep through the fabric instantly, a problem nylon doesn’t have.
The Three Rules of Tent Ventilation (and the One Rule You’re Breaking)
Ventilation isn’t about cracking a window. It’s about creating a consistent airflow path that carries moisture-laden air from inside your tent to the outside atmosphere. The mechanics are simple: warm air rises. You need an exit point high up and an intake low down.
Common mistake: Opening only the roof vent, this creates a dead zone of stagnant, humid air at sleeping-bag level. You need cross-ventilation, which means two openings at different heights.
Most tents have at least two types of vents. The first is the obvious roof or peak vent, often with a kick-stand and Velcro tab to hold it open. The second is the gap under the rainfly created by the vestibule. That lower gap is your intake. The high vent is your exhaust. Block either one and the system fails.
TL;DR: Open every vent you have, high and low, to create a chimney effect. If it’s not raining, unzip a vestibule door completely.
Why Your Vestibule Isn’t Just a Porch
A vestibule is a dual-purpose space. It stores wet boots and your pack, yes. But its primary job is to be an airlock. When you leave the inner door’s mesh panel closed but the vestibule door open, you get a powerful convective current. Cool, dry air flows in under the vestibule door, warms up inside the tent, picks up moisture from your breath, and exits through the high vent.
Block that lower intake with a backpack or boots, and you’ve choked the system. The air inside stagnates, humidity skyrockets, and condensation forms. This is the single most common error I see, people treat the vestibule as a sealed gear closet.
| Ventilation Element | Its Job | What Happens If You Block It |
|---|---|---|
| High roof/peak vent | Exhausts warm, moist air | Humidity builds at head level; condensation drips down walls |
| Vestibule lower gap | Intakes cool, dry air | Airflow stops; tent becomes a sealed humid box |
| Mesh inner door | Allows airflow while keeping bugs out | Closed door forces all air through vestibule; reduces total flow |
| Rainfly vent flaps | Secondary exhaust points | Closed flaps trap moisture between fly and inner tent |
The fix is simple. Before you zip yourself in for the night, look at the gap under your vestibule door. Is your pack lying across it? Move it. Are your boots there? Shift them to the side. Leave a clear channel for air to flow in.
Where You Pitch Matters More Than You Think
You can have the best-ventilated tent on the market and still wake up in a puddle if you pitch it in the wrong spot. Condensation is a product of local microclimate. The air near the ground at the bottom of a valley is colder and holds more moisture. The air on an exposed ridge is windy and dry, but often too cold for the tent fabric to stay above dew point.
The sweet spot is almost always under tree cover at a mid-elevation. Trees act as a buffer. They reduce radiant heat loss from your tent fabric into the night sky, which lessens the temperature differential. They also often sit in a slightly warmer, less humid microclimate than open fields.
I’ve pitched identical tents 50 meters apart, one under a dense pine canopy, one in a meadow. The meadow tent was soaked inside by morning. The forest-floor tent was merely damp around the edges. The difference was about 2°C in overnight low temperature and a 15% drop in relative humidity.
Avoid these three sites:
- Valley bottoms and lake shores: Cold, humid air pools here. One study from a backpacking forum found humidity levels can be 20–30% higher at a lake’s edge than on a shelf 10 meters above it.
- Open fields: No windbreak means faster heat loss from your tent fabric. That colder fabric triggers condensation the moment your warm breath touches it.
- Completely sheltered hollows: No wind means no natural air exchange. You’re relying solely on your tent’s vents, which often isn’t enough.
Instead, look for a sheltered spot with some airflow. A slight breeze is your friend. It constantly replaces the air around your tent with drier air. Pitch your tent so its vents align with the prevailing wind direction. Many stormproof tent models are designed with this in mind, placing vents on opposite sides to capture cross-breezes.
The Gear You Bring Inside (And What to Leave Outside)
Everything you bring into a tent holds moisture. Your breath is the biggest source, but your wet socks, damp rain jacket, and even the water vapor from a just-boiled pot are close behind.
Rule one: never cook inside. Boiling water releases a huge amount of water vapor directly into the enclosed space. It also heats the air inside, which then hits the cold walls and condenses even faster. Beyond condensation, it’s a safety hazard and makes your tent smell like food, a bad idea in bear country.
Rule two: isolate wet gear. Your soggy hiking clothes aren’t going to dry overnight in the humid tent air. Hanging them inside just turns your tent into a laundry room. Put them in a trash bag or dry sack and leave that sack outside in the vestibule, or under the rainfly if animals aren’t a concern.
| Gear Item | Bring Inside? | Reason |
|---|---|---|
| Wet hiking clothes | No — bag and leave outside | Adds direct moisture to the air; won’t dry anyway |
| Damp boots | No — leave in vestibule | Evaporates moisture into tent; can mildew |
| Water bottle | Yes, but sealed tight | Minor source; necessary for hydration |
| Cook pot with leftover water | No — empty and clean outside | Residual heat and evaporation adds humidity |
| Electronics (phone, headlamp) | Yes | Minimal moisture impact; keep from freezing |
This discipline extends to your own body. Change out of your sweaty hiking clothes before bed. The drier you are when you climb into your bag, the less moisture you’ll pump into the tent air all night. It’s a small habit with a massive payoff.
Cold-Weather Condensation is a Different Beast
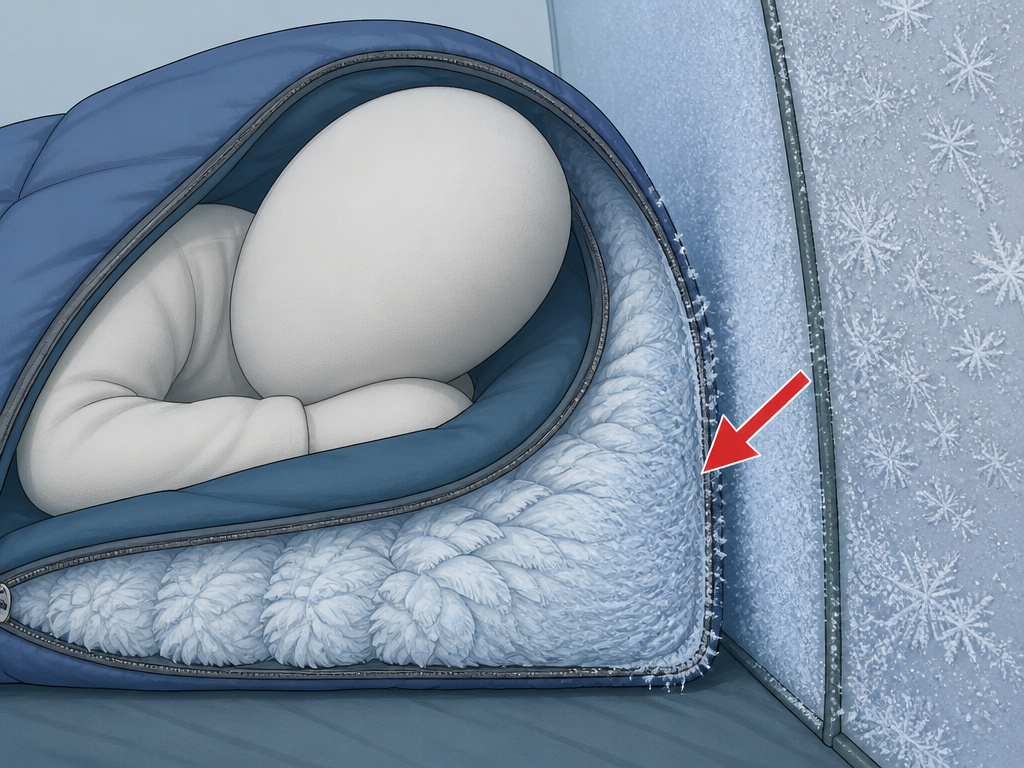
Condensation doesn’t disappear when the temperature drops. It gets worse, and the consequences are more severe. In freezing conditions, the water vapor from your breath hits the cold tent wall and turns directly to frost or ice. That’s actually better than liquid water, until you bump the wall and it falls on you as a shower of ice crystals.
The real danger is inside your sleeping bag. If your bag is lofting against a single-wall tent or a poorly vented double-wall, the moisture from your breath can condense on the inside of the bag’s shell, right down by your feet. In sub-freezing temps, that moisture freezes.
Common mistake: Letting condensation collect at the foot of your sleeping bag in cold weather, by morning, the down or synthetic insulation there is matted with ice, losing 80% of its loft. It won’t dry until you get it into a warm, dry environment, which could be days.
This is a particular issue with tents that use AirBeam pole systems or single-wall designs. The air inside the beams is often colder than the tent air, creating a perfect cold surface for condensation. I’ve seen Vango AirBeam tents with a ring of frost around the base of each beam by morning.
The solution is aggressive ventilation, even when it’s cold. Yes, you’ll lose some heat. But losing a few degrees of warmth is better than losing the insulation in your sleeping bag. Use a ground sheet underneath your tent. It creates a barrier that stops ground moisture from wicking up, which is a hidden source of humidity. Many winter camping tents or canvas tents for wood stoves are designed with this in mind, incorporating heavy-duty floors and integrated stove jacks to manage moisture and heat.
TL;DR: In freezing weather, ventilate more, not less. Sacrifice a little warmth to save your sleeping bag’s loft. A slightly cooler, dry night is better than a warm, wet one.
Double-Wall vs. Single-Wall: The Architectural Difference
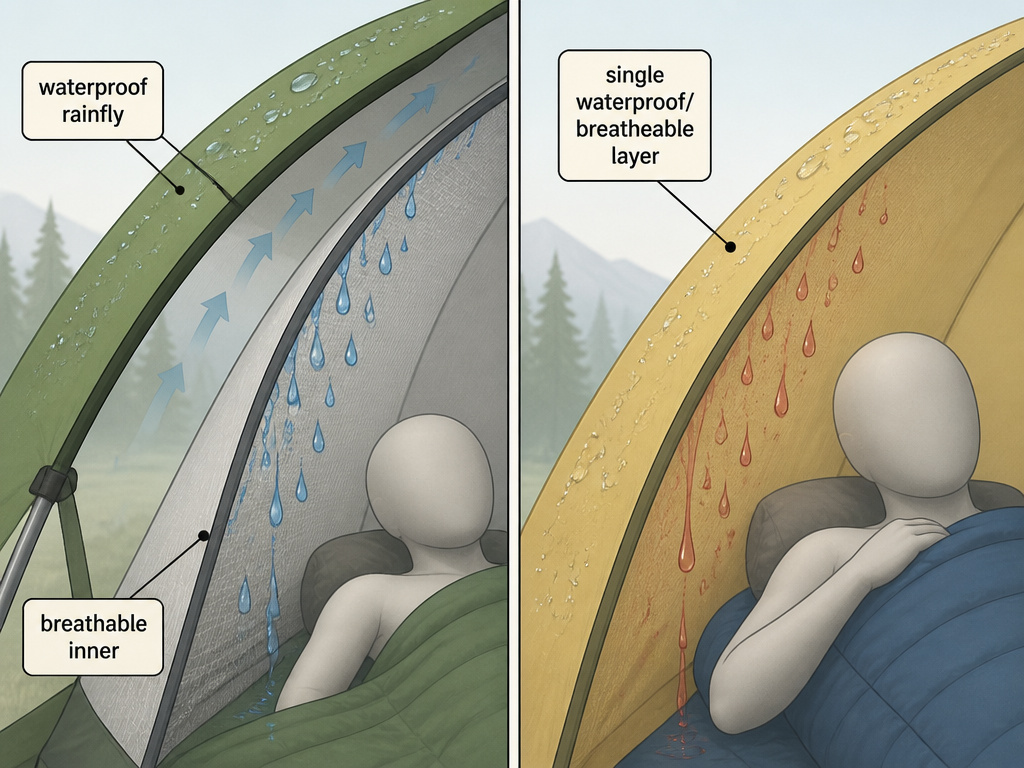
Your tent’s design is the single biggest factor in condensation management. This isn’t a minor preference; it’s a fundamental architectural choice.
Double-wall tents have a breathable inner tent (usually mesh) and a separate waterproof rainfly. The magic is in the gap. Condensation forms on the inside of the cold rainfly, then drips harmlessly down the outside of the inner tent. You and your gear stay dry inside the mesh inner. Most family camping and backpacking tents are double-wall.
Single-wall tents use one layer of fabric that’s both waterproof and, ideally, somewhat breathable. There’s no gap. When condensation forms, it’s on the inside of that single layer, right where you and your gear are. You’ll be brushing against wet fabric all night. These are common in mountaineering and ultralight setups where saving weight is critical.
I used a single-wall tent for a week on the Colorado Trail. Every morning, I’d wake up to a fine mist of condensation on the footbox of my sleeping bag. By day four, the bag’s loft was noticeably compressed. I switched to a double-wall breathable backpacking tent for the rest of the trip. The weight penalty was 300 grams. The dryness payoff was immeasurable.
The choice comes down to priority. If absolute minimum weight is your goal, you accept the condensation management of a single-wall or tarp tent. You’ll be wiping down walls every morning. If dry comfort is the goal, the double-wall is non-negotiable. That air gap is worth every extra ounce.
Material Matters: Nylon, Polyester, and the Polycotton Trap
Most modern tents are made from nylon or polyester. Both are synthetic, relatively non-absorbent, and dry quickly. The difference in condensation behavior between them is minor.
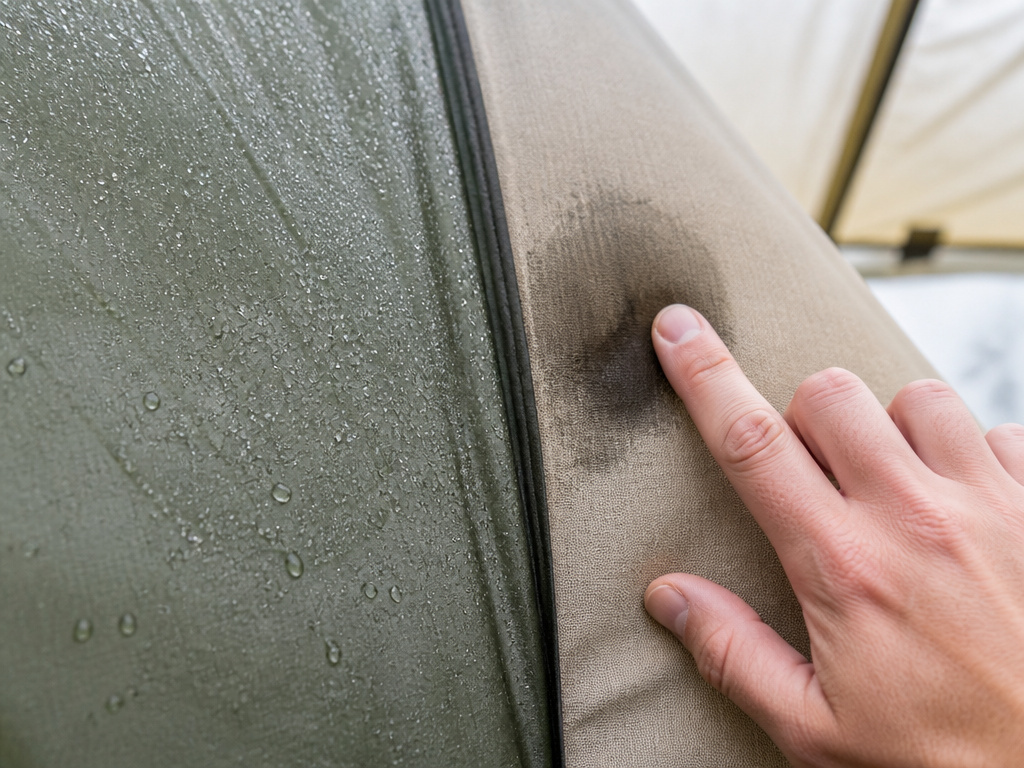
Polycotton (a cotton-polyester blend) is different. It’s popular in heavy-duty canvas shelters for its breathability and resistance to UV degradation. Here’s the trap: polycotton feels more breathable because it absorbs a tiny amount of moisture. But if you touch a polycotton tent wall from the inside, the moisture on the fabric will wick through to your finger, a phenomenon called “cold bridging.” With nylon, the water beads and runs off.
Vango, a major manufacturer, explicitly warns against touching the walls of a polycotton tent for this reason. In a nylon tent, brushing the wall might shake loose a few droplets. In a polycotton tent, it can create a damp patch on your sleeping bag or clothing.
So which should you choose?
- Nylon/Polyester: For all-weather, general-purpose camping where quick drying and total waterproofness are key. The condensation beads up.
- Polycotton: For long-term basecamping in dry climates, where superior breathability over days is worth the trade-off in weight and the “no-touch” rule.
Frequently Asked Questions
Does a bigger tent have less condensation?
Yes, to a point. A larger air volume dilutes the moisture from your breath. But a six-person tent still holds about one pint of water in its air volume even when empty. The real advantage is that you’re less likely to touch the walls, which is a major source of wet gear.
Should I wipe down the condensation inside my tent?
In the morning, if it’s light condensation, yes. Use a microfiber towel or a dedicated camping towel to soak it up. Wring it out outside. Don’t just leave it, when you pack the tent, that moisture gets trapped in the fabric and can lead to mildew. If it’s heavy condensation or frost, shake the tent vigorously from the outside to dislodge as much as possible before packing.
Does a rainfly increase condensation?
It can. A rainfly, by definition, is a waterproof layer. If it’s pitched too close to the inner tent, it reduces the air gap and can trap humid air. The key is to ensure it’s taut and not touching the inner tent anywhere. Many rainflies, like those from MSR, include a peak vent specifically to let moisture escape from that gap.
Can a dehumidifier work in a tent?
Portable, battery-powered dehumidifiers exist, but their capacity is tiny compared to the moisture one person produces overnight. They’re more useful in a storage scenario over weeks, not for active camping. Your best “dehumidifier” is a battery-powered fan to increase airflow, or a portable air conditioner for car camping, which actively removes humidity as it cools.
Why is there condensation on the bottom of my tent?
This is usually “ground sweat”, moisture evaporating from the soil and condensing on the colder underside of your tent floor. Using a ground sheet or footprint creates a barrier that stops this. It’s also a sign you pitched on damp ground; try a slightly higher, drier spot next time.
Before You Go
Stopping condensation isn’t about one magic trick. It’s a system. Start with the right shelter, a double-wall tent with plenty of vents. Pitch it smartly, away from water and under some cover. Then, manage the interior like a submarine captain: everything wet stays sealed and outside, every vent stays open, and you breathe through your nose.
The difference between a damp, miserable morning and packing up dry isn’t luck. It’s the few minutes you spend at sundown moving your pack away from the vestibule door, cracking the peak vent, and changing into dry sleep clothes. That discipline keeps the 1–2 pints of moisture you produce each night outside where it belongs. Your sleeping bag will thank you.
