
How To Protect Tent From Rain & Stop Condensation for Good
This post contains affiliate links. As an Amazon Associate, we earn from qualifying purchases.
To protect a tent from rain, you must manage three threats: direct water ingress through seams and fabric, condensation buildup inside, and ground moisture wicking through the floor. Factory seam sealing and a correctly sized footprint address the first and third. Site selection and fly ventilation manage the second. A hydrostatic head rating of 1500mm is the bare minimum for light rain; for sustained downpours, look for 3000mm or higher.
Most people think a waterproof rainfly is enough. It isn’t. Condensation soaks you from the inside, a mis-sized groundsheet channels water under the floor, and a single unsealed stitch line leaks like a sieve after six hours of steady pressure. You wake up damp, blame the tent, and miss the real mistakes.
This guide walks through the fixes manufacturers bury in their manuals, like MSR’s warning about 24-hour mildew starts or Tarptent’s note on re-tensioning a stretching shelter. We’ll cover site choice, ground rules, seam work, and the one ventilation trick that cuts interior moisture by half.
Key Takeaways
- Seam sealing is non-negotiable. Factory-applied tape can fail; a manual bead of sealer along every stitch line blocks water under sustained pressure.
- A groundsheet must be smaller than the tent floor. An oversized tarp catches rain and funnels it underneath you, defeating its purpose.
- High humidity makes ventilation a trap. Opening every vent during a rainstorm draws in more saturated air, increasing condensation inside. Leave one vent cracked, but seal the rest.
- Polyester flys outlast nylon in the sun. UV rays degrade nylon’s waterproof coating twice as fast, turning a 3000mm-rated fly into a 1500mm one in a single season of weekend trips.
- Store a wet tent for one day max. Mildew spores germinate within 24 hours in a warm pack, creating permanent stains and a sour smell no wash can remove.
Before You Pitch: Site Selection is 80% of the Battle
You can have the best sealed tent on the market and still wake up in a puddle if you pitch in a bowl. Topography dictates where water flows. Pitch on a slight rise, even a six-inch hump makes a difference. Avoid natural depressions, the base of hills, and any ground that looks like it once held a stream.
Distance from water matters more than you think. That serene spot 20 feet from a lake is a condensation factory. Cool, moist air settles there overnight. The Washington State Parks tent camping guide recommends pitching at least 200 feet from any water source. It’s not just about flooding risk. It’s about sleeping in a dry bag instead of a damp one.
Common mistake: Pitching under dense tree cover for rain protection, the canopy drips for hours after the storm passes, and falling branches are a real hazard in high winds. Look for a spot with partial cover, not directly under the thickest branches.
Wind direction is your friend. Face the smallest door or the tent’s narrowest profile into the prevailing wind. This reduces the surface area the rain hits and helps the fly shed water. Check the weather forecast before you stake the first peg. A shift in wind can turn a sheltered spot into a wind tunnel.
TL;DR: Pitch on high, flat ground at least 200 feet from water, with the tent’s slim side to the wind. Avoid depressions and dense overhead canopy.
The Groundsheet Gambit: Underneath vs. Inside
The rule is simple: your groundsheet must be smaller than your tent’s floor. An inch or two of floor should sit directly on the ground on all sides. Why? An oversized tarp acts as a rain catchment. Water hits the tarp, runs underneath the tent floor, and pools under your sleeping pad. You stay dry from above but soak through from below.
Most manufacturer manuals, like the one for Tatonka Tents, state their purpose-made footprints are “specially tailored” to this exact size. A generic blue tarp from the hardware store is fine, but you must cut it. Don’t guess. Lay the tent out, trace the outline, then cut inside that line.
Now, the counterintuitive part. Some experienced campers, and the Washington State Parks blog, suggest placing a tarp inside the tent during a torrential downpour. This isn’t for ground moisture, it’s a last-ditch shield against a leaking seam or fly saturation. It’s a backup, not a replacement. Your primary moisture barrier should still be a correctly sized footprint underneath.
| Groundsheet Placement | Best For | Risk If Skipped |
|---|---|---|
| Under the tent floor, 2-3 inches smaller on all sides | All conditions, primary protection | Oversized tarps channel water under the floor |
| Inside the tent floor, full-size | Emergency backup during heavy rain | Traps condensation between tarp and tent floor, can mildew |
| No groundsheet | Ultralight backpacking on dry, soft ground | Punctures, abrasion, and ground moisture soak-through |
If you’re shopping for a new shelter, start with our reviews of the best tents for heavy rain, which highlight models with robust, bathtub-style floors. For extreme conditions, a durable canvas tent offers superior abrasion resistance right out of the box.
Seam Sealing: The $20 Insurance Policy
Factory seam sealing is a strip of tape applied to the inside of stitched seams. It’s good, until it isn’t. Adhesive fails over time, especially with temperature swings and fabric flexing. The manual fix is a liquid seam sealer brushed along the exterior of every stitch line on the rainfly.
Hold your rainfly up to a bright light. See pinpricks along the seams? Those are needle holes from manufacturing. Water will find them. Seam sealer fills those holes. Don’t just seal the obvious roof seams. Do every single stitch line on the fly, including around zippers and vent flaps.
Apply seam sealer in a dry, warm environment, above 60°F (15°C). Cold application creates a brittle seal that cracks on first fold. Lay the fly flat, apply a thin bead, and let it cure for a full 24 hours before packing.
The difference is measurable. An unsealed seam might hold up to a 1000mm hydrostatic head. A properly sealed one can match the fabric’s rating, often 3000mm or more. This turns a passing shower defense into a storm-ready barrier. For tents that see frequent use, re-seal every other season.
TL;DR: Inspect factory seams for light leaks. Seal every exterior stitch line on the rainfly with liquid sealer and let it cure for a full day before use.
Fabric and Fly: Know Your Numbers
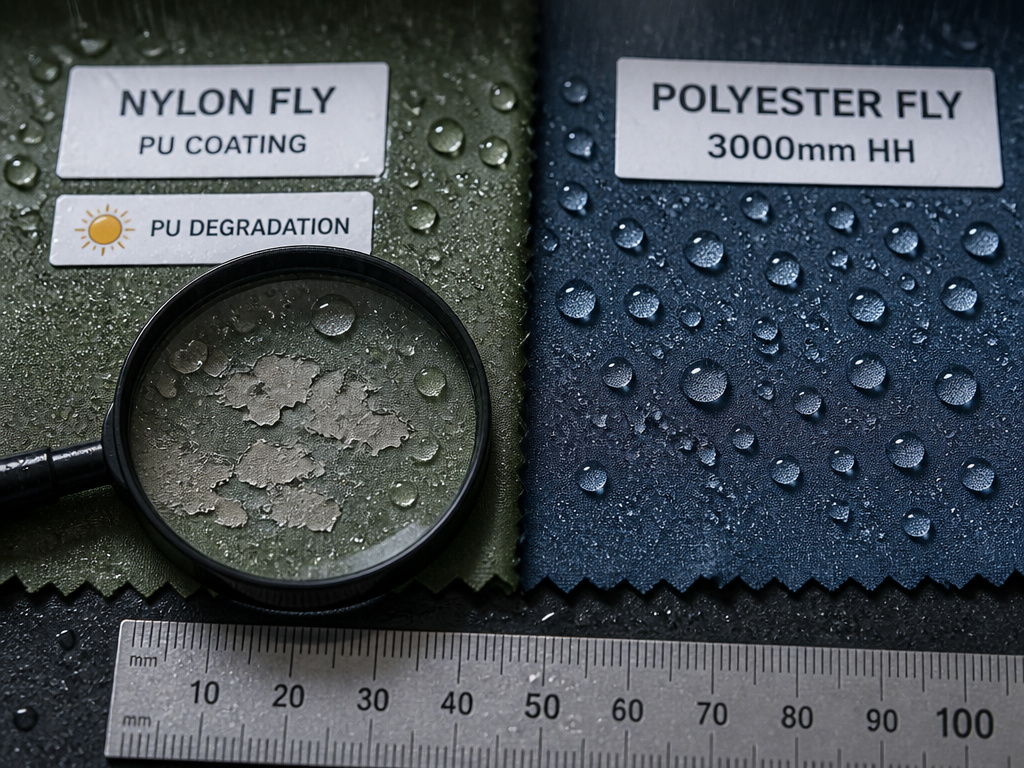
Tent materials are rated for water resistance using a hydrostatic head test, measured in millimeters. The number represents the height of a water column the fabric can support before droplets penetrate. A 1000mm rating might bead light rain. A 3000mm rating should handle a prolonged storm.
Nylon flys are common and lightweight, but they have a weakness: UV degradation. Sunlight breaks down the waterproof polyurethane (PU) coating. An MSR manual explicitly states UV damage is not covered under warranty. A nylon fly left pitched in direct sun for a season can lose half its waterproof rating. Polyester flys, while slightly heavier, are far more UV-resistant and can be left in the sun longer without the same damage.
| Fabric Type | Hydrostatic Head Range | Key Strength | Key Weakness |
| :— | :— | :— |
| Silnylon (Silicone-coated Nylon) | 1200mm – 4000mm | Extremely lightweight, good packability | UV-sensitive, coating can delaminate |
| Polyester (PU-coated) | 1500mm – 5000mm | Excellent UV resistance, durable | Heavier than nylon, can be less packable |
| Dyneema Composite Fabric (DCF) | Fully waterproof | Totally waterproof, incredibly strong | Very expensive, can develop pinholes over time |
Dyneema Composite Fabric (DCF) is in a league of its own. It’s a laminated plastic film, think a incredibly strong grocery bag, and is truly waterproof, not just water-resistant. The trade-off is cost and a tendency to develop pinholes at stress points over years of use. For most campers, a well-sealed polyester fly around the 3000mm mark is the sweet spot.
Your essential tent camping gear should always include a bottle of waterproofing spray like Nikwax TX.Direct. Reapply it to the fly’s exterior once a year, focusing on areas that see the most wear like the peak and door flaps.
Guy Lines and Tension: The Wind and Rain Anchor
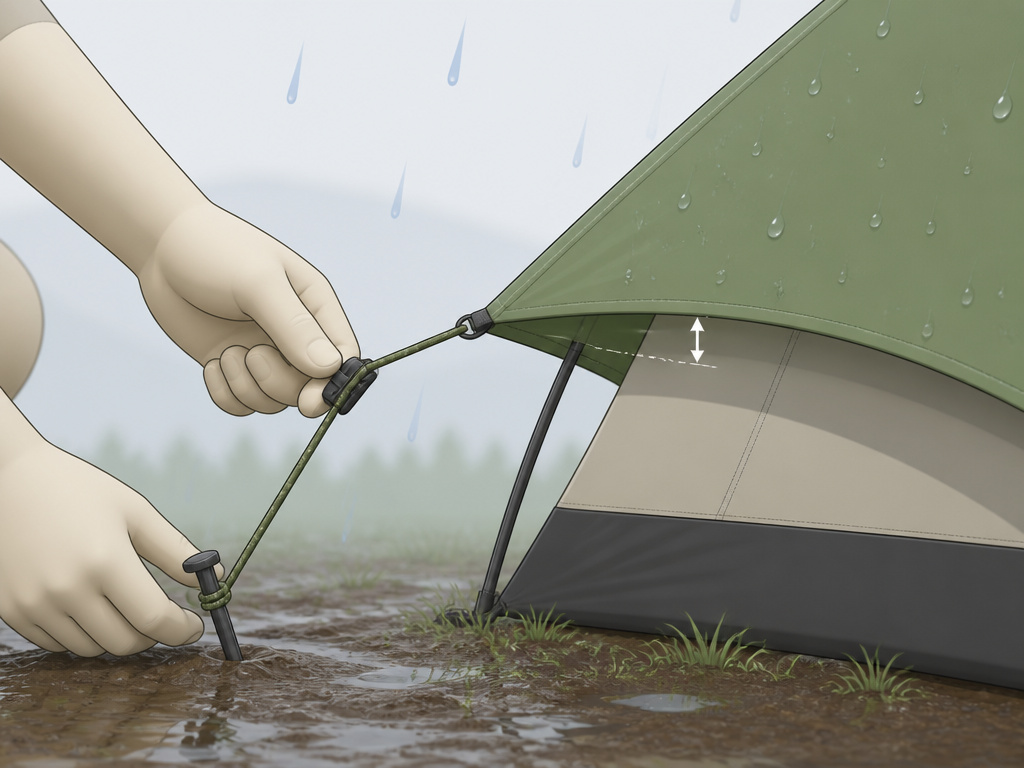
Guy lines aren’t just for high winds. In rain, a taut fly is a dry fly. A sagging rainfly touches the inner tent, creating a cold bridge where condensation forms and soaks directly into your sleeping bag. The goal is a consistent 1-2 inch air gap between the fly and the inner wall all the way around.
Use every tie-out point. Stake the lines at a 45-degree angle away from the tent. Here’s the counterintuitive bit: leave a little slack. A line pulled guitar-string tight transfers all the wind’s force directly to the fabric and stitching. A slight curve in the line acts as a shock absorber. The Tarptent Double Rainbow manual specifically advises to “re-tension the shelter as it stretches,” acknowledging that fabrics relax after initial pitching.
I once cranked the guylines on a new tent until they sang. A midnight gust didn’t break the line, it ripped the reinforced tie-out patch clean off the rainfly. Now I tension until the fly is drum-tight, then back off a half-inch on each line. The difference in storm performance is zero. The difference in longevity is everything.
This approach is critical for tents for high winds, where the load management is even more important. After a heavy downpour, check the lines again. Wet nylon and polyester can stretch significantly, requiring a second tightening pass.
Condensation Management: When Ventilation Backfires
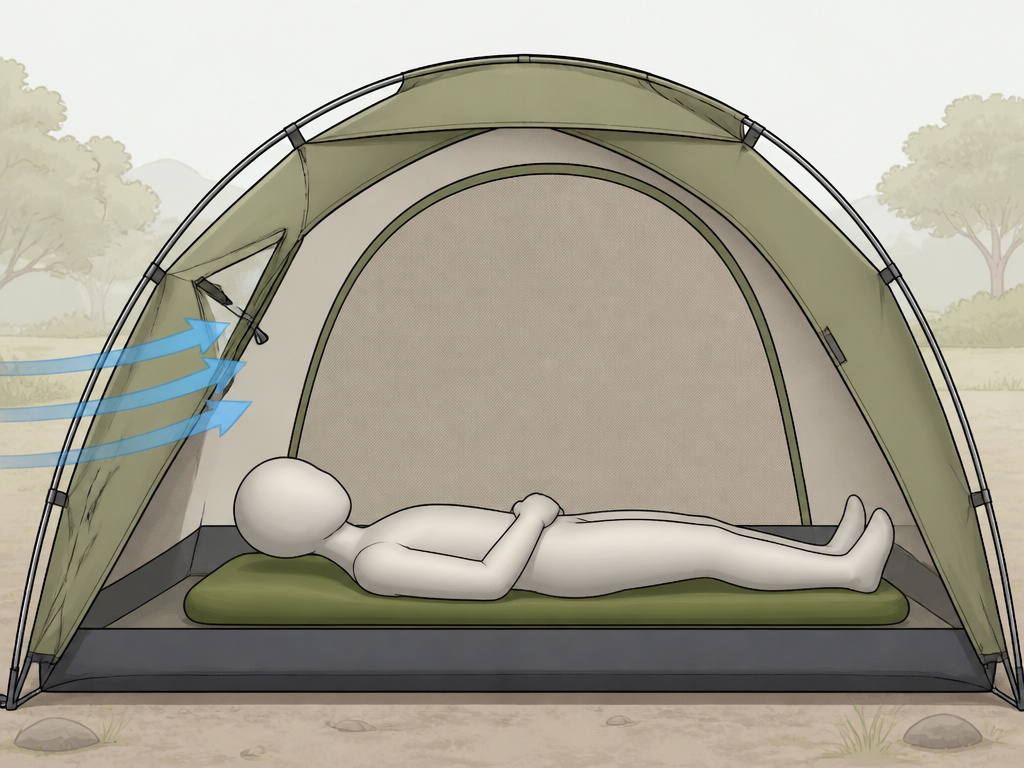
Condensation isn’t a leak. It’s warm, moist air from your breath and body hitting the cold fly surface and turning to water. The standard advice is to ventilate maximally. But the MSR manual contains a crucial warning: “During periods of high humidity, such as rain, a high degree of ventilation can actually increase condensation by drawing in more humid air.”
Opening every vent in a rainstorm pulls in more of the saturated outside air. The solution isn’t to seal up completely, that leads to suffocation and even more moisture from your breath. Leave one vent, usually the one opposite the prevailing wind, slightly cracked. Keep others closed. This creates a slow, controlled exchange.
Breathing matters. One study cited in a popular camping video found you lose roughly 40% more water vapor breathing through your mouth than your nose. It sounds minor, but over an eight-hour sleep, that’s a significant amount of added moisture. Train yourself to nose-breathe while sleeping.
TL;DR: In high humidity, limit ventilation to one cracked vent. Mouth breathing adds significant interior moisture. Use a microfiber towel to wipe down the fly’s interior each morning.
The Critical Dry-Out Before Storage
This is the step everyone rushes. You get home tired. The tent is damp. You stuff it in the garage, promising to deal with it tomorrow. Tomorrow becomes next week. The MSR owner’s manual is blunt: “Storing a wet tent for as little as 24 hours in warm weather can start mildew formation.” Mildew stains are permanent. The smell never fully leaves.
Set the tent up in a shaded, breezy spot. Direct sun can degrade fabrics. Hang the rainfly separately from the inner tent. Open all doors and vents. It might take a few hours. It’s done when every surface feels room-temperature dry, not just not-wet.
If you absolutely cannot dry it fully, like packing up in a downpour, the Tatonka manual has a contingency: unpack the wet tent and spread it out in a dry place the same day. Hang it over a shower rod, lay it across chairs. Never leave it bundled in its stuff sack.
Common mistake: Assuming a “waterproof” floor means you can ignore ground moisture, prolonged contact with wet earth allows water vapor to migrate through the fabric via hydrolysis, softening the waterproof layer from the inside out. Always use a footprint.
For longer trips where daily drying isn’t possible, consider the added protection of tent camping accessories like a dedicated gear loft to keep wet items separated from your sleeping area.
Frequently Asked Questions
Can I use a regular tarp as a tent footprint?
Yes, but you must cut it to be 2-3 inches smaller than your tent’s floor on all sides. An oversized tarp will catch rainwater and channel it under the tent floor, creating a worse problem than having no footprint at all.
How often should I re-waterproof my tent?
Reapply a waterproofing spray (like Nikwax TX.Direct) to the rainfly’s exterior once per season if you camp frequently. For occasional users, every two years is sufficient. The telltale sign is when water stops beading and starts soaking into the fabric.
Is condensation inside a tent normal?
Yes, especially in cool, humid conditions or with multiple occupants. A small amount of condensation on the lower walls of the rainfly in the morning is normal, as noted in the MSR manual. Puddles on the inner tent floor are not normal and usually indicate a missing or mis-sized footprint.
What’s the difference between water-resistant and waterproof?
Water-resistant fabric (like untreated nylon) will repel light rain for a short time but will eventually wet through under sustained pressure. Waterproof fabric has a coating or laminate (like PU or DCF) that should prevent water penetration entirely under its rated hydrostatic head pressure, often 1500mm or higher.
My tent came with a “waterproof” rating. Why did it leak?
The most common points of failure are unsealed or poorly sealed seams, not the fabric itself. Check seam sealing first. Second, the waterproof coating can degrade from UV exposure, abrasion, or improper storage. Third, a sagging rainfly that touches the inner tent can transfer condensation directly.
Before You Go
Rain protection isn’t a single product. It’s a system: a sealed fly, a correctly sized groundsheet, a smart pitch, and disciplined drying. Skip any one piece, and water finds a way in.
Focus on the seams first, they’re the weakest link. Then get the ground right. A lightweight tarp shelter might forego a floor, but your standard tent cannot. Finally, respect the dry-out. That last hour in the yard saves a $300 tent from a mildew death.
Remember the hierarchy: site selection beats gear, a tight pitch beats a loose one, and a dry bag beats a warranty claim every time.
