
How to Re Waterproof a Tent | The 8-Year Coating Breakdown
This post contains affiliate links. As an Amazon Associate, we earn from qualifying purchases.
Re-waterproofing a tent requires three specific treatments: sealing the stitched seams, refreshing the flaking urethane coating on the inside, and reapplying the Durable Water Repellent (DWR) finish on the outside. Match the sealant to your tent’s fabric—silicone for silicone nylon (silnylon) and polyurethane-based products for standard polyester or nylon tents. A urethane coating typically delaminates after 8-10 years, which is the main cause of leaks in older shelters.
Most people assume a leaking tent is doomed. They see drips and start shopping for a replacement. The real failure is almost always the factory-applied waterproof coatings breaking down from age and UV exposure, not the fabric itself. You can fix it.
This guide walks through diagnosing the actual problem, choosing the exact right products, and applying them so your shelter holds up to the next storm.
Key Takeaways
- Tent fabric is not waterproof. Polyester and nylon shed water only because of factory-applied coatings; these wear off and must be refreshed.
- Match the sealant to the fabric. Using a silicone sealant on a polyurethane (PU)-coated tent (or vice versa) creates a useless, peeling mess.
- Urethane coating delamination is a time bomb. The sticky, flaky coating on the inside of your rainfly typically fails after 8-10 years, regardless of use.
- Condensation mimics a leak. If the tent interior is uniformly damp, you need more ventilation, not more waterproofing.
- Skip the iron for seam tape. Attempting to re-tape seams with a household iron often melts the fabric. Use liquid seam sealant instead.
What You Actually Need to Re-Waterproof a Tent
Gather your supplies before the tent is wet and spread out. Using the wrong product wastes a afternoon and can ruin the material.
| Product Type | Specific Use | Consequence of Using the Wrong Type |
|---|---|---|
| Seam Sealant | Sealing needle holes along stitched seams and guy points. | Peels off within a week; leaks return immediately. |
| Urethane Coating | Refreshing the flaky inner layer of the rainfly and floor. | Will not adhere; leaves sticky residue that attracts dirt. |
| DWR Spray | Restoring water-beading on the outside of the rainfly. | Water soaks in instead of beading; fabric wets out faster. |
You need a seam sealant matched to your tent fabric. For silicone nylon tents (often called silnylon), you need Gear Aid Seam Grip SIL. For standard polyester or nylon tents with a polyurethane coating, you need a PU-based sealant like McNett Seam Grip WP.
For the inner coating, a product like McNett Tent Sure is designed to refresh that layer. For the exterior, a Revivex DWR spray will restore the water-shedding finish. You also need a mild soap, a soft brush, a garden hose, and a well-ventilated space to work.
TL;DR: Buy three products: a fabric-matched seam sealant, a liquid urethane coating, and a DWR spray. Getting the seam sealant wrong guarantees failure.
Step 1: Diagnose the Real Problem
Is it a leak or just condensation? This answer changes everything. Condensation forms when warm, moist air inside the tent hits the cooler rainfly. It appears as a fine, even mist or droplets across the entire inner surface. A leak produces isolated drips or distinct wet patches in specific spots, often along seams or where the fabric feels thin.
Common mistake: Treating condensation with waterproofing — this does nothing to solve the humidity issue and can reduce the fabric’s breathability, making condensation worse.
Set the tent up in your yard on a dry day. Use a garden hose to simulate rain, spraying the fly evenly. Go inside and mark any spots where water comes through with a piece of painter’s tape. Also, inspect the inside of the rainfly. If the coating feels sticky or is flaking off in brownish bits, the urethane layer is delaminating. This is the most common failure in tents older than eight years.
If the tent is relatively new and leaking, the issue is almost always the seams. Factory seam tape can fail, or budget tents may have poorly sealed seams from the start. Check the hydrostatic head (HH) rating if you can find it. A rating under 1,500mm is meant for fair weather; it will wet through in a sustained downpour no matter what you do. In that case, consider upgrading to one of the best tents for heavy rain.
Step 2: Clean the Tent Completely
Any sealant or coating needs a perfectly clean, dry surface to bond to. Dirt, oils, and old waterproofing residue will prevent adhesion.
Start by setting up the tent or laying the rainfly flat. Use a soft-bristled brush and a solution of mild, non-detergent soap (like Nikwax Tech Wash) with cool water. Gently scrub the entire exterior and interior. Pay special attention to the floor, which collects ground-in grime. Never use detergent, bleach, or a pressure washer. These can strip the durable water repellent (DWR) coating and damage fabric fibers.
Rinse thoroughly with a hose until the water runs clear. Let the tent dry completely in the sun. This is non-negotiable. Applying any product to a damp tent traps moisture and causes mildew. A full dry in direct sunlight can take several hours. While it dries, organize your essential tent camping gear for the next outing.
Step 3: Seal the Seams (The Right Way)
This is the most critical step for stopping pinpoint leaks. Every hole made by a sewing needle is a potential water entry point.
- Identify every seam. This includes all stitching on the rainfly, the tent body seams, and especially reinforcement points for guylines and poles.
- Apply the correct sealant. For PU-coated tents, use McNett Seam Grip WP. For silicone nylon tents, use Gear Aid Seam Grip SIL. Squeeze a small bead onto the brush applicator (usually built into the tube’s cap).
- Paint it on smoothly. Brush the sealant over the seam, ensuring it fills the stitch holes. Aim for a thin, even layer. Too much product adds weight and takes forever to dry.
- Let it cure. Follow the product’s directions, but assume it needs at least 4-6 hours of dry, warm weather. Ideally, leave it overnight.
I tried re-taping a seam with a household iron once, following an online hack. The tape melted unevenly and bonded to my ironing board cover more than the tent. The repair was a stiff, lumpy mess that leaked on its first outing. Liquid sealant is slower but foolproof.
Skip this step, and water will seep through the stitches even if the fabric around them is perfectly waterproof. This is why checking seams is a key part of any tent camping equipment list.
TL;DR: Brush the right liquid seam sealant over every stitch line. Do not use an iron. Wait for it to dry completely.
Step 4: Reapply the Urethane Coating (PU)
The sticky, plastic-like layer on the inside of your rainfly and tent floor is a urethane coating. It blocks water from passing through the fabric. Over time, it oxidizes, becomes tacky, and flakes off. Once it starts flaking, water will seep through those spots.
Urethane coating delamination is not a defect; it’s a material lifespan issue. Manufacturers like Kelty note it typically happens after 8-12 years.
For small, flaky areas, a targeted refresh works. For a fully delaminated fly, you’re essentially recoating the entire interior surface.
- Locate the bad spots. The coating will look cloudy, feel sticky, or rub off as brown/green flakes.
- Prepare the surface. For stubborn flakes, you can gently rub the area with a cloth dampened with rubbing alcohol to dissolve and remove the old coating. Let it dry.
- Apply the new coating. Use a product like McNett Tent Sure. In a well-ventilated area, apply a thin, even layer with a paintbrush or foam brush over the damaged areas. For a full recoating, apply it to the entire inside of the fly and floor.
- Dry thoroughly. This coating needs 24-48 hours to fully cure. Hang the fly so the coated side doesn’t touch anything.
This process adds a small amount of weight. For lightweight tarp tents or ultralight shelters, a full recoating might outweigh the benefits—replacement could be smarter.
Step 5: Restore the DWR on the Outside
The Durable Water Repellent finish is what makes water bead up and roll off your rainfly. When it wears off, the fabric “wets out,” becoming saturated and heavy, which can lead to seepage.
After the seam sealant and urethane coating are fully dry, you can apply the DWR.
- Ensure the tent is clean and dry. Any moisture will dilute the treatment.
- Apply the DWR spray. Use a product like Revivex DWR. In a well-ventilated outdoor area, spray an even, light coat over the entire exterior of the rainfly. Hold the can about 6-8 inches away.
- Activate the treatment. Most DWR sprays require heat to bond to the fibers. The instructions may recommend tossing the fly in a dryer on a low, gentle heat cycle for 20 minutes, or using an iron on a low setting (with a cloth barrier). Follow the product label.
- Test it. Once cool, sprinkle water on the fly. It should bead up and roll off. If it soaks in, a second light application might be needed.
A strong DWR finish is a hallmark of storm-resistant tent designs. It’s the first line of defense, turning the rain away before it ever tests the seams or coatings underneath.
How to Choose the Right Products for Your Tent
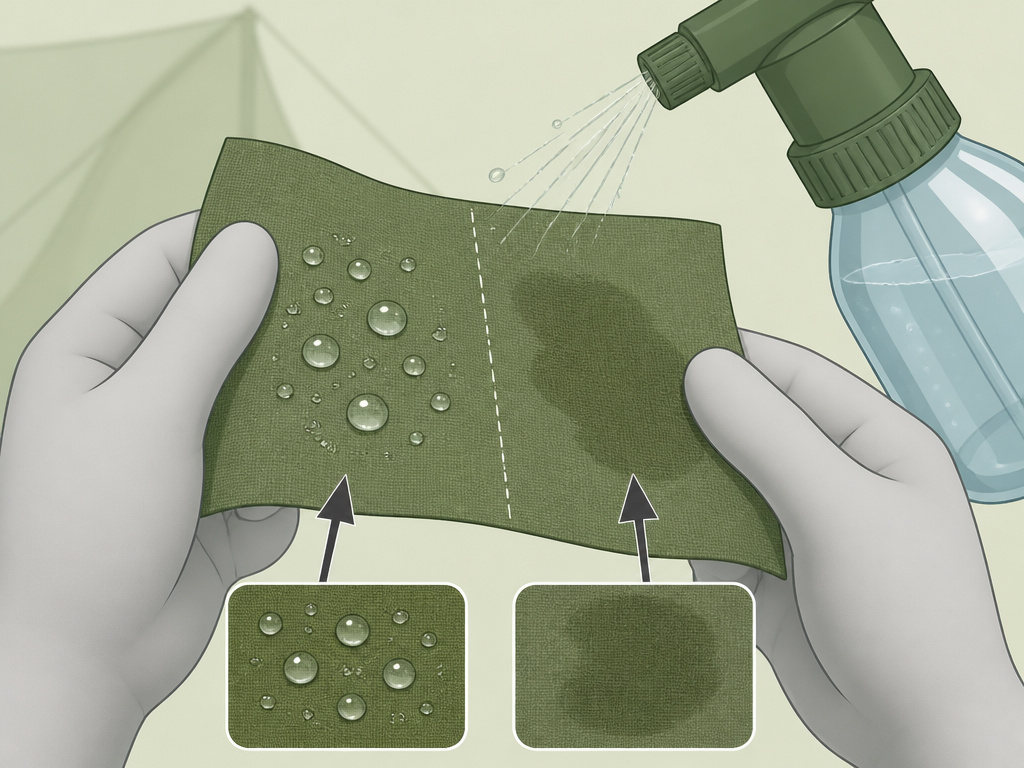
This decision tree prevents the most common, costly mistake.
| Your Tent Fabric Is… | Use This Seam Sealant | Use This Coating Refresh | Good For Tents Like… |
|---|---|---|---|
| Silicone-coated Nylon (Silnylon) | Gear Aid Seam Grip SIL | Silicone-based coating (less common) | High-end ultralight backpacking tents, some tarp tent shelters. |
| Polyurethane-coated Polyester/Nylon | McNett Seam Grip WP | McNett Tent Sure (urethane) | Most family car-camping tents, affordable tents under $100, and many quality tents under $200. |
| Canvas | Specialized waxed thread or sealant | Liquid wax or oil-based treatments (e.g., Otter Wax) | Durable canvas tents and canvas tents with stove jacks. |
If you’re unsure, check the tent’s manual or the manufacturer’s website. As a last resort, perform a water test on a small, inconspicuous area of the fly’s interior. Spray water on it. If the fabric darkens and absorbs water immediately, it’s likely silicone-coated (which absorbs water into the threads before the coating stops it). If the water beads on the surface, it’s likely PU-coated.
This specificity matters. Using a silicone sealant on a PU tent creates a bond that flexes differently, leading to quick peeling. It’s a waste of a budget-friendly tent option.
When to Waterproof, and When to Replace
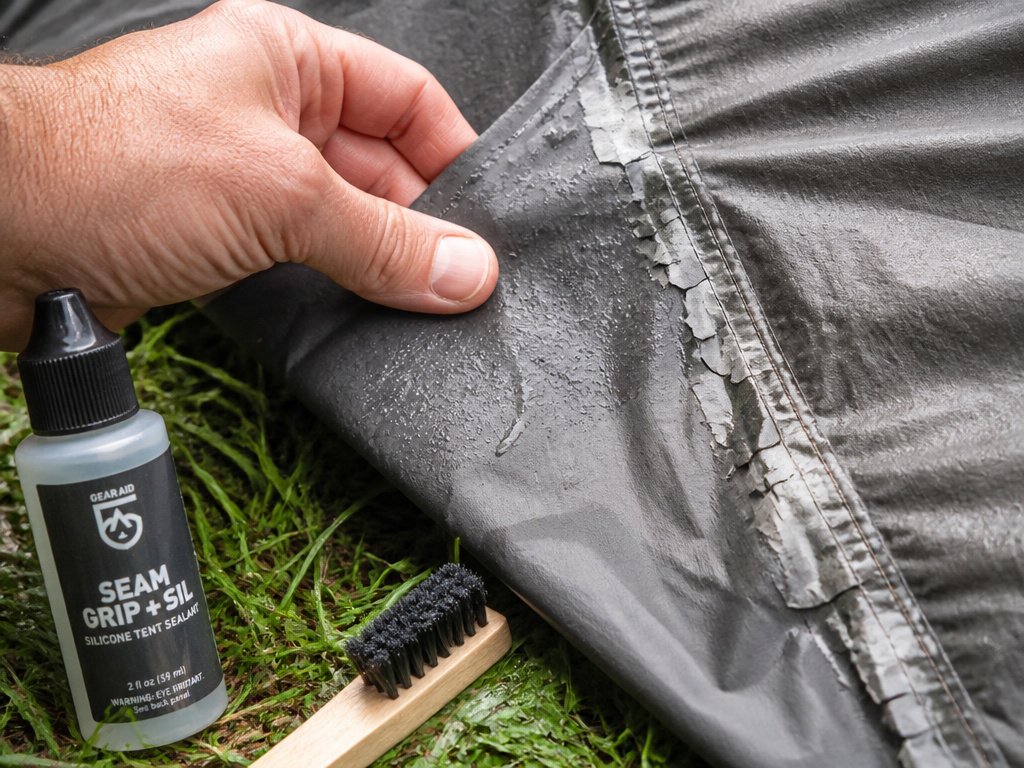
Re-waterproofing is a maintenance task, not a resurrection. It works when the fabric is sound and only the coatings are failing.
Re-waterproof your tent if:
- The leaks are isolated to seams or small spots.
- The interior urethane coating is flaky but the fabric underneath is intact.
- The tent is less than 10 years old and was a quality model to begin with.
Replace your tent if:
- The fabric itself is fraying, thin, or has holes.
- The waterproof coating is completely gone and the fabric wets through instantly.
- The poles are broken, the zippers are shot, and the camping comfort gear inside is worth more than the shelter.
- It’s a cheap, poorly designed tent with a very low hydrostatic head rating (under 1500mm). No amount of spray will make it stormworthy.
For frequent campers in harsh conditions, investing in a high-wind resistant tent from the start reduces how often you’ll need to go through this process.
Frequently Asked Questions
Can I use a generic waterproofing spray from the hardware store?
You should not. Those sprays are often for solid surfaces like brick or concrete. They can clog the breathable pores of tent fabric, trap moisture inside, and create a sticky film that attracts dirt. Always use a tent-specific DWR spray.
How often should I re-waterproof my tent?
There’s no fixed schedule. Reapply DWR when water stops beading on the fly. Check seams every season or two, especially before a big trip. The interior urethane coating will last 8-12 years before needing a refresh.
My tent floor is leaking, but the coating looks fine. What gives?
The floor gets the most abrasion. The coating might be microscopically worn. First, ensure it’s clean. If it still leaks, apply a liquid urethane coating like Tent Sure to the entire floor interior. For heavy use, add a footprint—it’s a key piece of must-have tent accessories.
Can I waterproof a tent in cold weather?
Most sealants and coatings require application at temperatures above 60°F (15°C) to cure properly. Applying them in the cold leads to improper curing, a sticky finish, and immediate failure. Wait for a warm, dry day.
Is it worth waterproofing a very old tent?
It depends on the fabric’s condition. If the nylon or polyester is still strong and supple, yes. If it’s brittle, UV-damaged, or ripped, the cost and effort of products outweigh the value. Consider recycling it and upgrading your shelter.
The Bottom Line
Re-waterproofing a tent is a straightforward, rewarding repair. It hinges on correctly diagnosing the leak source and matching your products to the tent’s fabric. Seal the seams first, tackle the flaky urethane coating on the inside, and finish by renewing the DWR on the outside. Done right, this process can add years of reliable service to a trusted shelter, saving you the cost of a new tent and keeping perfectly good gear out of the landfill. Just make sure you have the right portable tent lanterns for those longer drying sessions.
