
How to Set Up a Pop Up Tent Without the Common Mistakes
This post contains affiliate links. As an Amazon Associate, we earn from qualifying purchases.
To set up a pop-up tent, clear a level area, pull the rigid frame from the bag, not the fabric, unfold it onto the ground, stake the four corners before fully extending the legs, and secure it. Proper takedown requires two people to push the frame inward evenly, avoiding the broken hubs and voided warranties that come from forcing it alone.
I’ll never forget the sound: a sharp crack from the center of my brand-new OutdoorMaster 10×10 pop-up canopy, followed by the sickening sight of a spiderweb of white plastic radiating from the hub. I’d ignored the manual’s two-person takedown warning, thinking I could muscle it alone. That broken hub (Part #600926, a $45 replacement) taught me that speed and convenience come with very specific rules.
Pop-up tents are genius for beach days, farmers’ markets, and backyard gatherings, but they’re not idiot-proof. They’re engineered for a specific sequence. Skip a step, and you go from a seven-minute marvel to a tangled, broken mess.
This isn’t just about following instructions. It’s about understanding why those instructions exist, so you don’t learn the hard way, like I did, with a tent that wouldn’t fold flat and a three-mile hike of shame carrying a duct-taped bundle.
Key Takeaways
- Unpack by gripping and pulling the rigid frame ends from the bag. Yanking the fabric guarantees an internal tangle and a crooked setup.
- Stake all four corners before extending legs to full height. An unsecured pop-up is a sail; a 15 mph gust can turn it into a cartwheeling projectile.
- Takedown is a two-person job for larger models. The manual for the 8 FT x 10 FT POP-UP TENT explicitly lists single-person closure as a cause of damage not covered by its 30-day warranty.
- Surface matters critically. The manual for the 2 PERSON POP-UP TENT states plainly that sandy surfaces reduce stability. Use longer stakes or switch to weighted bags.
- Never store a damp tent. Mildew can bloom in under 48 hours inside a sealed bag, and material warranties exclude damage from improper storage.
A pop-up tent consists of a pre-assembled, spring-loaded frame housed within a connected fabric canopy. Setup involves removing the unit from its carry bag, allowing the frame to unfold onto a prepared surface, extending the adjustable legs to the desired height, and securing the structure with stakes or weights to counteract wind lift.
What’s the One Unpacking Mistake That Tangles Every Pop-Up Tent?
Most people grab the first handful of nylon they can and pull. This twists the pre-attached frame inside the bag, ensuring the legs and hubs bind when you try to unfold it. The tent pops open lopsided, and you spend 20 minutes fighting a spring-loaded spiderweb.
The correct sequence is on the bag’s label for a reason. First, clear a space larger than the packed tent. Lay the bag flat, zipper up. Feel through the fabric for the rigid ends of the frame, usually at the bag’s bottom. Grip these frame ends firmly and pull the entire skeleton out in one smooth motion.
Walk the unfolded frame to your site, hold it waist-high, and give a gentle downward shake. The fabric will unfurl, and the tent will settle into shape. Now you can orient the door. This method, straight from the 4-Person Pop-Up Tent Instructions, prevents 90% of setup frustration before you’ve even touched a stake.
Common mistake: Yanking the tent out by its fabric, this twists the internal hubs, causing legs to jam during extension and often resulting in a permanently warped frame that won’t fold flat.
How Do You Stake a Pop-Up Tent So It Stays Put?
Staking isn’t something you do after the tent is up; it’s what you do before the tent becomes a hazard. The moment those legs click into a higher setting, your canopy transforms into a giant sail. I’ve watched a 10×10 catch a gust and lift clean off the ground, bending legs and tearing seams, damage explicitly excluded as “wind damage” from the 8 FT x 10 FT POP-UP TENT’s 30-day limited warranty.
Your first action after unfolding should be to drive a stake through at least one corner grommet. Use a proper mallet from your tent camping equipment kit. The included stakes are often insufficient. Match your stake to the ground, not the other way around.
| Ground Type | Recommended Stake | Key Insight |
|---|---|---|
| Soft Sand or Grass | 10-inch spiral or sand stake | Straight down for maximum pull-out resistance in loose material. |
| Firm Soil/Gravel | 8-inch Y-stake or angled nail stake | Insert at a 45-degree angle away from the tent to leverage soil against lateral wind force. |
| Hard Pavement/Concrete | Weight bags (7+ lbs per corner) | Stakes are useless. Use sandbags or dedicated weight plates with reinforced loops. |
After securing all four corners, then extend the legs to your desired height. For constant wind, like with many pop-up tents for the beach, use the lowest setting. Finally, attach and stake out any guy lines to the canopy’s reinforced points, not the legs, creating a stabilizing triangle.
TL;DR: Stake corners first, then extend legs. Choose your stake based on ground hardness. Guy lines are non-optional in any breeze.
Are You Breaking Your Tent’s Legs Without Knowing It?
That grinding sound when you force a leg? Those are the plastic locking teeth stripping. Pop-ups use different mechanisms, and using the wrong action breaks them.
Most modern canopies, like the Quictent HSLT1203M, use a push-button system. Press the button to release, slide, and release to lock. Forcing it without pressing the button is the fastest way to a wobbly, unreliable leg. The 2 PERSON POP-UP TENT (IAN 469672_2407) uses a twist-lock; over-tightening it crushes the internal nylon bushing.
The trick is to extend legs evenly. Don’t raise one corner to the top while others are low. This torques the frame and stretches the canopy unevenly. Instead, use a “star pattern”: extend one leg to the second notch, then move to the diagonal opposite leg and match it. Work your way around. This keeps tension balanced and is especially important for larger stand-up tents where frame stress is higher.
If a leg jams, don’t kick it. Collapse the tent slightly to check for fabric caught in the joint or a twisted hub. Forcing it is how you get a permanent, unfixable lean.
What If Your Only Setup Spot Is a Terrible Surface?
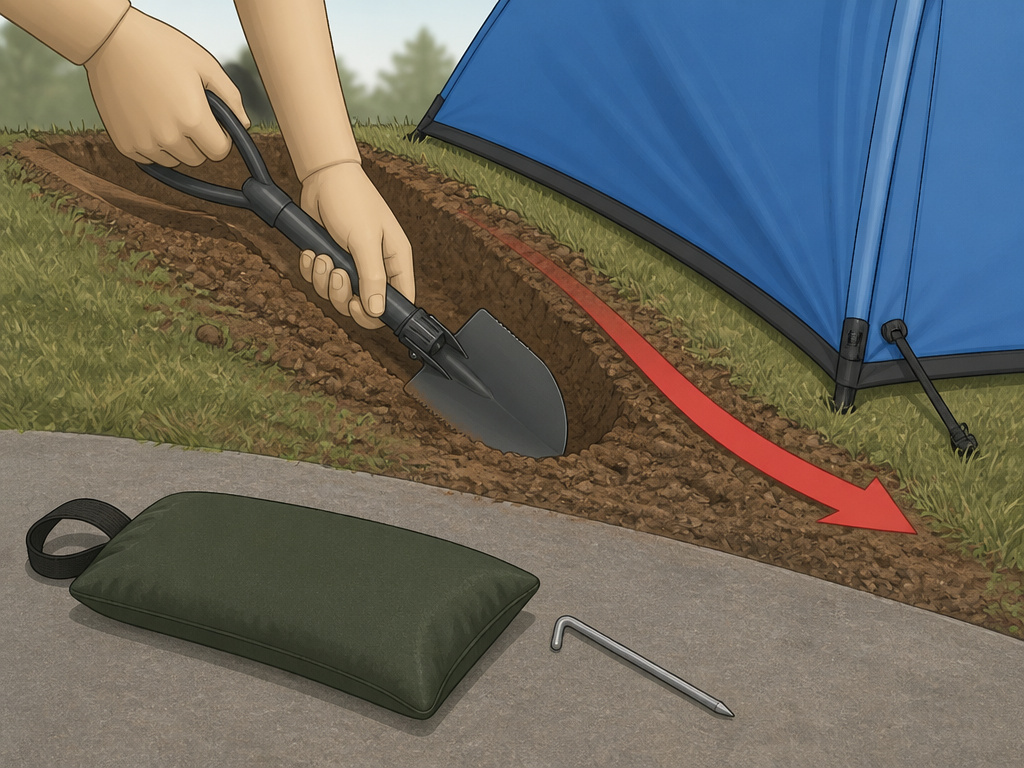
Manuals are brutally honest about this. The 2 PERSON POP-UP TENT manual states: “Sandy surfaces reduce the stability of the tent.” It’s not a suggestion. Sand shifts, stakes creep, and a strong lateral gust can pull all four at once.
I once set up on a slight slope at a festival, thinking it was minor. An overnight rain channeled water directly under my tent floor, creating a cold, damp mess. Now, if I’m stuck on an incline, I orient the door uphill and dig a small trench along the high side to divert water around, a five-minute task with a camp shovel that saves the night.
For sand, you need longer, specialized stakes. For pavement, you need weight. My failed market stall experiment, using 5-pound dumbbells that slid in a storm, taught me to use 7-pound Rhino Sandbags with nylon loops. The cheap vinyl ones split after a season in the sun.
The golden rule: Avoid steep inclines and clear away sharp debris. The best surface is flat, firm, and clear. If you’re venturing beyond a perfect backyard, consider if a more robust shelter from our list of durable canvas tents is a better match for the conditions.
How Do You Close a Pop-Up Tent With Two People (The Right Way)?
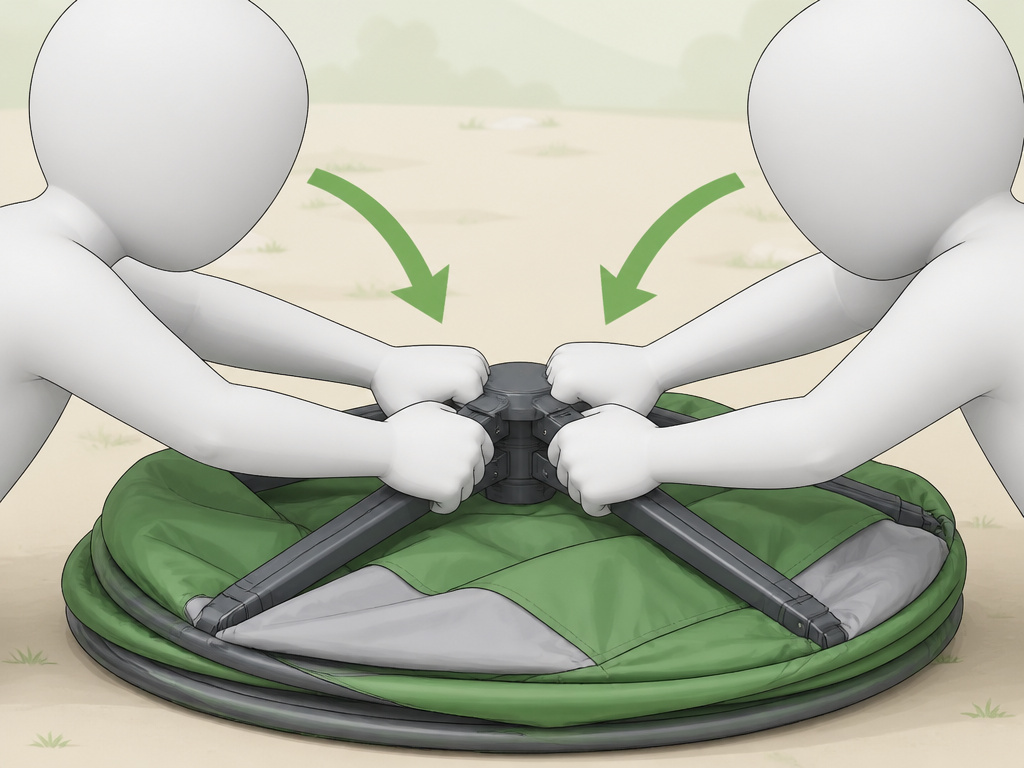
This is the moment of truth, where most frames are broken. The troubleshooting section of the 8 FT x 10 FT POP-UP TENT manual is clear: “Canopy will not easily close. Possible cause: One person attempting to close the frame. Corrective action: Use two people.” Ignoring this voids warranties.
Here’s the method that works: Two people face each other across the tent, each gripping the frame at the center of their side. On a count of three, both push inward and downward simultaneously, folding the frame into a disc. The key is even, synchronized pressure. Do not twist.
If it resists, stop. Ensure every single leg lock is fully released. A single locked leg will resist the collapse and can snap a hub. Once flat, fold the fabric neatly over the frame, working around in a circle to avoid catching material in the joints, a common cause of tears.
Finally, let the tent dry completely before bagging it. Packing it damp once can lead to mildew within 48 hours, and that sour smell never truly leaves.
TL;DR: Two people, push inward simultaneously. Check that all legs are unlocked. Never, ever bag a wet tent.
Frequently Asked Questions
Can one person set up and take down a pop-up tent?
One person can usually handle the setup, though it’s trickier. The takedown, however, often requires two people, especially for models 8×10 and larger. Manufacturers like the maker of the 8 FT x 10 FT model explicitly warn that single-person takedown can cause damage not covered by warranty.
How long should a pop-up tent last?
With proper care, a quality pop-up tent can last 3-5 seasons of occasional use. Longevity depends entirely on following the setup/takedown procedures, avoiding high winds, and never storing it damp. Cheaper budget tents under $100 may have a shorter lifespan due to lighter materials.
Can you use a pop-up tent in the rain?
You can, but you must respect its limits. Check the hydrostatic head (HH) rating. A 2000mm HH (like the POP-UP TENT 2.1) handles a light shower; a 3000mm rating offers more protection. No pop-up is designed for prolonged, heavy downpours. Seams will eventually wet through.
Do pop-up tents need guy lines?
Yes, if they are included. Guy lines dramatically increase stability in wind by triangulating the structure. Attach them to the canopy’s reinforced points and stake them at a 30-45 degree angle. They are a critical part of your tent camping accessories for safety.
Are pop-up tents good for camping?
They are excellent for casual, faff-free camping in good weather at drive-up sites, perfect for car camping tents style trips. They are not suitable for backpacking, severe weather, or long-term exposure, as their frames and fabrics are less robust than traditional pole tents.
Before You Go
A pop-up tent’s promise of instant shelter is real, but it’s a conditional promise. It works when you partner with its design, not fight it. Pull the frame, stake first, extend evenly, and close with a friend. The seven-minute setup is a reward for respecting the process.
Choose your surface wisely and never cheat on drying time. That mildewed smell is a permanent souvenir of a rushed job. For perfect summer days and stable ground, a pop-up is a brilliant tool. For anything more demanding, your shelter should match the challenge, sometimes that means opting for a more resilient design.
Grab your mallet, call a friend, and go enjoy that instant canopy. Just remember, the fastest way to set it up is to do it right the very first time.
