
How to Set Up a Tent | The Two Grommets Most People Miss
This post contains affiliate links. As an Amazon Associate, we earn from qualifying purchases.
To set up a tent, match the poles to their corresponding sleeves, thread them through, secure the tips into the stake-loop grommets, and then attach the rainfly. The pole-to-sleeve match is the step that goes wrong fastest. A black pole in a grey-trimmed sleeve collapses the roof in a stiff breeze.
This guide walks through the three-step sequence that beats wind, the two grommets most people miss on premium tents, and how to fix shock cord that goes slack in the cold. It is not a generic list. It is the difference between a shelter that holds and one that folds.
Key Takeaways
- Match poles to sleeves by color trim or diameter, a grey pole in a black sleeve bends under tension and can snap.
- For MSR double-wall tents, use the outer grommet in the stake loop for dry climates, the inner grommet when the fabric is humid and loose.
- Shock cord loses elasticity below freezing; pull each pole section back and forth quickly to warm and tension it, or tie a new knot.
- Saltwater corrodes aluminum pole ferrules silently; rinse poles with fresh water after any beach trip and apply a light silicone lubricant.
- Thread the rainfly pole through its sleeve before clipping the fly to the tent body, reversing the order tears the seam tape.
The 3-Step Sequence That Beats the Wind
Lay the tent body flat, insert poles, then attach the rainfly. That is the factory sequence for a reason. Deviate and you fight the design every time.
First, clear the ground of sharp rocks and sticks. Unfold the tent body completely, door facing your chosen direction. Stake the four corners loosely, just enough to keep it from blowing away. This initial stake is a placeholder, not the final tension.
Threading a pole through a sleeve is a single continuous motion. Start at one end, feed the shock-corded sections through, and let the cord pull the next segment into the sleeve. Forcing a kinked section jams the sleeve and can tear the fabric.
Second, identify the correct pole for each sleeve. The Coleman Montana 6 Tent uses a visual cue: its Main Body Poles are black and go into black-trimmed sleeves, while the Side Body Poles are grey and go into grey-trimmed sleeves. Mixing them puts a 9.5mm pole under the wrong load angle. The roof sags, and in wind, it can buckle.
Third, insert the pole tips into the grommets at the base of each stake loop. This is the moment the tent becomes a structure. For most tents, there is one grommet. For MSR tents, there are two: an outer and an inner. The outer grommet is for dry climates where the fabric stays tight. The inner grommet is for humid climates where the fabric expands and sags. Picking the wrong one leaves the tent skin either drum-tight and stressed or too loose and flappy.
TL;DR: Stake loosely, match poles to sleeves by color or diameter, then pick the correct grommet for your climate before final tension.
Tools and Parts You Need Before Starting
You need the tent bag, a mallet, and a ground tarp. The mallet is non-negotiable. Using a shoe or a rock rounds off stake heads and bends them.
A ground tarp or footprint extends the life of your tent floor. It is a separate sheet that goes under the tent, not inside it. The wrong move is laying the tent body directly on abrasive sand or pine needles. A footprint also stops groundwater from seeping through the floor seams. Do not use a blue poly tarp larger than the tent’s footprint, it will catch rain and channel it under the tent.
Inside the tent bag, you should find:
– The tent body (the main compartment with mesh and fabric)
– Poles (shock-corded or segmented)
– Rainfly (the waterproof outer layer)
– Stakes (usually 6-10 depending on model)
– Guylines (attached to the rainfly or separate)
– A pole repair sleeve (a short metal tube)
Count the stakes before you leave home. The Coleman Kenai 10’x8′ Tent includes two long shock-corded frame poles and a separate shock-corded rainfly pole. The CORE 10 Person Instant Pyramid Tent uses telescoping roof poles that click into place. If your poles are not shock-corded, you will assemble them segment by segment, a slower process.
Common mistake: Staking the rainfly directly to the same loop as the tent body, this binds the layers and prevents ventilation, leading to interior condensation within two hours of nightfall.
Missing a stake or guyline is a trip-ender. Some tent camping equipment kits sell replacement stakes, but matching the exact length and shape matters. A too-short stake pulls out in soft soil. A too-thick one will not fit through the stake loop.
How to Match Poles to Sleeves (And Why It Matters)
Pole sleeves are the fabric tunnels on the tent body. Poles slide through them. This seems simple until you have a pile of poles and the light is fading.
Look for color coding. The Coleman Montana 6 uses black trim for its Main Body Pole sleeves and grey trim for its Side Body Pole sleeves. Both poles are 9.5mm diameter, but the sleeves are cut and reinforced for specific stress vectors. Putting a grey pole into a black sleeve torques the joint.
If there is no color trim, match by pole length and sleeve position. Longer poles typically arch over the tent’s center. Shorter poles often form the side walls. Test-fit by laying the pole alongside the tent before threading. A pole that is obviously too long for a sleeve is meant for another.
| Pole Type | Typical Sleeve Location | Risk If Misplaced |
|---|---|---|
| Main Body / Ridge Pole | Over the tent’s centerline | Side walls cave in, rainfly won’t align |
| Side / Wall Pole | Along the tent’s sides | Roof sags, headroom is lost |
| Rainfly Pole | Over the rainfly (separate sleeve) | Fly sags, touches tent body, wets interior |
Shock-corded poles feed easiest. Hold the first segment, push it into the sleeve opening, and let the elastic cord pull the next segment through. Do not force a segment that is resisting, back it out, straighten the cord inside, and try again. Forcing it kinks the pole.
Non-shock-corded poles require you to connect each segment manually outside the sleeve, then feed the whole assembly through. This is tedious but precise. Drop a segment in the dirt and you will spend five minutes finding it.
Why this matters: The pole-sleeve system distributes wind load across the entire tent frame. A misplaced pole creates a weak point. In a 20-mph gust, that weak point flexes. After a few flex cycles, the aluminum fatigues and the pole snaps. It happens at the joint, not the middle.
Inserting Pole Tips into Grommets: The MSR Dual-Grommet Trick
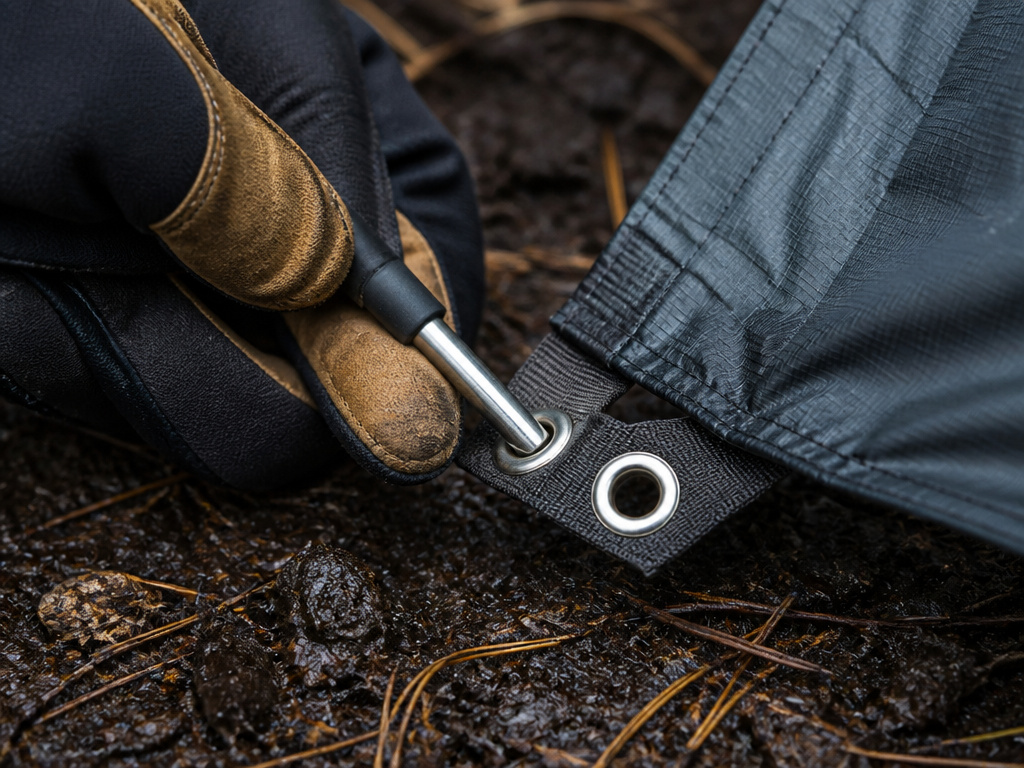
Once the poles are threaded, lift the tent structure. It will tentatively stand. Now locate the metal grommet at the base of each corner’s stake loop.
For most tents, you simply press the pole tip into the grommet. It clicks or seats firmly. For MSR double-wall tents, you have a choice. The stake loop has two grommets: one set toward the tent (inner), one set toward the outside (outer).
The rule is climate-based. In dry, low-humidity conditions, fabric contracts and is tight. Use the outer grommet. This pulls the fabric taut against the pole. In humid, wet conditions, fabric expands and becomes loose. Use the inner grommet. This gives the fabric slack so it does not overstress the seams.
I used the outer grommet on a coastal Oregon trip where the marine layer rolled in by dusk. By midnight, the fabric had absorbed so much moisture it stretched. The pole tips were pulling against the outer grommets with audible creaking. I moved them to the inner grommets at 2 a.m. in the rain. The noise stopped and the tent held.
Skipping this choice seems minor. It is not. An over-tightened tent in humidity can rip a stake loop or tear a seam. An under-tightened tent in dry wind will flap violently, wearing the fabric at the stress points. The MSR manual states this explicitly because they have seen the failures.
After the pole tips are seated, finish staking the corners. Drive stakes at a 45-degree angle away from the tent. Straight-down stakes hold less pull force. If the soil is soft, use longer stakes or deadman anchors like logs or rocks.
Attaching the Rainfly Without Sagging
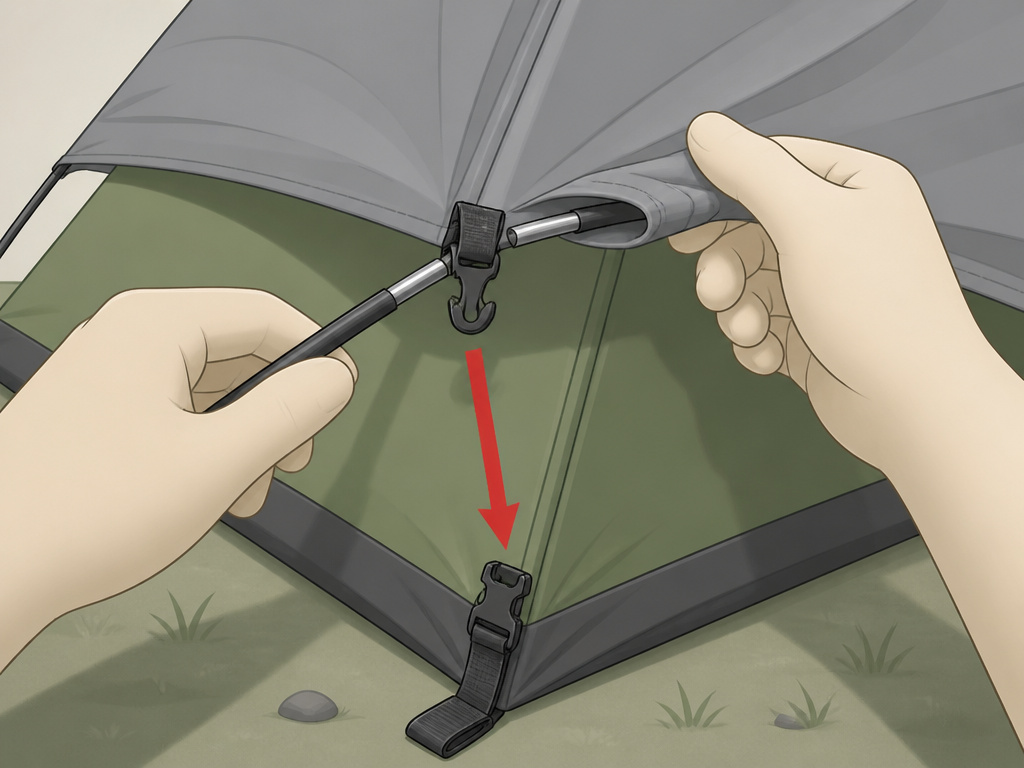
Drape the rainfly over the erected tent body. Align its corners with the tent corners. Do not clip it yet.
First, if your rainfly has its own pole sleeve (like the Coleman Kenai), thread that pole now. The Kenai’s rainfly pole is also shock-corded. Feed it through the sleeve on top of the fly. Then insert its tips into the fly’s designated grommets or clips. This gives the fly its shape and keeps it from touching the tent body.
Second, attach the fly to the tent. Most models use plastic clips or buckles that snap onto the poles. The CORE 10 Person Instant Pyramid Tent uses buckle attachments at the rainfly corners that connect to straps at the base of the tent corners. Clip from the bottom upward. This ensures the fly is tensioned downward, shedding water away from the tent body.
Common mistake: Clipping the rainfly to the tent body before threading the rainfly pole, the fly then sags onto the tent mesh, transferring moisture through contact and creating a cold spot directly above your sleeping bag.
Third, stake out the fly’s guylines. These are not optional. Extend each guyline to its full length, stake it out, and then tighten. The fly should be drum-tight. A saggy fly pools water and eventually leaks. A tight fly sheds water and creates a ventilation gap between fly and tent, the double-wall effect that stops condensation.
In high wind, add extra guylines to the rainfly’s midpoint. Use any spare cord or paracord. Tie one end to the fly’s loop, the other to a stake driven at a 45-degree angle into the wind.
Shock Cord and Cold Weather Fixes
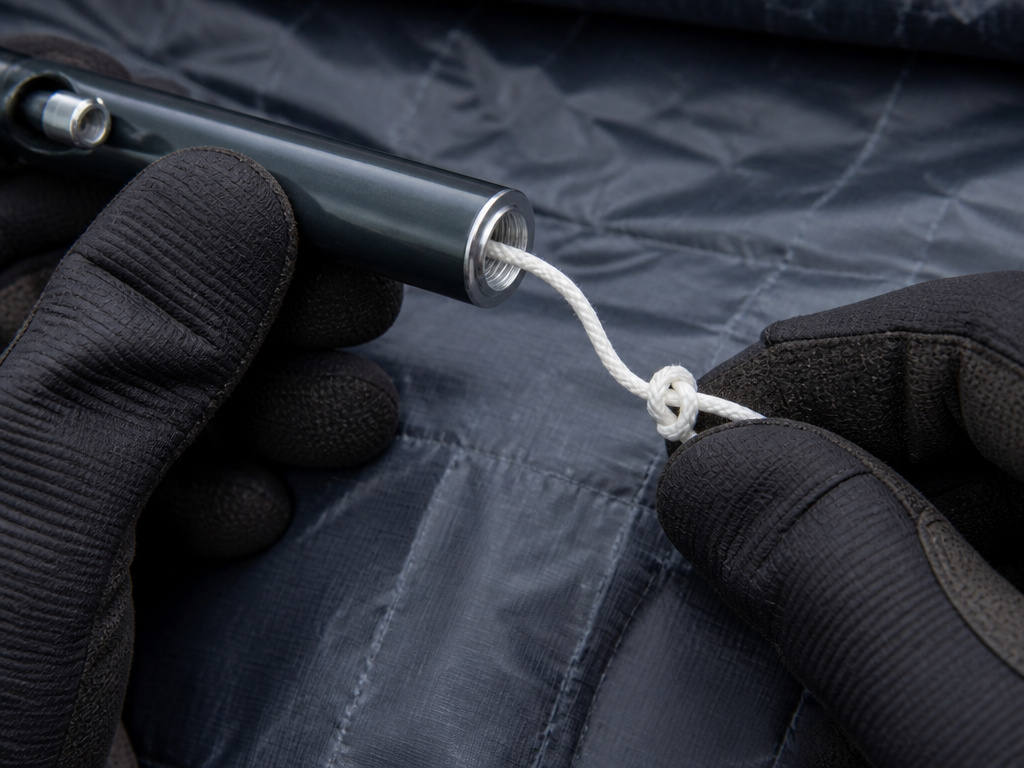
Shock cord is the elastic cord inside segmented poles. It holds the sections together. In cold weather, the cord loses elasticity. Below freezing, it can become so slack the poles will not stay extended.
The fix is in the MSR manual. Pull each pole section quickly back and forth. The friction warms the cord and restores some tension. If that fails, you can re-tie the cord. Unscrew the end tip of the pole. Pull out a few inches of cord. Tie a new knot closer to the tip, then trim the excess. Screw the tip back on.
Do not ignore a slack shock cord. On a windy night, a pole section can separate mid-storm. The tent collapses. I have seen it happen with a Coleman instant tent at 14°F. The cord was fine at setup, but by midnight it was limp. A pole segment slipped out, the structure folded, and we spent the rest of the night in the car.
Saltwater is a separate killer. Aluminum pole ferrules corrode when exposed to salt. The corrosion seizes the joints. After a beach trip, rinse poles with fresh water. Dry them thoroughly. Apply a light coat of silicone lubricant to the ferrules. This also helps in sandy environments where grit grinds the joints.
For long-term storage, do not leave poles assembled. The constant tension weakens the shock cord. Disassemble the poles and store them loosely coiled in the bag.
Tensioning Guylines and Final Adjustments
Guylines are the ropes attached to the rainfly. Their job is to pull the fly away from the tent body, creating an air gap. That gap is your ventilation.
Start with all guylines staked at their full length. Then walk around the tent and tighten each one progressively. Do not crank one guyline fully tight while others are loose, this twists the fly. Tighten each a little, then move to the next, and repeat.
A properly tensioned guyline has no slack, but is not bowstring-tight. You should be able to deflect it about an inch with light finger pressure. In rain, tighten them a bit more, wet fabric stretches.
Check for fly contact. Run your hand between the fly and the tent body. If you feel the fly touching the tent, loosen the nearby guyline or adjust the pole. Contact points drip condensation onto the inner tent.
Look at the silhouette. The fly should be smooth, with no wrinkles or dips. Wrinkles channel water. Dips pool it. Adjust pole tips in their grommets or re-stake guylines to eliminate them.
TL;DR: Tighten guylines progressively in a circle, check for fly contact by hand, and eliminate any dips or wrinkles in the fly’s surface.
Which Tent Design Is Fastest to Set Up?
Instant tents with pre-attached poles are fastest. Pop-up tents are a close second. Traditional pole-and-sleeve designs are slowest but most stormworthy.
| Tent Type | Setup Time | Best For | Trade-Off |
|---|---|---|---|
| Instant / Cabin Tents (e.g., CORE Instant Pyramid) | 2–5 minutes | Families, festivals, short fair-weather trips | Heavier, bulkier, less stable in high wind |
| Pop-Up Tents (spring-loaded frame) | 1–3 minutes (pop-up), 5+ minutes (staking) | Beach trips, picnics, emergency shelter | Fragile frame, difficult to repack, poor wind resistance |
| Traditional Pole & Sleeve (e.g., Coleman Montana, MSR) | 10–20 minutes | Backpacking, stormy conditions, long-term camps | Requires practice, more parts to lose |
Instant tents like the CORE 10 Person Instant Pyramid Tent use telescoping poles that click into place. You unfold the tent, extend the poles until they click, and stake it down. The trade-off is weight, those pre-attached poles and hubs add pounds. They also catch more wind.
Pop-up tents deploy in seconds. You throw them into the air and they spring open. Staking them down takes longer than the pop-up. Repacking them is a notorious puzzle. They are fantastic for a sunny day at the beach but miserable in any wind over 15 mph.
Traditional tents are the standard for a reason. The pole-and-sleeve system, when mastered, is reliable and strong. It splits the wind load across multiple points. For serious weather, whether a high-wind tents scenario or a heavy rain tents situation, this is the design that holds. The learning curve is the initial time investment. Your fifth setup will be twice as fast as your first.
Frequently Asked Questions
How long does it take to set up a tent for the first time?
Allow 30 minutes your first time, in daylight. The process involves matching parts, reading labels, and trial-and-error. By the third setup, you should be under 15 minutes for a traditional tent, under 5 for an instant model.
Can one person set up a large family tent?
Yes, but it is harder. Family tents like the Coleman Kenai 10’x8′ or the CORE 10 Person Instant Pyramid are designed for two people. One person can do it by staking corners first, then using their body weight to hold the structure while inserting poles. Having a second person is always faster and safer.
What is the most common mistake when setting up a tent?
Mixing up the poles. It sounds simple, but in fading light or with similar-looking poles, people thread the ridge pole into a side sleeve. The tent goes up but the geometry is wrong. The rainfly will not align, and the first stiff breeze stresses the misplaced pole. Always match by color trim, sleeve position, or pole length before threading.
How do you set up a tent on concrete or a wooden platform?
Use extra guylines and sandbags or weights instead of stakes. Tie the guylines to stable objects like picnic tables, railings, or heavy rocks. For the tent body, use a footprint and consider a tarp tents style setup that relies less on ground penetration. Do not drill into the platform.
Why does my tent sag after a few hours?
Fabric stretches, especially nylon, when it gets damp or cold. Shock cord also relaxes. Re-tension all guylines and pole connections after the first hour. In humid conditions, you may need to move pole tips to the inner grommets on MSR-style tents to accommodate the stretch.
Can you leave a tent set up for a week?
Yes, but you must re-tension it daily. Sun, wind, and moisture change the fabric tension. Check guylines and stakes each morning. If using a canvas tents model, the cotton will tighten when wet and loosen when dry, requiring more frequent adjustment.
Before You Go
Setting up a tent is a physical skill. Reading about it is not the same as doing it. Practice in your backyard before the trip. Time yourself. Take it down and do it again.
The sequence is everything: lay flat, stake corners, match poles, thread sleeves, seat grommets, drape fly, thread fly pole, clip fly, tension guylines. Miss a step and you will be redoing it in the dark.
Carry a pole repair sleeve and extra stakes. Know how to re-tie shock cord. Recognize the two grommets on an MSR tent. These specifics turn a frustrating chore into a two-minute routine. Your shelter is your first line of defense against weather. Pitch it right, and it will hold.
