
How to Store a Tent to Prevent Mildew and Damage
This post contains affiliate links. As an Amazon Associate, we earn from qualifying purchases.
Store a tent by ensuring it is bone-dry, free of chemical contaminants, and kept in a cool, dark place. The most critical step is eliminating moisture, as mildew can begin forming in less than 24 hours, voiding most warranties and ruining waterproof coatings.
I’ve lost a tent to storage. It was a favorite old two-person model, hastily stuffed into its sack after a dewy morning pack-up. By the next season, a map of black speckles bloomed across the rainfly, and the floor had a tacky feel that never went away. That smell, damp and sour, is a heartbreak you only need once.
This isn’t about folding origami. It’s about understanding the silent killers: hydrolysis breaking down your floor coating, UV light weakening nylon fibers through a storage bag, and a single bug spray splash dissolving a waterproof finish. I’ll share the hard lessons, the manufacturer specs most people miss, and the simple routines that keep your shelter ready for years of adventures.
Key Takeaways
- Mildew can start on a damp tent in under 24 hours in warm conditions, leading to permanent stains, odor, and fabric breakdown, a non-warranty issue per MSR and Kodiak manuals.
- DEET and picaridin in insect repellents actively dissolve polyurethane and silicone waterproof coatings; never let them contact your tent fabric.
- UV light degrades tent materials even when packed away; always store in a dark, climate-controlled space, never a sun-exposed attic or garage.
- For canvas tents with treatments like Kodiak’s Hydra-Shield™, only use silicone-based products like Kiwi Camp Dry® for spot cleaning; detergents clog the breathable fabric.
- A simple pole maintenance check, wiping clean and checking shock cord tension, prevents costly corrosion and elastic failure.
What Are the Real Dangers of Improper Tent Storage?
Three factors work against your tent in storage, and they’re more aggressive than most campers realize. Moisture is the fastest actor, but heat and light are relentless.
Storing a wet tent for as little as 24 hours in warm weather is likely to start the process of mildew forming on the fabric. Mildew will cause your tent to stain, smell, and will lead to the premature breakdown of the waterproof coating.
That’s a direct warning from the MSR Tents Owner’s Manual. I learned this the hard way after a coastal trip. I packed my tent slightly damp from sea mist, and just two days later in my warm garage, the first faint grey spots appeared on the seams. That tent never fully recovered, and the waterproof layer on the floor peeled like old wallpaper the following season.
Heat accelerates every form of decay. In a summer attic or a car trunk, temperatures can soar past 140°F. At that heat, the plasticizers in seam tape and polyurethane coatings leach out, leaving them brittle. The shock cord inside your poles turns to limp spaghetti. One off-season in a hot space can effectively age your tent by several years.
Then there’s UV light, the silent killer. The MSR manual notes that “UV light is one of the most damaging elements for your tent,” weakening fibers even when the tent is packed. Sunlight streaming through a garage window onto your storage bag is enough. This degradation happens faster at higher elevations, but it’s a threat anywhere.
TL;DR: Moisture causes rapid mildew, heat accelerates material breakdown, and UV light weakens fabrics constantly. A closet is always better than a garage.
How Do You Properly Clean a Tent Before Storage?
You don’t need a deep clean after every trip, but you must address specific contaminants. Dry dirt can often be brushed off. The real enemies are sticky, acidic, or chemical residues.
My most costly lesson involved bug spray. After a weekend in the bug-infested woods, I packed my tent without noticing where my DEET-treated skin had brushed the nylon fly. The next time I pitched it in a rainstorm, water soaked straight through in perfect hand-shaped patches. The repellent had dissolved the durable water repellent (DWR) finish. I had to use a technical wash-in treatment to restore it, and even then, the original factory coating was gone forever.
For general cleaning, use water only. A garden hose on a gentle setting is perfect. If you must use soap, a single drop of unscented, biodegradable castile soap on a soft sponge is the absolute maximum. Machine washing is a death sentence, the agitation stresses seams and strips coatings.
Canvas tents, like those reviewed in our guide to the best canvas tents, require special care. The Kodiak Canvas manual explicitly warns against soaps and detergents, which can damage their Hydra-Shield™ treatment. For spot cleaning, they recommend only a silicone-based repellent like Kiwi Camp Dry®.
| Contaminant | Safe Removal Method | Consequence If Ignored |
|---|---|---|
| Mud & Dirt | Let dry completely, then brush off. Hose rinse if needed. | Abrades fabric when packed; generally harmless if removed. |
| Pine Sap or Tree Pitch | Dab with rubbing alcohol on a clean cloth. | Becomes glue-like, attracting more dirt and permanently staining. |
| Insect Repellent (DEET/Picaridin) | Gentle scrub with mild soap and cold water. Rinse thoroughly. | Dissolves waterproof coatings, leading to immediate leakage. |
| Saltwater Residue | Rinse all fabric and poles with fresh water. Dry completely. | Corrodes aluminum poles and can degrade fabric coatings. |
Common mistake: Using household cleaners or stain removers on tent fabric. These often contain solvents or brighteners that permanently damage waterproof treatments and void warranties. Stick to water and manufacturer-recommended products only.
TL;DR: Brush off dry dirt, rinse off mud. Never let bug spray or sap sit on the fabric. For canvas, follow the manual’s silicone-only rule.
What’s the Step-by-Step Process for Packing a Tent?
A good pack job prevents frustration and fabric damage. Forget stuffing; a controlled roll is your friend. This method ensures a perfect fit every time and protects your investment, whether it’s one of our top-rated budget tents under $100 or a premium model.
- Dry Absolutely Everywhere. This is non-negotiable. Pitch it in your yard or hang it indoors. Run your hand over every inch, the floor seams and rainfly corners are notorious for holding hidden dampness.
- Lay the Bag as a Guide. Place your empty tent bag at one end of the flattened tent. This visible marker shows you the maximum roll width.
- Fold, Don’t Crease. Fold the tent lengthwise once, but stop before you reach the halfway point. Your goal is for the two ends to be roughly aligned, not to create a tight, narrow bundle.
- Center Your Hardware. Place your tent stakes, pole bag, and any other tent camping accessories in the center of the folded fabric. This creates a soft core and prevents metal from grinding against the tent wall inside the sack.
- Roll Tightly, Not Forcefully. Starting from the end opposite the bag, roll the tent firmly toward it. Keep the roll even.
- Compress the Bundle. Once rolled, kneel on the bundle to press out air and prevent it from springing open. This is the secret to a compact package.
- Slide, Don’t Stuff. Slide the rolled tent into the bag. If it doesn’t fit, you rolled too wide. Unroll, fold slightly narrower, and try again. Forcing it stresses zippers and seams.
Skipping step four is a particular folly. I once left stakes loose in the sack, and after a season of rattling around in the trunk, the tent floor had a constellation of tiny punctures exactly where the metal tips had bounced.
Where Is the Best Place to Store a Tent Long-Term?
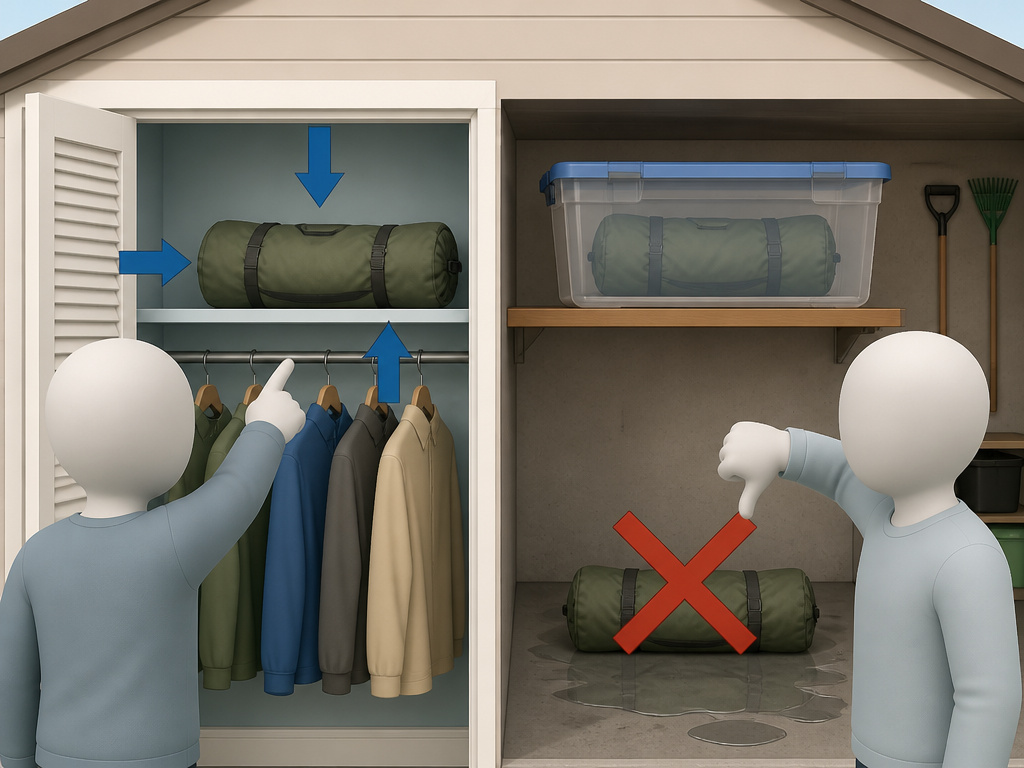
The ideal location is cool, dark, and dry. A closet shelf inside your climate-controlled home is perfect. Under a bed in a guest room also works well. The goal is stability, avoiding the temperature and humidity swings that degrade materials.
Attics, garages, and sheds are the usual suspects for tent murder. They cycle from freezing to blistering hot and often trap humidity. If your garage is the only option, mitigate the risk:
* Use a high shelf, away from windows and off the concrete floor (which wicks moisture).
* Place the tent bag inside a sealed plastic storage tub, like a Rubbermaid Roughneck. This adds a crucial buffer against humidity swings.
I stored a spare tent in my detached garage over a particularly humid winter. Come spring, the rainfly had a distinct, sticky feel where it had been folded, the early stages of hydrolysis, where the waterproof coating breaks down into a gooey mess. That tent was a total loss.
For truly long-term storage or if space is tight, a vacuum storage bag can be used, but with a massive caveat: the tent must be 100% bone-dry. Any trapped moisture becomes a sealed-in mildew incubator. For most people, a breathable cotton storage sack (larger than the original stuff sack) is a safer choice, as it prevents permanent creases in coated fabrics.
TL;DR: A bedroom closet is ideal. Garages require buffering in a sealed tub. Absolute dryness is mandatory for vacuum bags.
How Should You Maintain Poles and Shock Cords?
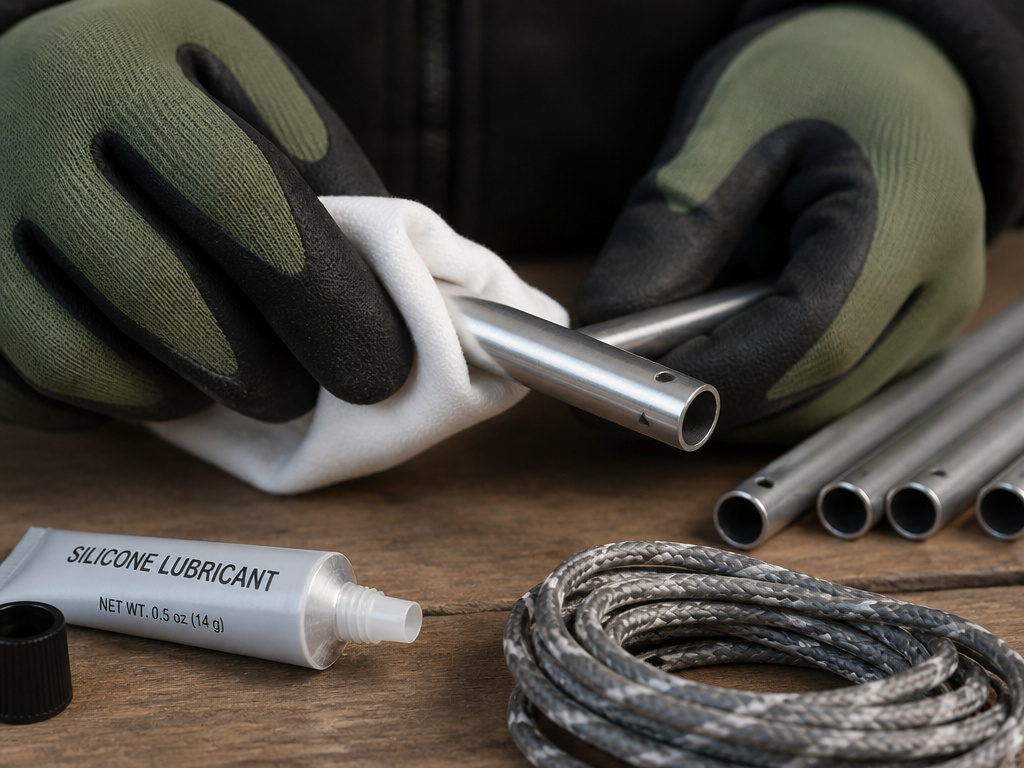
Poles are the skeleton of your tent, and their failure means a floppy, unusable shelter. A tiny bit of seasonal care prevents most issues. The main threats are corrosion, dirt, and a worn-out shock cord.
After any trip, especially near the ocean, wipe each pole section with a dry cloth. Salt is highly corrosive to aluminum. The MSR manual advises a freshwater rinse after saltwater exposure, followed by a “light coat of silicone lubricant” on the poles. I use a dab of Gear Aid Pole Lubricant for this, it’s a food-grade silicone grease that won’t degrade the shock cord, unlike petroleum-based products like WD-40.
Shock cord tension is easy to check. Assemble a pole section. If it feels loose and sections separate easily, the cord is stretched. The manual’s fix is clever: pull the pole section quickly back and forth a few times; the friction can often re-tension the cord. If that fails, you can unscrew an end tip, pull out slack, and tie a new knot.
| Symptom | Likely Cause | Immediate Action |
|---|---|---|
| Gritty feeling, hard to connect | Sand or dirt in the ferrule (joint) | Disassemble, wipe clean, apply silicone lubricant. |
| Pole sections won’t stay linked | Over-stretched or old shock cord | Re-tension using the manual’s method, or replace the cord. |
| White, chalky residue on aluminum | Salt corrosion | Clean with fresh water, dry thoroughly, lubricate. |
| Bent section | Accidental force (wind, knee) | Attempt gentle straightening; order a replacement section if kinked. |
Never store poles assembled. The constant tension unnecessarily fatigues the shock cord. Disconnect them and store them loosely in their bag or a separate tube. This is especially important for the longer poles of stand-up tents and spacious family camping tents.
TL;DR: Wipe poles clean, lubricate after saltwater, check shock cord, and always store them disassembled.
What Are the Most Common Storage Mistakes and How Do You Avoid Them?
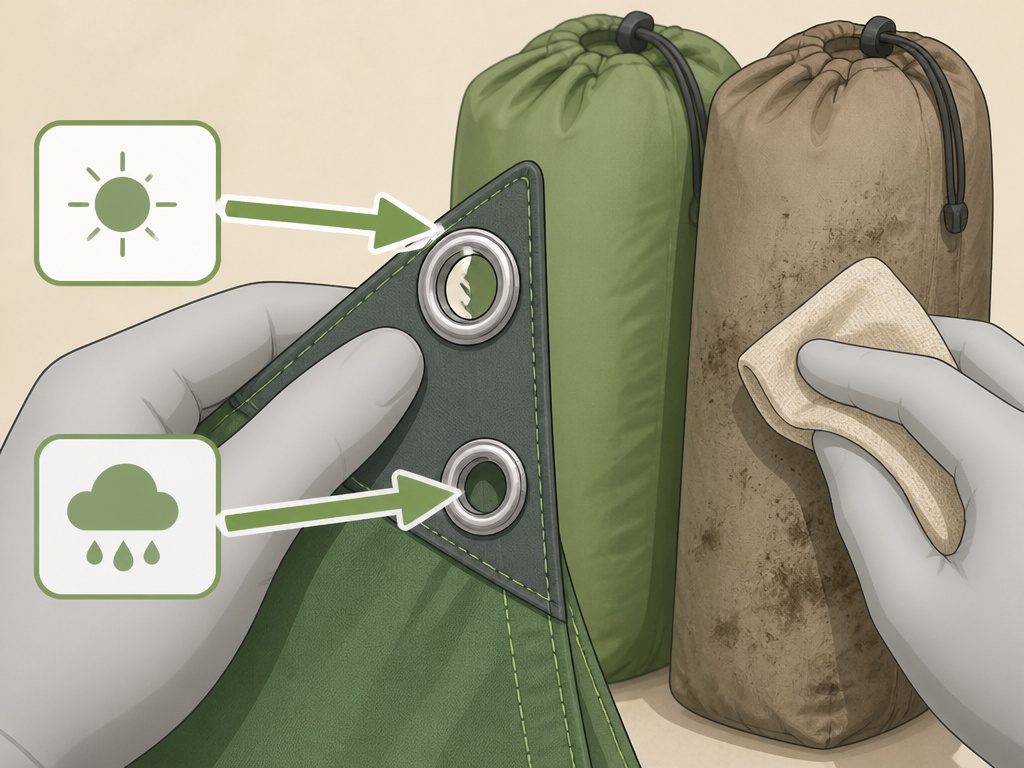
Beyond the big-ticket items, small oversights can shorten your tent’s life. Here are two frequent errors I see, both on the trail and in my own gear closet.
Ignoring the Two-Grommet System. Many quality tents, including MSR models, have two grommets side-by-side in the corner stake loops. This isn’t a flaw. As the MSR manual explains, fabric expands in humidity and contracts in dry air. Use the outer grommet in dry climates when the fabric is tight, and the inner grommet in humid climates when the fabric is loose. Using the wrong one puts constant stress on the corner seams, a common failure point.
Storing a “Dirty” Tent Bag. The exterior of your tent bag collects dust, pollen, and moisture from the ground. Storing that dirty bag in your clean closet just transfers grime onto your tent fabric over time. Give the bag a quick wipe down before putting it away.
Common mistake: Leaving a tent compressed in its tight stuff sack between trips, even for a week. This keeps delicate waterproof coatings under constant stress, leading to premature cracking. After drying, I transfer my tent to a large, old pillowcase for home storage, only using the original sack for travel.
Finally, don’t forget about your other essential camping gear. Sleeping bags should be stored loose, not compressed. Stoves need their fuel lines cleared. A little systematic post-trip care for all your equipment makes the next adventure start smoothly.
Frequently Asked Questions
Can I store my tent in a plastic bin?
Yes, a sealed plastic storage tub is an excellent choice, especially for garage or shed storage. It provides a critical buffer against humidity, dust, and pests. Just ensure the tent is completely dry before sealing it inside.
How can I tell if my tent is truly dry?
Pitch it or hang it in a warm, dry room indoors. Feel every seam, corner, and the bathtub floor with the back of your hand. Any coolness indicates residual moisture. When in doubt, give it an extra few hours.
What should I do if I find mildew on my stored tent?
Mix a solution of one part white vinegar to four parts water. Gently scrub the affected area with a soft brush, then rinse thoroughly with clean water. Set the tent up in direct sunlight to dry completely, as UV light helps kill remaining spores. Never use bleach.
Is it okay to store a tent with a small tear or broken zipper?
No. Repair any damage before storage. A small tear can grow under the pressure of being packed, and a faulty zipper can warp or break further. Addressing it immediately ensures your tent is ready for its next use.
Do I need to re-waterproof my tent every year?
Not necessarily. Only re-treat when water stops beading up on the rainfly. For synthetic tents, use a wash-in product like Nikwax Tech Wash. For canvas, follow the manufacturer’s instructions, typically recommending a silicone spray like Kiwi Camp Dry® for spot treatment.
Can extreme cold damage a stored tent?
Consistent, dry cold is generally less harmful than heat and humidity. However, avoid storing a damp tent in freezing conditions, as ice crystals can damage fabric fibers. The main risk in cold sheds is condensation cycles when temperatures fluctuate.
Before You Go
Storing a tent properly boils down to respecting a few non-negotiable rules. Dry it utterly, no matter how inconvenient. Keep it clean of chemicals, especially bug spray. Give it a stable, dark home off the concrete floor. These actions directly combat the timelines spelled out in manufacturer manuals, the 24-hour mildew warning, the seasonal UV degradation.
The process isn’t complicated. It’s the discipline that’s hard. That last-day fatigue tempts you to cut corners. But the twenty minutes you spend on a proper dry-and-pack routine is an investment that pays off for seasons to come, whether you’re prepping a family car camp tent for a summer road trip or tucking away a backpacking shelter for the winter. Your future self, unrolling a fresh, sweet-smelling tent under an open sky, will thank you.
