
How to Take Down a Pop-Up Tent Without Breaking It
This post contains affiliate links. As an Amazon Associate, we earn from qualifying purchases.
To take down a pop-up tent correctly, you need two people, a completely dry tent, and a controlled inward collapse. Lower all leg sections first, unlock the top frame, then push from the center while moving the legs together. Forcing it alone or pulling on the fabric often bends the spring-steel frame, voiding warranties like the 30-day coverage on Lowe’s Project Source models.
I’ve watched more than one campsite neighbor turn a simple pack-up into a frantic, sweaty wrestling match with their tent. The frame jams halfway, a plastic lock snaps, and suddenly a sunny trip ends with a broken shelter. It doesn’t have to be that way.
Pop-up tents operate on simple spring-tension physics. Fighting that tension is what breaks them. This guide walks you through the manufacturer-approved collapse sequence, the critical drying step most people rush, and how to troubleshoot when things stick. You’ll learn not just the steps, but the why behind them, so you can pack up with confidence and keep your tent ready for the next adventure.
Key Takeaways
- Two people are not a suggestion, they’re a requirement for larger models. The manual for the Lowe’s Project Source 8′ x 10′ Instant Canopy (Model #148346) explicitly lists one-person takedown as a cause of failure.
- Dryness is non-negotiable. Mildew can colonize damp nylon or polyester fabric in under 48 hours inside a dark storage bag, leading to permanent stains and odor.
- The sequence is sacred: legs down, top unlocked, then a center push. Reversing this order creates uneven pressure that can snap plastic locks or warp metal struts.
- The final fold is a specific figure-eight shape that coils into a circle, preventing the poles from twisting under tension in the bag during storage.
- Replacement parts are often available. If a plastic lock on a Clas Ohlson tent cracks, you can often order the exact part (like a ‘Top Hub Locking Pin’) directly from their spare parts portal.
Before you start: The spring-loaded frame can snap shut with enough force to cause serious finger pinches or lacerations. Wear work gloves. Never attempt takedown in wind over 15 mph, the canopy can act as a sail, pulling the entire structure over. Ensure all guylines, sandbags, and sidewalls are detached first.
Why Does the Right Sequence Matter So Much?
A pop-up tent frame is a network of scissor hinges held open by stored energy. The correct takedown method safely releases that energy evenly. The wrong method, usually a solo attempt involving yanking on a corner, twists those hinges. Once twisted, they bind, and forcing them is what leads to the bent poles and snapped plastic you see in frustrated online reviews.
The collapse procedure for a pop-up tent involves overcoming frame tension through balanced, inward pressure. Attempting this alone often results in misaligned hinges, which is the primary cause of jamming and component failure during takedown.
This is especially true for larger shelters. While a small 2-person pop-up might be manageable solo, the physics of a 10×10 foot canopy make a partner essential. This is a key reason many campers graduate to more stable, albeit heavier, stand-up tent models for basecamp use.
Common mistake: Yanking the fabric’s “finger ring” to start the collapse, this puts all the stress on a single stitch point and misaligns the frame from the outset, often tearing the canopy or deforming the ring within 5-10 uses.
What’s the Step-by-Step Collapse Method?
Follow this sequence precisely. Having a partner opposite you makes every step smoother and safer.
- Clear and Inspect: Remove every single item from inside the tent. A forgotten tent peg or carabiner becomes a projectile during collapse and can puncture the fabric from the inside, a frustratingly difficult spot to patch.
- Lower All Legs: Locate the button or pin lock on the middle section of each leg. Press and hold it, then slide the lower leg section up until it’s fully retracted. Do all four (or more) legs before touching the top frame.
- Unlock the Top Frame: Release the four corner locks first. Then, disengage the central locking mechanism. You should hear a soft click, not a crack. If it won’t budge, don’t force it; check that all legs are fully retracted.
- The Center Push (The Key Move): Position yourself at the center of one side, with your partner opposite. Place your hands on the frame segments in front of you. On the count of three, both push steadily inward toward the tent’s center while simultaneously walking the legs closer together. As the YouTube tutorial for a similar gazebo notes, the action is a coordinated “collapse the top… and moving the legs closer together.”
| If You Skip This Step… | …This Is Likely to Happen |
|---|---|
| Lowering all legs first | The frame jams at a 45-degree angle, unable to fold flat. |
| Unlocking the top frame corners before the center | The central hub bears uneven stress, potentially cracking. |
| Using a steady, centered push | The frame buckles sideways, twisting and potentially bending the metal struts. |
| Folding into a figure-eight | Poles cross and strain at pivot points, weakening the spring steel over repeated storage cycles. |
TL;DR: Partner up. Retract legs, unlock top, push inward from the center while bringing legs together. This is the universal method, whether you’re packing a pop-up beach tent or a large event canopy.
How Do You Properly Dry a Tent Before Storage?
This is the step that defines a tent’s lifespan. My own mildew disaster came from packing a slightly damp tent after a dewy morning. Forty-eight hours later, a constellation of black spots bloomed across the grey interior. Because of that, I now judge dryness by sound as much as touch: a truly dry nylon tent rustles with a crisp, papery whisper; a damp one gives a dull, muffled swish.
The POP-UP TENT 2.1 manual warns against over-taut erection, which prevents the fabric from adapting to weather changes. More critically, it and the Clas Ohlson manual state you must ensure the tent is “completely dry before packing it up for storage in order to prevent mould and mildew.”
Your drying options are:
* Ideal: Dry Upright. If weather permits, leave the tent fully erected in sun and breeze. This is best for durable canvas tents, which hold significant moisture.
* Practical: Collapse and Dry Flat. If you must leave, collapse the tent properly, then at home, fully unfold the wet fabric in a garage, over a railing, or on a dry patio. Use a high-velocity floor fan (not a gentle box fan) pointed at the seams, this concentrated airflow evaporates moisture from stitch lines twice as fast, which is critical because that’s where mildew starts.
Never fold or store the item when it is wet or damp. Let it dry completely to avoid mildew.
. Lowe’s 8′ x 10′ POP-UP TENT Manual
What’s the Correct Way to Fold and Pack It?
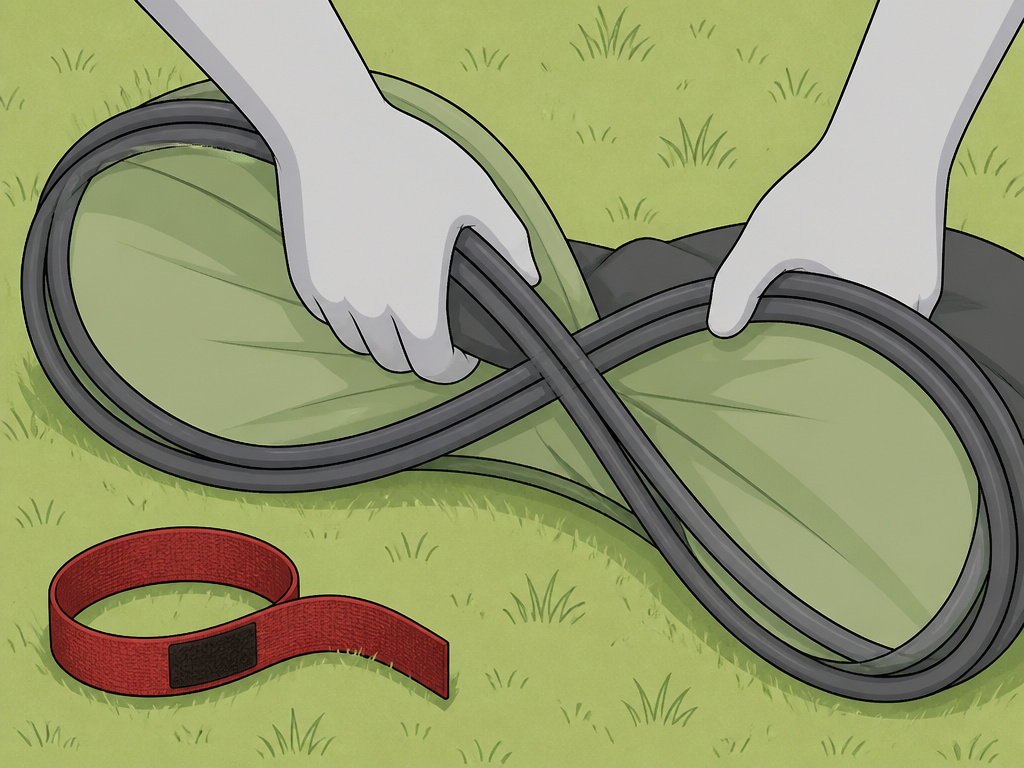
Once collapsed and bone-dry, the fight is over. Folding is just organization to prevent internal stress during transport.
- Lay the flattened frame on the ground.
- Manipulate it into a loose figure-eight shape (two connected loops).
- Bring the ends of the figure-eight together to form a circle. This is the natural, low-stress shape for the coiled poles.
- Secure the circle with the provided Velcro strap, snug, but not cinched tight.
- Gently place the folded frame into its storage bag. If it doesn’t slide in easily, a pole is twisted. Take it out and re-form the circle; never force it.
This figure-eight-to-circle method isn’t a random tip; it’s specified in manuals like Clas Ohlson’s to align pivot points so they aren’t under torsion in the bag. A well-packed tent, alongside your other essential camping gear, is a promise of many future trips.
How Do You Troubleshoot Common Problems?
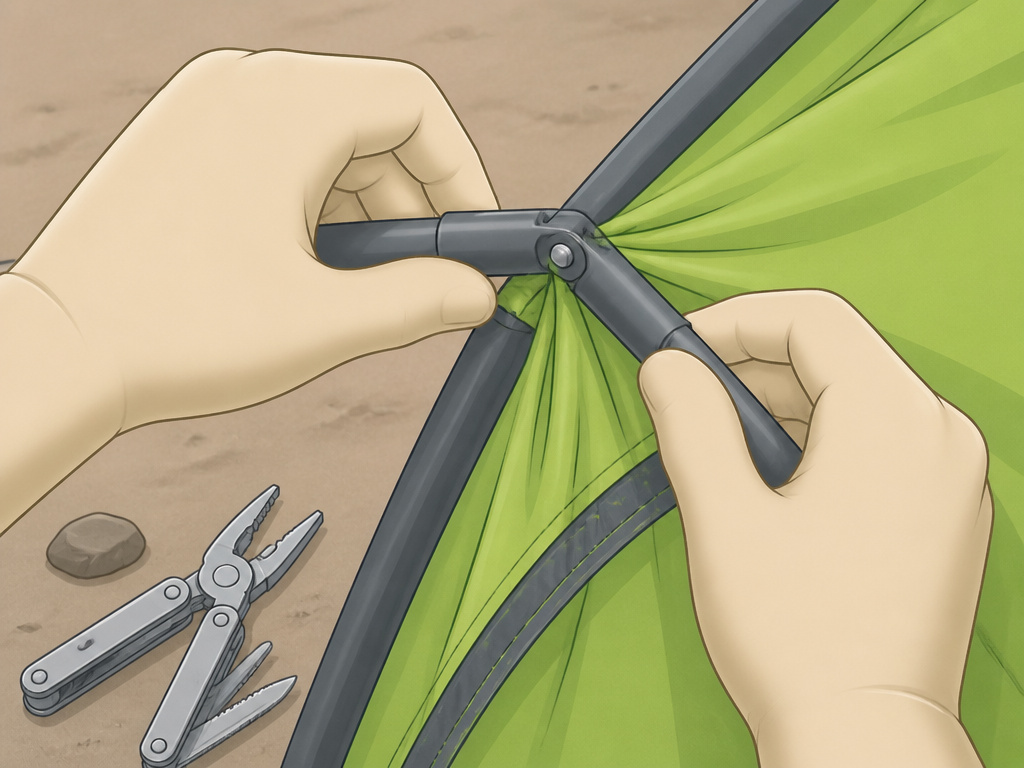
Even with care, things can stick. Here’s how to diagnose and fix common issues without causing more damage.
The Frame is Jammed at an Angle
- Likely Cause: The top frame was unlocked before all legs were fully retracted, creating uneven tension.
- Fix: Gently pull the frame back open. Start over: fully retract all legs, then unlock the top frame in the correct order.
A Leg Lock Button Won’t Depress
- Likely Cause: Sand, dirt, or debris is jammed in the mechanism.
- Fix: Tap the button firmly with a hard object like a multi-tool or rock. Once released, clean the mechanism thoroughly with a small, stiff brush, a hardware store paintbrush works perfectly.
The Fabric is Caught in a Hinge
- Likely Cause: The canopy wasn’t smoothed away from the frame before collapse.
- Fix: Reverse the collapse slightly until the fabric is free. Have your partner help guide the material clear of the moving parts before trying again.
Common mistake: Kicking or sitting on a stuck frame, this transfers sudden, concentrated force that can permanently bend metal or shatter plastic hubs, turning a simple jam into a total failure.
For persistent issues, always consult your specific manual. The procedure for a Koval 10×20 canopy with a center pole differs slightly from a simple dome-style tent.
What Should You Keep in Your Tent Maintenance Kit?
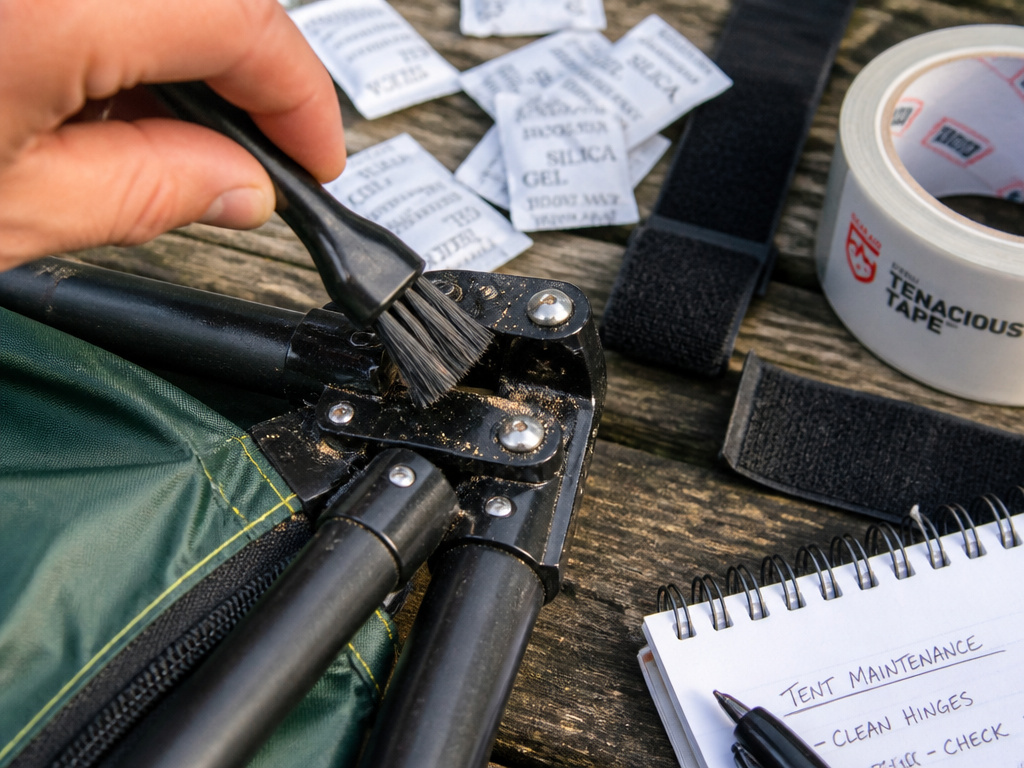
Packing the tent away isn’t the end. A small kit stored with your shelter solves problems before your next trip.
- A stiff-bristled brush – The kind you’d use for scrubbing dishes is ideal for ejecting grit from leg locks and hinges.
- Heavy-duty Velcro strap – The original strap will fray after a season of UV exposure. A $2 backup prevents a frustrating unpacking.
- Silica gel packets – I scavenge these from shoe boxes and electronics packaging. Toss a handful in the storage bag to combat ambient humidity, especially if you store gear in a basement or garage.
- Gear Aid Tenacious Tape – Clear, flexible repair tape. I learned the hard way that duct tape leaves a gummy residue that attracts more dirt and fails in the cold.
- A small notepad – Jot down which tent lighting solutions or other accessories you used, so packing next time is quicker.
Store the bag in a cool, dry place where it won’t be crushed. Proper care extends the life of even the most affordable camping shelters.
Frequently Asked Questions
Can one person take down a pop-up tent?
You can attempt it on smaller models, but it’s a significant risk. The manual for the Lowe’s 8×10 model explicitly lists “One person attempting to close the frame” as a cause of the canopy not closing easily, with the corrective action being “Use two people.” For anything larger than a 4-person shelter, a partner is strongly advised.
How long should it take to take down a pop-up tent?
The physical collapse with a practiced partner takes 2-3 minutes. The entire process, clearing gear, drying if needed, collapsing, folding, and packing, should take 10-15 minutes without rushing. Taking less time often means skipping vital steps.
What happens if I store my tent slightly damp?
Mildew growth is almost guaranteed, and it can begin within 48 hours in the dark, warm environment of a storage bag. This causes permanent stains, weakens fabric fibers, creates a lasting musty odor, and typically voids the manufacturer’s warranty.
My pop-up tent won’t collapse at all. What’s wrong?
The three most common culprits are: 1) One or more leg locks haven’t been fully released, 2) The top frame locks (especially the center hub) are still engaged, or 3) You are pulling from the edge or a corner instead of applying even, inward pressure from the center. Stop, re-check each point, and consult your model’s manual.
Is it okay to leave a pop-up tent up in the rain?
Most manufacturers advise against it. The Lowe’s manual states, “Never set up or continue to use in any rain, wind or storm conditions.” While the fabric may shed water, pooling can stretch seams, and the frame is not engineered for high wind or snow loads, which can lead to collapse or damage.
The Bottom Line
Taking down a pop-up tent isn’t a chore to rush; it’s a skill that protects your investment. The core principles are universal: respect the spring tension, use two people when the manual says to, and never, ever store it damp.
Mastering the legs-down, top-unlocked, center-push sequence will keep your tent, whether it’s a budget tent under $100 or a spacious family camping tent, popping up reliably for years. Fold it into that figure-eight, strap the circle, and store it properly. That way, your shelter is always ready, letting you focus on the adventure ahead.
