
How To Take Down A Tent: A Proven Wet-Weather Teardown Process
This post contains affiliate links. As an Amazon Associate, we earn from qualifying purchases.
To take down a tent, clear the interior, remove stakes, collapse poles by pushing, not pulling, sections together, and fold or roll the fabric loosely along its seams. The tent must be completely dry before long-term storage to prevent mold and fabric damage. If you must pack it wet, set it up to dry within 12 hours.
Most people rush the last step. They pull poles apart, jam a damp tent into its sack, and forget about it until the next trip. That’s how you get a mildew surprise and a $300 repair bill for snapped pole ends.
This guide covers the right sequence for dry and wet conditions, the one pole-handling mistake that causes most breaks, and how to store your shelter so it’s ready for the next decade.
Key Takeaways
- Push, never pull, tent poles. Letting the shock cord snap sections together or yanking poles through sleeves is the leading cause of pole-end damage and breakage.
- A wet tent is not a stored tent. Packing away moisture, even for a day, guarantees mold and can void warranties. If you must tear down in rain, loosely roll the tent and dry it completely within 12 hours.
- Leave a 10 cm (4-inch) gap in the main zipper on models like the Exped Orion. This prevents the zipper teeth from catching and tearing the fabric when you set it up next time.
- Saltwater kills aluminum poles. Rinse poles with fresh water after beach or coastal trips and apply a light silicone lubricant to slow corrosion.
- Store your tent loosely, not in its stuff sack. Use a large mesh bag or old pillowcase to let the fabric breathe and retain its waterproof coating.
Why Your Last Tent Takedown Probably Went Wrong
You followed the steps. You got it in the bag. So why did it smell like a gym locker two months later?
Common mistake: Storing a tent that’s even slightly damp, mold spores germinate in 24-48 hours, and the resulting stains and odor are nearly impossible to remove completely.
The problem is condensation. A tent that feels dry to the touch can still hold enough moisture in the seams and floor fabric to start a microbial party. The USAP field manual for tents explicitly tags tents at the end of a season with notes on moisture damage so repair crews know what to fix. You should do the same. A quick visual check for damp spots, especially along the tub floor, saves a ruined shelter.
The other major fail point is the poles. That satisfying snap when the shock cord pulls two sections together? That’s the sound of the pole ends slamming into each other. Do it enough times and the anodizing cracks. A small fracture turns into a full break under wind load. The MSR Tent owner’s manual states most pole damage happens during setup and takedown, specifically from pulling poles through sleeves and letting shock cord snap sections.
TL;DR: Moisture and brute force kill tents. Dry it completely and handle poles gently.
The 4-Step Dry-Weather Teardown (And How to Dry It Later)
This is the ideal scenario. You have time, the sun is out, and the grass is dry. Follow this sequence to keep everything clean and undamaged.
- Empty and sweep the interior. Get every sock, granola bar wrapper, and speck of dirt out. Dirt left in the tent grinds into the fabric during storage, acting like sandpaper on the waterproof coating. Use a small backpacking brush or just shake the floor vigorously.
- Disconnect guylines and remove stakes. Start with the leeward side (away from the wind) if there’s a breeze. Leave one windward guyline attached until the end, it keeps the tent from blowing away. Pull stakes straight up and out; rocking them back and forth widens the hole and damages the stake.
- Collapse the poles gently. For sectional poles, grasp each joint and push the sections together. Do not pull them apart and let the shock cord snap them shut. For a hub-style pole frame on a quick-setup tent, collapse it by following the manufacturer’s sequence, usually pushing the hub downward while bringing the legs inward.
- Fold or roll, don’t stuff. Lay the tent body flat on your groundsheet or a clean tarp. Fold it along its existing panel lines, then roll it loosely. Tight rolling creases the waterproof coating. For large family tents, folding is often easier than trying to roll the bulk.
If you’re storing the tent for more than a week, don’t use the stuff sack. The constant compression degrades the fabric’s waterproof treatment and can permanently crease it. An old pillowcase or a large mesh laundry bag is perfect.
What happens if you skip a step? Dirt left inside abrades the floor’s waterproof layer, leading to leaks. Stakes left in the ground become a trip hazard and get lost. Yanking poles stresses the shock cord and fractures pole ends, a $50 repair. Stuffing a dry tent tightly creates permanent creases where water will eventually seep through.
TL;DR: Clean, detach, push poles together, fold loosely. Store it loose, not crammed in its sack.
How to Take Down a Tent in the Rain (The Right Way)
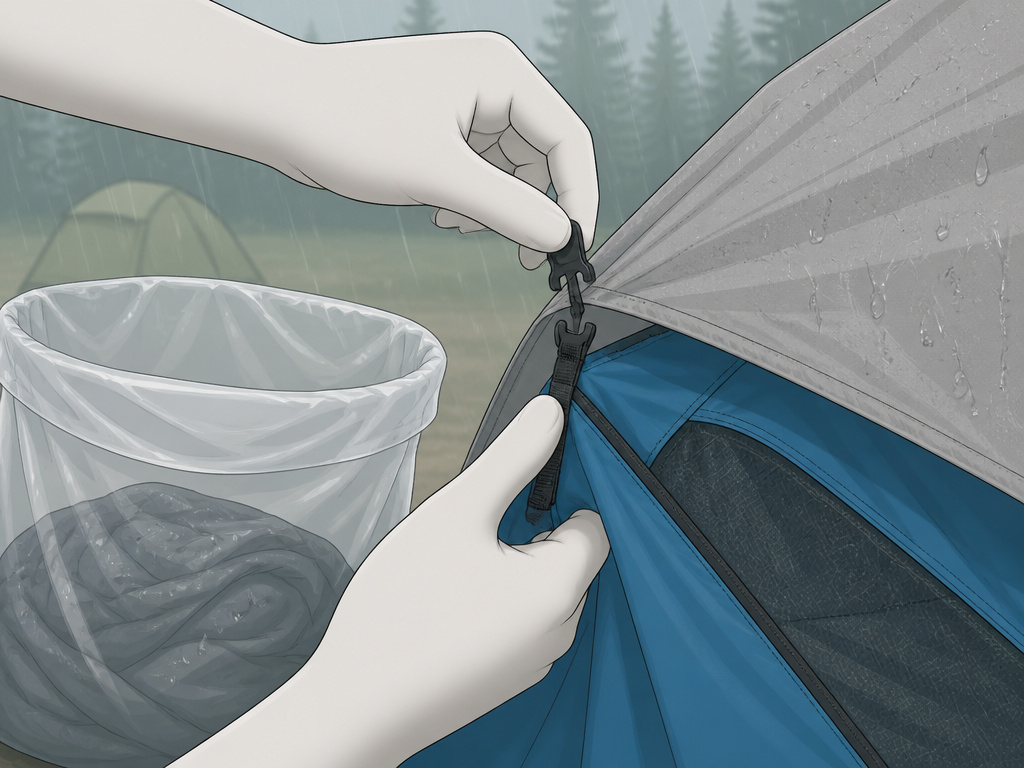
Rain happens. The procedure changes because your priority shifts from perfect packing to preventing a mold disaster. The Exped Orion Extreme and Orion UL manual has a specific wet-weather teardown: you can detach the inner canopy to pack it dry, then handle the wet rainfly separately.
Here’s the field-tested method.
- Strip the interior dry. Remove all sleeping bags, pads, and gear. Wipe down the tent walls with a microfiber towel or a dedicated shammy to shed the heaviest water.
- Disassemble under cover if possible. If you have a pop-up gazebo or a tarp strung up, take the tent down underneath it. This keeps the worst of the rain off during the process.
- Separate wet from dry components. On double-wall tents, unclip the inner body and pack it separately in a dry bag or trash compactor bag. The wet rainfly goes in its own bag.
- Pack it loose and get it dry fast. Do not tightly roll or stuff a soaking wet tent. Bundle it loosely, maybe even just stuff it gently into a large garbage bag. This minimizes the time the fabric stays in a wet, anaerobic state.
Common mistake: Bundling a wet tent tightly in its stuff sack, this traps moisture against the fabric for days, guaranteeing mildew. The Kodiak Canvas Swag Tent Model 8101 owner’s manual states that storing a wet or damp tent, even for a short time, can ruin it and void the warranty.
Your mission is to create airflow as soon as possible. Hang the rainfly over a shower rod, drape it on chairs in a garage, or lay it out in a basement with fans blowing. A tent air conditioner or dehumidifier in a small room speeds this up dramatically. A completely dry tent should have no cool spots to the touch and should smell like nothing at all.
| Scenario | Immediate Action | Long-Term Risk If Ignored |
|---|---|---|
| Light Condensation | Wipe down, air out for 1-2 hours before packing. | Mild mildew smell, possible staining on light-colored fabrics. |
| Rain During Teardown | Separate wet fly, pack loosely, dry within 12 hours. | Mold growth, waterproof coating degradation, voided warranty. |
| Soaked from Storm | Bundle loosely in garbage bag, dry with fans within 24 hours. | Permanent mildew stains, weakened fabric, foul odor that won’t wash out. |
TL;DR: In rain, pack wet parts loose and separate from dry parts. Dry everything completely within 12 hours, no exceptions.
The One Pole-Handling Mistake That Breaks $80 Poles
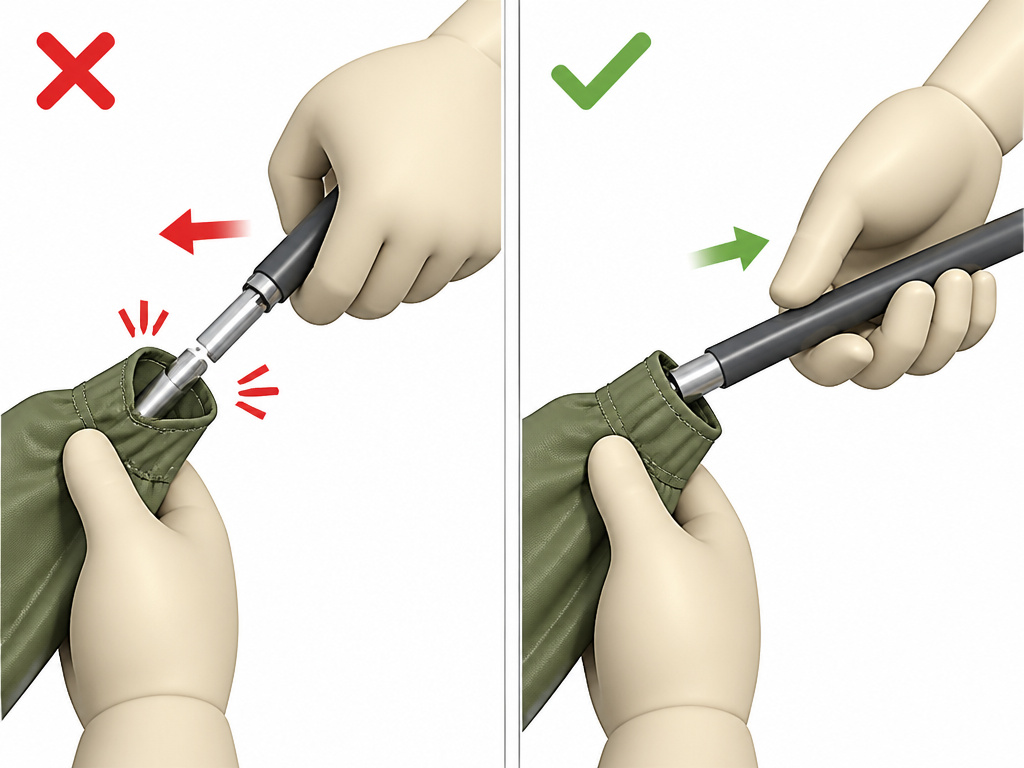
Pole repair kits aren’t cheap. The mistake is simple: you pull when you should push.
Push, don’t pull, poles through sleeves; pulling can cause sections to separate and damage the pole or fabric.
That’s a direct quote from the MSR manual. When you pull a pole through a tight sleeve, the sections can separate inside the fabric. The sudden jerk when they reconnect stresses the elastic shock cord and can crack the pole end. The correct method is to feed the pole by pushing from the end you inserted, guiding it smoothly.
For takedown, never let the shock cord snap the sections together. Control the collapse with your hands. This is especially critical in cold weather.
Why-layer: The shock cord inside poles is elastic. In extreme cold, it loses tension and becomes brittle. If you let a cold cord snap aluminum sections together, the metal is more prone to cracking. The official tent setup and takedown guide for extreme environments recommends pulling each pole section back and forth quickly to generate friction heat and restore cord tension before disassembly.
- For sectional poles: Grip the pole at the joint. Push the two sections together firmly until they nest. Work your way down the pole.
- For hub-style poles: Collapse the hub first, following the natural folding points. Then handle the leg sections as above.
- After saltwater exposure: Rinse poles with fresh water. Dry them, then apply a light coat of silicone lubricant to the ferrules. Salt corrosion will seize the joints.
TL;DR: Handle poles like glass. Push sections together, never pull them apart. Rinse them after beach trips.
How to Store a Tent So It Lasts 10 Years
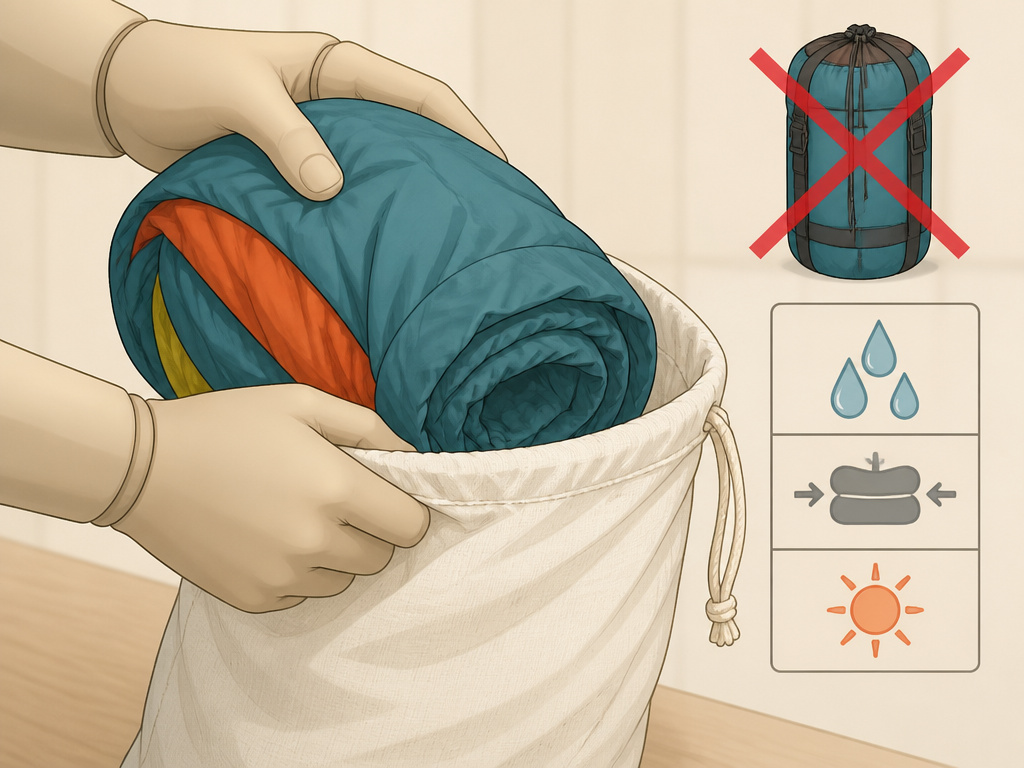
Storage is where tents go to die or thrive. The goal is to avoid three enemies: moisture, compression, and heat.
First, confirm it’s bone-dry. Feel the seams and the tub floor, these are the last places to dry. If you have any doubt, hang it for another few hours. For canvas tents, this is a non-negotiable rule. The canvas must be completely dry to prevent mildew and rot.
Second, never store a tent in its stuff sack long-term. The constant compression weakens the fabric’s fibers and can delaminate the waterproof coating. Instead, use a large cotton storage sack, an old pillowcase, or hang it loosely in a closet.
| Storage Factor | Ideal Condition | Damage Caused by Getting It Wrong |
|---|---|---|
| Moisture | 0% dampness before storage. | Mold, mildew, permanent stains, fabric rot, voided warranty. |
| Compression | Loosely folded or rolled in a large breathable bag. | Permanent creases, delamination of waterproof coating, weakened seams. |
| Temperature | Cool, stable, and dry place (e.g., closet, under bed). | Heat accelerates coating breakdown; cold makes fabrics brittle. |
| Light | Dark location (in a storage bag). | UV degradation from ambient light weakens nylon and polyester over time. |
Third, mind the accessories. Loosen all cinch straps on stuff sacks. The Kodiak manual warns that leaving them tight for months can permanently compress the foam in a sleeping pad stored inside. Coil guylines neatly to prevent tangles. Put stakes in a separate bag so they don’t puncture anything.
For durable tent materials like canvas, a light dusting of talcum powder on the folds before storage can prevent sticking. For synthetic fabrics, just ensure they’re clean and dry.
TL;DR: Store your tent dry, loose, and in the dark. The stuff sack is for transport, not for shelf life.
Frequently Asked Questions
Can you pack a tent wet if you’re going to dry it the same day?
Yes, but you must dry it completely within 12 hours. Bundle it loosely, do not stuff it tightly into its sack, to allow some air circulation. The moment you get home, unpack it and hang it with fans blowing. Even a day of damp, anaerobic storage can start mildew.
How do you take down a tent in high wind?
Use the wind to help you. Disconnect all guylines except the one on the windward side. Collapse the poles on the leeward (downwind) side first, letting the wind push the tent over gently. The Antarctic Program tent guidelines for Scott Polar tents specify tipping the structure into the wind and laying it flat with the apex pointed windward to prevent it from becoming a sail.
What’s the best way to clean a tent before storing it?
Use lukewarm water and a soft sponge, never a brush or detergent. Spot clean dirty areas, then rinse thoroughly. Hang to dry completely. For stubborn stains on a traditional camping shelter, a specialized tech wash like Nikwax Tech Wash is safe for waterproof coatings. Never machine wash or dry a tent.
Why do my tent poles keep getting stuck?
Dirt, sand, or corrosion in the ferrules (the connecting sleeves) causes sticking. Clean them with a cotton swab and isopropyl alcohol. For saltwater corrosion, use a very fine grit sandpaper (1000+) to polish the male end, then apply a tiny amount of silicone lubricant. Forcing a stuck pole will crack it.
Is it okay to store a tent in a hot garage or a cold basement?
Avoid both extremes. Heat accelerates the breakdown of waterproof coatings and elastic fabrics. A cold, damp basement invites moisture. A cool, dry, and dark closet or under a bed is ideal. If you must use a garage, place the tent in a plastic bin to protect it from temperature swings and dust.
The Bottom Line
Taking down a tent correctly takes ten extra minutes. Those minutes save you from a moldy mess, broken poles, and a leaking shelter next season. Remember the three non-negotiables: dry it completely, push poles together, and store it loose. Your future self, opening a fresh-smelling, ready-to-pitch tent, will thank you.
For your next trip, consider a stand-up tent for easier packing or a spacious camping tent that gives you room to organize gear during teardown. And always keep a roll of heavy-duty trash bags in your essential camping gear for those inevitable wet pack-outs.
