
How to Stake a Tent Properly With Correct Angles & Anchors
This post contains affiliate links. As an Amazon Associate, we earn from qualifying purchases.
To stake a tent correctly, drive corner stakes straight down and guyline stakes at a 45° angle away from the tent to resist wind lift. Secure the guyline knot within three inches of the ground and bury the stake to its full length to maximize the soil wedge holding it in place. Proper staking geometry, not brute force, is what keeps a shelter secure through a storm.
I’ve watched more tents fail from poor staking than from cheap fabric. On a ridge in the Wind River Range, I learned the hard way that a guyline tied six inches up a stake acts like a crowbar. A midnight gust levered it out, snapped a pole, and tore a seam. That repair tape is a permanent reminder: staking is foundational engineering.
This guide moves beyond generic advice. We’ll cover the precise angles and depths from industry manuals, how to adapt for sand and rock, and the sequence that guarantees a tight, storm-ready pitch every time.
Key Takeaways
- Anchor the windward corner first if the wind is already blowing to prevent the tent from becoming an instant sail.
- For loose sand or snow, forget vertical stakes. Use a deadman anchor, bury a stick or stuff sack horizontally, for real holding power.
- Re-tension all guy lines after the first rain. Nylon and polyester stretch when wet, turning a taut pitch into a saggy, leak-prone mess by midnight.
- Identify the critical stakes on a non-freestanding tent (often just 1-2) and place a rock on top of them. If these pull, the whole structure collapses.
- Pre-stake the corners for large family or cabin tents. Measure the diagonal to ensure a square layout before the tent even comes out of the bag.
For pole tents, a pull angle of 45 degrees or slightly steeper is suggested to withstand wind uplift while balancing vertical and lateral stake forces. Guy ropes should be secured to the stake not higher than two or three inches above the ground to minimize overturning moment.
Why Does Stake Angle Matter So Much?
Wind doesn’t just push a tent over; it gets underneath and lifts. Your guy lines are the primary defense against this upward force, and their angle of attack determines everything. A stake driven straight down resists only lateral pull. One driven at a shallow angle fights lift but can skid out sideways. The engineering sweet spot, confirmed by the official industry tentage safety standard, is 45 degrees.
This angle creates an optimal soil wedge. The buried length of the stake presses against a larger volume of dirt, providing resistance in both the vertical and horizontal planes. It’s the difference between a stake that holds and one that pivots out cleanly on the first gust.
TL;DR: Guyline stakes must be driven at a 45-degree angle, pointing away from the tent, to create a soil wedge that resists lifting forces.
The Critical Three-Inch Rule
The height where you tie the line to the stake introduces leverage. Tie it high, and any upward force creates a long lever arm that pries the stake out with alarming efficiency. Keeping the knot “not higher than two or three inches” above the ground, as the handbook states, shortens that lever to almost nothing.
I ignore the top hook on most stakes for this reason. I tie a taut-line hitch directly around the stake shaft, low to the ground. This simple habit has saved my shelter in countless squalls where others’ tents have faltered.
Common mistake: Using the top hook of a stake for guylines, this creates a 6-8 inch lever that will pull the stake out in sustained wind, often within an hour.
How Deep Should a Tent Stake Really Go?
The answer is unequivocal: until the hook or loop is flush with the soil. A fully buried stake utilizes its entire length to create a massive soil wedge. A half-buried stake relies on a small point of friction. The holding power difference isn’t linear; it’s exponential.
In Utah’s clay, a fully buried MSR Groundhog Mini can hold several hundred pounds of pull. That same stake, halfway in, might hold fifty. You drive it home not just for security, but for efficiency, it’s the most effective use of the tool.
Wait, that rule has a frozen-ground exception. In January, I shattered the tip of a DAC V-stake by hammering it to its full length into frozen soil. The polymer cracked. For ice, you bury it until flush, then stop. You then supplement with a deadman anchor for the guylines. It’s like driving a nail into concrete; you stop at resistance.
| Stake Burial Depth | Holding Power | Likely Failure Scenario |
|---|---|---|
| Full Length (Flush) | Maximum soil wedge | Stake may bend under extreme load. |
| 3/4 Buried | Moderate, reduced wedge | Pulls out in soft soil after rain. |
| 1/2 Buried | Low, point friction only | Fails in moderate wind, often at night. |
What’s the Correct Order for Staking?
Random corner staking creates a twisted, fighting mess. The correct sequence squares the footprint and distributes tension evenly. Start with two opposing corners. Pull the fabric taut until you hear a faint zip from the tensioned nylon, then drive the stake straight down. This sound is your cue.
Walk to the third corner. Pull it tight, but don’t yank so hard that you distort the alignment of the first two. Finally, set the fourth stake. Now walk the perimeter. The body should be drum-tight, with no wrinkles running from a stake to a pole. A wrinkle means that corner is over-tightened.
I won’t stake a dome’s corners in a circle. Opposing corners first locks the footprint square. If you go around the clock, the last corner never lines up and you have to redo two others, wasting time and patience.
Only after the inner tent is perfect do you attach the rainfly. Clip it on, then stake its points. The fly should be snug, but not guitar-string tight. Over-tightening can actually pull the inner walls inward, robbing you of precious interior space, a key consideration for spacious car camping tents.
How Do You Stake in Sand, Rock, or Wind?
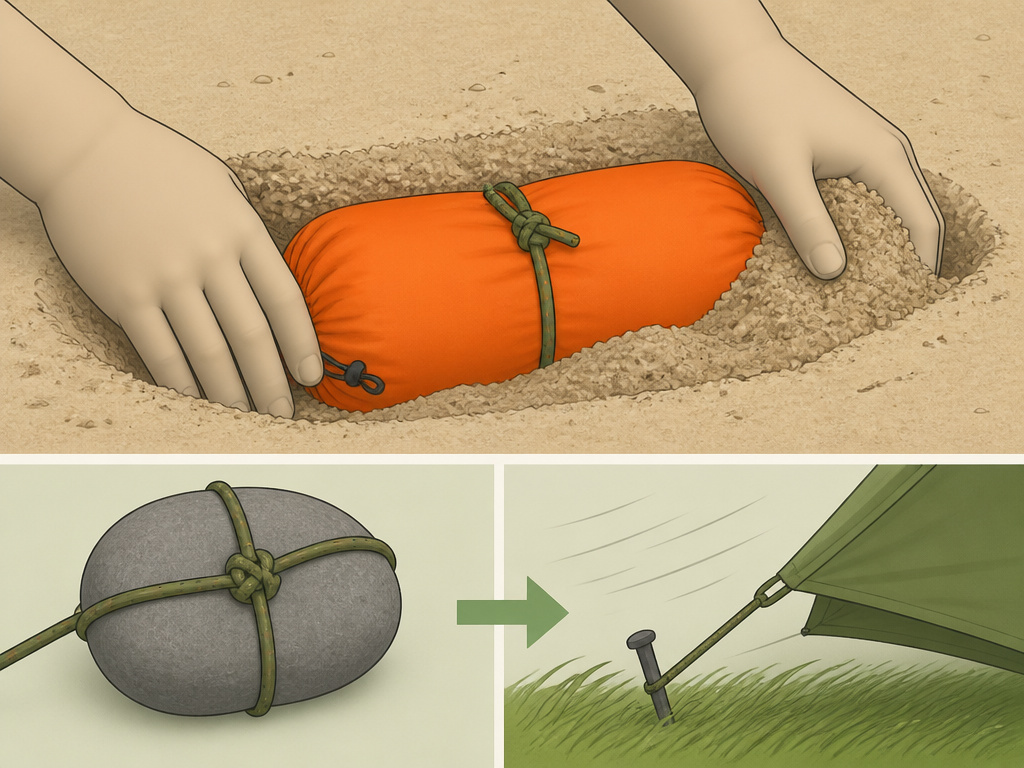
The standard 7-inch Y-stake is useless in six inches of loose sand. You must adapt your tactics to the ground, a principle underscored in the US Antarctic Program tent manual for extreme environments.
For Sand or Snow: The Deadman Anchor
Do not rely on short stakes. Bury a stick, trekking pole, or a stuff sack (the REI Co-op 20L works well) filled with sand horizontally. Tie your guyline to its center and cover it. The holding power comes from the weight and surface area of the material on top.
For Rocky or Root-Filled Ground: Move or Improvise
If a stake won’t go in, move its point a few inches before forcing it and bending it. If you absolutely cannot move, use a rock assist. Girth-hitch the guyline around a solid, smooth rock. This is a core technique for secure tent anchoring systems in severe environments.
For Windy Conditions: Anchor the Windward Side First
If wind is already blowing, don’t spread the tent out fully. Immediately stake the corner facing the wind. This prevents the tent from acting as a sail. Add extra guylines before you think you need them; a well-guyed storm-proof tent design is your best defense.
For Rain: Pitch High and Re-Tension
Keep a consistent air gap between the fly and inner tent. A touching fly wicks water inside. After the fabric gets wet, which can take under an hour, re-tension every line. Wet nylon stretches, and that sunset-tight pitch will be sagging by midnight.
Which Tent Stakes Should You Actually Use?
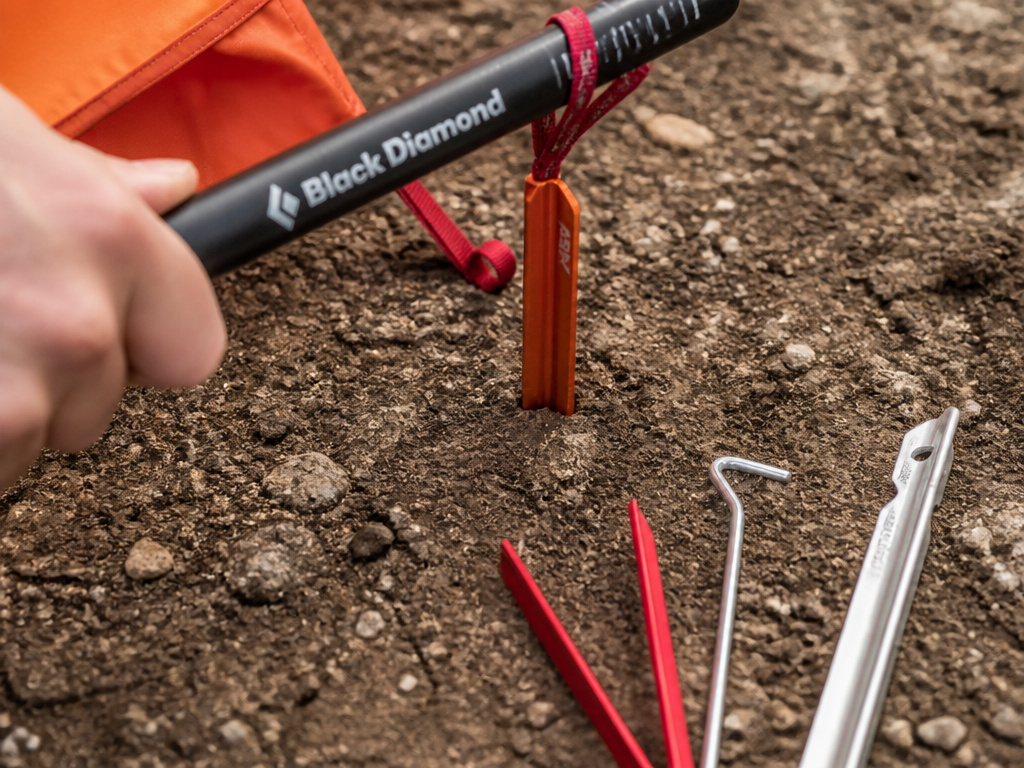
Your tent’s included stakes are for perfect, grassy campgrounds. For the real world, you need an upgrade. I carry a mix: six MSR Groundhog Minis (the orange ones) for critical corners and guylines, and a few lighter V-stakes for non-essential points. The Groundhog’s thicker gauge and angled ribs create a superior wedge without the weight penalty of the full-size version.
For a car-camping kit, the Coleman Rubber Mallet has a broad face that won’t slip. For backpacking, I use the flat side of my Black Diamond Carbon Z trekking pole. It’s surprisingly effective and saves carrying a separate tool.
| Stake Type | Ideal Ground | Failure Ground | Pro Tip |
|---|---|---|---|
| MSR Groundhog Mini | Hardpack, clay, gravel | Deep, loose sand | The ribbed design resists bending under lateral tension. |
| Y-Stake / V-Stake | Grass, loam, forest duff | Rocky or root-filled soil | Good general-purpose stake for non-critical points. |
| Ultralight Wire Stake | Firm, manicured lawns | Any challenging condition | Bends if you look at it wrong. Upgrade immediately. |
| 9″ Sand Stake | Loose sand, deep snow | Hard or rocky ground | The extra length provides surface area for friction. |
Your complete camping equipment list isn’t complete without the right stakes. They are as crucial as a reliable sleeping pad or a portable camping stove.
When Should You Pre-Stake a Tent?
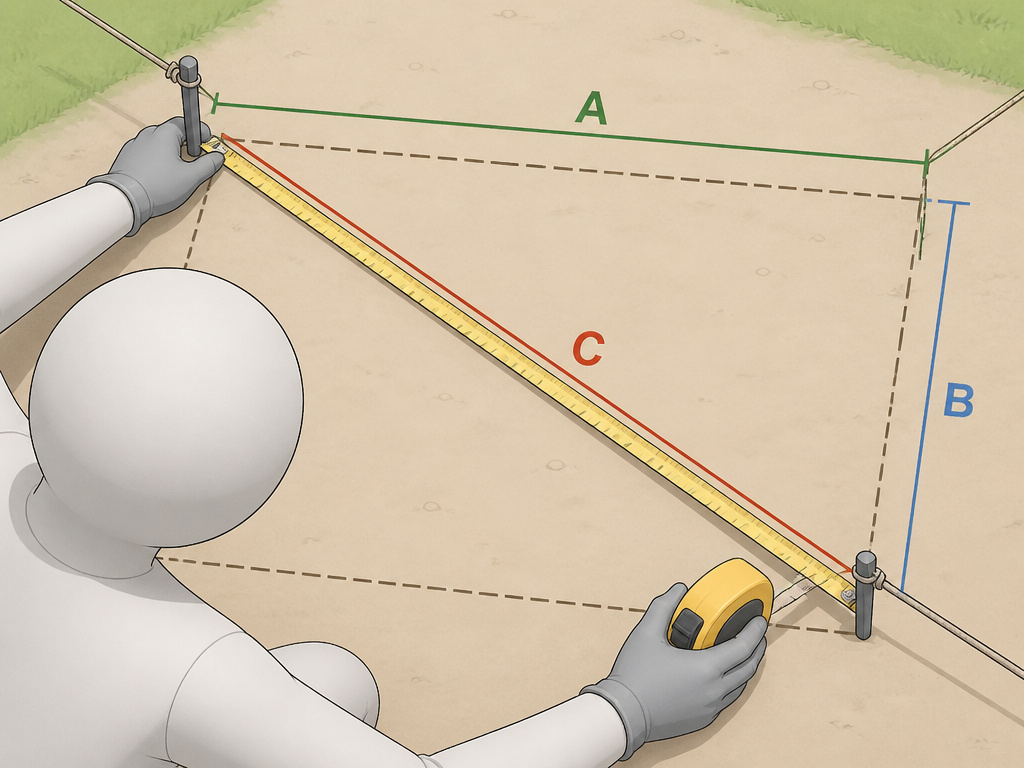
For a large family cabin tent or any shelter where the footprint is bigger than your wingspan, the “lay it out and stake” method fails. The tent is too heavy to adjust once part of it is anchored. This is where the pre-staking method from professional tent handbooks comes in.
- Clear the area of sharp debris like pinecones and rocks. Skipping this can puncture your floor on the first night.
- Measure the tent’s length and width. For a 40′ x 80′ tent, the diagonal must be 89.44 feet (A² + B² = C²). Skip this check and your tent will be trapezoidal, the poles won’t align with the grommets, causing uneven stress that can tear fabric at the corners.
- Drive a stake at each measured corner point.
- Unpack the tent and attach its corners directly to these pre-placed stakes.
This method is essential for managing the complex pole structures of many stand-up tent models and ensures a perfect, square setup every time.
How Can You Tell If Your Tent is Secure?
A properly staked tent engages multiple senses. It looks crisp, with clean lines and no sagging panels. It sounds like a dull drum when you flick the fabric. It feels uniformly tense when you run your hand along the guylines.
Before you zip up for the night, do a two-minute “panic check.” Ensure every stake is flush with the ground. Verify the rainfly gap is even. Feel each guyline for consistent tension. This ritual is the difference between sleeping through a storm and a 3 AM scramble in the rain.
Common mistake: Staking guylines straight down to save campsite space, this eliminates the 45-degree angle’s anti-lift benefit, guaranteeing a failure in the next strong gust.
Always pack spare stakes. They get lost and bent. Having a couple of extra MSR Groundhogs in your kit, perhaps alongside your tent lighting options for after-dark adjustments, solves most problems before they ruin a trip.
Frequently Asked Questions
What happens if I don’t stake my tent at all?
freestanding tent will hold its shape but can be blown away like a tumbleweed in wind. A non-freestanding tent will collapse immediately. Staking provides essential stability and tension for weather resistance.
Can I use rocks instead of stakes?
Yes, as a last resort on rocky ground. Loop your guyline around a solid, smooth rock using a girth hitch. Never tie off to a sharp rock that could cut the line in the night.
How many stakes do I need for a basic dome tent?
At minimum, you need four for the corners and two for the rainfly vestibules. Most three-season domes perform best with 8-10 stakes to properly guy out the fly for wind and rain.
Why do my tent stakes keep bending?
You’re likely using cheap, thin-gauge stakes (like nail stakes) in hard ground, or you’re hammering them at an angle with a rock instead of a mallet. Upgrade to thicker, ribbed stakes like MSR Groundhogs.
Should I stake my tent on a wooden tent platform?
You cannot stake into wood. Use freestanding tents on platforms and secure them with guy lines tied to the platform’s built-in rings, or use weighted bags specifically designed for platform anchoring.
What’s the single biggest staking mistake?
Not burying the stake completely. An exposed inch creates a pivot point and drastically reduces holding power, leading to a loose tent by morning.
Before You Go
Staking is the silent foundation of a good night outdoors. It’s not about muscle; it’s about geometry and soil mechanics. Match your stake to the terrain, honor the 45-degree angle, and bury it completely. These principles will see you through 95% of conditions.
For anything beyond a calm forest weekend, invest in a set of quality stakes. They are the cheapest insurance policy you can buy for your shelter. Pair them with the patience to tension your tent twice, once when dry, and once after the rain begins. Your comfort, and safety, depend on this simple, deliberate act. For more on building a reliable kit, explore our guides on essential tent camping gear and durable rainfly materials that stand up to the elements.
