
How to Tie Tent Guy Ropes for a Secure, Storm-Proof Pitch
This post contains affiliate links. As an Amazon Associate, we earn from qualifying purchases.
To tie a tent guy rope, secure a fixed Bowline knot to the tent’s loop and an adjustable taut-line hitch to the stake. Angle stakes 45 degrees away from the tent, 6-8 feet out, using the stake’s length to gauge distance. For high winds or soft ground, use a trucker’s hitch or deadman anchor for maximum hold.
I once watched a tent cartwheel across a Colorado meadow because the owner thought guy ropes were optional. He’d pitched a beautiful dome, staked the corners, and called it good. A sudden evening gust found the one unsecured mid-wall point, lifted the rainfly like a sail, and sent the whole structure tumbling. The difference between a peaceful night and a gear-chasing disaster often comes down to a few feet of cord and the right knot.
This isn’t about tying any knot; it’s about tying the right knots for the job. A Bowline won’t jam after a storm. A taut-line hitch lets you fine-tune tension as the fabric stretches. And your tent’s manual? It holds secrets, like MSR’s dual grommets or Eureka’s secondary loops, that are the real difference-makers when the weather turns.
Key Takeaways
- Anchor with a Bowline: Tie this non-slipping, easy-to-untie knot directly to your tent’s webbing loop. It’s your permanent, reliable connection point.
- Tension with a Taut-Line Hitch: Use this adjustable knot on the stake end. It grips under load but slides for perfect tension, outperforming flimsy plastic tensioners.
- Stake smart, not hard: Place stakes 6-8 feet from the tent, angled at 45 degrees away from the pull. Use the stake’s length to measure this distance for consistency.
- Respect your tent’s design: Modern tents have engineered guy-out systems. Ignoring specific features like MSR’s climate-specific grommets or a Eureka model’s high-wind loops risks damage.
- Upgrade your cord: Skip the stretchy paracord. Use static, reflective cord like Kelty Triptease for better performance and safety.
What Knots Should I Use for Guy Lines?
You need two knots: one for the tent and one for the stake. The tent knot must be bombproof and easy to untie. The stake knot must be easily adjustable.
The Bowline knot forms a fixed loop that will not slip or constrict under load, making it the ideal permanent attachment point on the tent’s webbing loop or D-ring.
For the tent end, the Bowline is king. Here’s my cold-fingers method: Pinch the standing line (the part going to the stake) about a foot from the tent loop to form a small ‘C’. Push the free end up through the tent loop, then lay it over the standing line to make an ‘X’. Poke the free end under the standing line just below your pinch, then pull the free end and standing line apart. This ‘quick’ Bowline is slightly bulkier but foolproof when your hands are numb, and it won’t jam.
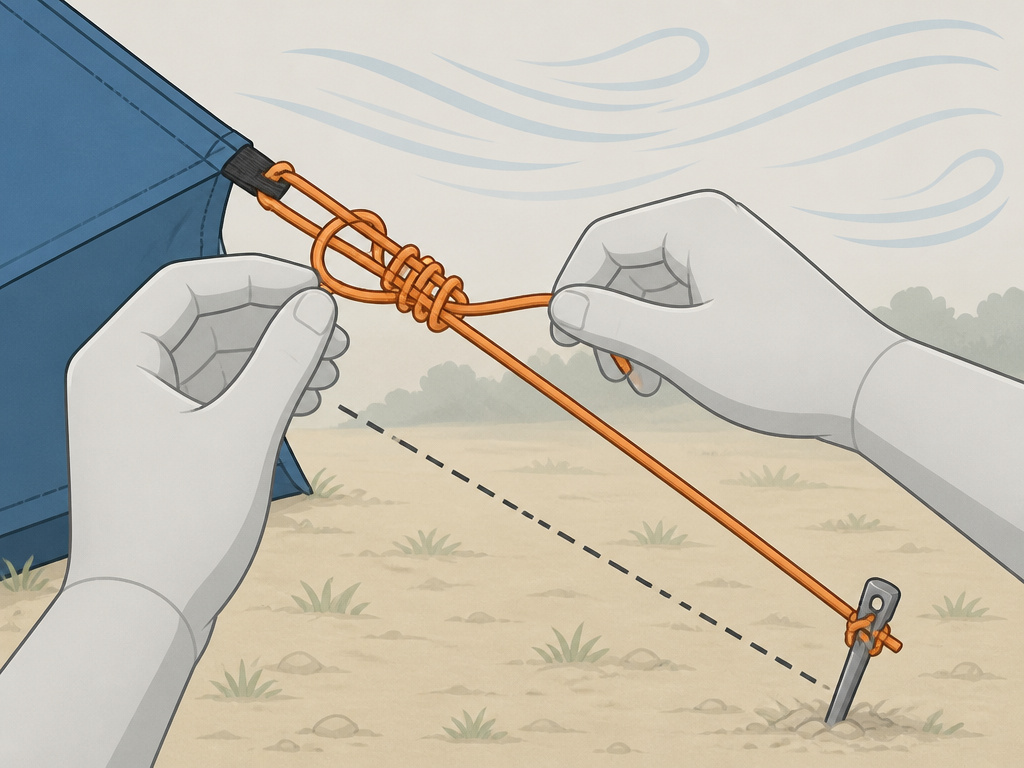
For the stake end, the taut-line hitch is your adjustable savior.
1. Loop the line around your stake.
2. Wrap the free end around the standing line twice, moving away from the stake.
3. Bring the free end back toward the stake and pass it through the two wraps you just made.
4. Tighten the knot by pulling on the free end, then slide the knot toward the stake to take up slack.
Common mistake: Using two half-hitches on the stake, this knot can’t be adjusted after setting tension, forcing you to untie and restart if the line sags.
TL;DR: A Bowline on the tent and a taut-line hitch on the stake cover 95% of scenarios. Practice them before you need them.
Where and How Do I Place My Stakes?
Getting the stake right is more about geometry and soil than brute force. A perfectly tied knot is useless if the stake pops.
For most family and car camping tents, manuals like the one for the Eureka Copper Canyon specify a 6-foot distance from the tent edge. Don’t guess. Lay your stake on the ground; its length is a perfect ruler. For a 9-inch stake, place it roughly eight stake-lengths away.
Before you start: Driving a stake at the wrong angle is the #1 cause of failure in wind. A vertical stake acts as a lever, prying itself out of the ground. Angling it correctly uses the soil’s shear strength along its length.
The 45-degree angle is non-negotiable. The stake must lean away from the direction of pull. Imagine the guy line is pulling northeast; the top of the stake should point southwest. For hard ground, use a rock to drive it in. In soft ground, you may need longer stakes or a deadman anchor.
| Soil Type | Best Stake Type | Critical Tip |
|---|---|---|
| Hard/Packed | MSR Groundhog (Y-beam design) | Drive at a shallower angle (30°) to avoid bending. |
| Soft/Loam | DAC J-Stake or similar skewer | Bury it completely; the top should be flush with the ground. |
| Sandy | 12-inch DAC V-Peg (wide surface area) | Bury it horizontally as a “deadman” anchor for maximum hold. |
| Snow | Snow/Sand Stake (large plastic plate) | Bury it completely and pack snow/soil on top. |
What if you hit rock or roots at the perfect spot? Use a trucker’s hitch. This creates a pulley system, letting you anchor to a tree or rock much farther out while maintaining extreme tension. It’s essential for securing storm-worthy tents in challenging sites.
How Do I Adjust for Different Tents and Weather?
Your tent is engineered with specific guy-out points. Using them correctly is what separates a secure pitch from a vulnerable one.
Not all tents treat guy lines the same. I’ve seen campers assume their new Big Agnes ties out like their old Coleman, and that’s how poles get bent. The manufacturer’s manual, often a PDF you download, holds the key details that generic advice misses.
The MSR Dual Grommet Quirk
Many MSR tents have two grommets in the stake-out loops where the pole tips insert. This isn’t a mistake. The outer grommet is for dry climates where the fabric stays tight. The inner grommet is for humid or wet conditions where the fabric will expand. Using the outer grommet in the rain prevents natural expansion, putting dangerous stress on seams and poles.
The Eureka High-Wind Mandate
For models like the Copper Canyon 1312, the manual is explicit: staking alone is insufficient in high winds. You must use the secondary web loops on each corner and center of the side walls. These aren’t optional “extra” points; they’re part of the structure’s engineering to handle lateral load. Ignoring them in a gust front is an invitation for a folded pole.
When to Ditch the Plastic Tensioner
Many spacious tent options come with pre-attached plastic three-hole tensioners. They’re fine for a calm night. But in cold, wet, or windy conditions, they fail. The plastic becomes brittle and can snap. For reliability, I cut them off and tie a taut-line hitch directly into the cord. For my repair kit, I don’t carry generic “cord.” I carry a 10-foot hank of Kelty Triptease Lightline. Its 2.5mm Dyneema core has negligible stretch, it doesn’t absorb water, and the reflective tracer is a lifesaver at night.
What’s the Protocol for High Winds?
When the forecast calls for consistent wind over 25 mph, your standard setup needs reinforcement. This is where technique turns into a necessity.
First, use every single attachment point on your tent, all corners, mid-wall loops, and rainfly points. Second, increase your stake distance to 8-10 feet if space allows. The longer line provides more shock absorption. Third, replace every taut-line hitch with a trucker’s hitch for superior mechanical advantage and zero slip.
| Condition | Primary Knot | Stake Distance | Extra Gear |
|---|---|---|---|
| Calm (0-15 mph) | Taut-line hitch | 6 ft | None needed. |
| Windy (15-25 mph) | Taut-line hitch (dressed twice) | 6-8 ft | Use all rainfly points. |
| High Wind (25-40 mph) | Trucker’s hitch on all lines | 8-10 ft | Use every loop, consider deadman anchors. |
| Storm (40+ mph) | Trucker’s hitch with backup half-hitch | 10+ ft, multiple anchors | Deadman anchors mandatory, plus waterproof tent features. |
The deadman anchor is your last line of defense in sand, snow, or mud. Bury a stick, trekking pole, or stuff sack filled with rocks perpendicular to the pull. Tie your guy line to its center and bury it. The surface area resists pull far better than any vertical stake.
This system isn’t overkill. It’s the standard procedure in the USAP field manual for tents, written for survival in Antarctic conditions. The principles are the same for your weekend trip when a storm rolls in.
How Do I Fix Common Guy Line Problems?
Things will go wrong. A loop tears, a stake pulls, or you simply run out of cord. Here’s how to recover.
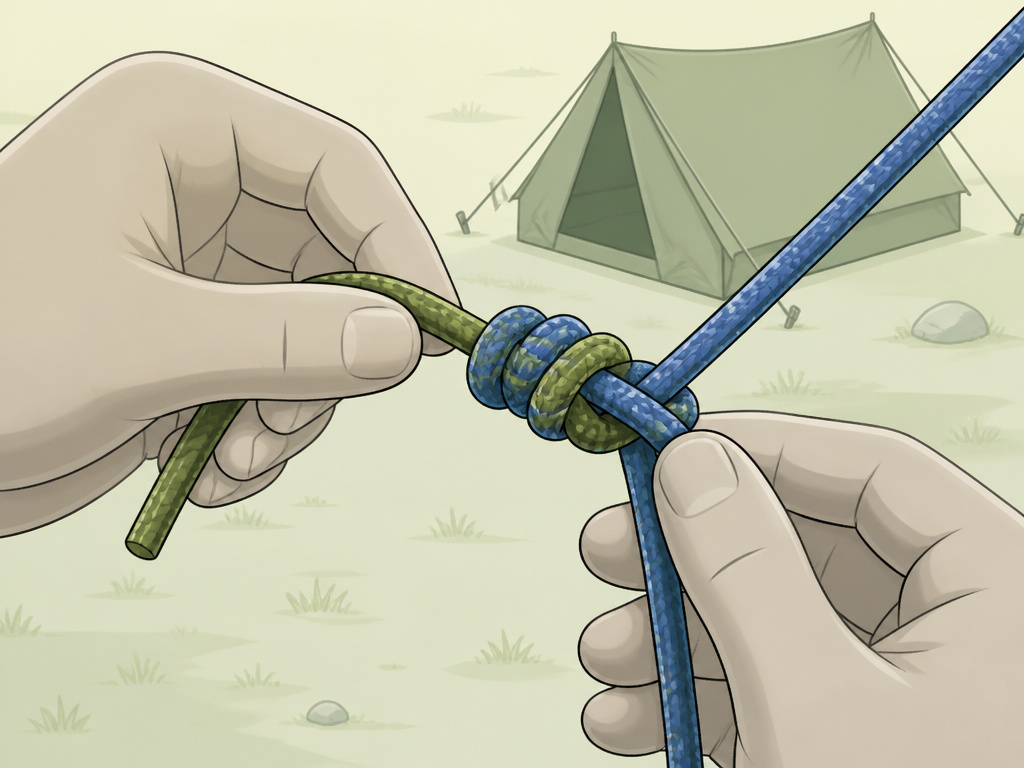
- The line is too short. Don’t tie two lines with a weak knot. Use a double fisherman’s bend (also called a grapevine knot) to join cords. It’s bulky but won’t slip.
- The webbing loop tears. For a temporary field fix, girth-hitch a short loop of cord around the pole itself, above the plastic clip. For a permanent repair, you’ll need a needle, heavy thread, and a patch of nylon webbing.
- The stake keeps pulling out. Move it at least a foot into fresh soil. If the ground is universally soft, switch to a stake with more surface area, like an MSR Groundhog. In sand, you need a deadman anchor.
- Water runs down the line into the tent. Tie a drip line. About two inches above where the line enters the tent, tie a short piece of string or a rubber band around the guy line, leaving a small tail. Water will travel down, hit the knot, and drip off harmlessly.
Having a few key items in your tent camping equipment kit solves most problems: 10 feet of spare 3mm cord, two extra stakes (I carry one Groundhog and one sand stake), and a small roll of repair tape for patching torn webbing.
Frequently Asked Questions
What’s the easiest knot for a beginner?
For the tent, a simple overhand loop (not a knot) passed through the webbing and then fed back through itself is secure and easy to untie. For the stake, a taut-line hitch is the simplest adjustable knot to learn. Plastic tensioners are easier but less reliable.
How tight should guy lines be?
They should be firm with no visible sag, but not banjo-string tight. You should be able to deflect the line about an inch with moderate finger pressure. Overtightening puts undue stress on poles and seams.
Can I use paracord as a guy line?
You can, but you shouldn’t. 550 paracord stretches significantly when wet, which sags your lines overnight. Dedicated guy line cord like Lawson’s Glowire or Kelty Triptease has minimal stretch, better UV resistance, and often includes a reflective tracer for safety.
Why do my lines keep coming loose?
You’re likely using a knot that slips (like two half-hitches) or a plastic tensioner on cord that’s too slick or thick for it to grip. Switch to a properly dressed taut-line hitch or a trucker’s hitch for high-wind situations.
Do I need to guy out my tent every time?
In perfectly calm, sheltered conditions, you might get away without it. But any forecast of wind, or if you’re using a large family camping shelter, guying out is cheap insurance. It stabilizes the structure, reduces flapping noise, and is essential for tents for wet weather.
How do I attach a guy line to a tree?
Use a trucker’s hitch. This gives you a mechanical advantage to pull the line extremely tight. Always use a tree strap or a piece of cloth to protect the bark; never run cord directly around a tree.
The Bottom Line
Mastering your guy lines transforms them from loose strings to integral parts of your shelter’s structure. The Bowline and taut-line hitch duo will handle almost everything you encounter, while the trucker’s hitch and deadman anchor are your tools for the worst conditions.
Remember the stakes: angle them away, and use their own length to measure the 6-foot distance. Listen to your tent’s manual, those model-specific details exist for a reason. And finally, upgrade your cord. Ditching the stretchy stock line for a static, reflective cord is one of the simplest and most effective camping gear upgrades you can make. It’s the difference between retightening lines at 2 a.m. and sleeping soundly through the storm.
