
How to Set Up a Tarp Over a Tent (The Right Way)
This post contains affiliate links. As an Amazon Associate, we earn from qualifying purchases.
To set up a tarp over a tent, string a ridgeline between two anchors, drape the tarp over it, and stake the corners at a 45-degree angle to form a ventilated A-frame. Crucially, pitch the ridgeline perpendicular to the wind and leave deliberate slack in cold weather to prevent material contraction from tearing seams or grommets.
You know the sound. The frantic thwip-thwip-thwip of a loose tarp corner in a midnight gust. It’s the sound of a bad pitch, and it means you’re about to get wet. I learned to hate that sound on a soggy trip to the Lake District, where my cheap polyethylene tarp felt like dragging a wet cardboard box.
A tarp isn’t just a rain catcher; it’s a versatile vestibule, a sun shade, and a windbreak. But only if you pitch it with intention. This isn’t about throwing a sheet over your tent. It’s about geometry, tension, and outsmarting the weather.
Key Takeaways
- Orient for the wind: For an A-frame, set the ridgeline perpendicular to the wind. For a storm-ready plow point, the closed, pointed end must face directly into the wind.
- Leave slack for the cold: Silnylon and Dyneema Composite Fabric (DCF) tarps contract as temperatures drop. Pitch with 10-15% slack in your lines to avoid a ripped seam by morning.
- Create an air gap: Maintain a 6-12 inch space between the tarp and your tent fly. Contact causes condensation and wicks water inside.
- Improvise your anchors: No trees? Use lightweight aluminum poles, trekking poles, a vehicle roof rack, or even a sturdy bush as anchor points.
- Steepen the pitch for rain: Use all reinforced tie-outs to pull the tarp taut. A steeper angle sheds water faster than a shallow, saggy one.
What Gear Do You Really Need for a Tarp Shelter?
You don’t need a pro kit, but choosing the right basics makes the difference between a shelter and a soggy mess.
Start with the tarp itself. An 8’x10′ is the minimum for covering a standard two-person tent, but a 10’x12′ offers more versatile coverage and pitching options. Material is your next decision. Cheap polyethylene tarps are bulky and loud. Silnylon is the backpacker’s staple, light and packable, but it stretches when wet. Dyneema Composite Fabric (DCF) is ultralight and doesn’t absorb water, but the cost is high and it can be noisy.
Your cordage is your structure. You’ll need 50-100 feet total. Skip the stretchy paracord for a static utility line like 2-3mm nylon cord. For stakes, carry at least eight. Standard Y-stakes work in most soil, but for sand or snow, you need longer, wider sand stakes or a deadman anchor.
Before you start: A falling pole or a snapped guyline under tension can cause serious injury. Never run a taut line across a trail or camp corridor. Always wear gloves when pulling lines tight, and inspect overhead for dead branches before setting up.
A basic kit fits neatly into any collection of tent camping accessories. For a complete gear checklist, our guide to essential camping equipment has you covered.
Which Tarp Configuration Is Best for Your Conditions?
The classic A-frame is versatile, but it’s not always the right tool. Your weather forecast should dictate your pitch.
| Configuration | Best Use Case | Wind Orientation | Primary Weakness |
|---|---|---|---|
| A-Frame | General-purpose rain protection & ventilation. | Ridgeline perpendicular to wind. | Sagging center can pool water; requires good anchor spacing. |
| Plow Point | High winds, driving rain from a predictable direction. | Pointed, staked end faces directly into the wind. | Open side is exposed; incorrect orientation causes violent billowing. |
| Simple Ridgeline | Quick sun shade, light drizzle, maximum airflow. | Low side faces into the wind for aerodynamics. | Minimal storm coverage; rain can drive underneath. |
The A-frame is your go-to. It provides balanced coverage and is easy to ventilate. The plow point is your storm mode. By staking one end flat and raising the other high, you create a wedge that splits the wind. Get the orientation wrong, and it fails spectacularly.
A simple ridgeline, just a rope with a tarp draped over, is fast for fair weather but offers little real protection. It’s a configuration better suited to ultralight lightweight tarp shelters used as a primary shelter.
Setting up a tarp over a tent requires a ridgeline suspended between two anchor points, with the tarp centered over the line. Corner guylines are staked at a 45-degree angle to create a steep pitch, ensuring water runoff and a ventilated air gap between the tarp and the tent fly. Final tension is adjusted at all points to eliminate sag.
Your choice also depends on your tent. A dedicated tent for heavy rain may need less coverage than a summer mesh model.
How Do You Pitch a Storm-Ready A-Frame? (Step-by-Step)
A secure pitch is a sequence. Rushing the steps guarantees a loose, noisy, or leaky setup.
Step 1: Establish Your Anchor Points
Find two solid anchors 10-12 feet apart. Trees are ideal; use a tree saver strap or a section of cord to protect the bark. No trees? This is where creativity wins. Use a pair of lightweight aluminum tarp poles, trekking poles lashed together, or even a vehicle roof rack paired with a ground stake.
Step 2: String and Tension the Ridgeline
Tie your main rope to the first anchor at roughly head height (6-7 feet). Run it to the second anchor and secure it with an adjustable knot like a trucker’s hitch or taut-line hitch. This line is the spine of your shelter.
Common mistake: Pitching the ridgeline parallel to the wind, the tarp will act as a giant sail, flapping relentlessly and straining every seam until failure.
Step 3: Drape and Center the Tarp
Throw the tarp over the ridgeline. Center it so an equal amount hangs down each side. The midpoint of the tarp should be directly over where your tent will sit. Walk around and sight it; a centered tarp leads to balanced tension.
Step 4: Stake the Four Corners
Start with the corner near your tent door. Pull it away from the tent footprint at a sharp 45-degree angle and stake it. Move to the opposite corner on the same side and repeat. This “opposing corners” method maintains balance. A straight-down stake creates a flat roof that pools water.
Step 5: Add Intermediate Tie-Outs and Final Check
Eliminate sag by using any reinforced mid-panel tie-outs. Stake these out to create a steeper, drum-tight pitch. Finally, verify a consistent air gap between the tarp and your tent fly. No part of the tarp should be touching your tent.
TL;DR: Anchor a ridgeline, center the tarp, stake opposing corners at 45-degree angles, then add mid-panel guylines to create a steep, taut pitch.
Why Does Tarp Tension Change Overnight?
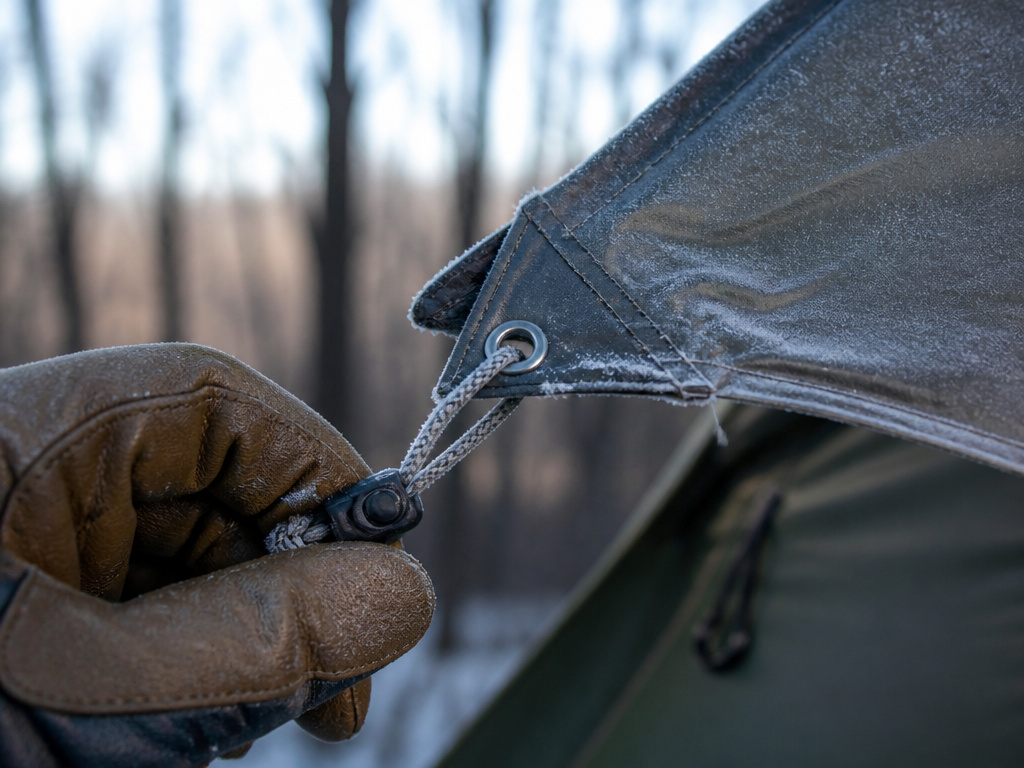
Pitching a tarp isn’t a set-and-forget task if the temperature is going to drop. Material science doesn’t care about your good knots.
Silnylon and DCF materials physically contract in the cold. A tarp pitched “guitar-string” tight at 70°F becomes critically over-tensioned when the temperature plunges to 40°F overnight. That relentless pressure has to go somewhere, usually a ripped seam or a grommet torn clean from its reinforcement.
| Material | Cold-Weather Behavior | Tension Strategy |
|---|---|---|
| Silnylon | Significant contraction; can stretch when wet. | Leave 10-15% deliberate slack in all lines. |
| Dyneema (DCF) | Minimal stretch, but still contracts. | Leave slight slack; less than silnylon, but never drum-tight. |
| Polyethylene | Minimal contraction, but stiffens and can crack. | Can be pitched tighter, but avoid extreme tension. |
The rule is simple: if you expect a temperature drop of 20°F or more, introduce deliberate slack. Your guylines should have a slight bow, not be bar-tight. You can always take up the slack in the morning if rain moves in. This is the most common reason a new tarp fails on its first cool-weather outing. While canvas tents with stove jacks have different rules, for synthetic tarps, slack is a safety feature.
I learned this the hard way in the Adirondacks. A perfectly taut silnylon pitch at dusk became a liability by 4 a.m. The sound of the grommet ripping out was like a gunshot. The repair was easy, but the lesson was permanent: the cold tightens what you leave loose.
What If You Don’t Have Trees for Anchors?
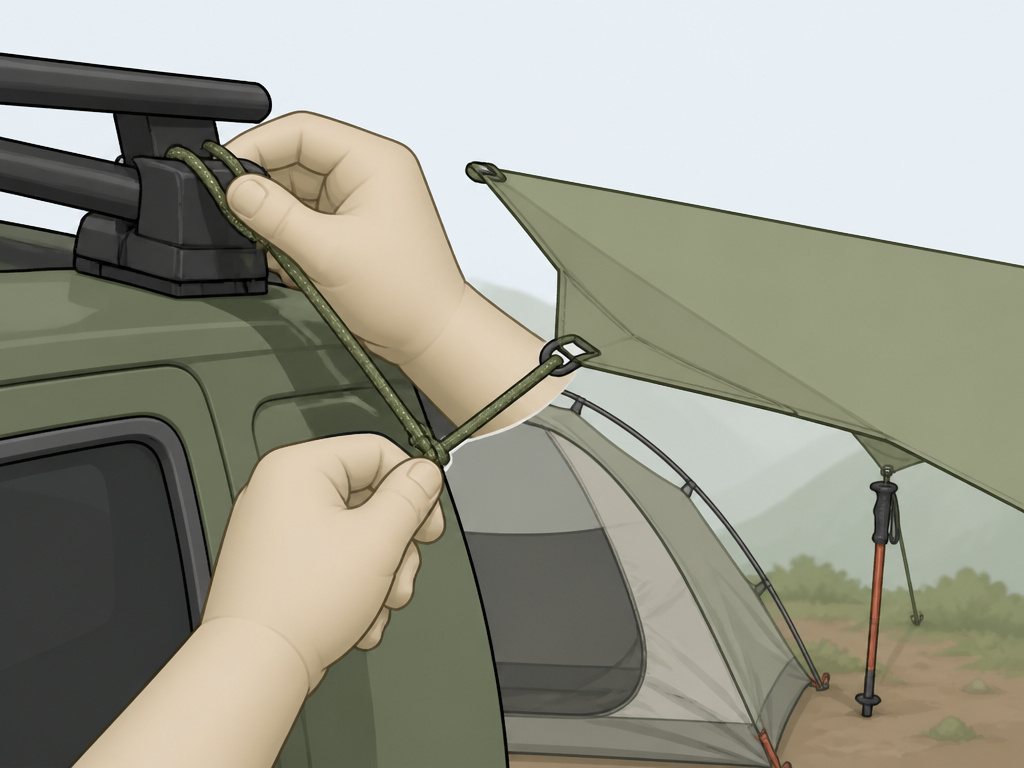
The perfect pair of trees is a luxury. Real-world camping demands improvisation.
The principle remains: you need two elevated points for your ridgeline. Here are your options, from most to least stable:
1. Dedicated tarp poles: Lightweight aluminum poles are sold for this. Bury the base or use a stake through the foot loop.
2. Trekking poles: Lash two together for extra height. It’s a bit wobbly in high wind, but it works in a pinch.
3. Vehicle anchor: A roof rack, trailer hitch, or even a secured door can be one anchor. Pair it with a ground stake or a second vehicle.
4. Natural features: A large boulder, a sturdy, living bush, or a fence post.
5. The “stick tripod”: Lash three long, sturdy branches together at the top to create a makeshift pole.
The goal is stability. This is why many dedicated backpacking tarp tents include their own pole sets, they can’t rely on the landscape.
How Do You Secure a Tarp for High Winds and Heavy Rain?
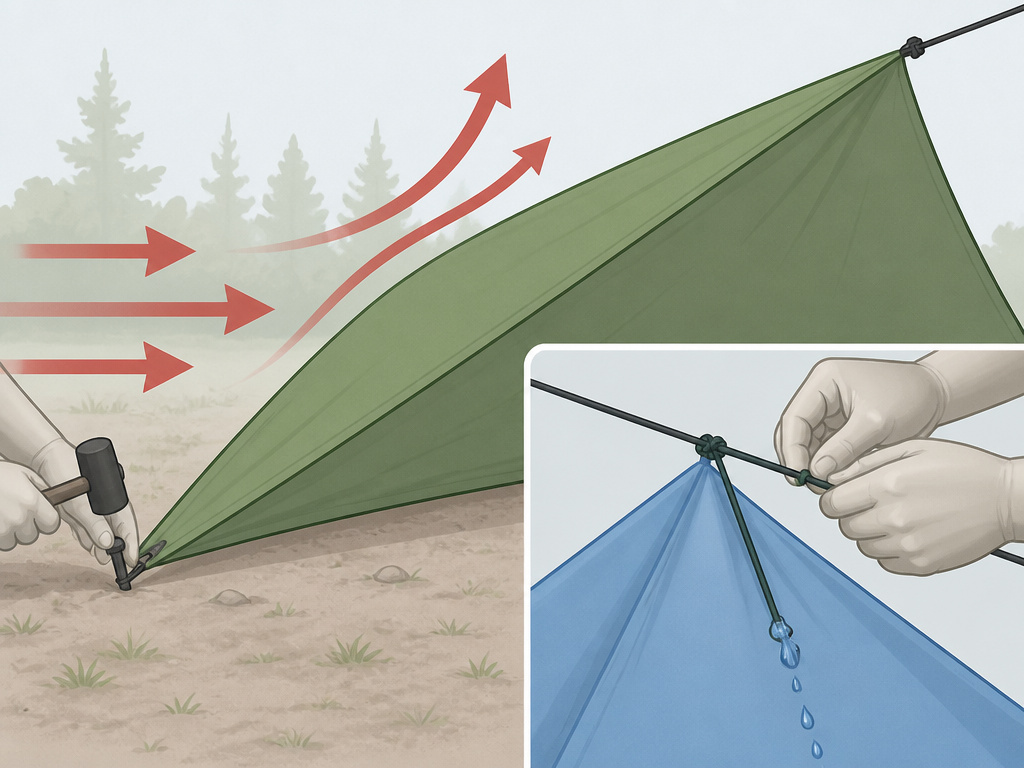
When the weather turns, your pitch needs to turn with it. A standard A-frame can catch too much wind.
For high winds, the plow point configuration is your best defense. It presents a narrow, wedge-shaped profile. The key is uncompromising orientation: the staked-down, pointed end must face directly into the wind. The wind hits the wedge and is deflected up and over. If the open side faces the wind, the tarp will billow and fail violently.
For heavy rain, the goal is a steep pitch. Use every tie-out point your tarp has. Pull the sides taut to create sharp angles so water sheets off instantly instead of pooling. If your ridgeline is an exposed rope, rain will run down it and under your tarp. Tie a short piece of cord over the ridgeline as a “drip line” to break the water’s path.
Common mistake: Setting up a plow point based on the current wind without checking the forecast for a shift. A 90-degree wind change turns your storm shelter into a chaotic sail. If winds are variable, a well-staked A-frame with extra guylines is a more forgiving choice.
These techniques are complementary to using a dedicated storm-proof tent, creating a layered defense system.
Frequently Asked Questions
Should the tarp touch the tent?
Never. Direct contact bridges the gap between the two layers, allowing rainwater to wick through via capillary action and trapping condensation. Always maintain a 6-12 inch air gap.
What size tarp for a 4-person or family tent?
For a larger shelter like a family stand-up tent, a standard 10’x12′ tarp may only cover the roof. Opt for a 12’x16′ or larger to create usable covered vestibule space for gear.
Can I use a blue poly tarp from the hardware store?
You can, but you might not enjoy it. They are bulky, noisy in wind, and the grommets often pull out under tension. They work for car camping in a pinch, but a silnylon tarp is a far better investment for frequent use.
How do I stop my tarp from flapping all night?
Flapping means loose fabric. First, tighten your main ridgeline. Then, tension each corner guyline. Finally, add tension to any intermediate tie-out points. The goal is to eliminate any large, loose panel that the wind can catch and snap.
Is a tarp enough for winter camping?
As a standalone shelter, a tarp offers minimal insulation and wind protection in winter. It’s better as a supplementary layer over a four-season tent. For true winter camping, a heavy-duty canvas shelter or a specialized mountaineering tent is a safer choice.
The Bottom Line
A tarp over your tent is the simplest, most effective way to add weather protection and living space. Remember the two non-negotiable rules: leave slack for the cold, and orient your pitch for the wind. A plow point faces the storm, an A-frame stands across it.
That extra five minutes you spend checking the forecast, feeling the wind, and setting a deliberate pitch is the difference between a miserable, damp night and sleeping dry through a downpour. It turns a simple sheet of fabric into a reliable, multi-season piece of essential camping gear.
And when you’re settled in for the night, dry and secure, the right tent lighting solution makes that sheltered space feel like home.
