
How to Put a Tarp Over Your Tent Correctly | Avoid Damage
This post contains affiliate links. As an Amazon Associate, we earn from qualifying purchases.
To put a tarp over a tent, you need a taut ridgeline rope strung between two anchor points (trees or poles) at least 7 feet high, drape the tarp over it, and stake the corners out at a steep angle to create a water-shedding pitch with a 6-12 inch air gap above your tent. The ridgeline tension decides whether the setup holds through a night of rain or collapses into a puddle.
Most guides tell you to tie a rope between two trees. They skip the part where a slack ridgeline lets the tarp sag into your tent fly within two hours of a steady drizzle, transferring moisture straight through the nylon. The tarp rubs, the condensation doubles, and you wake up damp from your own breath.
This method walks you through the three non-negotiable angles, ridgeline height, corner stake angle, and tarp-to-tent gap, that keep you dry. It covers what to do when there are no trees, when the wind picks up after midnight, and why that gap is more important than the tarp material.
Key Takeaways
- Pitch the tarp at a minimum 30-degree angle from the ridgeline to the corner stakes; anything flatter collects water that will eventually pool and collapse the center.
- Maintain a 6-12 inch air gap between the tarp and your tent’s rainfly. Less than six inches traps condensation, turning the underside of the tarp into a dripping ceiling.
- In strong wind, use a deadman anchor (burying a stick or stake sideways) for your corner guylines instead of standard stakes; a flapping tarp edge can rip a grommet out in one gust.
- If no trees are available, two trekking poles or heavy-duty tarp poles set in a wide A-frame configuration can substitute, but you must guy them out in four directions, not just two.
- Always check for dead branches overhead before setting up. A falling limb punctures both tarp and tent, and you won’t hear it coming over the rain.
Why You Need a Tarp Over Your Tent
A tarp isn’t just a rain fly. It’s a sacrificial layer that takes the weather’s first punch. Your tent’s rainfly is waterproof, but constant beating from heavy rain or hail degrades the DWR coating over time. A tarp absorbs that impact. More critically, it creates a ventilated buffer zone. This gap stops condensation buildup, the moisture from your breath that settles on the inside of a rainfly, from transferring to the tarp and dripping back onto your tent.
The second job is sun protection. A tarp reflects UV rays that break down tent fabric and fade colors. A third, often overlooked, function is catching debris like pine needles and bird droppings, keeping your actual tent cleaner for packing. For winter camping, a well-pitched tarp can also shed snow load before it weighs down your tent structure. Choosing the right tent camping equipment includes planning for this extra layer of protection.
A tarp pitched with a steep angle and a tight ridgeline sheds water instantly. A slack tarp forms a bowl that fills until the center touches your tent, creating a direct water bridge and defeating the entire purpose.
What You’ll Need (Beyond the Tarp)
You can have the best tarp in the world, but without the right support system, it’s just a large, floppy sheet. The tarp itself should be at least 10×12 feet for a standard two-person tent; go larger for family-sized stand-up tents or canvas tents. Nylon or polyester with a minimum 1500mm hydrostatic head rating is standard.
The real workhorses are the lines and anchors. You need 50-100 feet of paracord or nylon utility rope for the ridgeline. Don’t use that cheap, stretchy polypropylene stuff, it elongates when wet, ruining your tension. For stakes, standard tent stakes work for calm conditions, but on soft ground or in wind, you need 10-inch Y-beam or helical stakes. Six is the minimum; eight gives you backup.
A pair of trekking poles doubles as tarp poles if you’re without trees. If you know you’ll be in a treeless area, dedicated tarp poles like the MSR Thru-Hiker 90 are worth the weight. Finally, always carry a few extra carabiners and a small roll of gorilla tape. A ripped grommet can be field-repaired by folding the corner of the tarp, wrapping it with tape, and poking a new hole.
TL;DR: Your tarp is only as good as its anchor system. Invest in non-stretch rope, long stakes, and have a pole plan for treeless sites.
How to Set Up a Tarp Over a Tent (With Trees)
This assumes you have two sturdy trees roughly 10-15 feet apart. If they’re closer, your tarp will be steeper. If they’re farther, you risk a saggy center.
Step 1: Find and Prep the Site
Look up before you look down. Scan for dead branches, widowmakers, that could fall. Clear the ground between and around the trees of sharp rocks and sticks. Position your tent under the planned tarp area, noting where the doors will face. You want the tarp to extend at least a foot beyond each side of the tent for proper runoff.
Step 2: Run and Tighten the Ridgeline
Tie one end of your rope around the first tree at chest height (about 5 feet). Walk the rope to the second tree, pull it hand-tight, and tie it off at the same height. This is your first mistake. Hand-tight is never tight enough.
Now, untie the second end. Use a trucker’s hitch or a taut-line hitch to create a mechanical advantage. Cinch it down until the rope twangs when you pluck it. The ridgeline should be 7 feet high at minimum. This height creates the necessary clearance for the air gap over your tent. A slack ridgeline is the root cause of 90% of tarp failures.
Common mistake: Tying the ridgeline at head height because it’s easier, the tarp will hang too low, the corners won’t have room for a steep pitch, and you’ll be constantly ducking. Set it at 7 feet even if you have to stand on a log to tie it.
Step 3: Drape and Center the Tarp
Throw the tarp over the ridgeline. Center it so there’s equal material hanging down on both sides. The ridgeline should run across the center of the tarp, not along one edge. If your tarp has reinforced attachment points along its centerline, use those. If not, just let the fabric rest over the rope. Walk around and eyeball the coverage. The tarp should completely shade the tent footprint with extra overhang.
Step 4: Stake Out the Corners
Start with the corner furthest from the wind. Pull it away from the tent at a 45-degree angle from the ridgeline. You’re not staking straight down, but out and away. Push the stake into the ground at that same 45-degree angle, with the point facing away from the tarp. This gives maximum holding power. Repeat for all four corners.
After all four are staked, go back to each one and tighten the guyline. The tarp material should be drum-tight, with no floppy fabric. If a corner is still sagging, move the stake further out and re-tension.
Step 5: Create Doors or Walls (Optional)
If you want side walls for extra wind or rain protection, don’t just stake the sides straight down. Use a second set of guy lines from the mid-point of the tarp’s side, pull them out laterally, and stake them. This creates a steep wall that sheds wind instead of catching it like a sail. For a simple door, gather the loose fabric at one end of the ridgeline, tie it off with a short piece of cord, and stake that tie-out point.
TL;DR: A tight ridgeline and steeply angled corner stakes are non-negotiable. Slack in either spot invites water pooling and fabric slap.
How to Set Up a Tarp Over a Tent (Without Trees)
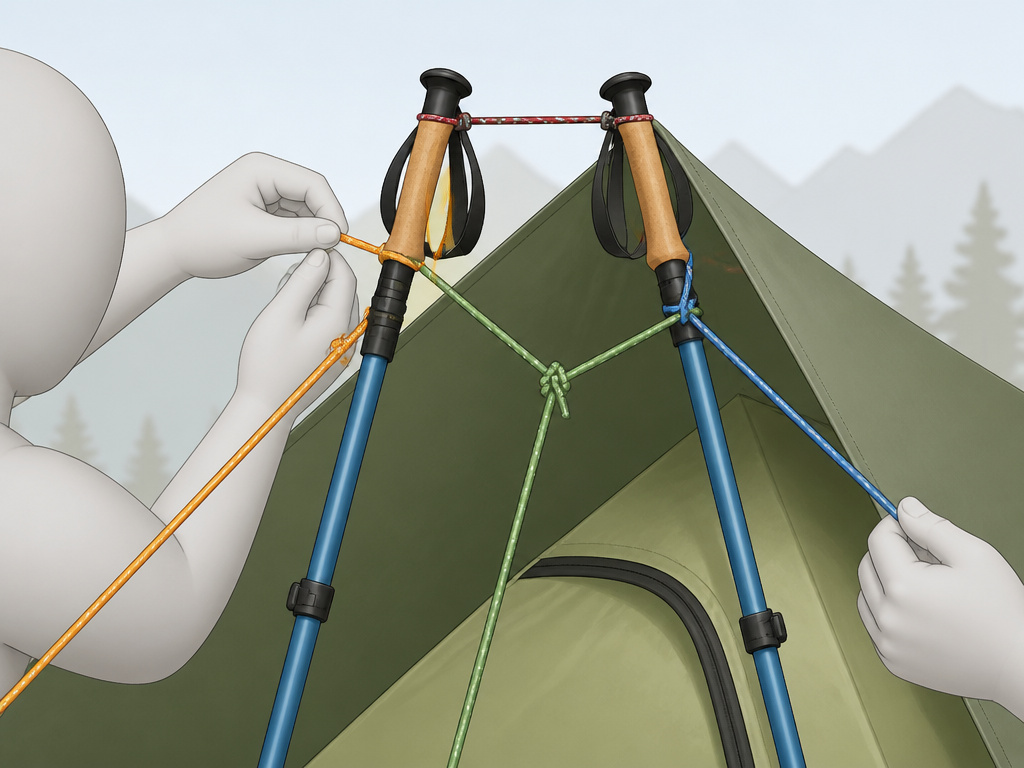
No trees means you become the tree. This method requires more cordage and stakes, but it’s just as secure.
The A-Frame Pole Method
This is the most stable option. You’ll need two poles (trekking poles, tarp poles, or sturdy branches) and four additional guy lines per pole.
- Set your two poles about 10 feet apart, fully extended.
- Tie a guy line to the top of each pole. Stake these lines out directly opposite each other, in line with the imaginary ridgeline. These keep the poles from falling inward.
- Tie two more guy lines to the top of each pole, but at 90-degree angles to the first set. Stake these out to the sides. Each pole now has three guy lines holding it up in a tripod-like configuration.
- Run your ridgeline rope between the tops of the two poles. Tighten it with a trucker’s hitch.
- Drape the tarp over the ridgeline and stake the corners as before.
The pole guy lines are critical. A pole with only one guy line will collapse sideways with the first gust. This setup is excellent for beach camping or alpine zones above the treeline and is a core skill for using lightweight tarp shelters.
The Vehicle or Rock Anchor Method
If you have a car, truck, or large rock, you can use it as one anchor point. Secure one end of the ridgeline to the vehicle’s roof rack or around a solid rock. Use a pole for the other anchor, as described above. Just ensure the vehicle isn’t going to move, and pad any rope contact points on the car to prevent scratches.
| Anchor Method | Best For | Key Risk If Skipped |
|---|---|---|
| A-Frame Poles | Treeless, open fields, beaches | Poles collapse sideways without 3-4 guy lines each. |
| Vehicle | Car camping, roadside stops | Rope abrasion damages car paint; vehicle movement collapses setup. |
| Rock/Log | Rocky terrain, riverbanks | Anchor point shifts under load, dropping the tarp onto the tent. |
The 3 Critical Adjustments Most People Miss
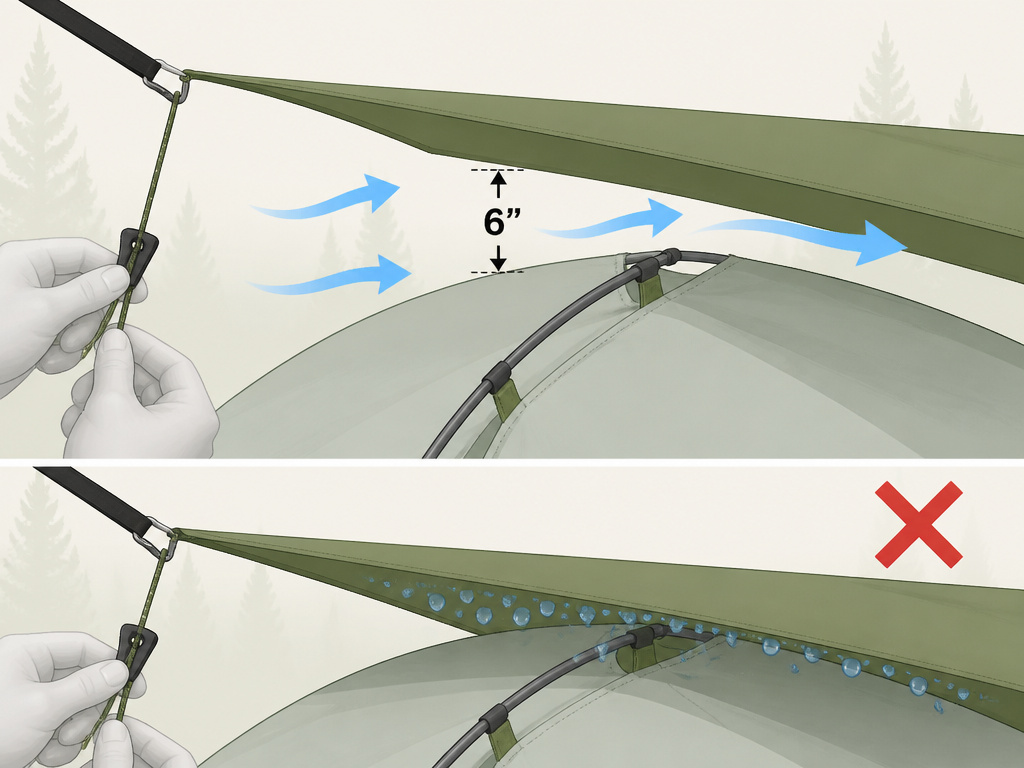
Pitching the tarp is only half the battle. Fine-tuning these three elements is what separates a dry camp from a miserable one.
1. The Condensation Gap
The space between your tarp and your tent’s rainfly is your ventilation lifeline. Less than six inches and the two surfaces will interact, trapping warm, moist air from inside your tent. This moisture condenses on the underside of the tarp and drips back onto the tent, effectively raining inside your buffer zone. A gap of 6-12 inches allows air to circulate and carry that moisture away. You can measure this with a trekking pole laid horizontally, if it doesn’t fit between the tarp and tent at the closest point, restake your corners to create more height.
2. The Pitch Angle
A flat tarp is a water collector. You need a steep pitch so rain runs off immediately. From the ridgeline to each corner stake, the angle should be at least 30 degrees, and 45 is better. Visualize the ridgeline as the peak of a roof and the corners as the eaves. If you can’t achieve this angle because your trees are too close together, lower your ridgeline attachment points on the trees to create more slope. This is especially vital for tents for heavy rain scenarios, where runoff volume is high.
3. Ridgeline Tension
A loose ridgeline is the single point of failure. After you stake the corners, go back and pluck the ridgeline. It should produce a clear, high-pitched twang. If it’s silent or makes a dull thud, it’s too loose. Rain will collect in the sag, and wind will cause the whole tarp to flap violently. Retighten the trucker’s hitch. In cold weather, check it again before bed, nylon rope contracts slightly as temperatures drop.
I pitched a tarp perfectly one evening in the Sierra. Calm night. Woke up at 2 a.m. to a sound like a whip cracking. A temperature drop had loosened the ridgeline just enough for a gust to get under the tarp. It slapped against the tent pole so hard it woke the entire site. I had to go out in the rain and retension it with numb fingers. Now I check tension twice: after setup, and right before I zip up for the night.
Common Tarp Over Tent Mistakes (And How to Fix Them)
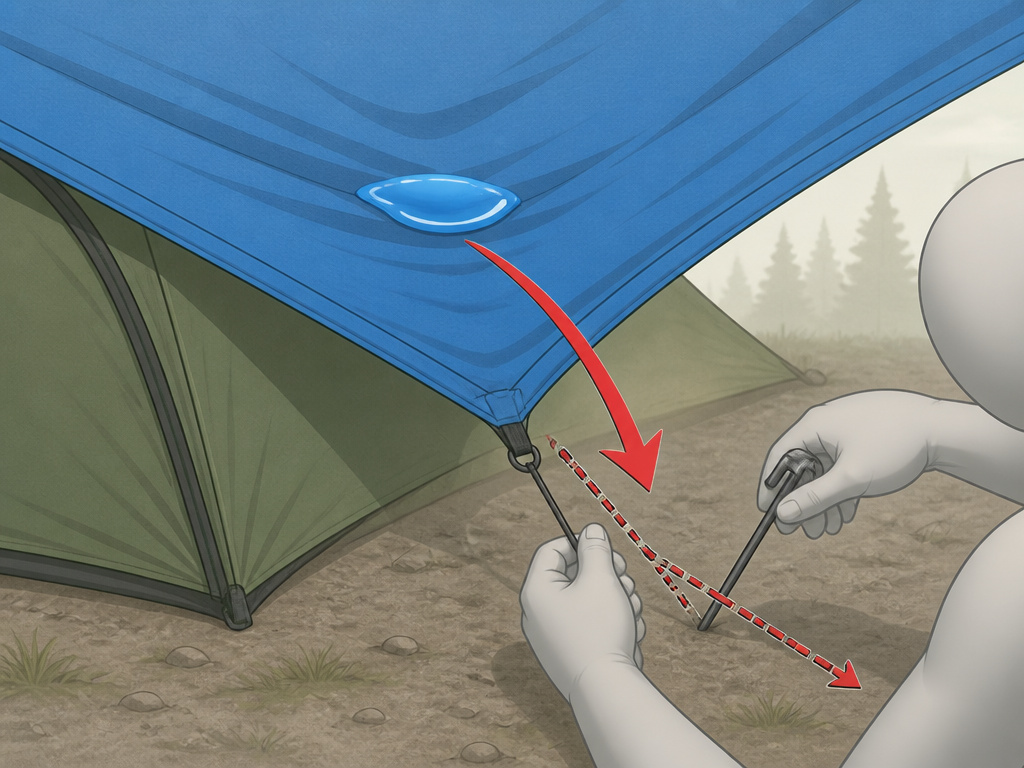
Getting the tarp up is one thing. Keeping it up through a storm is another.
Water Pooling in the Middle: This means your pitch is too flat. Solution: Lower the attachment points of your ridgeline on the trees, or move your corner stakes further out to increase the angle. Sometimes adding a central pole under the tarp’s midpoint can lift a sag, but it’s better to fix the pitch.
Tarp Flapping Against the Tent in Wind: This damages tent fabric over time. Solution: Increase the gap by raising your ridgeline or re-staking corners further from the tent. You can also add side guylines to pull the tarp’s sides taut laterally, removing slack that turns into flapping fabric.
Not Accounting for Wind Direction: Always pitch the tarp so the low end faces away from the prevailing wind. If the wind changes, the low side becomes a scoop, funneling rain under the tarp. Check the weather forecast and orient your setup accordingly. For serious wind, consider a high-wind tents style of pitching, where the tarp is almost vertical on the windward side.
Stakes Pulling Out in Soft Ground: Use deadman anchors. Bury a stick, log, or a spare tent stake sideways in the soil, tie your guyline to its center, and cover it. The holding power is exponentially greater than a vertical stake in mud or sand.
TL;DR: Water pooling means your angle is wrong. Fabric flapping means your tarp is loose. Both are fixed by re-staking with more distance and more tension.
Frequently Asked Questions
Should the tarp touch the tent?
No. A tarp touching the tent defeats its purpose. Contact transfers rainwater through capillary action and eliminates the ventilation gap needed to prevent condensation. Maintain at least a 6-inch air gap at all points.
Can I use a blue poly tarp from the hardware store?
You can, but you shouldn’t for more than a single trip. Poly tarps are heavy, bulky, tear easily, and are incredibly loud in the wind. A silnylon or silpoly tarp used for backpacking is lighter, packs smaller, and is much quieter.
How do I stop the tarp from sagging when wet?
Use a non-stretch ridgeline rope like static kernmantle cord or Dyneema. Nylon rope stretches when wet, creating sag. Pre-stretch your nylon rope by wetting it and tensioning it before you leave home, or better yet, switch to a low-stretch material.
Is a tarp necessary if my tent is waterproof?
For occasional fair-weather camping, no. For extended trips, heavy rain, hail, or strong sun, yes. A tarp extends the life of your tent’s waterproof coating by taking the brunt of UV and physical abrasion from debris. It’s cheap insurance for expensive tent camping accessories.
Can I put a tarp under my tent instead?
groundsheet under your tent protects the floor from punctures. A tarp over your tent protects the entire shelter from weather. They serve different purposes. You can use both, but never let the groundsheet extend beyond the tent footprint, it will catch rainwater and channel it underneath you.
What size tarp do I need for a 4-person tent?
For a standard 4-person dome tent, a 12×16 foot tarp is a safe minimum. It provides overhang on all sides. For larger family tents or canvas tents with stove jacks, consider a 16×20 foot tarp or two smaller tarps joined together.
Before You Go
A tarp over your tent isn’t about redundancy; it’s about resilience. The right pitch turns a simple sheet of fabric into a weather-blocking shield that adds years to your tent’s life and dryness to your nights. Remember the three angles: a tight ridgeline high enough to walk under, corner stakes set at 45 degrees, and that critical 6-inch gap above your rainfly. Forget any one of them, and you might as well not have bothered.
For a first-time setup, practice in your backyard before a trip. You’ll find the rhythm of tensioning the ridgeline and judging the pitch. And always pack 20 feet more rope than you think you’ll need. The one time you don’t is the time you’ll find the perfect trees just a little too far apart. Your future dry, storm-proof self will thank you for the extra cord and the practiced know-how.
