
How to Pitch a Tent: A Step-by-Step Guide for Any Campsite
This post contains affiliate links. As an Amazon Associate, we earn from qualifying purchases.
To pitch a tent, you start by staking the four corners loosely, insert the pole tips into the correct climate-specific grommets, raise the structure, secure the rainfly, and apply final tension through corner straps and guylines. The order is critical, tightening things out of sequence fights the tent’s design and can damage seams.
I’ve watched a friend’s brand-new tent become a crumpled heap at 2 AM because they skipped the guylines on a calm evening. I’ve also fought a vacuum-sealed Vango Banshee on a blustery Scottish coast, learning the hard way that a zipped door turns setup into a wrestling match. This isn’t just theory; it’s what works after hundreds of pitches in rain, wind, and perfect golden-hour light.
This guide walks you through the universal logic that works for a Coleman Sundome, an MSR Hubba Hubba, or a big family tunnel tent. We’ll cover the “why” behind each step, the model-specific quirks from official manuals, and how to avoid the mistakes that guarantee a damp or wobbly shelter.
Key Takeaways
- Always unzip the tent door before you start. A closed tent creates a vacuum that fights the poles as you raise them.
- Find your tent’s two grommets on the corner stake loops. Use the outer one in dry climates for initial tautness; switch to the inner one in humidity so the fabric can tighten as it absorbs moisture without stressing seams.
- Tension in this order: loose corner stakes, then poles, then rainfly, then final corner strap tightening, then guylines. Reversing this binds the fabric.
- A wet tent stored for just 24 hours in a warm car can start growing mildew, which stains fabric and voids the waterproof coating warranty on brands like MSR.
- Guy out your tent every single time, even if it’s calm. Pre-attached guylines are the difference between a peaceful night and a frantic 2 AM stake-pounding session.
What is the correct order for pitching a tent?
Every tent design follows a core logic of progressive tension. Start loose, add the rigid pole framework, then gradually pull everything tight from the ground up. Mess up the sequence, and you’re fighting the engineering.
Pitching a tent applies tension in a specific sequence: stake four corners to define the footprint, insert poles to create volume, drape the rainfly for protection, then tighten corner straps and guylines to lock the structure taut against wind.
Before you start: Pitching on uneven or debris-covered ground can puncture your tent floor and lead to a miserable night. In high winds, a poorly anchored tent can collapse, potentially breaking poles. Always clear your site and use stakes appropriate for the soil.
Here’s the universal five-step process, refined with hard-won lessons.
- Site and Footprint. Clear away pine cones, sticks, and rocks. Lay your footprint or ground tarp (shiny side up) and orient your tent body on top, matching any colored tabs. This is when you decide door placement, away from the prevailing wind is best.
- Anchor the Corners Loosely. Peg the four corner loops of the tent body. Get down on a knee and drive each stake at a 45-degree angle away from the tent, using the heel of your hand until it resists a firm tug. Crucially, keep all strap adjusters on these corners fully loose. If you tighten them now, the fabric can’t shift to accept the poles.
-
Build the Frame. Assemble your shock-corded poles. For most dome tents, you’ll insert opposing pole tips simultaneously to “walk” the dome up evenly. The pole tip seats into a grommet on the corner stake loop. This is where climate matters.
Many quality tents, like those from MSR, have two grommets. Your choice here prevents long-term damage.
Climate Condition Correct Grommet The Consequence of Getting It Wrong Dry / Low Humidity Outer Grommet Using the inner grommet over-tensions the dry fabric, stretching seams prematurely. Humid / Wet Forecast Inner Grommet Using the outer grommet leaves the tent sagging; as damp fabric tightens, it can’t take up the slack, straining stitches. This spec comes straight from the MSR owner’s manual. Ignoring it is a silent killer of tent longevity.
-
Raise and Cover. Once poles are seated, the tent stands. Drape the rainfly over, aligning doors (often with matching colored tabs). Hook the fly’s corner grommets under the same pole tips holding the tent body. Don’t tighten its straps yet.
- Final Tensioning. This locks it all down. Go to each corner and pull the strap adjuster tight until the fabric walls are smooth. Next, stake out the rainfly’s vestibule points. Finally, attach and tighten your guylines until they’re snug, not guitar-string tight.
Common mistake: Cranking down guylines before tightening the corner straps. This pulls the tent structure sideways, distorting door zippers and misaligning pole geometry, leading to a noisy, unstable night.
TL;DR: The mantra is loose-to-tight. Stake corners loosely, insert poles into the correct climate grommet, raise, add fly, then tighten everything from the corners outward.
How does the pitching process change for different tent types?
The universal steps adapt to your tent’s architecture. A dome, a tunnel, and a single-wall trekking pole tent have different pivot points.
For Dome Tents: Their crossing poles create a self-supporting arch. The key is to insert opposing pole tips simultaneously. Push one side into its grommet, then immediately walk to the other side and lift that pole into place. This walks the dome up evenly. Fully erecting one side first makes you fight the geometry.
For Tunnel Tents: These have parallel hoops. You must peg the entire footprint before inserting any poles. As shown in a setup video for the Freedom Trail Sendero 4, all four corners are staked with loose tension first. Then you slide each pole through its long sleeve; the pre-anchored corners keep the fabric aligned so the poles raise the entire tunnel smoothly. Trying to pole a tunnel tent without staked corners makes it slide around like a writhing caterpillar.
For Instant or Pop-Up Tents: The frame is pre-attached. Your job is to unfold and extend, then immediately secure the base. As you unfold, weight the corners with your gear. A gust can turn an unpegged instant tent into a tumbleweed. I’ve chased one across a field.
For Single-Wall & Trekking Pole Tents: The process inverts. You often pitch the rainfly first using your trekking poles as the main support. Forgetting to seam-seal the guyline attachments on a cottage-industry tent like a Zpacks Duplex is the real rookie mistake that leads to leaks.
Large shelters like spacious family tents or stand-up tents with vertical walls act like sails, making their guylines non-optional. The same goes for storm-ready tents designed for exposed ridges, their strength is unlocked only with a full complement of anchors.
What gear do you need for a bombproof pitch?
Your tent bag includes the bare minimum. For a pitch that holds from dusk till dawn, you need a few key upgrades.
- A Proper Mallet: Skip the rock, it bruises and bends lightweight aluminum stakes. A Fiskars 7-inch rubber mallet gives you control for angled strikes in hard ground.
- Extra, Better Stakes: The supplied hooks are often flimsy. I pack a mix: Vargo Titanium Nail Pegs for rocky Sierra granite, MSR Groundhogs for general hardpack, and MSR Blizzard Snow Stakes for sand or snow.
- The Right Footprint: This isn’t just for comfort; it protects the tent floor. It must be slightly smaller than the tent floor. A larger tarp channels rainwater underneath you.
- A Multi-Tool: The pliers are perfect for extracting a bent stake, and the knife can trim a wayward guyline.
A complete camping equipment list also includes a headlamp for late arrivals and a small brush to sweep your site. That single pine cone you ignore will feel like a boulder by midnight.
How do you secure a tent in high winds or bad weather?
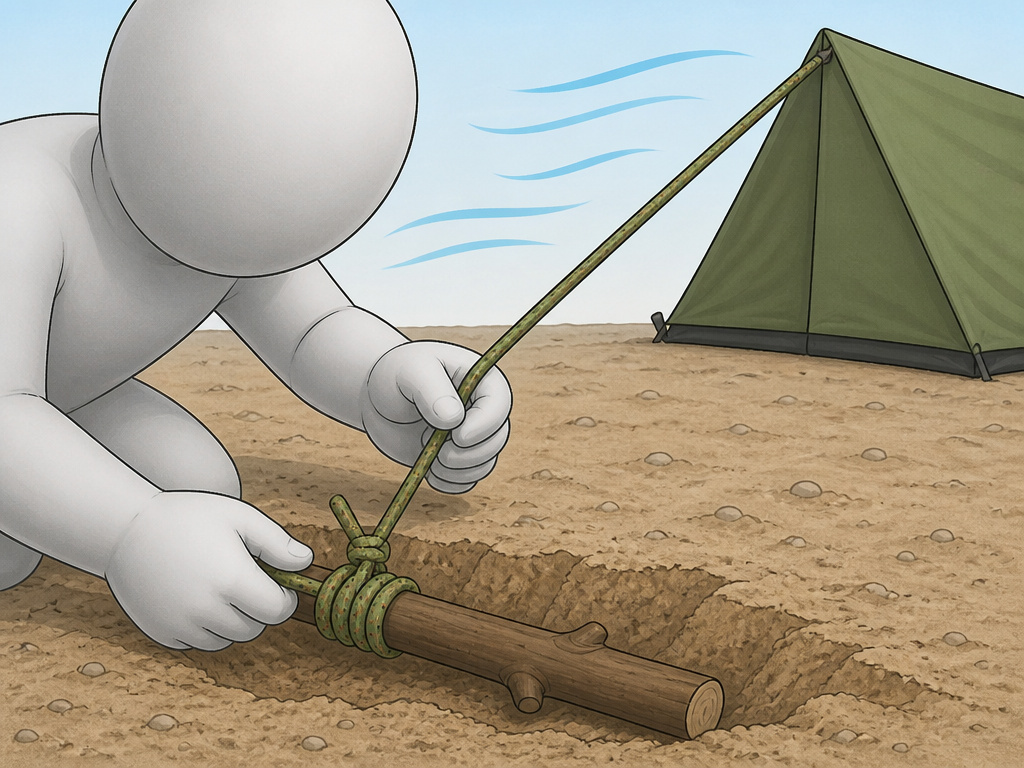
When the weather turns, your pitching technique needs to adapt. The principles in the official USAP tent setup procedures for Antarctica are your guide for extreme conditions.
In High Winds:
- Pitch into the Wind. Orient the tent’s smallest side or solid back into the wind, as advised in the Macpac Minaret instructions, to minimize resistance.
- Use Deadman Anchors. In snow or sand, bury a stuff sack, stick, or stake horizontally as a “deadman” and tie your guyline to it. The U.S. Antarctic Program Field Manual calls this “bombproof” for large tents.
- Belay the Tent. In severe winds, the manual suggests raising a Scott tent while belaying it with an attached rope, letting the wind assist.
For Heavy Rain:
- Pitch the Fly First (A-Frame). Some tents allow you to set up the rainfly with its poles first, creating a dry shelter to assemble the inner tent underneath. This is a game-changer.
- Mind Your Vestibules. Angle vestibule doors so they don’t funnel water inside. Ensure your waterproof tent features like sealed seams and bathtub floors are intact before you go.
In Cold/Snow:
- Pre-Tension Shock Cord. In extreme cold, shock cord loses elasticity. The MSR manual advises pulling pole sections back and forth to retension it before setup.
- Ventilate When Cooking. If using a stove, the Antarctic manual mandates using a vent tube to prevent dangerous carbon monoxide buildup, a critical tent accessory for winter camping.
Choosing the right wind-resistant tents or rainproof tents for your environment is the first step, but proper technique is what makes them perform.
What are the most common tent pitching mistakes?
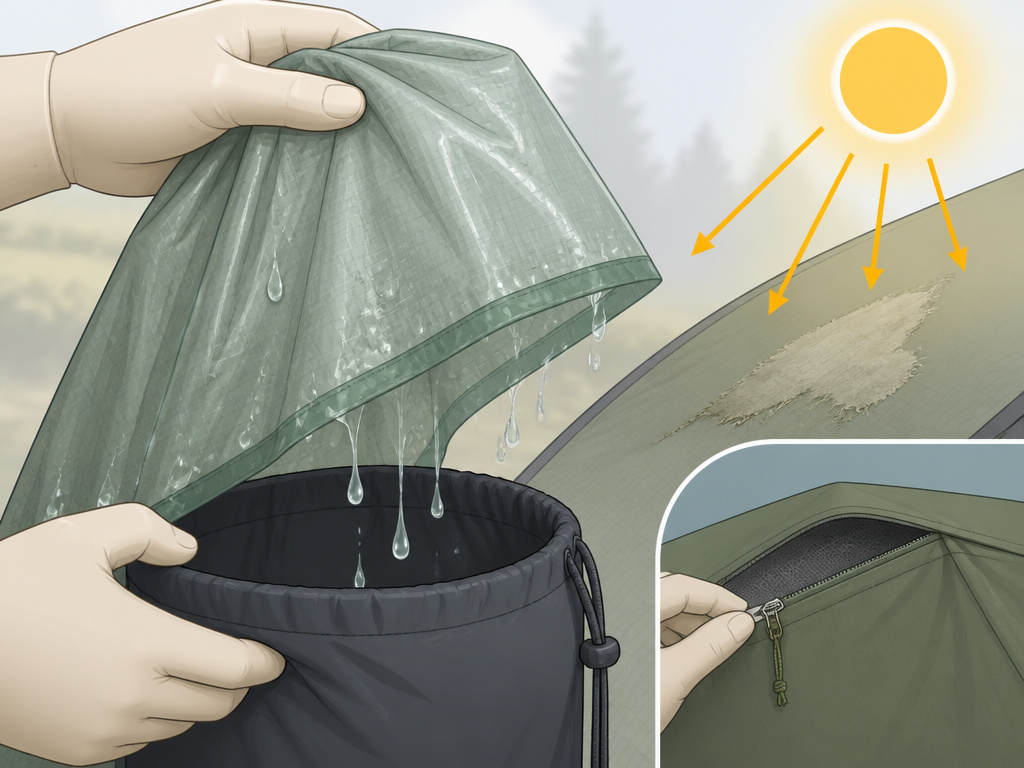
Two errors account for most pitching frustrations and long-term tent damage. I’ve made both.
Mistake 1: Storing the Tent Damp.
This is the silent killer. The MSR owner’s manual is blunt: storing a wet tent for as little as 24 hours in warm weather starts mildew, which stains, smells, and causes the waterproof polyurethane coating to break down via hydrolysis. This damage isn’t covered under warranty. Always dry your tent thoroughly, fly, body, and footprint, before packing it away.
Mistake 2: Ignoring UV and Salt Damage.
Prolonged UV exposure, especially at high elevation, breaks down fabric strength, causing fading and eventual tears. Saltwater corrosion can destroy pole joints. After beach trips, rinse poles in fresh water and apply a light silicone lubricant.
Mistake 3: Poor Ventilation Management.
Condensation starts at setup, not when you sleep. Open all vents, roof and low side, immediately. As one YouTube instructor put it, “the key to a dry night in a tent is a well ventilated tent.” Pair good airflow with portable tent lighting that doesn’t emit much heat to keep condensation minimal.
Common mistake: Using a ground tarp larger than the tent floor. This channels runoff between the tarp and tent bottom, guaranteeing a wet sleep system. Trim it or buy the manufacturer’s specific footprint.
Frequently Asked Questions
How tight should guylines be?
guyline should be snug with slight flex when you push against it. If it’s so tight it vibrates like a guitar string, it’s distorting the tent structure. In high wind, tighten them more, but watch that poles aren’t bending inward from the strain.
What if I lose or break a tent stake?
Improvise with a “deadman” anchor: tie your guyline to a sturdy stick, rock, or stuff sack filled with sand and bury it. In a pinch, secure lines to nearby trees or logs. Carrying a few extra stakes is far cheaper than replacing a pole broken in a collapse.
Can I pitch a tent on a wooden platform?
Yes, but you need different anchors. Use platform straps or long cords to lash the tent’s corner loops directly to the platform. Don’t just weight it with gear; wind can get underneath and lift it. Some campgrounds provide metal rings for this.
Should I attach the inner tent first or the poles first?
For most modern double-wall family camping tents, the inner is attached to the poles. You pitch them as one unit, then add the rainfly. Some mountaineering models require pitching the fly first. Check your manual, but inner-first is standard for domes and tunnels.
Why does my tent leak at the seams after one season?
This is likely hydrolysis from frequent storage while damp, or UV degradation. Once the polyurethane coating breaks down, it becomes sticky and fails. Preemptive seam sealing and always drying your tent are the best defenses. For a durable, breathable alternative, consider traditional canvas tents.
Is a footprint really necessary?
For longevity, yes. It protects the tent floor from abrasion and ground moisture. A tailored footprint is best, but a trimmed piece of Tyvek works well. Without one, you risk punctures and accelerated wear.
Before You Go
Pitching a tent well is a skill of patience and order. It starts with choosing the right site and matching your stakes to the soil. Remember the sequence: loose corners, correct grommet, raised frame, draped fly, then final tension from the ground up.
The goal is a shelter that’s taut, quiet, and dry. That comes from respecting the design, whether you’re setting up quick pop-up tents for a beach day or securing sturdy tent designs for a mountain storm. It’s about creating a calm, secure space where the only thing you need to worry about is what to cook for dinner. Now, get out there and pitch your perfect home under the stars.
