
Do Tents Come With Stakes? The Real Answer
This post contains affiliate links. As an Amazon Associate, we earn from qualifying purchases.
Yes, every new tent includes a set of stakes and guylines in the box. Manufacturers like Coleman and MSR explicitly state they are required for safe setup. However, this included kit is a bare minimum designed for ideal, calm conditions on forgiving soil, it’s often insufficient for real-world wind, slopes, or challenging ground.
You’ve just unboxed your shiny new shelter, feeling that mix of excitement and mild dread about the first pitch. You dump out the contents: tent body, rainfly, poles, and a small, crinkly plastic bag. Inside are your stakes. They look… flimsy. You count them. For my six-person family tent, there were exactly six.
I learned their limits on a breezy weekend at Douthat State Park. I used all six, skipped the guylines, and woke at 2 a.m. to a sound like a flag whipping in a hurricane. The rainfly, untethered, was slapping the tent body with each gust. A corner stake had pulled loose from the soft forest duff. That flapping nylon was my tent screaming the footnote I’d ignored in the manual.
Let’s move past the showroom pitch. I’ve compared manuals from Coleman, MSR, and major instant cabin brands. Here’s what they really say about the stakes in your box, when they’ll fail you, and what you need to do about it.
Key Takeaways
- Factory stakes are a liability-compliant starter kit, not a complete anchoring system. MSR’s manual admits you may need to buy more for “extreme or varied soil conditions.”
- Staking at a 45-degree angle away from the tent isn’t a tip, it’s physics. A vertical stake loses over half its holding power in loose soil.
- Never store stakes inside the tent bag. On my third trip with a Coleman Sundome, an uncapped MSR Groundhog stake I’d tossed in sawed a 3-inch tear in the mesh door during transit, requiring a $40 repair.
- The included count is a mathematical minimum. A complex tent needs a stake for every loop and guyline, plus spares. The included ten for a 6-Person Instant Cabin Tent leaves zero room for error.
- For hard, sandy, or snowy ground, the included stakes are practically useless. You need specialty anchors or improvised techniques.
What Stakes Actually Come in the Box?
Open that small bag and you’ll typically find basic, mass-produced stakes. For a Coleman Montana 6 Tent, it’s a set of thin, silver stakes. For a 6-Person Instant Cabin Tent with LED Lighted Poles, the parts list confirms ten stakes. These are almost always simple “J” or slim “Y” stakes made of brittle plastic or thin, easily-bent aluminum.
Tent manuals universally treat stakes as mandatory safety equipment. The Coleman Stockton manual warns, “Secure with all stakes and guylines provided to prevent property damage or personal injury,” while the MSR manual states, “All tents, including freestanding models, require staking to prevent them from flying away in a gust of wind.”
Manufacturers include just enough to get the tent standing on a flat, grassy lawn. It’s a cost and liability calculation. The stark truth is in the MSR Tent Owner’s Manual: “Enough stakes and guy cord are supplied to safely setup your tent in most situations.” It then immediately adds, “It may be necessary to purchase additional and/or specialized stakes and guy cords for use in extreme or varied soil conditions.” That’s the official disclaimer, your kit is for a demo, not a gale on an exposed ridge.
The guylines included are usually a fixed, short length. If your site is uneven or you need to anchor to a distant tree for optimal wind resistance, they’re often too short, forcing you to place stakes too close to the tent to be effective.
TL;DR: Your tent includes a basic, often flimsy stake set designed for perfect campground soil. Real-world conditions demand more.
How Many Stakes Do You Really Need?
The number in the box is a starting point, not a prescription. Let’s break down a real setup for a common dome tent with a full rainfly:
* 4 for the corner loops.
* 2 for the rainfly door guylines (if equipped).
* 2 for the rear rainfly guylines.
* 2 for the side panel pull-outs (for wall stability).
That’s ten stakes for a basic, secure pitch. Now check your kit. Many six-person tents include exactly six. You’re already short before accounting for spare stakes or challenging ground.
Common mistake: Using only the corner stakes – the tent stays upright, but a 15 mph crosswind will deform the walls, strain the pole joints, and turn your rainfly into a noisy sail all night.
I carry a simple formula: one stake for every attachment point on the tent body and rainfly, plus two spares. For a larger family tent or an exposed site, I might bring 50% more. This philosophy is part of a smart complete camping gear list. Skimping on stakes risks your entire shelter.
| Tent Type | Typical Included Stakes | Stakes for a Secure Pitch | Recommended Spares |
|---|---|---|---|
| 3-Person Backpacking Tent | 6-8 (Aluminum J) | 8-10 (for all guylines) | 2 |
| 6-Person Family Dome | 6-10 (Plastic/Mixed) | 10-14 (for corners & all guylines) | 2-4 |
| Instant Cabin Tent | 10 (as per manual) | 10-12 (may lack extra guy points) | 2 |
The Right Way to Stake: A Field-Tested Method
Forget the serene, 30-second setup videos. Here’s the sequence that works when the wind is picking up and the light is fading.
- Zip Everything Closed First. I learned this lesson the hard way at Joshua Tree. Fumbling with a misaligned zipper at 2 a.m. because I staked with the door open is a special kind of frustration. As one practical YouTube tutorial advises, closing the doors before staking prevents the fabric from being “stretched into the wrong position.”
- Match the Stake to the Loop. Tent bases have web loops. Rainflies have plastic rings or clips specifically for guylines. Never run a guyline through a base loop, it misdirects force and can damage the seam.
- Drive at a 45-Degree Angle, Away from the Tent. This isn’t a suggestion; it’s in every Coleman diagram for a reason. A stake driven straight down pulls out with far less lateral force. The 45-degree angle engages the soil’s shear strength.
Here’s my tensioning order for a storm-worthy pitch:
1. Corner Loops: Stake all four, pulling the tent body snug but not lifting the floor.
2. Rainfly Guylines: Attach and stake these next, tensioning until the fly is taut but not drum-tight.
3. Extra Guylines & Pull-Outs: Stake any remaining points last. These stabilize the structure against twisting.
Skipping the guylines is the fastest route to a sleepless, noisy night as the fly billows and slaps the tent body incessantly.
When Your Factory Stakes Will Fail You (And What to Do)
The included stakes assume a soft, forgiving lawn. Three common scenarios break that assumption completely.
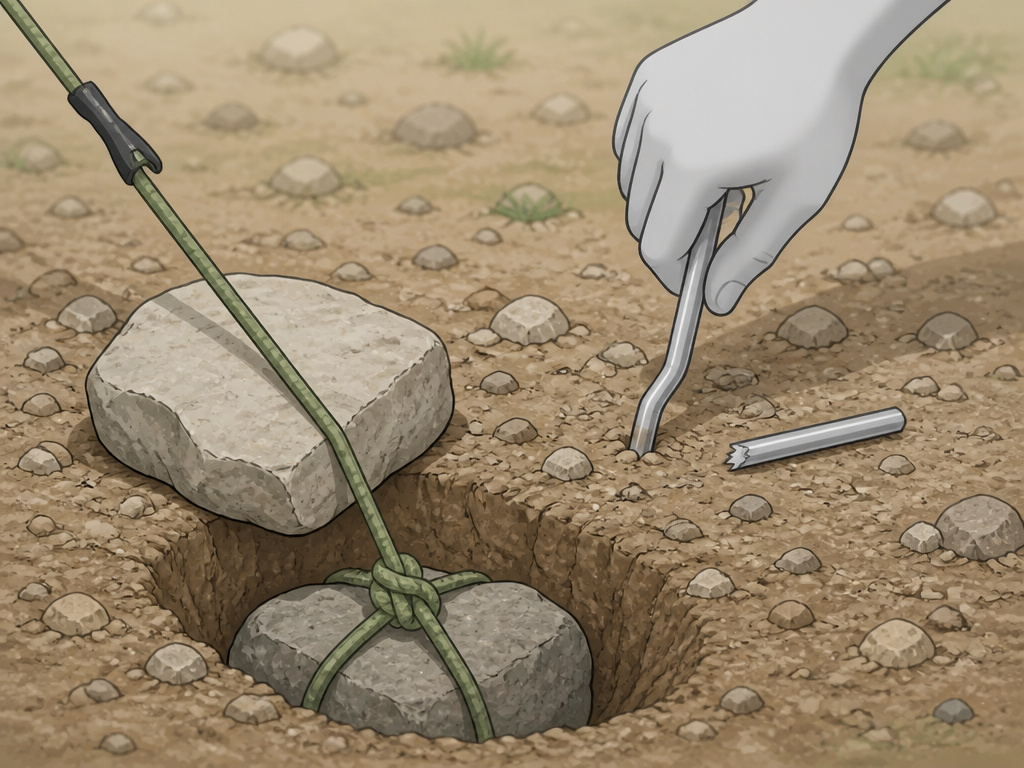
Hard or Rocky Ground: Forcing a thin aluminum stake into compacted clay or gravel will bend or break it. The MSR manual warns that “nearly all pole damage occurs during setup,” often from hammering a stubborn stake. Instead, use a deadman anchor. Tie a guyline around a fist-sized rock, bury it, and place a larger rock in front. A backcountry hiking video demonstrates this brilliantly for impossible ground.
Snow: Plastic and aluminum stakes offer zero hold in soft snow. You need a deadman anchor buried in the snowpack. The technique from a winter camping guide is specific: bury a stuff sack or stake sideways, layer snow on top, stomp it down, and wait 15 minutes for it to freeze before tightening the line. That waiting period is non-negotiable.
Sand: Straight stakes have minimal surface area and pull out with laughable ease. You need wide-plate sand stakes or screw-style beach anchors, which are never included.
| Scenario | Why Factory Stakes Fail | Immediate Fix | Long-Term Upgrade |
|---|---|---|---|
| Hard/Rocky Ground | Tips bend; won’t penetrate. | Rock deadman anchor. | Heavy-duty steel nail stakes or titanium stakes. |
| Deep Snow | No holding power in unconsolidated snow. | Buried stuff sack deadman; let freeze. | Specialized snow stakes (long, wide). |
| Loose Sand | Pulls out with minimal lateral force. | Bury a stuff sack filled with sand. | Wide-plate plastic sand stakes or screw anchors. |
| High Wind | Thin stakes lift out under constant load. | Add more guylines using longer cord. | Longer, thicker aluminum Y-stakes (e.g., MSR Groundhog). |
Upgrading Your Stake Kit: A Gear Junkie’s Guide
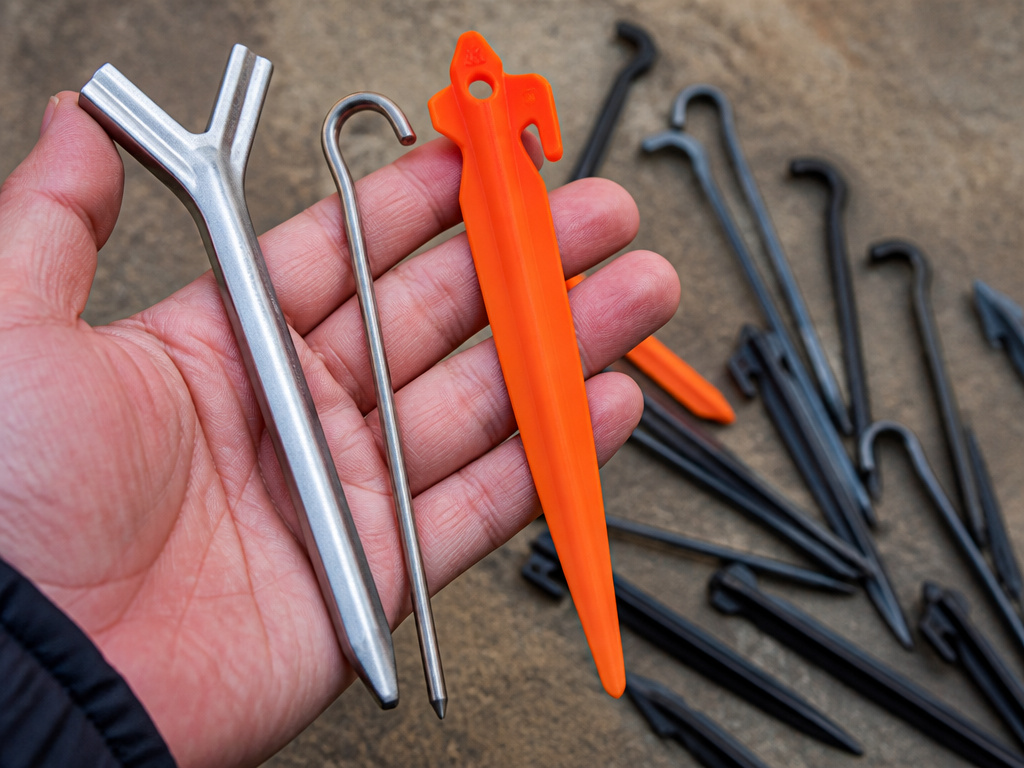
The plastic stakes that come with budget tents are adequate for one season on perfect grass. After that, they become brittle. Upgrading is one of the most cost-effective gear improvements you can make.
For general car camping, 8-inch or 9-inch aluminum Y-stakes are the workhorse standard. I’ve tested MSR Groundhogs against generic brands; the Groundhog’s tapered blade and notch design held with significantly more force in my backyard clay test. They’re a core part of any serious tent camping accessories kit.
For specialized conditions:
* Hard Ground: Heavy-duty steel nail stakes or robust titanium stakes. They can be hammered into stubborn soil.
* Sand/Snow: Orange plastic plate stakes (like MSR Blizzards) or snow/sand-specific screw anchors.
* Ultralight Backpacking: Thin titanium shepherd hooks. They save weight but require perfect, soft ground and careful placement, a key consideration for ultralight tent options.
Your choice should mirror your typical terrain. A car camper should pair robust stakes with a rubber mallet. A backpacker weighing every gram for lightweight two-person tents might opt for titanium.
I keep three sets in my gear bin: aluminum Y-stakes for car camping, titanium hooks for the trail, and sand stakes for beach trips. The factory bag stays in the box as a last-resort backup only.
The Critical Mistakes to Avoid
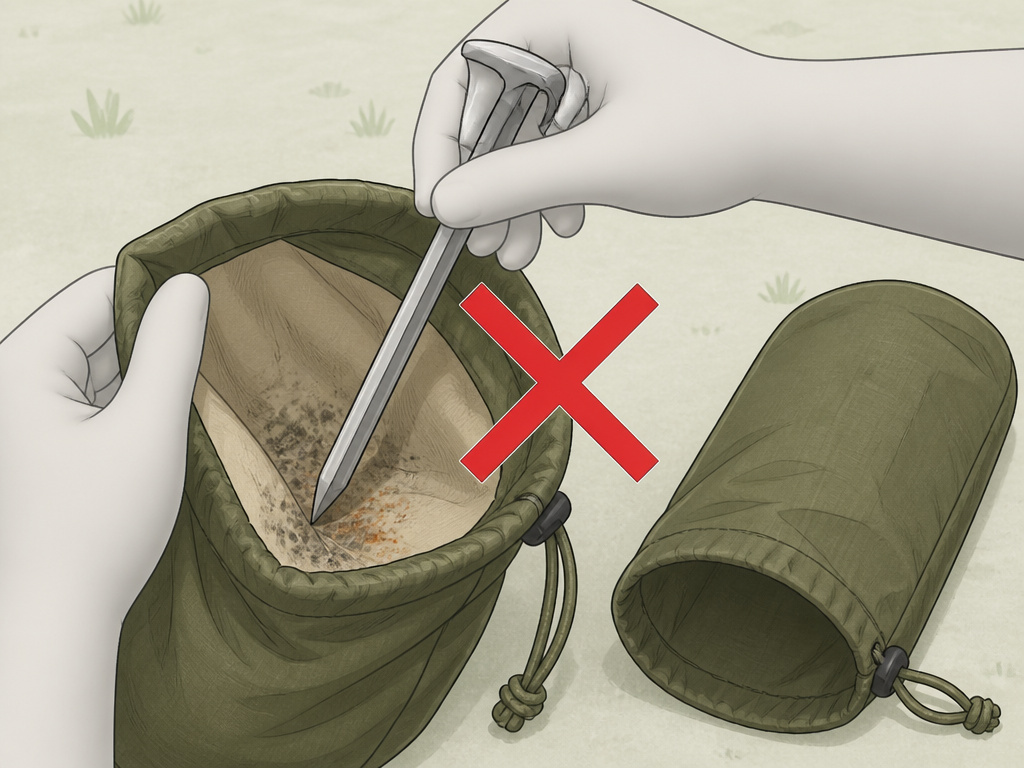
Beyond using the wrong stake, there are two universal, manual-emphasized errors that ruin gear.
First, never store stakes or poles inside the tent bag. Every manual screams this. My Coleman Sundome’s 3-inch mesh tear was a $40 lesson. The Coleman Stockton manual is explicit: “All poles and stakes must be placed in the storage bag to prevent damage to the fabric.” It’s not a suggestion; it’s a prediction.
Second, never store a tent damp, even for a short time. A damp bag with metal stakes inside becomes a petri dish for mold and corrosion. The stakes rust, weaken, and stain your tent fabric.
Before you start: Stakes are sharp. Pushing them in with your bare hand can slice your palm if they slip. Always use a mallet, a rock, or the heel of your shoe. If a stake bends, replace it immediately, its structural integrity is compromised.
Frequently Asked Questions
Can you set up a tent without stakes?
You can assemble a freestanding tent without stakes, but you cannot secure it. Even a slight breeze can lift and roll an unstaked tent. For any weather beyond dead calm, stakes are mandatory.
What if I lost or bent all my tent stakes?
Replace them immediately. Generic replacements are available at any outdoor store. Match the length and type as closely as possible. Using mismatched, shorter stakes drastically reduces stability. For a reliable set, consider it part of your essential tent camping equipment.
Are more expensive stakes actually worth it?
Absolutely, if you camp regularly or face challenging conditions. A $3 aluminum Y-stake holds significantly better than an included plastic one and won’t snap. For backpackers, the weight savings of titanium can justify the cost, especially for backpacking tents for couples where every ounce counts.
How do you secure a tent on a wooden platform?
You can’t drive stakes into wood. Use 1-inch-wide nylon webbing straps with buckles to wrap around the platform boards, or employ heavy-duty elastic cords with hooks to attach to the platform’s underside. Some campgrounds provide screw eyes or rings for this purpose.
What Actually Matters
Your tent came with stakes. Treat them as a proof-of-concept, not a complete solution. Count them, understand that their design assumes perfect conditions, and test them in your backyard soil, you’ll quickly feel their limits.
For any trip where the weather isn’t guaranteed perfect, packing a set of real, aftermarket stakes is the cheapest insurance you can buy. They cost little, add minimal weight, and are the definitive difference between a shelter that flaps and one that holds firm through the night.
The best two-person backpacking shelters often assume you’ll supply your own stakes. You should adopt the same mindset. Don’t let a $2 piece of plastic be the reason your weekend unravels.
