
How Big Is a 20×20 Tent? Real-World Dimensions & Layouts
This post contains affiliate links. As an Amazon Associate, we earn from qualifying purchases.
A 20×20 tent provides 400 square feet of covered space with an eave height of 7 to 8 feet. Its peak height ranges from under 13 feet for a basic frame to nearly 18 feet for a high-peak model. This size fits 40 seated dinner guests, 65 in ceremony rows, or 80 for a standing cocktail hour. The physical footprint is exactly 20 by 20 feet, but the total site needed, factoring in stakes and safety, is a minimum of 24 by 24 feet.
Most product listings just shout “400 square feet!” and move on. They don’t tell you about the 14-foot center pole that will bisect your dance floor, or that the standard stake kit likely won’t meet your local wind code. I learned this the hard way helping a friend plan her wedding, and again when I tried to load a 750-pound tent kit into the wrong truck.
This isn’t just about specs. It’s about what fits, what works, and what fails when you’re on the clock. Let’s talk real space, real weight, and the setup realities you won’t find in the manual.
Key Takeaways
- You need a 24×24 foot site, not 20×20. The extra perimeter is critical for safe staking and taut walls.
- Celina Tent’s manuals explicitly state their standard stake kits may not meet local code, evaluating soil and wind for extra anchors is your responsibility.
- Occupancy is certified: 40 for sit-down dinners, 65 for theater rows, 80 for standing receptions. Squeezing in more compromises safety and comfort.
- A pro can set up a basic frame tent solo in 30 minutes, but a first-time crew of 3-4 needs over 2 hours for a complex high-peak model.
- The weight swing is massive: from 226 lbs for an aluminum pole tent to over 750 lbs for a high-peak frame. Your vehicle and crew size depend on it.
A 20×20 shelter offers 400 square feet of interior space with a peak height up to 17 feet 10 inches for high-peak frame models. Standard eave heights are 7 to 8 feet, providing clear vertical walls. This configuration supports formal seating for 40, theater-style rows for 65, or a standing reception for 80 persons within its footprint.
What Does 400 Square Feet Really Mean for Your Site?
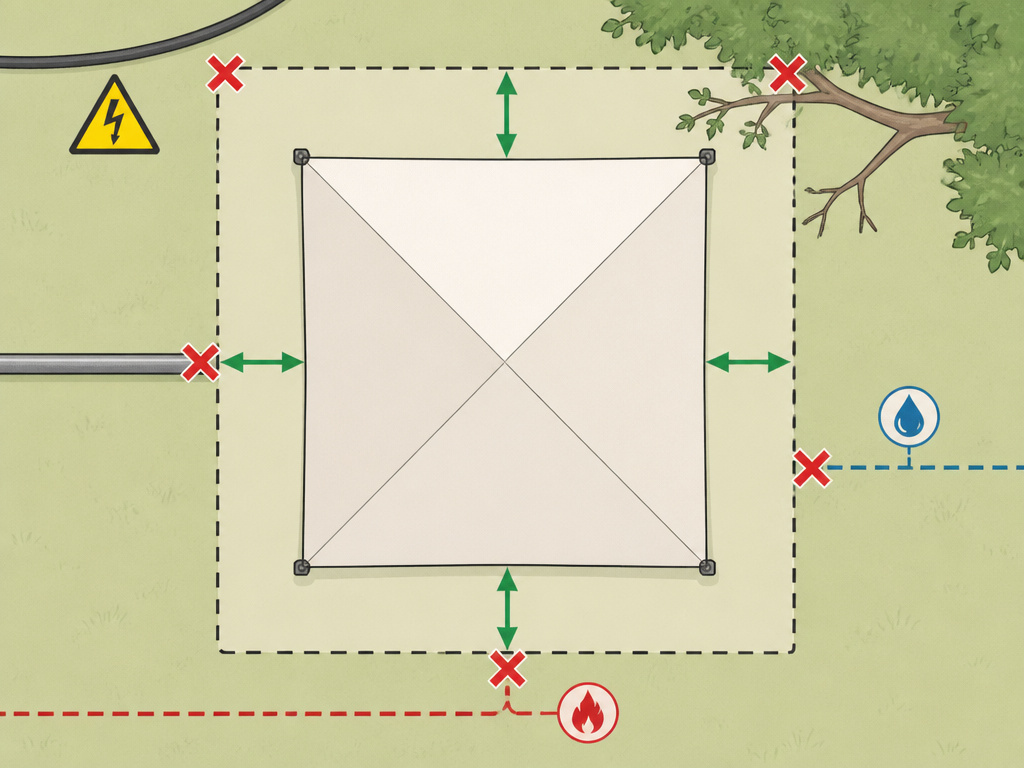
You’ve measured a perfect 20×20 patch in your yard. It should work, right? Stop, that’s the first mistake. The tent’s walls go to the edge, but its anchoring system does not.
Stakes must be driven at an angle, away from the base. Guy lines on pole tents extend even farther. If you stake right at the edge of your cleared area, those lines become dangerous tripwires. The non-negotiable rule is to add a minimum of two feet on every side.
That changes your site math from 400 to 576 square feet. Before you commit, get a tape measure and mark a 24-foot square. Then, look up and down.
Look up for power lines and low-hanging branches. Look down for sprinkler heads, septic lids, or those little colored flags marking buried utilities. I once saw a crew shear a fiber-optic line because they ignored the flags; the delay and repair bill were monumental.
TL;DR: Your site must be 24×24 feet. Physically mark it and do a thorough overhead and underground hazard check.
How Many People Can You Actually Fit Inside?
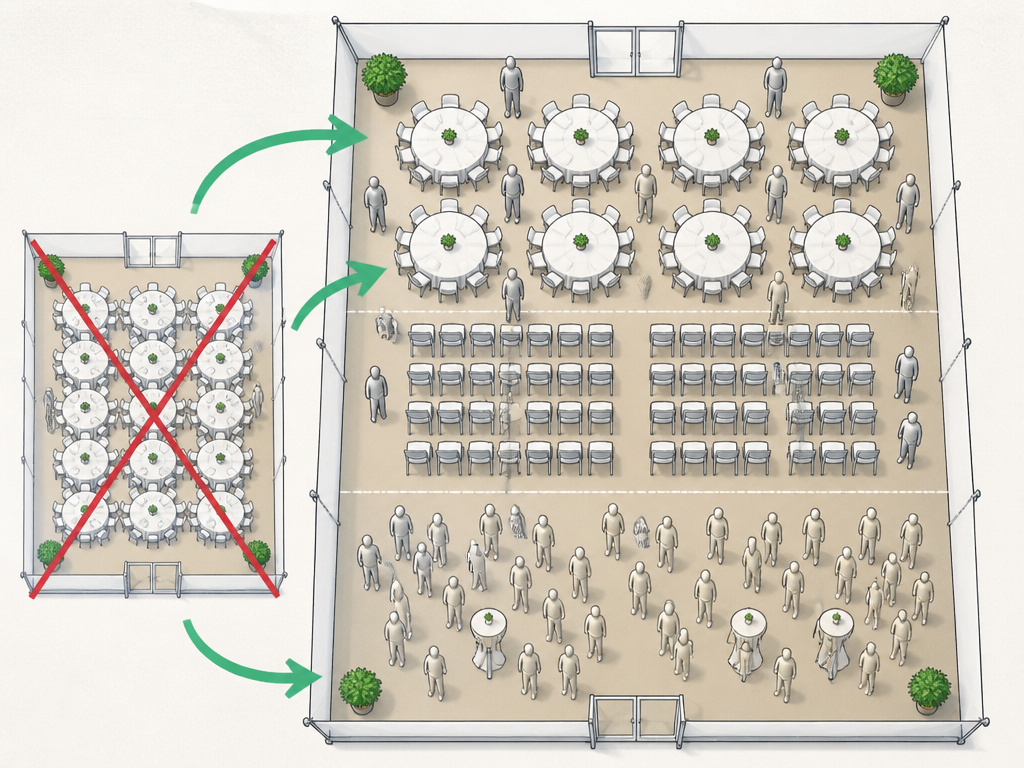
“Fits 50 people” is a useless phrase. Are they dining, dancing, or listening to a speaker? The occupancy data from manufacturer spec sheets, like those from Celina Tent, gives you real, code-informed numbers to plan with.
| Seating Style | Maximum Occupancy | Square Feet Per Person | Ideal Use Case |
|---|---|---|---|
| Sit-Down Dinner | 40 guests | 10 sq ft | Wedding receptions, banquets with 60″ round tables |
| Cathedral Seating | 65 guests | 6.15 sq ft | Ceremonies, presentations, theater-style rows |
| Standing Reception | 80 guests | 5 sq ft | Cocktail hours, mingling, trade show booths |
The sit-down dinner number is your anchor. It accounts for 8-person round tables, chairs, and space for servers to move. Trying to force 50 seated guests means wall-to-wall tables and no room for a dance floor or buffet.
For a pure cocktail party, 80 is the absolute fire marshal limit, aim for 60 to keep it comfortable. Your event’s shape dictates its real capacity.
Common mistake: Planning for 60 seated dinner guests in a 20×20 tent. The consequence is a cramped, unpleasant event where servers can’t navigate, and it happens as soon as your guests sit down.
Pole, Frame, or High-Peak? Your First Major Choice
This decision dictates where you can set up, how much interior space you lose, and the overall vibe. It’s more than just looks.
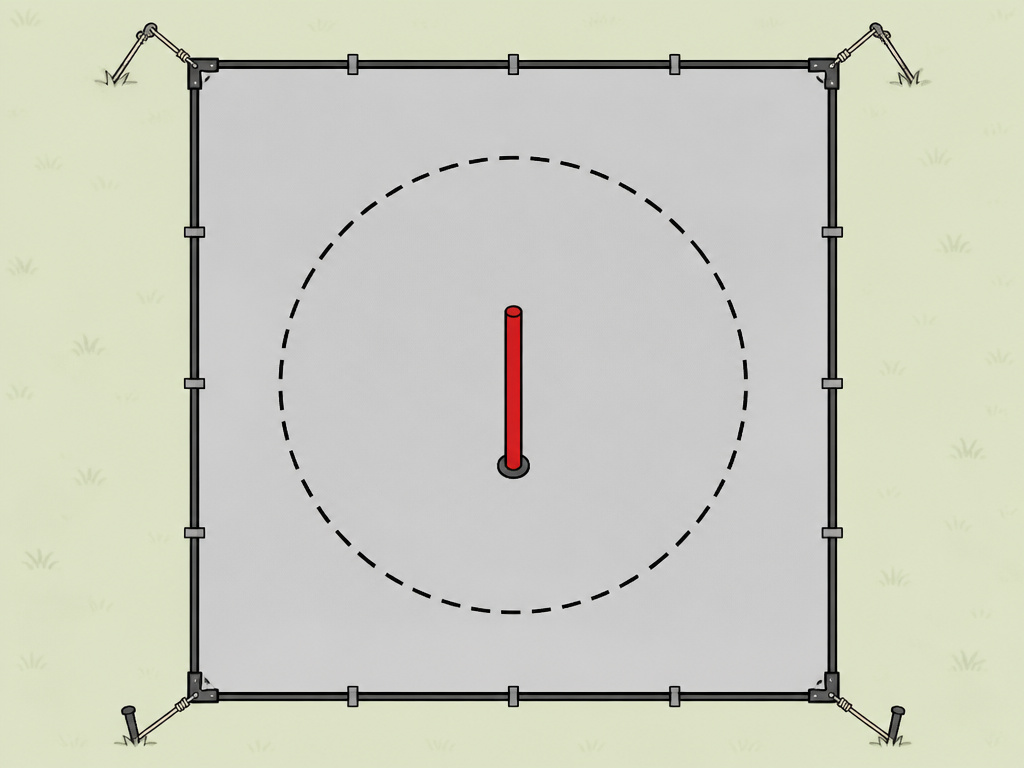
Pole Tents, like the Celina Classic Series, are the traditional choice. They have a graceful, peaked roof held up by tension and interior poles staked into soft ground.
* Pros: That classic, elegant look, think vineyard weddings. Often cheaper to rent. The steep pitch sheds water brilliantly.
* Cons: Require soft ground for stakes. Interior center poles obstruct your floor plan. More vulnerable to wind if not perfectly tensioned.
Frame Tents, such as the Celina Classic Series Frame, use a rigid aluminum structure. They’re free-standing, with no interior poles.
* Pros: Can go on any surface: concrete, decks, even indoors. You get 100% usable floor space. Easier to attach sidewalls and hang decorations.
* Cons: Lower peak height (often 12-13 ft). More parts to assemble. Usually a higher rental cost.
High-Peak Frame Tents, like the Celina Master Series High Peak, are the statement pieces.
* Pros: Dramatically tall peak (up to 18 ft). Incredibly airy, spacious feel. Makes a huge visual impact.
* Cons: Heaviest and most complex kit. Longest components (over 14 ft). Highest cost, both to rent and to transport.
The center pole in a 20×20 pole tent is a specific obstacle. At my sister’s wedding, I insisted on a pole tent for the classic look. During the first dance, the 14-foot center pole wasn’t just in the way, it ripped her lace train when they spun too close. We’d positioned the dance floor based on the rental guide’s generic advice, not the 16-foot clear diameter the pole actually demanded. I learned to prioritize clear space that day.
Weight, Materials, and the Logistics They Dictate
Wait, before we get lost in spec sheets, a confession: I used to ignore the ‘total weight’ line. Then I had to load a 750-pound Master Series kit into a borrowed Ford Ranger. (Spoiler: it didn’t fit. We made two trips, and I still owe my friend a detailing.) So, yes, these numbers matter desperately.
| Specification | Celina Classic Series Pole Tent | Celina Master Series High Peak Frame Tent |
|---|---|---|
| Total Weight | 226–363 lbs (Alum. vs. Galvanized) | 618–753 lbs (Alum. vs. Hybrid) |
| Fabric | 16 oz. PVC Coated Polyester | 16 oz. PVC Coated Polyester |
| Frame Material | Aluminum or Galvanized Steel | Aluminum, Galvanized Steel, or Hybrid |
| Longest Component | 7’10” – 8’10” pole | 14’4″ rafter section |
| Peak Height | 14’10” – 15’10” | 17’10” |
| Recommended Crew | 2 people | 2–4 people |
Feel that weight difference? Aluminum vs. galvanized steel, it’s over 100 pounds. I learned this lugging a galvanized frame across a dew-soaked lawn at 6 AM; my hands were numb, and the cold, rough coating snagged my gloves. Aluminum is lighter and rust-proof, but your wallet feels it.
The 16 oz. PVC fabric is the commercial standard. It’s waterproof, blocks sun, and meets flame-resistant codes like NFPA 701. Brands like Celina and Anchor Industries use it for a reason. That longest component length is a hauling detail you can’t ignore. An 8-foot pole fits in a pickup. A 14-foot rafter needs a trailer.
Can You Really Set It Up Yourself? The Time vs. Skill Reality
The manual says “2 persons required.” For a seasoned pro with a simple frame, that’s true. For anyone else, it’s a fantasy.
I’ve been that solo pro. With a system, the right tools (a jackhammer for stakes is a game-saver), and no sidewalls, I’ve done a basic 20×20 frame in 30 minutes flat. But for a first-time crew tackling a high-peak model? Budget at least two hours. The process isn’t hard, but it’s fiddly, connecting rafters, lifting the center hub, ensuring each leg is seated before tensioning.
Here’s a realistic first-timer timeline:
1. Site Layout & Part Organization: 30 minutes
2. Frame/Pole Assembly: 45–75 minutes
3. Raising & Initial Tensioning: 30 minutes
4. Final Staking & Adjustment: 30 minutes
The biggest time-sink for novices is matching parts and getting even initial tension. The second tent you build will take half the time. If you’re renting, seriously consider paying for professional installation, the stress relief is worth every penny.
The Anchoring Fine Print You Absolutely Must Read
This is the most critical paragraph in any manual, and everyone skips it. From the Celina Classic Series manual: “Regardless of the number of stakes included… Celina makes no representation or warranty as to whether this is sufficient to meet the requirements for your installation site(s).”
The manual admits the standard kit will usually work but may not meet local wind load codes. You are responsible for evaluating soil and weather, adding more stakes or heavier ballast. For loose soil or a windy hill, double the stakes. For concrete, you need ballast, about 150 pounds per leg.
Common mistake: Using only the provided stakes on sandy soil. A stiff gust can pull them straight out, collapsing the tent onto your guests in seconds. I’ve seen it happen at a beach fundraiser; the timeline was instant, the consequence was a ruined buffet and a terrified crowd.
But don’t just plop a water barrel on pavement; it can slide. Use a rubber horse stall mat underneath to prevent scratches and add friction. For serious anchoring on decks, look at purpose-made systems like SureFoot Weight Bags. They’re stackable and have D-rings for securing lines directly, a far cry from makeshift sandbags.
What Fits Inside? Three Proven Layouts
Let’s move from theory to practice. What does 400 square feet actually hold? These are real layouts from events I’ve worked.
Layout 1: The Intimate Dinner (40 Guests)
- Five 60-inch round tables.
- A 10×10 foot dance floor in one corner.
- A 6-foot buffet table against a wall.
- Verdict: Comfortable and walkable. Servers can navigate. This is the gold standard for a reason.
Layout 2: The Ceremony Flip (65 Guests)
- Ceremony: 65 chairs in rows with a central aisle and an arch.
- The Flip: During an outdoor cocktail hour, a crew clears chairs and sets 8 banquet tables for 40.
- Verdict: Efficient but requires a coordinated team and a separate cocktail area. Don’t attempt this without dedicated help.
Layout 3: The Vendor Showcase
- Four 10×10 foot booth spaces around the perimeter.
- A central aisle for foot traffic.
- Verdict: Clean, defined spaces for each vendor. Prevents attendee congestion.
You cannot have a full 20×20 dance floor and a full seating area. It’s one or the other, or a compromise of both. Always draft your layout to scale first.
Frequently Asked Questions
How much does a 20×20 tent weigh?
Weight varies wildly by model. A Celina aluminum pole tent starts around 226 pounds. The same tent with a galvanized frame hits 363 pounds. A Master Series High Peak frame can exceed 750 pounds. Always check the spec sheet for your specific model and frame material.
Can one person set up a 20×20 tent?
An experienced professional with the right tools can set up a basic frame tent alone in 30-45 minutes. For everyone else, especially with pole or high-peak models, plan on a crew of 2-4. The components are heavy and awkward for solo maneuvering.
Are 20×20 tents waterproof?
Commercial tents from brands like Celina use 16 oz. PVC-coated polyester, which is fully waterproof. Seams are typically welded. However, water can ingress where sidewalls zip together or at ground level if the tent isn’t properly tensioned and staked to create a drip edge.
What’s the difference between a pole tent and a frame tent?
Pole tents require center poles and stakes in soft ground, offering a classic peaked shape. Frame tents are free-standing with no interior poles, can be installed on any surface, and provide full, unobstructed floor space. The choice impacts your site, budget, and interior layout.
How do I secure a tent on concrete?
You need ballast, not stakes. Each leg may require 150+ pounds of weight. Use water barrels, concrete blocks, or commercial weight bags. Secure them to the tent frame with ratchet straps and place them on rubber mats to prevent sliding and surface damage.
Before You Go
A 20×20 tent gives you 400 square feet of shelter, but that’s just the starting point. You must plan for the larger site, choose your tent type based on ground surface and desired interior space, and anchor it far more robustly than the standard kit suggests.
The capacity numbers are real limits. Use them with a scaled layout before finalizing your guest list. And if you’re DIY-ing the setup, practice or hire a pro, the peace of mind is invaluable. For more on spacious shelters, explore our guides on 9-person tents and stand-up tents. If you’re camping with the family, our review of 6-person family tents is a great next read. And for those stormy adventures, you’ll want the right heavy rain tents and high-wind tents in your arsenal.
