
How to Build a Tent Platform That Lasts
This post contains affiliate links. As an Amazon Associate, we earn from qualifying purchases.
To build a tent platform, construct a level, raised wooden frame on a stable foundation, sized at least one foot wider than your tent. Use pressure-treated 2×8 lumber for joists spaced 16″ on center, secure it with structural screws, and anchor the tent using heavy-duty lag eye bolts screwed into the joists, not just the decking.
I learned the hard way that a great tent deserves a terrible platform. On a group trip in the Adirondacks, a friend’s beautiful bell tent sat on a hastily built deck of untreated 2x4s. By the third night of rain, the floor felt like a trampoline, and the musty smell of trapped moisture never left. We spent the next season rebuilding it properly. That experience taught me that the platform is the silent partner to your shelter—get it wrong, and nothing else matters.
This isn’t about pouring a concrete monolith. It’s about smart, durable construction that sidesteps common pitfalls, from county inspectors to rotting posts. I’ll walk you through the choices I’ve made (and the mistakes I’ve fixed) so your platform is a rock-solid foundation for seasons of memories.
Key Takeaways
- Keep platform height under 18 inches to avoid triggering deck-specific building codes and permit headaches in most areas.
- A 3×3 grid of nine concrete deck blocks is ideal for a 16’x16′ platform; size up the grid for larger tents to prevent bounce.
- Use only galvanized structural screws like GRK R4s for framing—their star drive bites better into wet, pressure-treated wood than standard Phillips heads.
- Anchor your tent with 3/8” x 4” lag eye bolts screwed through the deck board and into the joist underneath. Anchoring only to decking guarantees a pull-out.
- Let pressure-treated lumber dry for a week before building to minimize shrinkage and prevent noisy, widening gaps between boards.
A tent platform is a raised, level wooden deck built on a stable foundation, designed to elevate a camping shelter off damp ground. It extends at least one foot beyond the tent’s footprint for maintenance access, uses pressure-treated lumber with joists spaced 16 inches on center for rigidity, and is anchored to the ground with concrete blocks or piers. The structure is secured to the platform with heavy-duty lag bolts instead of ground stakes.
Why Bother With a Platform at All?
You could just pitch your tent on the grass. But after a few seasons, ground moisture will degrade even the best tent floor, and uneven ground turns sleep into a slow-motion slide toward one corner. A platform solves this permanently. It creates a clean, dry, and perfectly level base that makes setup consistent every single time. For heavier shelters like durable canvas tents, it’s almost a necessity to prevent groundsheet wear and improve airflow underneath.
More than just comfort, it’s about longevity. My first canvas tent lasted three seasons on the ground before the floor started to delaminate. My current one, on a proper platform, is going strong into its sixth year. The platform also defines your space, keeping gear organized and providing a clear “porch” area outside the tent door. It’s the difference between camping and creating a semi-permanent outdoor retreat.
Wood Posts or Concrete Blocks: Picking Your Foundation
Your foundation choice decides whether your platform is a seasonal perch or a permanent headache. I learned this after building a platform with wood posts set directly in clay soil. By the following spring, the whole structure listed like a sinking ship. The fix taught me to match the foundation to the ground, not the other way around.
For most flat, well-drained sites, precast concrete deck blocks are the fastest path to success. I use Simpson Strong-Tie CBC44Z blocks set on a 2-inch bed of 3/4-inch crushed stone, compacted with a hand tamper. This stone size drains better than pea gravel and won’t wash away. The blocks keep all wood off the ground, which is a major win in termite-prone areas.
Before you start: Using power tools, lifting heavy lumber, and mixing concrete all carry injury risk. Always wear safety glasses, hearing protection, and gloves. Use a partner to lift large frames. Ensure all electrical tools are rated for outdoor use and cords are kept clear of cutting paths. Check local utility lines before digging post holes.
If your site slopes or has unstable soil, concrete piers are the answer. Dig holes below the local frost line, set a 4×4 post, and pour a 60 lb bag of Quikrete Fast-Setting Concrete Mix around each one. The key is to form the concrete into a slight dome at the top so water runs away from the post. This method lets you adjust each post’s height to level the frame on uneven ground.
| Foundation Type | Best For | Tools & Materials Needed |
|---|---|---|
| Concrete Deck Blocks | Flat, stable ground; termite zones; seasonal setups. | Deck blocks, 3/4″ crushed stone, hand tamper, long 2×4 & level. |
| Concrete Piers | Sloped or rocky ground; permanent installations; high-wind areas. | Post-hole digger, 4×4 posts, Quikrete bags, level, gravel for drainage. |
| Poured Concrete Slab | Very wet climates; heavy clay soil; a “forever” foundation. | Concrete forms, wire mesh, rebar, mixing equipment, float & trowel. |
TL;DR: Choose concrete deck blocks for flat, easy sites; use concrete piers for sloped or soft ground; and only consider a full slab for permanent, termite-heavy locations.
The Shopping List: Lumber & Hardware That Actually Lasts
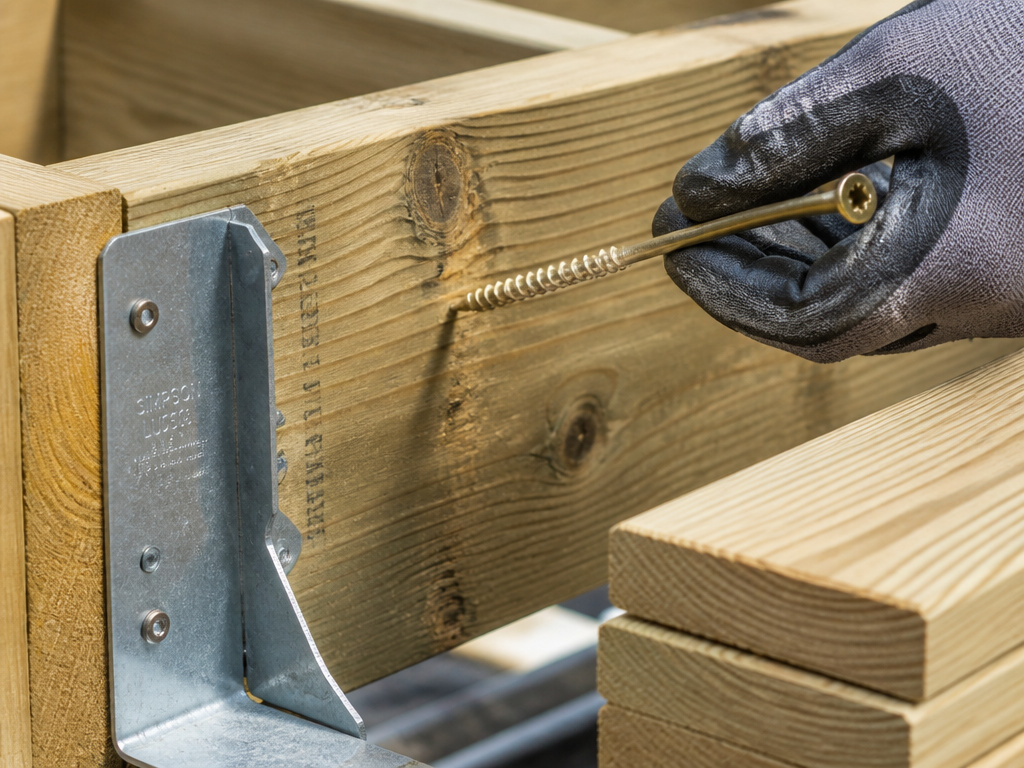
Walking into a lumber yard can be overwhelming. Grabbing the cheapest 2x4s and a box of drywall screws is the classic first-timer error I made. A platform must handle dynamic load—the weight of people moving, gear shifting, and wind pushing—not just static weight. Here’s what you actually need.
- Frame & Joists: Pressure-treated 2×8 lumber. The extra depth provides crucial stiffness for 16-inch joist spacing. Using 2x6s would force 12-inch spacing, using more wood and saving zero money.
- Decking: 2×6 pressure-treated boards. They span the 16-inch gap between joists without flexing. Leave a consistent 1/8-inch gap between boards for drainage and wood expansion.
- Fasteners: This is where I’ve developed a strong preference. I use GRK R4 #9 x 3-1/2” structural screws for all framing. I tried SPAX on an earlier project, but the GRK’s star drive bites harder and strips less often when driving into dense, wet pressure-treated lumber at an angle. For decking, use 2-1/2” deck screws.
- Joist Hangers: Galvanized steel hangers for every joist connection. Nail them in place with the provided short nails, then run two structural screws through the face of the hanger into the joist end to lock the joint solid.
Common mistake: Using untreated lumber or “bright” (non-galvanized) screws to save money. The wood will rot and the screws will rust, causing the entire structure to fail within two years. Pressure-treated lumber and coated hardware are non-negotiable for outdoor ground contact.
How Big Should Your Platform Be? A Sizing Grid
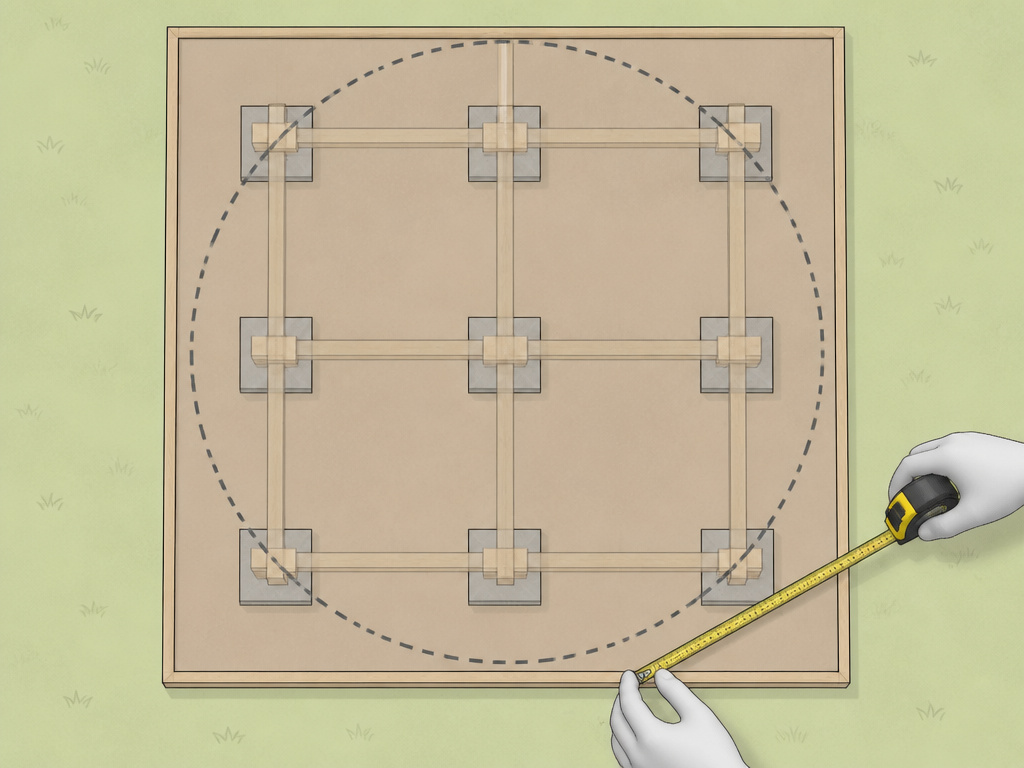
A platform that matches your tent’s exact floor size is a trap. You need at least one foot of clearance on all sides for adjusting guy lines, brushing off debris, and general maintenance. More critically, the joist grid underneath must be supported at both ends by your foundation blocks or posts.
The math from the detailed Wilderness Resource guide is your blueprint. For a common 13-foot bell tent, you build a 16-foot square platform. This uses standard 16-foot lumber for the rim joists. For larger spacious family tents or six-person family tents, you must scale up both the platform and the support grid.
| Tent Diameter | Minimum Platform Size | Foundation Grid Pattern | Block Spacing |
|---|---|---|---|
| 13 feet | 16′ x 16′ | 3×3 (9 blocks) | ~7 feet apart |
| 16 feet | 20′ x 20′ | 4×4 (16 blocks) | ~6 feet apart |
| 20 feet | 24′ x 24′ | 5×5 (25 blocks) | ~5.5 feet apart |
Build the entire frame on level ground first. Assemble the perimeter, square it by measuring diagonally, then install the interior joists. Only lift the completed, rigid frame onto your pre-leveled foundation. Trying to piece it together in the air guarantees a wobbly, out-of-square result.
Anchoring Your Tent: No Ground Stakes Required
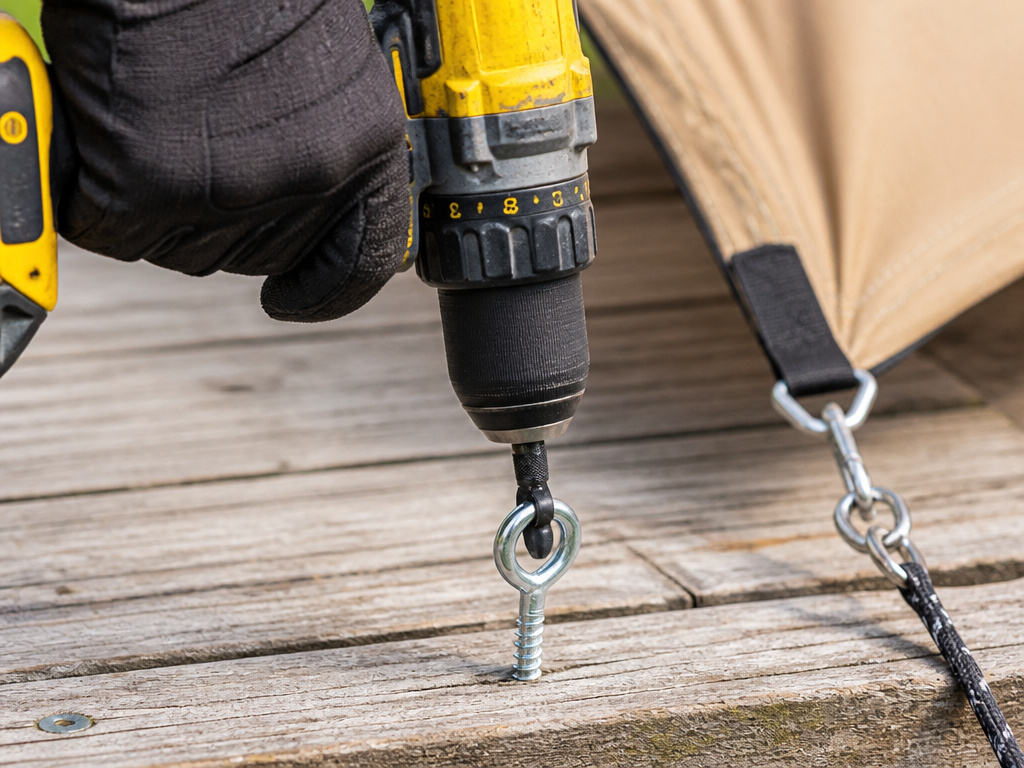
Ground stakes are useless on a wooden deck. You must attach the tent directly to the structure. This is where most DIY attempts fail—they assume the tent’s weight is enough.
You need heavy-duty lag eye bolts. The minimum is 3/8-inch diameter and 4 inches long. Drill a pilot hole slightly smaller than the bolt’s shaft through the deck board and deep into the joist below. Position them to match your tent’s stake loops. Screwing an eye bolt only into the deck board is an invitation for a splintered pull-out during the first stiff wind.
For the main peak guy lines, you need a high anchor point. Bolt a 4×4 post vertically to the outside of your rim joist, about 6-7 feet tall. Attach an eye bolt near the top. Run your guy line from the tent through that eye and back to a tensioning device. This transfers wind load directly into the platform frame, which is critical for the stability of high-wind resistant tents.
Common mistake: Using rope or webbing directly around deck boards or joists for anchoring. This creates a sawing action that will quickly wear grooves into the wood, weakening the structure. Always use a dedicated metal anchor point like a lag eye bolt.
If your platform sits on a concrete slab, the process changes. You’ll need wedge-type expansion anchors. Drill a hole with a hammer drill and masonry bit, insert the anchor sleeve, then screw in the eye bolt. The concrete won’t give, so ensure your tent’s attachment hardware is equally robust.
The Build: A Step-by-Step Process
Follow this sequence. Skipping steps or changing the order usually means taking things apart later.
- Wrestle Your Site into Submission. Clear all vegetation, roots, and rocks from an area at least two feet wider than your planned platform. The sound of a steel rake scraping over bare, level dirt is the first win of the project. Use a string level to check for slope.
- Set and Level the Foundation. For deck blocks, place them on compacted gravel at your grid points. Use a long, straight 2×4 and a 4-foot level to ensure all blocks are perfectly level with each other. For posts, dig holes, set and plumb the 4x4s, then pour concrete. Let it cure for at least 48 hours.
- Build the Frame on Solid Ground. Construct the perimeter rectangle from your 2x8s. When the diagonal measurements are equal, it’s square. Then install the interior joists every 16 inches using joist hangers. This is much easier on the ground than in the air.
- Lift and Secure the Frame. Get help—a 16×16 frame is heavy. Set it onto your foundation. Use treated wood shims to fine-tune levelness across the entire structure. Secure the frame to deck blocks with galvanized spikes or to posts with post-to-joist brackets.
- Lay the Decking. Start at one side and work across. Use a 1/8-inch spacer (a nail works) between boards for consistent gaps. Attach each board with two screws at every joist crossing. Stagger the end joints for a stronger, better-looking deck.
- Install Anchors Before the Tent. This is the forgotten step. Drill and install all lag eye bolts and any high anchor posts now. It’s infinitely easier without the tent in the way.
- Let the Wood Acclimate. Fresh pressure-treated lumber is soaking wet. If you build with it immediately, those neat 1/8-inch gaps will become 1/4-inch in a month as the wood dries and shrinks, leading to a creaky, loose platform. Let the lumber sit stacked and stickered in a dry place for at least a week before you build.
What Usually Fails (And How to Stop It)
Platforms don’t fail randomly; they fail at predictable weak points. Knowing these lets you build them out from the start.
The most common failure is rot at the base of wood posts, even pressure-treated ones. The solution is a concrete footing that rises an inch above the soil line, ensuring the post never sits in pooled water. The next is fastener corrosion. Cheap screws rust, lose their grip, and the frame gets loose. My rule is galvanized or stainless steel for every single fastener.
I watched a platform for a large car camping tents sway side-to-side because the builder used only vertical posts with no diagonal bracing. Every gust made the tent walls snap. We fixed it by screwing 2×4 braces in an “X” pattern across the underside of the frame, tying every joist together. The movement stopped completely.
Finally, check local rules. While a sub-18-inch platform often flies under the radar, some areas have rules about “permanent structures” based on square footage alone. A 20×20 platform is 400 square feet, which might cross a threshold. A five-minute call to your local building department can save you from a “notice of violation” tag on your finished work.
Frequently Asked Questions
How high can I build my tent platform without needing a permit?
Aim for 12 to 18 inches off the ground. This height clears the tent floor from ground moisture and allows airflow. In most jurisdictions, staying under 24 inches keeps you below the threshold that triggers formal deck-building codes, which often require permits, guardrails, and engineering drawings.
Can I build a platform on a slight slope?
Yes, and it’s often preferable for drainage. Use the concrete pier method with 4×4 posts. Dig your post holes to the same depth, but cut the posts to different heights after the concrete sets to create a level top for your frame. This is more reliable than trying to shim a pre-built frame on a slope.
What’s the best way to anchor a tent to a composite deck?
The principle is the same as with wood. Use the same 3/8” x 4” lag eye bolts, but you must pre-drill a precise pilot hole for the shank and use a washer under the eye to distribute the load and prevent pulling through the composite material. Ensure the bolt threads firmly into the wooden joist beneath the composite decking.
Is pressure-treated lumber safe to touch inside a tent?
Modern pressure-treated lumber uses alkaline copper quaternary (ACQ) or copper azole formulations, which are safer than the old arsenic-based CCA. However, it’s still not recommended for direct, prolonged skin contact. Your tent floor should always be a separate barrier (a groundsheet or the tent’s built-in floor) between you and the treated wood.
How do I maintain a wood tent platform?
Annual maintenance is simple. Inspect for loose hardware and tighten any screws or bolts. Check for signs of rot, especially where wood meets concrete. Clear debris from under the platform to promote airflow. Every two to three years, apply a water-repellent sealant to the deck boards to extend their life.
The Bottom Line
A well-built tent platform transforms a good campsite into a permanent, cherished outdoor room. It’s not about complexity, but about using the right materials in the right way: stout 2×8 joists, a proper support grid, structural screws, and serious anchors.
Skip the shortcuts on hardware and foundation. That extra investment in GRK screws and a proper gravel base pays back in stability and silence. When you’re cozied up inside during a downpour, listening to the rain patter on the fly while your floor stays perfectly dry and firm, you’ll know every ounce of effort was worth it. Build it once, build it right, and enjoy it for years. For more ideas on outfitting your new basecamp, explore our guides on essential tent camping gear and tent camping accessories.
