
How to Fix a Tent Zipper: A Real-World Repair Guide
This post contains affiliate links. As an Amazon Associate, we earn from qualifying purchases.
The fastest way to fix a tent zipper is to diagnose the real culprit. For a loose slider, a gentle squeeze with pliers takes 30 seconds. For a broken slider on a YKK #3 zipper, Big Agnes sends free replacements you can install yourself. If the plastic coil teeth are torn or gapped, you need a professional sewing repair costing about $20.
I learned this the hard way on a soggy trip in the Adirondacks. My Big Agnes Copper Spur HV UL2’s main door zipper started grinding. I sprayed it with WD-40, thinking I’d solved it. The oil attracted so much grit and pine duff that within a week, the #3 teeth were ground into a milky paste. The fix? A full zipper replacement. Now I only use a dry silicone lubricant like Gear Aid’s Silicone Spray, it doesn’t attract dirt, and that lesson saved my next three seasons of camping.
This isn’t generic advice. It’s the exact process I’ve used to fix my own gear and help friends salvage trips. We’ll cover how to get the right part, the one tool you already own that fixes 80% of problems, and when to admit defeat and call a pro.
Key Takeaways
- A wobbly slider that won’t close teeth is the most common failure. Fix it by pulling it to the end of the track and gently squeezing the top and bottom plates with needle-nose pliers.
- Big Agnes offers a free DIY replacement slider program for tents with YKK #3 zippers. Call 877.554.8975 with your tent’s model code (starts with T, J, or Y on the sewn-in tag).
- If the plastic zipper coil has a visible gap, tear, or misaligned section, a new slider won’t work. The permanent fix is a sewing repair, which costs about $20 per zipper.
- For a trailside emergency, a FixNZip screw-on slider is a valid temporary fix, but the manufacturer explicitly states it is not a permanent solution.
- Never use WD-40 or oil-based lubricants on plastic coil zippers. They degrade the plastic and attract abrasive grit. Use a 100% dry silicone spray after cleaning teeth with a soft brush and dish soap.
Before you start: Working on a partially zipped door puts dangerous tension on the plastic teeth. Always unzip the door completely before inspection or repair. Forcing a repair under tension can snap multiple teeth in seconds, turning a simple fix into a major sewing job.
Is Your Problem the Slider or the Teeth?
Your first move is the most important: run your thumb and forefinger down the entire length of the zipper teeth on both sides. You’re feeling for smooth, even engagement. If the track feels smooth but the slider just rattles over it, the slider is the issue. If you feel a bump, a hard stop, or a section that feels “empty,” the plastic coil itself is damaged.
Diagnosing a faulty tent zipper requires inspecting the slider housing for cracks or widening and the plastic coil for gaps, tears, or misaligned teeth. A functional slider moves smoothly when manually guided; a damaged coil will not interlock even with a new slider.
Here’s a quick reference to separate slider problems from coil disasters:
| Symptom | Likely Cause | DIY Fix? | Severity |
|---|---|---|---|
| Slider moves but teeth won’t close | Slider housing is widened/loose | Yes – Squeeze with pliers | Low – 30-second fix |
| Slider is stuck in one spot | Debris in track or single bent tooth | Yes – Clear debris, realign tooth | Low – If caught early |
| Slider body is cracked or pull tab missing | Broken slider | Yes – Replace slider | Medium – Needs part |
| Visible gap in teeth, won’t mesh | Coil is misaligned or torn | No – Requires sewing | High – Professional repair |
| Zipper separates above slider | Bottom stop failed or slider is damaged | Maybe – Re-thread & make new stop | Medium – Technical but doable |
TL;DR: Smooth track, faulty slider. Bumpy or gappy track, damaged coil. This diagnosis decides everything.
The 30-Second Fix for a Loose Zipper (You Already Have the Tool)
If your zipper runs but won’t close the teeth, the slider’s housing has widened. This happens from years of pulling at an angle or one heroic yank. The fix is embarrassingly simple.
- Unzip the door completely.
- Pull the faulty slider to the very top or bottom of the track, where the two sides of teeth meet.
- Take a pair of needle-nose pliers and gently squeeze the top and bottom plates of the slider together. You’re not crushing it, just closing the gap by a fraction of a millimeter.
- Test the zip.
Common mistake: Squeezing the sides of the slider instead of the top and bottom plates. This distorts the channel and can make the problem worse. You should hear a quiet, solid click when the teeth engage properly, not a gritty, grinding plastic sound.
I’ve done this on a friend’s tent in a parking lot with rain approaching. It took longer to find the pliers than to do the repair. If one gentle squeeze doesn’t work, try one more. Over-tightening will make the slider too tight and risk breaking the teeth.
How to Clean and Lubricate Your Zipper the Right Way
Before you try anything drastic, clean the zipper. Dirt and body oils are the silent killers of smooth operation. This isn’t a generic wipe-down; you need to scrub the coil teeth directly.
What you’ll need:
- A soft-bristled toothbrush (an old Colgate Extra Clean works perfectly)
- A drop of mild dish soap like Dawn Ultra
- A damp cloth
- A 100% dry silicone lubricant (I use Gear Aid Silicone Spray)
Don’t use a metal pick or your knife tip to dig out debris, you’ll puncture the tent’s waterproof PU coating. Use the corner of a laminated loyalty card; it’s softer than a credit card but stiff enough.
- With the door fully unzipped, scrub along both sides of the coil teeth with the dry toothbrush to loosen dry grit.
- Add a drop of dish soap to the brush and gently scrub again. The soap cuts body oils and sap without leaving a residue that harms the fabric’s DWR coating.
- Wipe the teeth clean with a damp cloth. Don’t dunk the tent door in water.
- Let it air dry completely.
- Apply the dry silicone spray sparingly along the teeth. Zip and unzip a few times to work it in.
Skip wax-based lubricants like McNett’s Zip Care for tent doors. They work great on metal-tooth jacket zippers but attract and hold dirt and sand on tents, creating a grinding paste. WD-40 or other oils will degrade the plastic teeth over time.
When You Need a New Slider: Getting the Exact Part
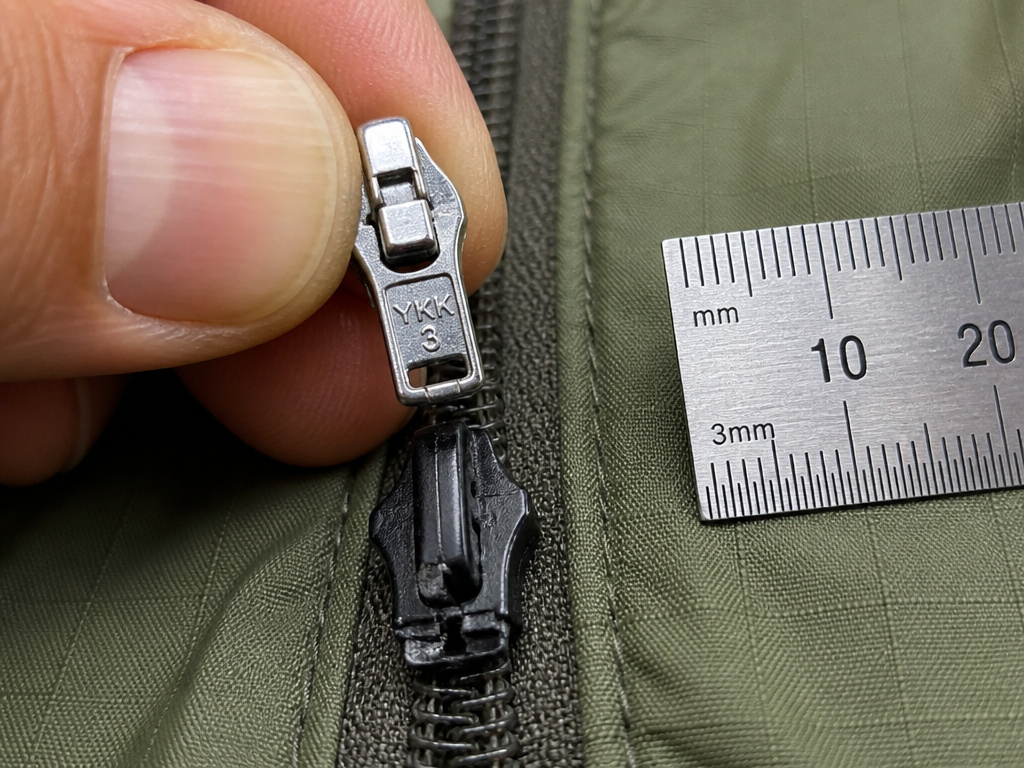
If the squeeze doesn’t work or the slider is cracked, you need a replacement. This is where specificity matters. You must match the zipper size, which is usually stamped on the back of the old slider (e.g., “YKK #3”).
Big Agnes uses YKK #3 coil zippers on most of their tents. If the stamp is worn, measure one tooth. A #3 tooth is about 3mm wide. Using a #5 slider on a #3 zipper is a guaranteed failure.
The good news? Big Agnes has a stellar DIY program. For tents with YKK #3 zippers, they provide free replacement sliders. You just need to contact them with your tent’s model information. As outlined in their DIY Zipper Slider Repair guide, you can call their support line at 877.554.8975 (Mon-Thurs, 10am-4pm MST) or open a case online. Have your tent’s model code ready, it’s on a small white tag sewn into a tent body seam and starts with T, J, or Y.
For other brands, check the manufacturer’s repair site first. Hilleberg and NEMO have similar support pages. If they don’t offer parts, a local gear repair shop or sailmaker can source a matching YKK slider.
The Step-by-Step Slider Replacement Process
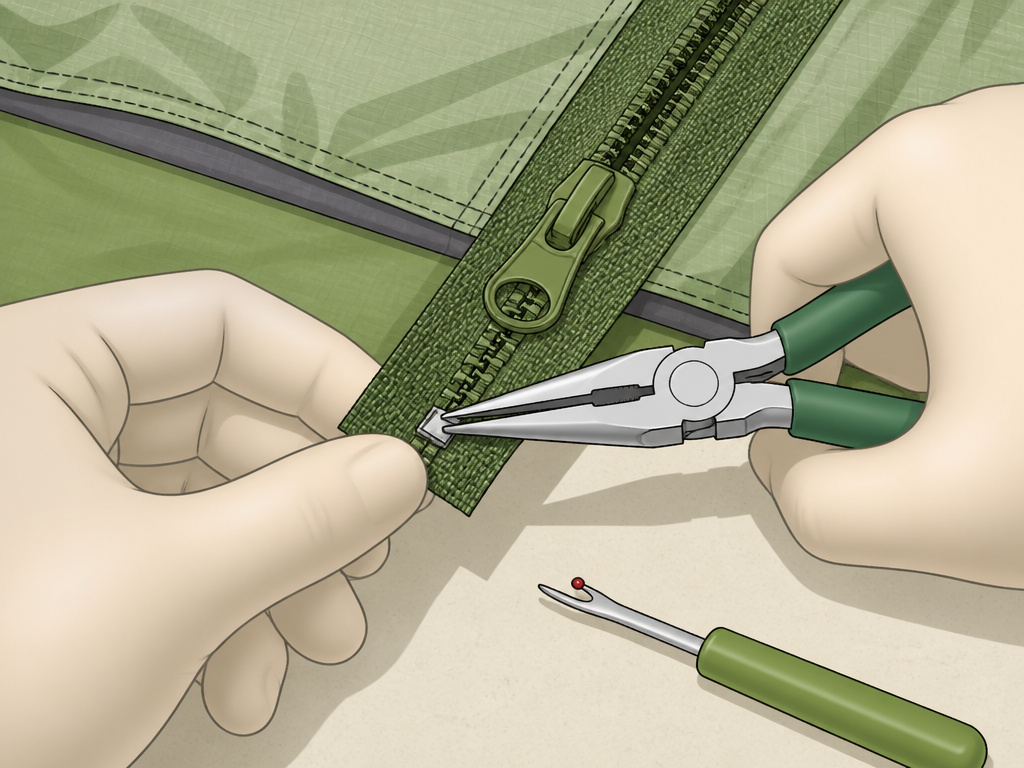
Once you have the correct part, the swap takes about ten minutes. Big Agnes designed this for field repairs. You’ll need needle-nose pliers and maybe a seam ripper.
If the zipper can still close:
- Zip it completely shut. This aligns the teeth.
- At the top of the track, where the two sides meet, you’ll find small metal stops.
- Use pliers to gently pry open one side of the top stop just enough to slide the old slider off.
- Slide the new slider onto the track, feeding both sides of the coil in evenly.
- Crimp the metal stop back into place with your pliers.
If the zipper is stuck open or the slider is off:
This is trickier because the teeth aren’t aligned. You’ll likely need to remove the bottom stop.
1. Use a seam ripper or small scissors to cut the few stitches holding the fabric stop at the very bottom end of the zipper tape.
2. Carefully slide the broken slider off.
3. This is a two-person job for a tent door: one person holds the two sides of the coil perfectly aligned and flat, while the other feeds them evenly into the new slider. Go slow.
4. Once the slider is on, create a new bottom stop. The strongest method is to sew the fabric stop back with a box stitch using nylon thread. For a field fix, use a tight wrap of Gorilla Tape and secure it with a small cable tie poked through the tape and fabric.
Threading a new slider onto a loose coil is frustrating if you’re alone. I lay the tent door flat on a picnic table and use two heavy rocks to pin the zipper tape down, keeping the teeth aligned while I work the slider on with both hands.
TL;DR: Zip shut, pry top stop, swap slider, crimp stop. Zipper stuck open? Cut bottom stop, thread carefully, sew or tape a new stop on.
When DIY Isn’t Enough: Recognizing a Professional Repair
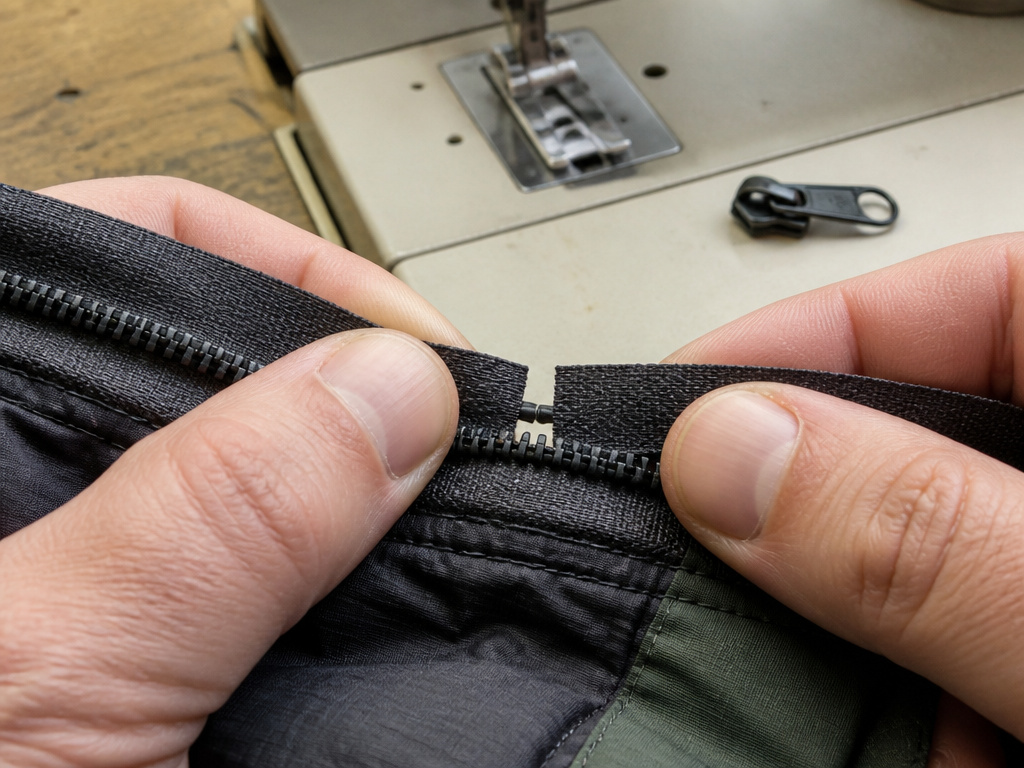
A new slider only works if the zipper teeth are intact. Look at the coil. If there’s a section where the teeth don’t meet, creating a permanent gap in your weather seal, or if the plastic is torn, you need a pro.
Common mistake: Trying to force a new slider onto a gapped or damaged coil. You’ll hear a horrible grinding and permanently cross-thread the teeth. The repair cost jumps from a free slider to a $40+ sewing job.
Big Agnes is clear on this point. They can send sliders worldwide, but for coil damage, “a seamstress or gear shop is needed to install them due to required tools and sewing skills.” This isn’t a slight on your abilities; home machines struggle with multiple layers of tent fabric and webbing.
For a trail emergency, a FixNZip screw-on slider can bridge a gap or replace a lost slider temporarily. You screw it onto the zipper tape. It’s clunky and not fully waterproof, but it will get the door closed for the weekend. Just know it’s a temporary patch, not a cure.
Most non-warranty zipper repairs cost about $20 per zipper/door, plus shipping. If you’ve invested in storm-resistant tent designs or wind-resistant tents, this repair is a small price to keep your shelter secure. It’s far more economical than replacing a high-end tent.
Building Your Permanent Tent Repair Kit
You don’t need specialty gear. Assemble this kit once and toss it in your gear bin. It handles 95% of zipper and minor fabric issues.
- Needle-nose Pliers: For slider adjustments and crimping stops.
- Seam Ripper: More precise than a knife for cutting stitching.
- Gear Aid Tenacious Tape or Gorilla Tape: For field patches and making temporary zipper stops.
- Small Cable Ties: To reinforce taped stops or secure loose webbing.
- Gear Aid Silicone Spray: The right lubricant. A small tube lasts years.
- Nylon Thread & a Heavy-Duty Needle: For sewing stops or small tears. Cotton thread rots.
This kit, alongside your essential tent camping gear, turns a potential trip-canceler into a minor delay. It’s just as important for affordable tent options as it is for quality tents under $200.
Frequently Asked Questions
Can I permanently fix a tent zipper with a FixNZip?
No. Manufacturers like Big Agnes explicitly recommend FixNZip as a temporary, on-trail solution. The plastic housing and screw mechanism are not as durable as a molded YKK slider and can fail with repeated use. Plan for a proper slider replacement or sewing repair when you get home.
My tent isn’t a Big Agnes. How do I find a replacement slider?
First, check your tent manufacturer’s website for a repair program. If they don’t offer one, carefully remove the old slider and look for a size stamp (e.g., YKK #5). If it’s worn, measure the tooth width in millimeters. Search for “YKK #[size] replacement slider” online or visit a local upholstery or gear repair shop, they often have bins of them.
Is it worth repairing an old tent zipper, or should I just replace the tent?
If the tent fabric, poles, and seams are otherwise sound, a repair is almost always worth it. A professional zipper repair typically costs $20-$40. Compare that to the cost of a new tent, especially if you own a reliable model. Repair extends the life of your gear sustainably.
What’s the best way to prevent zipper problems?
Clean and lubricate your zippers at the start and end of each season using the dry silicone method described above. Always zip and unzip with a straight pull, not at an angle. Before storing your tent, ensure the zippers are fully closed to keep the sliders in the correct position on the track.
The slider is back on, but the zipper still separates. What now?
This usually means the slider is still too loose or is damaged. Try the plier-squeeze method again at the end of the track. If it still separates, the slider is likely worn out and needs replacement. A new slider provides a tighter, factory-fresh grip on the teeth.
The Bottom Line
A broken tent zipper is a nuisance, not a death sentence. Most failures are a loose slider fixed with a 30-second squeeze of pliers. For broken sliders, manufacturers like Big Agnes have streamlined free replacement programs, you just need your tent’s model code.
The real skill is in the diagnosis. Taking two minutes to feel for coil damage can save you an hour of futile wrestling. Keep the right lubricant on hand, build a small repair kit, and you’ll handle most failures on the spot. This practical maintenance is what keeps even the best tent camping equipment list reliable for years, whether you’re in a stand-up tent model or a lightweight tarp shelter. Now, get those pliers and get back outside.
