
How to Make a Homemade Tent That Actually Keeps You Dry
This post contains affiliate links. As an Amazon Associate, we earn from qualifying purchases.
You can build a reliable homemade tent using a large waterproof tarp, a strong ridge line like 550 paracord, and sturdy stakes. The key to staying dry lies in three specific, often-overlooked steps: installing drip lines on your ridge cord, leaving a deliberate air gap at the ground, and digging a perimeter trench to divert runoff.
Hi, I’m Chloé. I’ve spent countless nights under tarps and tents, from perfect AllTrails sunsets to unexpected Scottish downpours. While I love my high-tech shelters, there’s a unique satisfaction in crafting your own refuge from a few simple pieces of gear.
This isn’t about throwing a blanket over some dining chairs. A proper DIY tent is a functional shelter that can handle real weather. Let’s build one that won’t leave you soggy by morning.
Key Takeaways
- A 12′ x 9.5′ waterproof polyester tarp is the minimum practical size for a one-person shelter with gear; smaller tarps sacrifice crucial living space.
- Always tie a short 6-inch drip line onto your main ridge cord just outside the tarp edge; this simple knot prevents the most common cause of interior leaks.
- Dig a 2-3 inch deep trench around your shelter’s perimeter before staking down; this acts as a gutter to stop ground runoff from flooding your sleep area within minutes of rain.
- Pitch on a slight incline with your head uphill whenever possible; a perfectly flat spot becomes a water collection basin once the ground saturates.
- Use 550 paracord for all lines; cheaper twine absorbs moisture, stretches, and will sag overnight, compromising your shelter’s integrity.
What Do You Need to Build a Homemade Tent?
Gathering the right materials is where most DIY projects succeed or fail before you even leave home. You need four core components, and substituting lower-quality items here is a direct path to a miserable night.
First, the tarp. I recommend starting with a size like the Southern Survival 12′ x 9.5′ waterproof tarp. The material matters more than the marketing. Avoid cheap polyethylene blue tarps, they stretch when wet, creating saggy pools where water collects. Polyester or ripstop nylon holds tension better. The size is critical; an 8×10 tarp might cover your body but leaves your pack in the rain.
Second, the cordage. 550 paracord is the standard for its strength, light weight, and reliable knot-holding ability. You’ll need at least 100 feet. Mason line or general-purpose twine absorbs water, stretches, and will leave your shelter sagging by midnight.
Third, stakes. Invest in a set of 10-12 heavy-duty Y-beam or spiral steel stakes. The thin, wire-style stakes included with many cheap tents bend instantly in firm soil. You’ll use a minimum of eight for a basic pitch, plus extras for reinforcing in wind.
Fourth, anchors. You need two solid points roughly 10-12 feet apart. Trees are ideal. If you’re on a beach, patio, or other hardscape, you must create anchors using heavy rocks or sandbags, each weighing at least 20 pounds. A single gallon jug of water won’t hold against a stiff breeze.
A taut pitch is a dry pitch. Any slack in the tarp or ridge line creates a low point where water will gather and eventually overcome the fabric’s waterproof rating.
How Do You Pitch a Storm-Resistant A-Frame Tent?
The order of operations here is deliberate. Skipping or rearranging steps is the difference between a shelter that stands and one that fails.
Step 1: Scout and Prepare the Site
Look for two sturdy anchors about 12 feet apart. Check the canopy overhead for dead branches, “widow-makers”, that could fall. Clear the ground of sharp debris. Feel the slope; your head must be uphill. If the site is perfectly flat, your trench (Step 7) becomes even more critical.
Step 2: Set the Main Ridge Line
Tie one end of your paracord to the first anchor at chest height using a taut-line hitch or trucker’s hitch, a knot you can adjust. Walk to the second anchor, pull the cord hand-tight, and secure it. The line should be as tight as a low guitar string. A sagging ridge line guarantees a sagging roof.
Step 3: Drape and Center the Tarp
Lay the tarp over the ridge line. Center it so an equal amount hangs down each side. Ensure any reinforced grommets face downward. If your tarp has a reflective side, decide whether to face it out for sun deflection or in for warmth.
Step 4: Install the Critical Drip Lines
This is the step most quick guides omit. Cut two 6-inch pieces of spare cord. Tie one onto the main ridge line about 2 inches outside each edge of the tarp. This creates a break. Rain runs down the ridge line, hits the knot, and drips off harmlessly instead of traveling under the tarp via capillary action.
Step 5: Stake Out the Four Corners
Start with the corner by your head. Pull it taut outward and stake it at a 45-degree angle away from the shelter. Repeat for all four corners. Maintain a consistent 2-inch gap between the tarp edge and the ground on all sides. This gap is your ventilation to combat condensation.
Step 6: Add Intermediate Guy Lines for Tension
The walls will still be loose. Find the midpoint of each side, pull it outward, and stake it down. In windy conditions, add a second guy point per side. Adjust every line until the fabric is drum-tight. Tap it; it should sound firm, not flap loosely.
Step 7: Dig the Perimeter Trench
Don’t skip this because you’re tired. Using a stake or trowel, dig a shallow trench 2-3 inches deep and 4 inches wide around the entire shelter. Slope it to channel water away from your door. This trench is a gutter that intercepts ground runoff.
Common mistake: Staking the tarp flush to the ground to “seal out drafts”, this traps all humidity from your breath inside, guaranteeing a soaking from condensation by morning, even without rain.
TL;DR: Pitch tight, add drip lines, leave a ground gap, and dig a trench. The trench is non-negotiable.
How Does Water Get Into a DIY Tent?
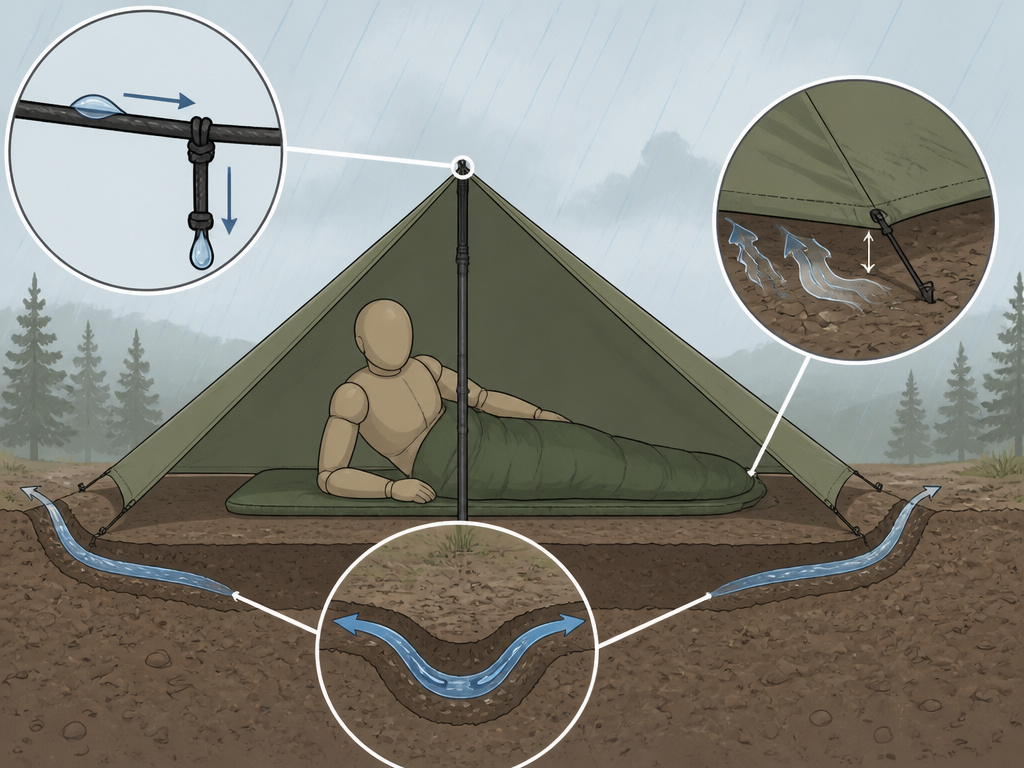
Understanding the physics of leaks helps you prevent them. Water infiltrates from three primary sources, and only one is falling rain.
The first is capillary action. Water wicks along the underside of your ridge line, travels under the tarp, and drips inside. The simple drip line knot you installed breaks this siphon. Without it, you get a persistent drip right above your face.
The second is condensation. Your body releases about a liter of moisture overnight through breath and sweat. In a sealed shelter, this vapor hits the cold tarp interior and condenses into droplets. The 2-inch ground gap you left allows cross-flow ventilation to carry this humid air out.
The third is ground runoff. Rain hits the ground and sheets across the surface. On a slope, this flow is directed. Your perimeter trench intercepts this sheet flow, channeling it away like a moat. In a storm, you’ll see it working as the trench fills with water that would otherwise be under your sleeping pad.
| Leak Source | Mechanism | Prevention Strategy |
|---|---|---|
| Capillary Siphon | Water travels along cord under tarp edge | Tie a 6″ drip line on ridge cord outside tarp |
| Interior Condensation | Body humidity condenses on cold fabric | Maintain a 2″ air gap around entire base |
| Ground Runoff | Rain sheets across soil into shelter | Dig a 2-3″ deep perimeter trench, sloped downhill |
Wind tests your pitch tension. A loose panel will flap, working stakes loose and potentially inverting. A tight, drum-like pitch sheds water effectively. The sound tells you everything, a steady drumming is good; sporadic flapping means you need to re-tension.
Tarp Tent or Sewn Tent: Which Should You Use?
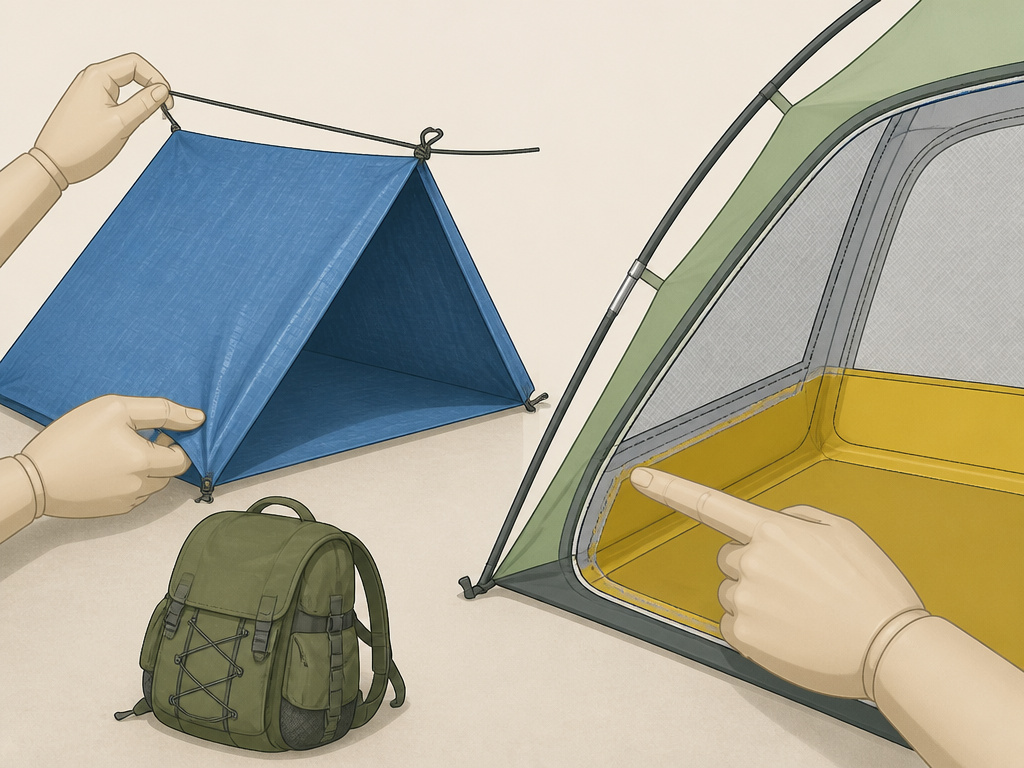
A homemade tarp shelter is a specific tool with distinct advantages and limitations. It’s not a direct replacement for a manufactured tent.
Choose a DIY tarp shelter for fast, lightweight trips in fair to moderate weather. It’s perfect for summer backpacking, bike touring, or as an emergency kit component. You’ll learn invaluable skills about site selection and weather reading. For inspiration on minimalist setups, explore our guide on various lightweight tarp tents.
Choose a manufactured tent for prolonged rain, high winds over 20 mph, bug season, or winter camping. A factory-sewn tent offers a bathtub floor, sealed seams, integrated bug netting, and pole structures engineered for lateral wind loads. For trips where comfort and security are paramount, a reliable stand-up tent design with ample headroom is worth the investment.
The cost comparison is often a wash. A quality tarp, paracord, and robust stakes can cost about as much as a solid budget tent design. You’re not saving money, you’re trading convenience for flexibility and a deeper understanding of shelter fundamentals.
I keep a tarp and cord in my truck for spontaneous overnighters. For a planned week-long trek, I pack a fully enclosed tent. The tarp is a skill-builder; the tent is reliable insurance.
What Are the Most Common DIY Tent Failures?
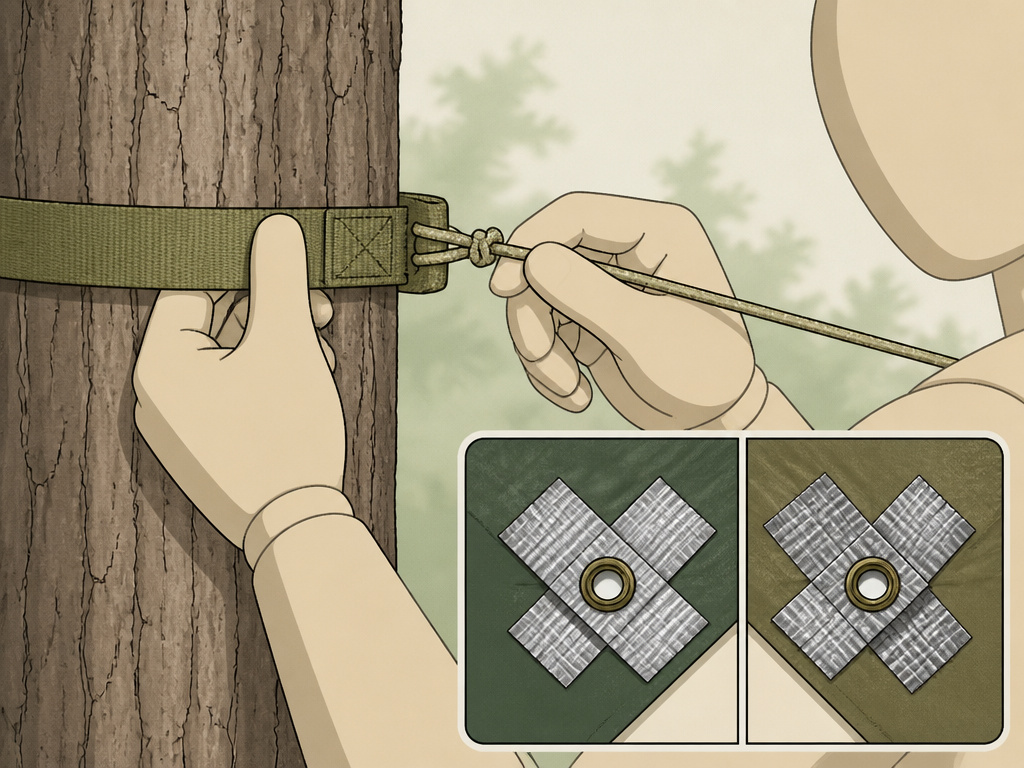
Homemade shelters fail in predictable ways. Recognizing these failure points lets you prevent them before they happen.
The ridge line attachment is a primary weakness. Grommets can tear, and cord can damage tree bark. Use a tree protector, a wide nylon strap or even a folded bandana, between the cord and the tree to distribute load. For grommets, reinforce them with duct tape on both sides before your trip.
Stake pull-out occurs in soft soil or high wind. The solution is in the angle and depth. Always stake at a 45-degree angle away from the direction of pull. In sand or snow, use deadman anchors: bury a stick or a stuff sack filled with sand and tie off to that. In high wind, add more guy lines to distribute the load rather than cranking existing ones tighter, which can stress your secure anchoring systems.
Seam leakage appears on cheaper tarps where stitching punctures aren’t sealed. You can address this with a silicone-based seam sealer from any outdoor or hardware store. Apply it to every stitched seam on the tarp’s top side and let it cure for 24 hours.
Finally, UV degradation will eventually break down the tarp fabric. Polyester has better UV resistance than polyethylene. Always store your tarp out of direct sunlight when not in use. Once the material becomes brittle and starts to crack, its lifespan is over, typically after 3-4 seasons of regular use.
How Can You Upgrade a Basic A-Frame for Comfort?
For a short trip, the basics suffice. For a longer stay or basecamp, a few simple upgrades transform a bare shelter into a comfortable outdoor home.
- Add a Ground Cloth: Use a piece of Tyvek or a second, cheaper tarp cut smaller than your shelter’s footprint. If the ground cloth extends past the tarp walls, it will catch rainwater and funnel it directly underneath you.
- Create a Door Flap: Utilize extra tarp length by folding one triangular end inward to form a door. Secure it with mini carabiners or strong clips. This adds privacy and a significant windbreak.
- Rig a Gear Vestibule: Stake out one end of the A-frame about a foot higher than usual. This creates a covered, outdoor space for wet boots and packs, keeping mud and dew out of your sleeping area.
- Install an Interior Ridgeline: String a separate piece of paracord inside the shelter, parallel to but lower than the main ridge. Use small S-hooks to hang a headlamp, glasses, or damp socks. This is a simple piece of tent interior gear that prevents you from losing small items in the dark.
| Upgrade | Required Materials | Primary Benefit |
|---|---|---|
| Proper Ground Cloth | Tyvek sheet or spare tarp, scissors | Insulates from cold/damp ground; protects tarp from abrasion |
| Adjustable Door Flap | Extra cord, 2-3 mini carabiners | Provides privacy, blocks wind, and reduces interior drafts |
| External Gear Vestibule | Two extra stakes, 10 ft of cord | Creates dry storage outside sleeping area for packs and wet gear |
| Internal Organization Line | 10 ft cord, 2-3 S-hooks | Keeps essentials organized, accessible, and off the ground |
These upgrades don’t just add comfort; they make your shelter more functional and resilient, turning it into a true basecamp. For more ideas on what to bring, check out our list of essential camping gear.
Frequently Asked Questions
What is the most durable tarp material for a homemade tent?
Polyester offers the best balance of durability, weight, and cost for most DIY builders. It resists stretching when wet better than polyethylene and has better UV resistance than many nylons. Look for a ripstop weave and a waterproof rating of at least 1500mm for reliable storm protection.
Can you make a tarp tent without any trees?
Absolutely, but you must create your own anchor points. The most stable method is to use two trekking poles, tent poles, or sturdy branches lashed into an inverted V at each end of your shelter. Secure them with heavy-duty tent guylines in a tripod configuration. On a beach or patio, heavy rocks or sandbags can serve as anchors.
How do you heat a homemade tarp tent?
You don’t. A tarp provides zero insulation; it only blocks wind and precipitation. Warmth must come from your sleep system: an insulated sleeping pad with a sufficient R-value and a sleeping bag rated for temperatures colder than you expect. Never use open flames or portable heaters inside a tarp shelter due to extreme fire risk and carbon monoxide danger.
Is a DIY tent safe in a lightning storm?
No. A tarp shelter offers no protection from lightning. In a thunderstorm, your priority is to avoid being the tallest object or near tall objects. Abandon the shelter and move to a low-lying area away from isolated trees. This same rule applies to manufactured tents; lightning safety is about location, not your shelter’s material.
How long will a homemade tarp tent last?
With proper care, cleaning, drying thoroughly, and storing out of direct sunlight, a quality polyester tarp should provide 30-40 nights of reliable use. Failure points are usually the reinforced grommets tearing out or the waterproof coating wearing thin. Your cord and stakes should last for years.
The Bottom Line
Building a homemade tent teaches you the fundamentals that a store-bought model can hide: precise site selection, the importance of tension, and proactive water management. Your first pitch might be loose. Your second will be better. By the third, you’ll look at a patch of ground and instinctively know where the ridge line should go.
Remember the drip line. Remember the trench. Pitch it tight, and you’ll sleep dry, earning a deeper connection to the skills that keep you comfortable outdoors. For your next adventure, whether under a tarp or in a full-featured shelter, make sure you’re equipped with the right camping setup tools for the job.
