
How to Mount a Roof Top Tent: A Real-World Guide
This post contains affiliate links. As an Amazon Associate, we earn from qualifying purchases.
Mounting a roof top tent safely requires verifying your roof rack’s dynamic weight capacity, using the correct hardware (like 13mm bolts for rack clamps), and setting the ladder to a precise 60-degree angle. Overlooking any of these can lead to a dangerous failure on your first trip.
I’ve seen too many first-timers treat the installation like assembling flat-pack furniture. They follow the basic steps, skip the “unnecessary” details, and then wonder why their tent groans like a haunted house on a windy night. The difference between a solid basecamp and a roadside disaster is in the specifics you think you can ignore.
This guide walks you through the real process, from unboxing to the essential post-installation shakedown. I’ll share the hard lessons I’ve learned, like why a generic wrench won’t cut it and how a wrong ladder angle almost cost me a tent in Moab, so your first night up top is peaceful, not perilous.
Key Takeaways
- Your roof rack’s dynamic weight capacity is the law. A tent, plus people, must stay under this number. Most factory racks fail this test.
- Torque specs matter. Hand-tight is a starting point, not the finish line. Vibration is a relentless thief.
- The 60-degree ladder rule is structural, not a suggestion. I learned this the hard way when a steep ladder levered a mounting bolt halfway out.
- Mounting tracks often need trimming. An overhanging track is a guaranteed snag on a garage door or low branch.
- Never install alone. The lift is awkward and dangerous without a spotter. This isn’t a solo pride moment.
Before you start: This task involves lifting a heavy, bulky object above your head and securing it to a moving vehicle. Never work alone, a dropped tent can crush fingers or destroy your car’s roof. Always confirm your roof rack’s dynamic weight rating on the manufacturer’s sticker; exceeding it risks catastrophic rack failure at highway speeds.
What Tools and Prep Do You Really Need?
You can’t wing this with a rusty toolbox. Before the tent even leaves the box, get your workspace and gear in order. A flat driveway or empty parking lot is ideal. Unpack everything and lay out the hardware against the manual’s parts list. I once spent an hour searching for a “missing” channel slider that was tucked under the mattress, check inside the tent first.
For tools, you need more than a multi-tool. Here’s what’s on my checklist:
* A 13mm socket and ratchet (for the rack clamps)
* A 10mm wrench (for the track-to-tent bolts)
* A hacksaw with a metal blade (for trimming tracks)
* A file or sandpaper (to deburr cut edges)
* A torque wrench (crucial. I use a Tekton 24335 that covers 10-150 ft-lb)
* Anti-seize lubricant (I prefer Permatex 80078 silver paste)
The torque wrench and anti-seize are what separate a temporary fix from a permanent installation. The lubricant prevents galvanic corrosion between the aluminum tracks and steel bolts, making future removal or adjustment possible without shearing a bolt head off.
How Do You Attach the Mounting Tracks Correctly?
Lay the tent shell bottom-up. You’ll see the pre-drilled holes, four for standard models, six for Tepui’s XL series. The mounting tracks are long aluminum extrusions that bolt here.
First, decide on orientation: tracks parallel to the hinge (rear-mounted) or perpendicular (side-mounted). The Tepui manual notes side-mounting is better for most sedans or smaller SUVs and usually means you won’t have to cut the tracks. Your choice affects ladder placement and vehicle clearance.
Line up the tracks, insert the 10mm bolts from below, add a washer, and thread on the Nylock nut from the top. Hand-tighten only. If you crank them down now, you won’t be able to slide the tracks later for final alignment with your crossbars.
Common mistake: Fully tightening the track bolts before final positioning, this locks the tracks in place, making it impossible to align them with your vehicle’s crossbars without a full disassembly.
TL;DR: Bolt the tracks on loosely using the 10mm hardware. Your choice of side or rear mount depends on your vehicle’s roof shape and where you want the ladder.
When and How Should You Cut the Mounting Tracks?
This is the step people regret skipping. If any track extends past the edge of the tent’s baseplate, it must be cut flush. That overhang will catch on the first low-clearance obstacle you meet.
The Tepui manual is clear: for tracks perpendicular to the hinge, mark where the track meets the tent edge and cut with a hacksaw. Side-mounted orientation often avoids this. Measure twice, because a track cut too short loses critical bolt holes.
| Orientation | Best Vehicle Fit | Cutting Required? |
|---|---|---|
| Tracks Perpendicular (Rear Mount) | Trucks, Full-Size SUVs | Very Often |
| Tracks Parallel (Side Mount) | Sedans, Compact SUVs, Crossovers | Usually Not |
After cutting, file the sharp edges smooth. A fresh aluminum burr can slice your hand during the lift or scratch your car’s paint. A few minutes with a file saves a lot of pain.
Is Your Vehicle’s Roof Rack Actually Strong Enough?
This is the most critical check. The number on your roof rack’s sticker is its dynamic weight capacity, the max it can handle while the vehicle is moving. Your tent’s weight, plus sleepers and gear, must stay under this limit.
A RecPro tent weighs 48 lbs. Add two adults and bedding, and you’re easily at 300+ lbs. Most factory “crossbars” are rated for only 150-165 lbs dynamic. They’re insufficient. You need aftermarket bars from Thule or Yakima, which often rate between 220-330 lbs.
If the math doesn’t add up, upgrading your rack isn’t optional. It’s a safety requirement. A failure here doesn’t mean a loose bolt; it means your tent detaching at 65 mph.
This is why choosing the right rooftop tents for Crosstrek or other specific vehicles involves matching the tent weight to the rack’s true capacity, not its advertised looks.
What’s the Safe Way to Lift and Position the Tent?
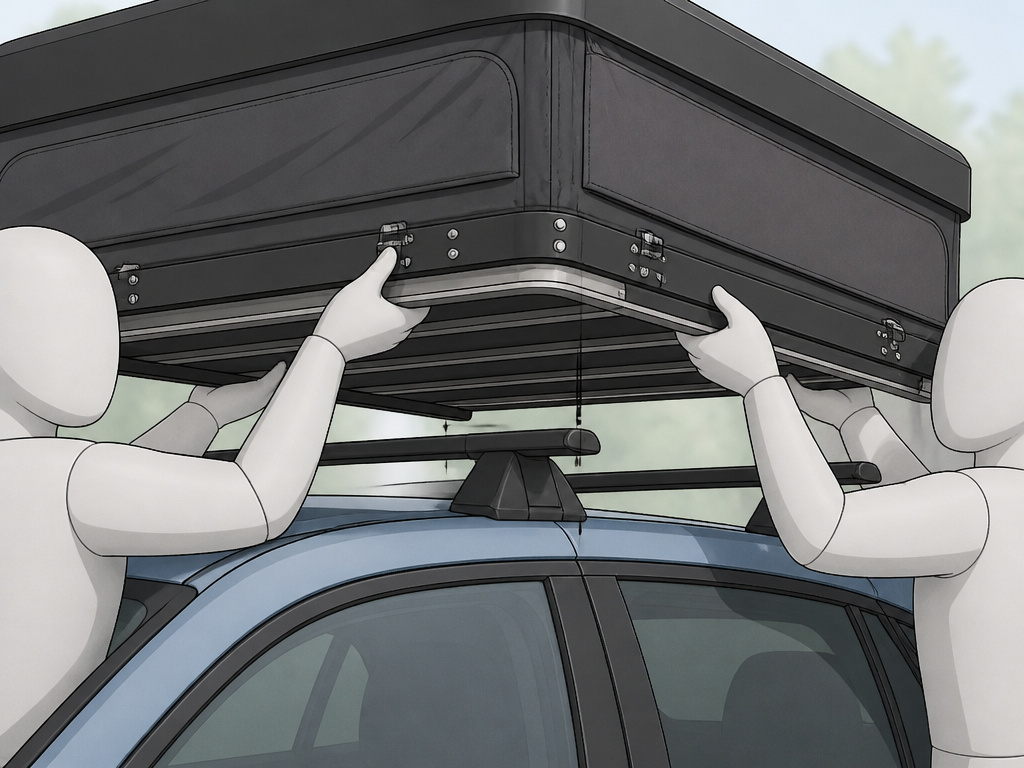
This is a mandatory two-person job. Position the tent box beside the vehicle. Each person grips the base frame, never the fabric shell. On three, lift with your legs, not your back. It’s a top-heavy, awkward weight. Walk it onto the roof and guide it onto the crossbars. Avoid dragging the tracks across the paint; that’s what your helper is for.
Center the tent side-to-side. Also consider front-to-back balance for stable handling. If you have an awning, you may need to offset the tent. Ensure the hinge side is accessible for opening. This is also the time to confirm your choice between clamshell rooftop tents and soft-shell models still fits your vehicle’s profile.
How Do You Securely Clamp the Tent to the Crossbars?
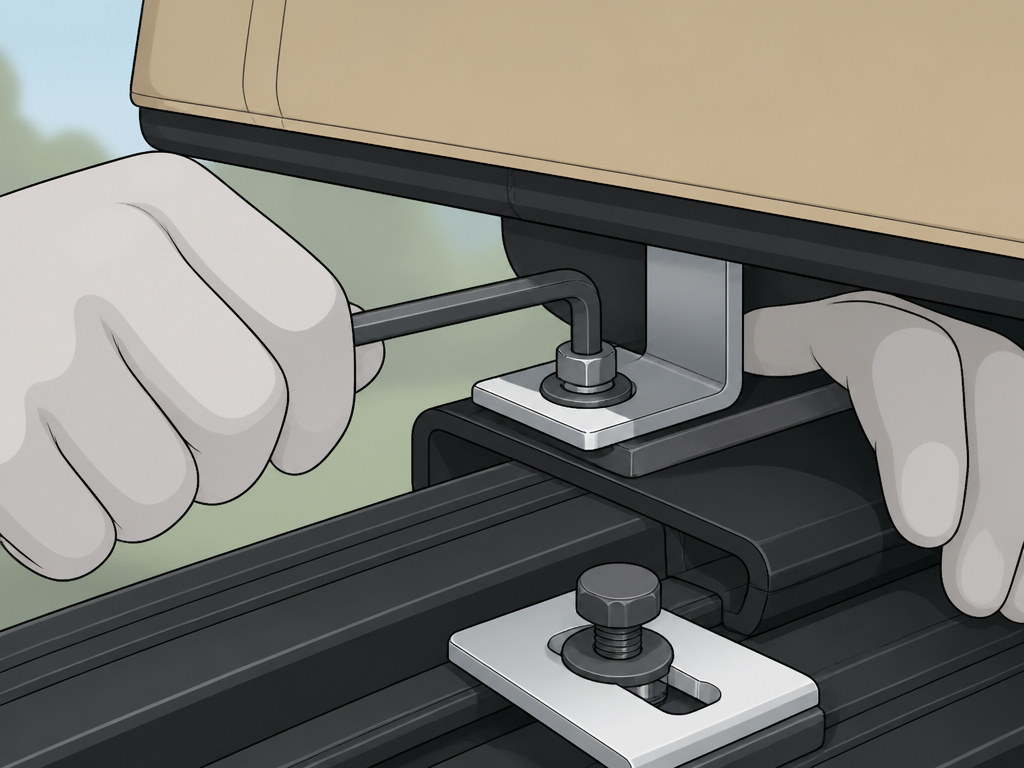
Now for the main attachment. Locate the channel sliders and clamping plates.
- Slide a channel slider into the track on one corner.
- Drop a 13mm bolt through the slider.
- From under the crossbar, add the small L-plate, then the larger clamping plate to bracket the bar.
- Thread on the washer and nut, hand-tighten.
Repeat loosely at all four corners. Do not fully tighten one corner first. If you do, you’ll rack the tent base out of square, making the opposite slider impossible to align. This misalignment can stress the fiberglass base, leading to cracks.
Once all four are loosely attached and the tent is aligned, go corner-by-corner and tighten. Use your torque wrench if you have a spec (often 18-22 ft-lb for the clamp bolts). If not, tighten until the bolt no longer turns with firm, steady pressure. You’re clamping the crossbar, not crushing it.
A dab of dish soap in the track makes the sliders move smoothly. This was a game-changer the third time I installed my Tepui, saving my knuckles and my patience.
Why is the 60-Degree Ladder Angle Non-Negotiable?
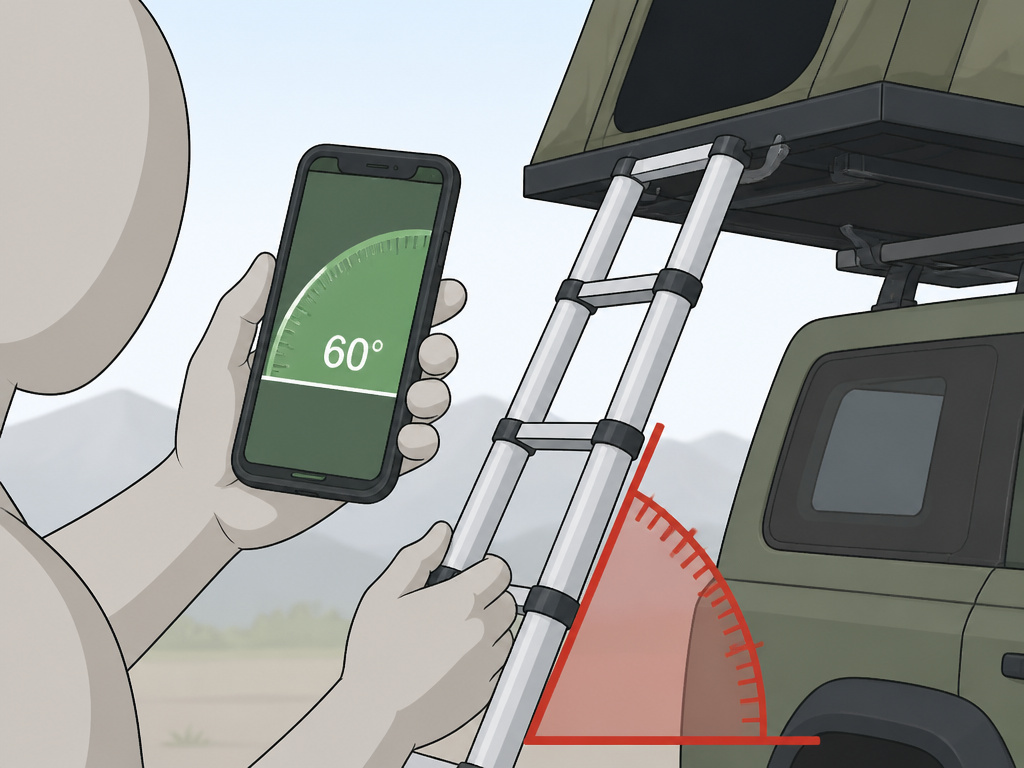
The ladder should form a 60° angle with the ground when the tent is open. Climbing on a ladder set at 90° or less than 60° risks bending the ladder or destabilizing the entire tent.
This verbatim warning from the RecPro manual is the most overlooked spec. I learned its importance on a trip to Moab. I was lazy and set my ladder at about 75 degrees. The first time my partner climbed in, the whole tent groaned. We found the front-left mounting bolt had already worked half an inch loose. That lever force is terrifyingly real.
The ladder is a structural brace. At 60 degrees, it transfers weight efficiently to the ground. Steeper, and it uses the tent’s front mounts as a pivot, prying upward. If the ladder doesn’t reach the ground at 60°, you need an extension. If the angle is too shallow, the RecPro manual says you may shorten it by drilling new holes above the existing ones. Drilling below weakens the ladder and will cause a failure.
TL;DR: Use a phone app to set a 60-degree angle. This isn’t about comfort; it’s what keeps the tent secured to your roof.
What Does the Post-Installation Shakedown Involve?
You’re not done when the last bolt is tight. This is where you catch the mistakes.
First, open the tent fully. Climb in and move around. Listen for creaks or flexing. Check zippers and the rainfly. Then, get out and visually inspect all eight bolt connections. Give each one another quarter-turn with the wrench, this is the “settling” pass.
Your final task is the road test. Drive 50 miles on a mix of roads. The vibration from highway travel and bumpy back streets will seat the hardware and reveal any loosening. After this drive, re-torque every bolt. I’ve never done this without finding at least one that needed another nip.
From then on, a quick hand-check at the start of each camping season and after any brutal off-road trip is sufficient. This diligence is what separates reliable overlanding shelters from a liability.
Frequently Asked Questions
Can I use my car’s factory roof rails?
Almost certainly not. Factory rails are often decorative and lack the strength of true load-bearing crossbars. You need crossbars that attach to the vehicle’s hardpoints with a published dynamic capacity exceeding your loaded tent weight.
My ladder is too short or long for a 60-degree angle. What now?
If it’s too short and doesn’t reach the ground, you need a manufacturer-approved extension. If it’s too long creating a shallow angle, consult your manual. The RecPro guide allows shortening by drilling new holes only above the existing locking pins to maintain strength.
Do I need special tools?
You need metric wrenches, typically 13mm for rack clamps and 10mm for the track bolts. A torque wrench is highly recommended for consistent, safe tightness. A hacksaw is essential if your tracks need trimming.
Can I install this by myself?
It’s strongly discouraged. The awkward weight and height make it dangerous for you and your vehicle. A helper is crucial for safe lifting, alignment, and spotting.
How often should I check the bolts?
Check and re-tighten after the first 50 miles of driving. After that, perform a visual and hand-check at the start of every camping season and following any severe off-road use.
Will this work with any vehicle?
Mostly, but you must verify roof rack capacity first. Smaller cars may be better suited for specific vehicle-attached tents or tailgate camping shelters that don’t rely solely on the roof.
Before You Go
Mounting a roof top tent isn’t just assembly; it’s building trust in a system that will be your home in high places. The reward for nailing the details, rack capacity, bolt torque, that perfect ladder angle, is a shelter that sets up in minutes and lets you sleep soundly anywhere your wheels can take you.
It transforms a simple car campsite tent into a genuine adventure hub. Pair it with the right camping gear essentials and you’ve got a mobile basecamp ready for whatever the trail brings. Now go find a view worth waking up to.
