
How to Set Up a Tent With Poles: A Camper’s Guide
This post contains affiliate links. As an Amazon Associate, we earn from qualifying purchases.
To set up a tent with poles correctly, you must first master the click, the tactile confirmation each pole end is fully seated in its corner grommet. Miss that, and your shelter is a pretzel waiting for a breeze. The sequence is sacred: clear your site, match poles to sleeves, insert and click, raise the frame, then stake from the ground up.
I learned about that click the expensive way. On my first solo trip in an old REI Half Dome, I rushed the pole insertion. A midnight wind gust didn’t just collapse the tent; it snapped the pole ferrule. I spent a shivering night in my car, and a replacement pole set cost me $45. I’ve pitched hundreds of tents since, from my trusty Marmot Tungsten to massive family cabin tents, and that lesson on foundational tension is everything.
This isn’t a generic tutorial. I’m weaving in the exact specs from tent manuals I’ve used and the hard-won tricks that turn a frustrating fight into a smooth, ten-minute routine. Let’s build a shelter that stands.
Key Takeaways
- Pole color-coding is your best friend, black poles go in black-trimmed sleeves, grey in grey, as per the Coleman Stockton manual. Mixing them guarantees a saggy, unstable frame.
- Always stake the tent body’s corners before attaching guylines. Doing it backwards lets wind get underneath, turning your rainfly into a sail.
- In wind, point the tent’s narrow end into the breeze. In rain, orient doors away from the prevailing wind. In heat, point a door into the wind for a cooling cross-breeze.
- The final stake you drive should be at the tent’s windward corner. This locks the structure against the force trying to lift it.
- A rubber mallet is non-negotiable on hard ground. Using a rock bruises your hands and bends cheap stakes on the first swing.
Where Should You Pitch Your Tent?
Your tent’s performance is decided before a single pole is assembled. A poor site means a sleepless night, no matter how perfect your pitch.
Before you start: Lightning seeks tall objects, and dead limbs fall without warning. The Coleman Stockton Tent manual explicitly warns against setting up under trees for these reasons. Also maintain a clear distance from overhead power lines. These aren’t generic cautions; they’re based on documented incidents.
Feel the ground with your hands, not just your eyes. Clear away every pinecone, rock, and twig. A slope you can’t see will have you and your sleeping pad migrating into the wall by morning. Seek higher, slightly elevated ground to reduce condensation, but avoid exposed hilltops in stormy weather.
Weather dictates orientation. Forget guesswork.
Common mistake: Facing the door away from the wind to keep rain out. If the wind shifts, and it will, rain drives straight into the mesh, soaking your interior in minutes.
For stability, position the tent so its narrowest end faces the prevailing wind, presenting a smaller profile. For cooling in hot climates, orient a door toward the breeze. To keep rain out, point doors away from the wind. Check the sky, feel the air, then lay your footprint.
TL;DR: Find flat, high ground free of debris. Let the weather tell you which way to face your tent, wind for stability, heat for breeze, rain for a dry interior.
What’s the Correct Pole Assembly Sequence?
This is the core physical act. Rushing it means doing it twice, often at dusk.
Step 1: Lay Out and Identify Every Component
Unpack everything onto your cleared site: tent body, rainfly, poles, and stakes. Immediately separate the poles by type. Most modern tents use a foolproof color-coding system, but you have to pay attention.
Take the Coleman Stockton (model 4010004689). Its manual specifies two long black Main Poles for sleeves with black trim and two long grey Side Poles for sleeves with grey trim. Threading a grey pole into a black sleeve creates a lopsided frame that will never peak correctly. Lay each pole parallel to its corresponding sleeve on the tent body.
Gently slide pole sections together. If a section binds, twist it slightly while pushing, never force it. Forcing can crack the ferrule, a lesson I learned the hard way. The shock cord should bring the sections together smoothly.
| Pole Type | Identifying Feature (e.g., Coleman Stockton) | Core Function | What Happens If It’s Wrong |
|---|---|---|---|
| Main Poles | Longer, often black, thicker diameter | Forms the primary “X” arch that defines the dome | Tent sags in the center; rainfly won’t align; structural weakness |
| Side/Wall Poles | Shorter, often grey or silver | Creates vertical wall space and usable headroom | Walls cave in, making the interior feel claustrophobic |
| Rainfly Pole (if present) | Shortest, often a single arch | Lifts rainfly off tent body to create a condensation-battling air gap | Rainfly contacts tent body, transferring moisture inward |
Step 2: Insert and “Click” the Poles Into Place
Now, connect the skeleton to the skin. For pole-through-sleeve designs, feed the tip into the sleeve and gently push it through. For clip-based designs, you’ll often clip the tent to the pole after arching it.
The critical moment is the click. Each pole end must seat fully into the metal grommet or plastic pin at the tent’s corner. On the Coleman Stockton, you insert one end of each black Main pole into pins in the inside front corners. You’ll feel a distinct snap or see the pin disappear into the pole end.
A perfectly pitched tent starts with a sound: the soft click of each pole end settling into its grommet. No click means no security. Lower the frame and check each corner before proceeding.
Miss this, and the pole will slip out under tension, causing a collapse just as you think you’re done. Visually and physically verify all four (or more) corners are fully seated.
Step 3: Raise the Frame and Lock It Down
With poles clicked in, lift the tent. Grasp the apex of one main pole arch and walk it upward. The fabric will follow. Repeat with the opposite arch. The frame should pop into a taut, freestanding shape.
Now, attach the rainfly. Drape it over, align all corners and doors, and clip or buckle it securely. If the fly has its own short poles, insert them now to create that crucial ventilation space.
How Do You Secure a Tent Against Bad Weather?
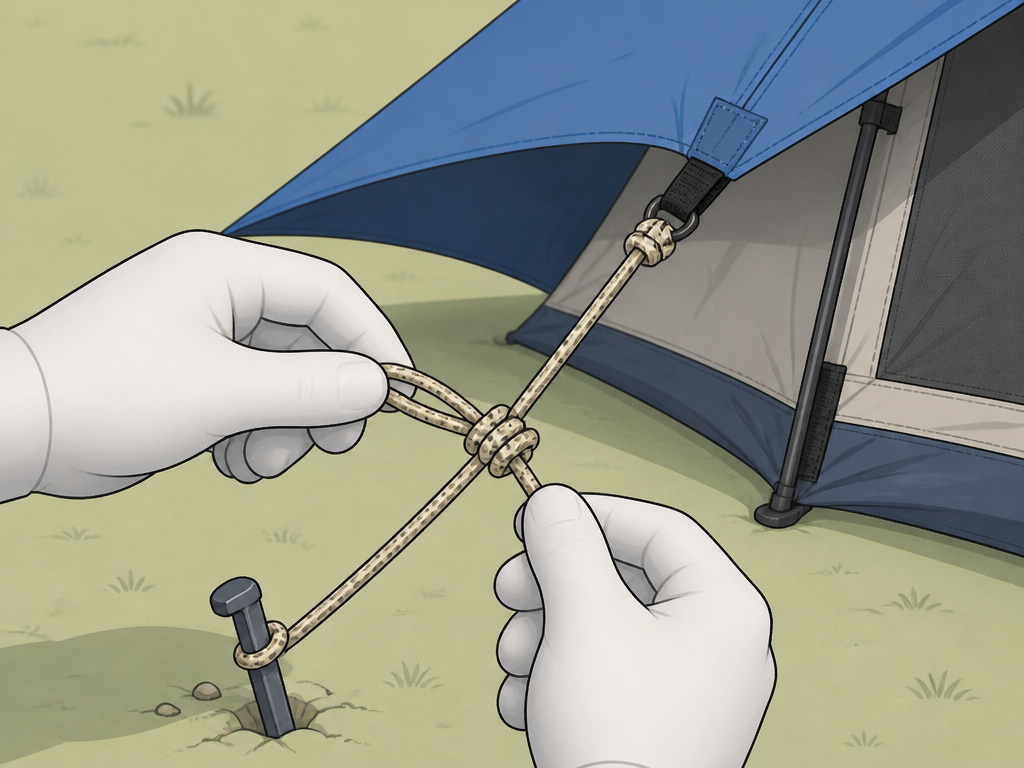
A freestanding tent is just a model. Securing it transforms it into a storm-ready shelter.
- Stake the tent body corners first. Use a mallet to drive stakes at a 45-degree angle away from the tent. This angle means wind tension pulls the stake deeper into the ground.
- Secure the rainfly corners and vestibules. Ensure the fly is centered and doors align.
- Attach and tension the guylines last. This is the step everyone wants to skip. Don’t.
Guylines are not decorative. They allow the rainfly to tension independently, creating an essential air gap that stops condensation from transferring to your sleeping bag. A sagging fly touching the inner tent means you’ll wake up damp, even without rain.
Tie each guyline to a stake about two feet out. Use a taut-line hitch, a knot you can adjust after the line stretches. The rainfly should be drum-tight. A flapping fly isn’t just loud; it transfers shocking loads directly to your poles. For more on building a resilient kit, our guide to essential tent camping equipment covers stakes, mallets, and other setup savers.
TL;DR: Stake tent corners, then rainfly, then guylines. Tight guylines create a vital air gap that is your best defense against interior condensation.
What Are the Most Common Pole Tent Problems?
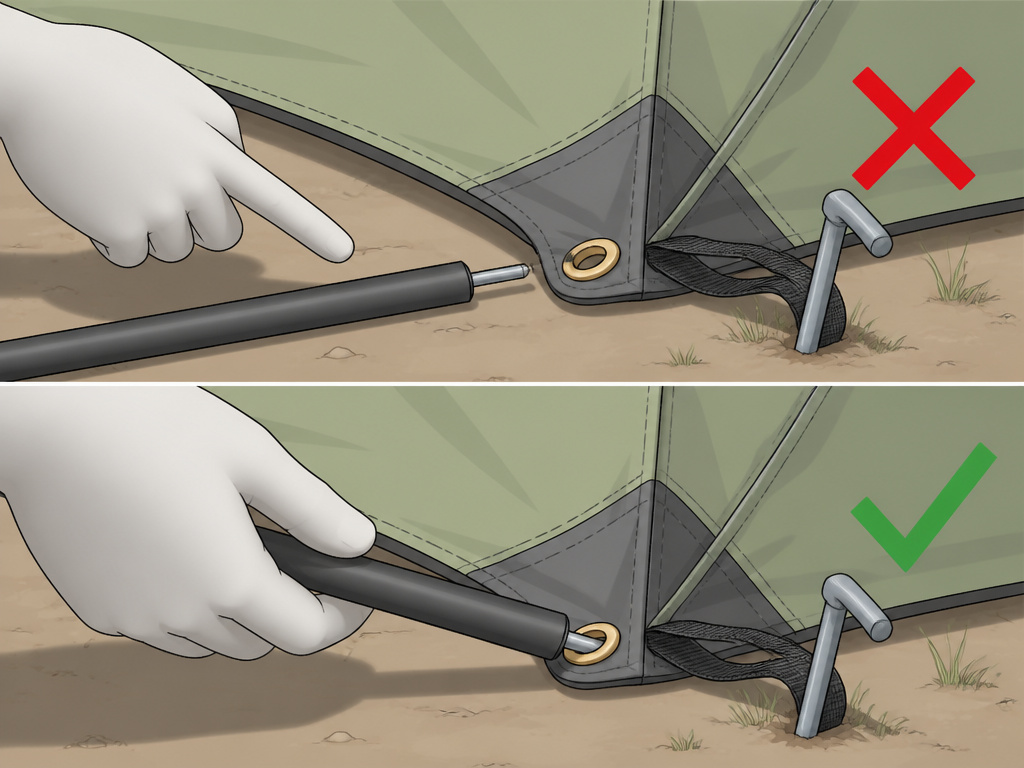
When things go wrong, it’s usually one of these culprits. Here’s how to diagnose and fix them fast.
| Problem | Likely Cause | Immediate Fix |
|---|---|---|
| Tent won’t stand up / collapses | Pole ends not seated in grommets. | Lower the tent and check for the click at every corner. |
| Sagging center or uneven shape | Main pole is in a side sleeve (or vice versa). | Check pole color against sleeve color. Disassemble and reassign. |
| Violent flapping & wind noise | Loose guylines or rainfly. | Retension all guylines; the fly should be tight, not loose. |
| Condensation inside walls | Rainfly is touching tent body. | Loosen body stakes slightly, tighten rainfly guylines to increase gap. |
| Whole tent shifts in wind | Tent body corners weren’t staked first. | Lower tension, stake body corners securely, then re-tension fly. |
A sagging center drove me nuts on my Big Agnes Copper Spur until I realized its ‘hubbed’ pole system required a specific criss-cross order the manual buried on page four. Meanwhile, my Marmot tents like the Tungsten use all one-color poles, so you identify them by length alone. Always consult your specific manual, it’s the ultimate authority, much like the detailed Appalachian Mountain Club tutorial on fundamental techniques.
Common mistake: Skipping guylines because the weather is calm. A midnight storm arrives without warning, and the first gust uses the rainfly as a sail, collapsing your pole structure. I’ve seen it happen in minutes.
Which Tent Design Is Easiest to Set Up?
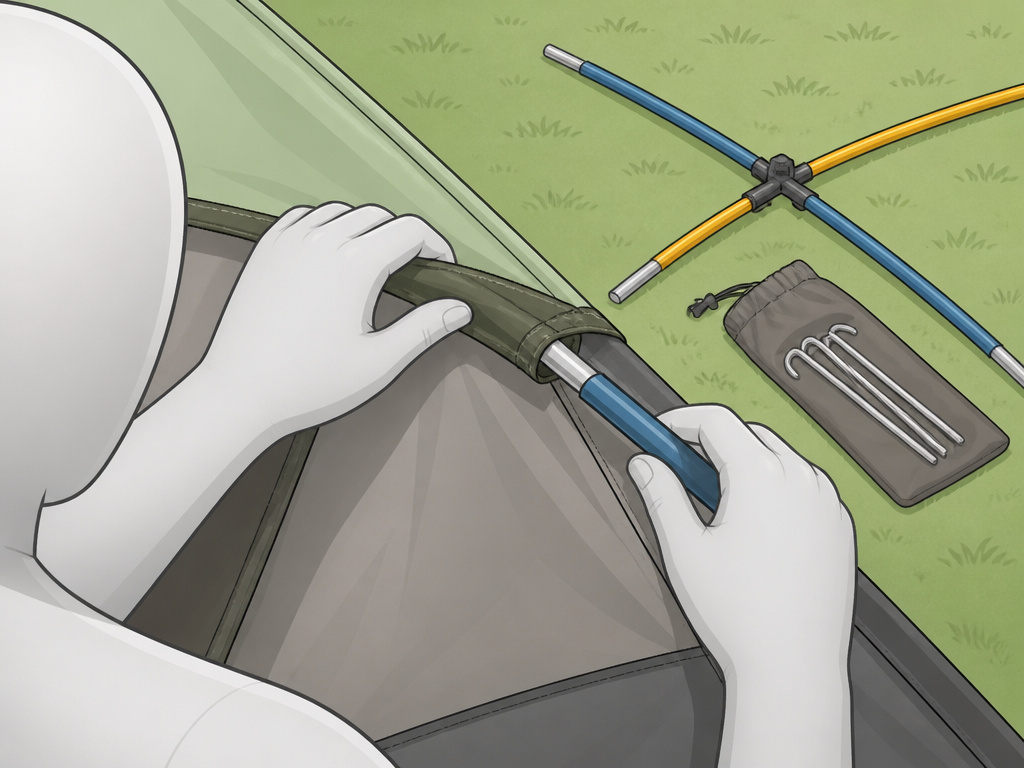
The core principles are universal, but the execution varies. Your choice impacts setup speed and complexity.
Dome tents, like many popular two-person tents, use flexible crossing poles and are generally the simplest for beginners. Tunnel tents use sequential hoops and require precise staking from the get-go. Cabin tents, including many stand-up tents with vertical walls, use rigid pole frames that are heavier but offer immense space.
Your climate should guide your choice. For frequent wet-weather camping, a dedicated tent for heavy rain with a full-coverage fly is worth the investment. For base camps or car camping, the durability and classic appeal of a canvas tent is unmatched, though their pole systems are substantially heavier. If you’re starting on a budget, there are reliable and straightforward budget tents under $100. Stepping up to the tents under $200 range often gets you clearer color-coding and better materials, which directly simplify the process we’ve covered.
Frequently Asked Questions
How long does a first-time setup take?
Give yourself 30 minutes in daylight. The delay is almost always in pole identification and stake sequencing. Your second attempt will take 15 minutes. After a few tries, you’ll be under 10. A backyard practice run is the best investment you can make.
Can one person set up a 6-person tent?
It’s a struggle, but possible with technique. Use your knees and back to hold an arch up while you stake. For larger cabin tents or even some compact two-person tents with complex poles, a second person isn’t just helpful, it’s necessary to prevent the frame from twisting or collapsing.
What’s the single most common pole error?
Inserting the pole ends backwards into the corner grommets. The pole should curve inward, toward the tent’s center. If it curves outward, tension is wrong and the pole can snap under strain. Always double-check the curve matches the tent’s natural arch.
Do I need to seam seal a new tent?
Most come with factory-taped seams. You should still check, especially on the rainfly. Applying a silicone-based seam sealer to any stitched seams is cheap insurance, particularly for waterproof tents you’re relying on in a storm. Do this at home, not at the campsite.
How do I take down a wet tent?
Shake off excess water. Wipe the poles dry before packing to prevent corrosion. If possible, pack the wet tent body/fly in a separate bag. The moment you get home, hang everything to dry completely. Mold can begin growing in less than 24 hours.
The Bottom Line
Setting up a tent with poles is a physical skill that rewards a patient, methodical approach. It’s not about strength; it’s about listening for the click, matching colors, and following the ground-up staking order. That’s the rhythm that builds confidence.
The difference between a shelter that laughs at the wind and a frustrating bundle of fabric is about ten minutes of focused attention. Get the poles right, and the rest is straightforward. For more insights on specific brands and models that excel in ease of use, our reviews of tents from Marmot can point you toward designs that make this process even smoother. Now, go find that flat spot and pitch with confidence.
