
What Is a Rain Fly? Your Guide to Staying Dry
This post contains affiliate links. As an Amazon Associate, we earn from qualifying purchases.
A rain fly is the waterproof outer shell of a tent, designed to shield the inner tent from rain and wind. Its most critical job is creating a ventilated air gap between itself and the tent body, which manages condensation from your breath and body heat. Without this gap, moisture wicks through, leaving you damp.
I learned the importance of that gap the hard way on a soggy trip in the Scottish Highlands. My trusty MSR Hubba Hubba NX’s fly sagged onto the mesh after a guy line came loose in the night. By dawn, a cold trickle had found its way onto my sleeping bag, a miserable, entirely preventable wake-up call. That experience taught me a rain fly isn’t a passive cover; it’s an active, tension-dependent system.
Let’s break down exactly how this piece of gear works, so you can pitch it with confidence and stay dry no matter what the weather throws at you.
Key Takeaways
- The air gap is everything. A taut fly creates a space for condensation to form and roll away. A sagging fly that touches the inner tent will transfer water directly to your gear.
- Material specs matter. Look for a hydrostatic head rating of at least 1,500mm for reliable three-season use. Polyester with a PU coating is the durable workhorse; silicone-coated nylon is lighter for backpacking.
- You don’t always need it. In dry, warm, and calm conditions, stowing the fly maximizes ventilation and star-gazing.
- Failure has clear signs. Peeling interior coating, leaking seams, and a persistent musty smell mean your fly’s waterproofing is compromised.
- Proper care extends life. Store your fly completely dry and out of prolonged UV light to get the full 5-10 years out of it.
A rain fly elevates the waterproof barrier away from the breathable inner tent, creating a critical air gap. This gap allows warm, moist air to vent, preventing internal condensation from soaking your sleeping bag and gear.
What does a rain fly actually do?
Most people think it just blocks rain. While that’s true, its smarter function is climate control. Your body and breath release moisture inside the tent. When that warm, humid air hits the cold underside of a properly elevated fly, it condenses on the fly and rolls harmlessly outside. If the fly sags and touches the tent body, that moisture transfers directly through the fabric via capillary action. So, a well-pitched fly manages the weather you create inside as much as the weather outside.
How Do I Know If My Rain Fly Is Failing?
A failing fly won’t always announce itself with a dramatic tear. The decline is usually gradual, and catching it early is the difference between a minor refresh and a ruined trip. Here’s what to look for, based on the wear I’ve seen on my own gear over the years.
First, do the hold-it-to-the-light test. Look for areas where the polyurethane (PU) coating on the inside has started to crack, peel, or flake away. This is UV damage, and it’s the most common killer. Once that coating goes, the fabric loses its waterproofness. On my old REI Half Dome 2, this started appearing on the high-stress points after about six seasons of consistent use.
Next, run a tactile check. Seam tape should be firmly adhered, not lifting or cracking. Feel for fabric that’s become stiff or brittle, especially along fold lines, another sign of UV degradation. Finally, trust your nose. A musty smell that survives a proper wash often means mold has gotten into the fabric layers, weakening them from within.
| Symptom | Likely Cause | Immediate Consequence |
|---|---|---|
| Water soaks in, doesn’t bead | DWR (Durable Water Repellent) coating worn | Fabric wets out, increasing weight and reducing breathability. |
| Peeling/flaking inside coating | UV degradation of PU coating | Fabric loses waterproofness; leaks develop in rain. |
| Leaks along stitched lines | Failed seam tape | Direct water ingress during sustained rain. |
| Persistent mildew smell | Mold growth in fabric layers | Weakened material and health concerns from spores. |
TL;DR: Inspect your fly before each season for peeling coatings, failing seams, and fabric stiffness. Address issues before you’re in a downpour.
When Should I Use (or Skip) the Rain Fly?
This isn’t an all-or-nothing piece of gear. Knowing when to deploy it is a key skill for comfort. I’ve boiled it down to a simple rule of thumb based on temperature, moisture, and wind.
Common mistake: Automatically putting the fly on every time. On a hot, dry, still night, you’re turning your tent into a stuffy sauna. The trapped heat can make sleep impossible.
Use it when: Rain is in the forecast, full stop. Also use it when temperatures will drop overnight (condensation management is key), in windy conditions (a taut fly stabilizes the structure), or when you need privacy or shade. For serious weather, you’ll want the full protection of dedicated tents for heavy rain.
Skip it when: The forecast is definitively dry, warm, and clear. In these conditions, I often pitch just the inner tent, or even use the fly and footprint as a standalone lightweight tarp shelter, to maximize airflow and enjoy the stars. This is a classic move for summer backpacking with ultralight two-person tents where every ounce and breath of air counts.
What Are the Different Types of Rain Flies?
Not all flies are created equal. The right choice balances protection, weight, and ventilation for your style of camping. The biggest divide is between full and partial coverage.
Full-coverage flies extend close to the ground on all sides. They offer superior storm and wind protection, making them the go-to for alpine trips, winter camping, or exposed coastlines. The trade-off is weight and slightly reduced airflow. You’ll find this robust design on most tents for high winds.
Partial-coverage flies protect mainly the roof and upper walls. They’re lighter and promote excellent ventilation, ideal for summer backpacking where rain is a brief threat. However, they offer less protection in driving, wind-blown rain.
Material choice is the other major factor. For car camping and durability, I prefer polyester with a PU coating, it resists UV degradation and stretching better than nylon. The 75D polyester on my Kingdom 6 has a 3,000mm rating that laughs at storms. For the trail, silicone-coated nylon is the standard for featherweight backpacking tents due to its fantastic strength-to-weight ratio, though it can stretch when wet.
| Fly Type | Best Use Case | Protection Level | Weight/Packability |
|---|---|---|---|
| Full-Coverage (Polyester) | Storm camping, winter, high wind | Excellent | Heavier / Bulkier |
| Partial-Coverage (Nylon) | Summer backpacking, fair weather | Good (not for storms) | Lighter / More Packable |
| Expedition (e.g., PVC) | Prolonged extreme wet (rainforest) | Maximum (zero breathability) | Very Heavy / Bulky |
How Do I Pitch a Rain Fly Correctly?
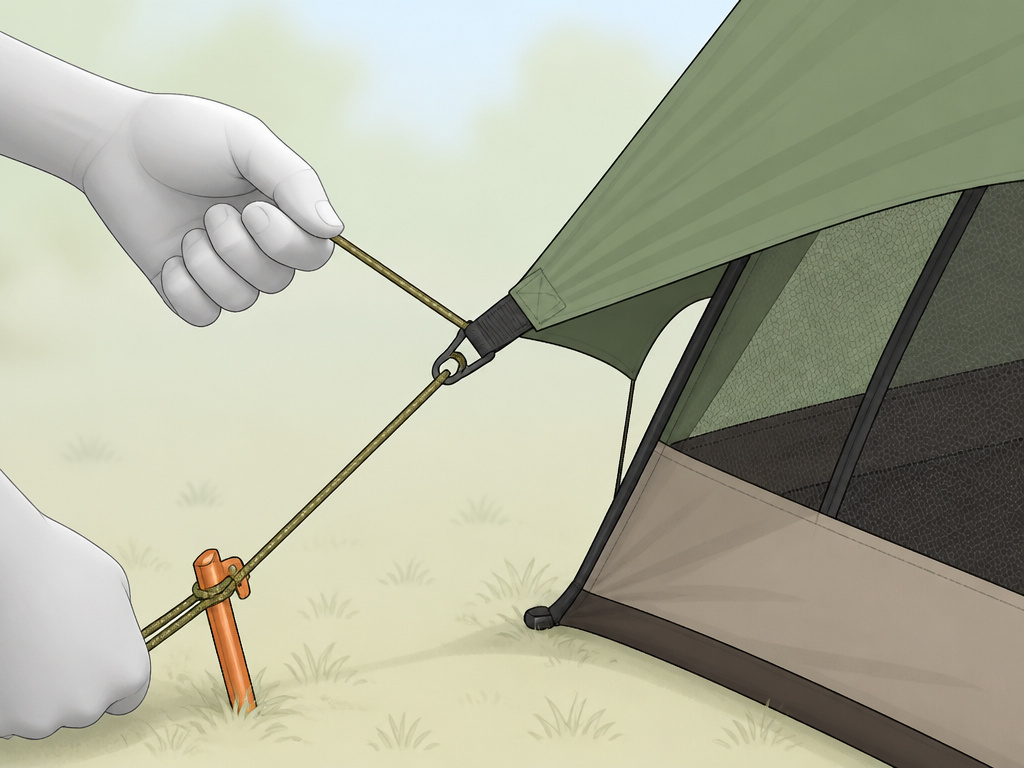
Pitching a fly isn’t just throwing a tarp over your tent. It’s a precise sequence that ensures that all-important air gap. Here’s the method I use every time, which prevents the sag that doomed my Scottish trip.
- Pitch the inner tent taut first. This is non-negotiable. A sloppy inner structure guarantees a saggy fly. Get those corners staked and poles tensioned until the fabric is drum-snug.
- Identify front/back and drape. Match the fly’s door to the tent’s door. Drape it evenly over the structure.
- Attach at the peak/primary points. Clip or sleeve the fly to the main pole hubs first. This anchors it.
- Secure the perimeter. Attach all corner clips or buckles, working around the tent to pull out slack evenly.
- Stake and tension every guy line. This is the step most people skip, and it’s the most critical. Each guy line pulls a panel taut. Stake them at a 45-degree angle away from the tent and crank them tight. A loose guy line is a useless guy line.
> Before you start: In high wind, a poorly tensioned fly can act as a sail, putting extreme stress on poles and stakes, potentially causing a collapse. In rain, a sagging panel will pool water and eventually contact the inner tent, creating a direct leak path. - Do the final gap check. Run your hand between the fly and inner tent at multiple points, especially across the top. You should feel clear space, not fabric contact. Readjust guy lines as needed.
Forgetting step five is the classic error. I’ve watched a friend’s fly pool water and collapse onto the mesh in a light drizzle because the guy lines were still coiled. Twenty minutes later, they had a quart of water in the tent vestibule. A full set of essential tent camping gear, including robust stakes and a mallet, makes this tensioning process foolproof.
Can I Repair or Replace a Worn-Out Rain Fly?
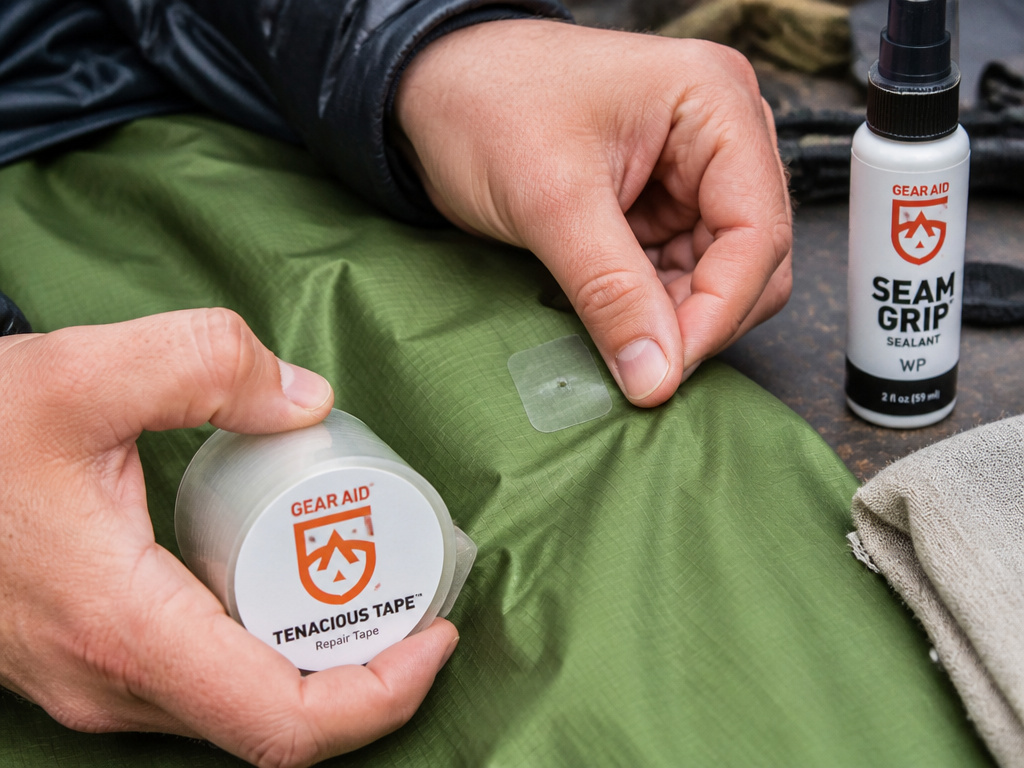
Sometimes, a fly can be revived. Other times, it’s time for a replacement. The fix depends on the failure mode.
For small punctures or tears, I swear by Gear Aid Tenacious Tape, applied to both sides of the clean, dry fabric, it forms a flexible, waterproof patch that lasts for years. For peeling seam tape, you need a liquid sealant like Gear Aid Seam Grip. Clean the old tape residue with alcohol, apply a thin bead of sealant, and let it cure fully.
If the interior PU coating is flaking off in large sheets, the fabric’s core waterproofing is gone. Patches and sealants are temporary fixes at this point. The fly has reached the end of its functional life, which typically ranges from 5 to 10 years with proper care.
When repairs are no longer viable, you have options. First, contact the tent manufacturer; many sell replacement flies. If that’s cost-prohibitive, especially for an older model, it might be more economical to invest in a new shelter. Exploring budget tents under $100 can sometimes yield a complete, reliable system for less than a custom fly. For those seeking extreme durability in a new purchase, the breathable fabric of durable canvas tents offers a different long-term proposition.
Frequently Asked Questions
Can you use a tent without a rain fly?
Yes, but only in guaranteed dry, calm, and warm conditions. The inner tent alone provides bug protection and privacy while offering maximum ventilation and views. In any other scenario, you lack essential waterproofing and wind protection.
How do you clean a moldy or dirty rain fly?
Use a technical cleaner like Nikwax Tech Wash in a bathtub or front-loading washer on a gentle cycle. Never use detergent, bleach, or fabric softener. Rinse thoroughly and hang to dry completely, direct sunlight is fine for drying. If water stops beading, reapply a DWR spray-on treatment.
Why is there water inside my tent with the fly on?
First, check if the fly is touching the inner tent anywhere, this causes wicking. Second, inspect the seams for failed tape. Third, ensure the fly’s door is fully covering the tent door and isn’t flipped open. If all else fails, the fabric’ waterproof coating may be degraded.
Do all tents include a rain fly?
Nearly all modern double-wall camping tents do. Some ultralight or mountaineering tents use a single-wall design where the waterproof layer is integrated. Always check the product description; if it says “double-wall,” a separate fly is included.
Is condensation on the fly’s inside normal?
Yes, this often means it’s working correctly. The condensation is forming on the fly instead of inside your tent. Maximize ventilation by opening all vents and ensuring the air gap is maintained. In cold, humid climates, some condensation is unavoidable.
The Bottom Line
A rain fly is your tent’s strategic shield. Its true genius isn’t just in the waterproof fabric, but in the ventilated space it creates. Master that air gap through proper tension and guy lines, and you’ve mastered dry camping.
Learn to read its condition, catching a failing seam or peeling coating early saves a lot of hassle. And remember, it’s not a mandatory piece for every night under the stars. On those clear, warm evenings, stowing it away transforms your shelter into a breezy observatory. Your comfort out there hinges on using the right tool for the conditions, and that includes knowing when to let your tent breathe. For more insights on selecting the right shelter from the start, our guide on backpacking tents for couples dives into weather protection and other key features.
