
What to Put Under a Tent for Protection and Warmth
This post contains affiliate links. As an Amazon Associate, we earn from qualifying purchases.
You need two distinct layers under your tent: a trimmed ground cloth to shield the tent floor from abrasion, and an insulated sleeping pad with a season-appropriate R-value to stop the cold ground from stealing your body heat.
I’ve learned this the hard way, shivering through nights and patching tiny punctures, all because I overlooked what was literally beneath me. It’s not just about keeping the tent clean; it’s about creating a micro-environment that lets you sleep, not just survive.
This isn’t a checklist of generic items. It’s a system, born from trail miles and mistakes, that matches specific gear to the ground you’re standing on. Let’s build your shelter from the ground up.
Key Takeaways
- A footprint’s real job is abrasion protection, not waterproofing. It preserves your tent floor’s factory coating from being ground away by grit and twigs.
- Sleeping pad R-value is your personal defense against the cold ground. Ignore it, and you’ll be cold regardless of your sleeping bag’s rating.
- On established wooden platforms or soft, sandy beaches, you can often skip the footprint, the abrasion risk is virtually zero.
- Always cut a DIY footprint or tarp 1-2 inches smaller than your tent floor. An oversized one channels rainwater directly under your sleeping area.
- For extreme cold, combine a closed-cell foam pad with an inflatable one. The foam adds reliable R-value and acts as a puncture-proof backup.
Do I Really Need a Ground Cloth Under My Tent?
That blue tarp from the hardware store? It’s a start, but it’s the wrong question. The right question is: what is the ground trying to do to my gear and my sleep? The answer dictates two separate solutions.
A functional ground system addresses two distinct threats: physical abrasion to the tent floor and conductive heat loss from the sleeper to the ground. It combines a footprint sized smaller than the tent floor with an insulated sleeping pad of appropriate thermal resistance (R-value).
I learned about abrasion the expensive way, on an early trip with a new tent on a seemingly soft Sierra Nevada site. Hidden granite sand acted like sandpaper. By morning, the tent floor’s coating was scuffed. By the end of that season, those scuffs were the first spots to dampen through. The ground won that fight.
TL;DR: Yes, you need a barrier. But you need two different kinds: one for your tent’s fabric, and one for your own warmth.
What Makes a Good Tent Footprint or Ground Cloth?
Forget waterproofing as the primary goal. Modern tent floors, like those from brands like MSR or Big Agnes, are rated between 3,000mm and 5,000mm+ Hydrostatic Head (HH), they’re already incredibly water-resistant. A footprint’s mission is to take the abrasive beating so that factory coating doesn’t wear thin.
The moment you stake down a tent, every shift, every gust of wind grinds the floor against the ground. A footprint sacrifices itself to this friction.
Footprint Materials: A Quick Comparison
| Material | Best Use Case | The Trade-Off |
|---|---|---|
| Branded Footprint (e.g., MSR Ground Hugger) | Guaranteed fit, integrated grommets for perfect alignment with your specific tent. | Most expensive option. A purpose-built footprint for a 2-person tent like the Klymit Maxfield weighs around 10 oz. |
| Tyvek HomeWrap | DIY favorite. Tough, cheap, and a good balance of weight and durability for car camping or base camps. | Weighs 3-4 oz, is notoriously noisy (it crinkles), and doesn’t pack down as small. |
| Polycro Window Film (from hardware stores) | The ultralight champion. At 1.5–2.4 oz, it’s perfect for backpackers on established trails where abrasion risk is lower. | See-through for site inspection, but less durable against sharp rocks. It’s a shield, not armor. |
Choosing the right foundation is as crucial as picking the right shelter itself, whether you’re eyeing durable canvas tents for basecamp or lightweight tarp shelters for fastpacking.
Common mistake: Using an uncut, oversized tarp that extends beyond the rain fly. This creates a perfect rainwater catchment that funnels moisture under your tent, guaranteeing a damp floor by morning, a specific, avoidable consequence of a single lazy step.
When You Can Actually Skip the Footprint
This is where experience trumps generic advice. On a smooth, established wooden tent platform at a state park, a footprint provides zero protective benefit and can even slide around. The same goes for a deep, soft sandy beach or a manicured grassy lawn for a single fair-weather night. Many ultralight backpackers on well-groomed trails ditch the footprint to save weight, knowing the risk is minimal. The abrasion threat simply isn’t present.
How Do I Choose a Sleeping Pad for the Cold Ground?
R-value. You’ve seen the number. But what does it feel like? Let me ruin a secret: my first “three-season” pad was an R-3.8. On a frozen October night near Marcy Dam in the Adirondacks, it was a lie. The cold seeped up like a chill rising through a stone floor. I spent the night in a miserable, shivering ball, my 20-degree bag rendered useless.
That experience sent me deep into the data. The Outdoor Foundation’s 2024 standards give us a clear, if conservative, baseline:
* Summer (ground > 50°F): R-2 minimum. Think of a basic foam pad.
* Shoulder Seasons (ground 30–50°F): R-3 to R-4.5. This is the sweet spot for most backpacking.
* Winter (ground < 30°F): R-5 or higher. This is serious insulation territory.
For shoulder seasons, I landed on the Nemo Tensor Alpine (R-4.8). Its horizontal baffles keep me centered, and the synthetic insulation stays warm if damp. But I pair it with a Gossamer Gear Thinlight foam pad when I know the ground will be frosty, the foam doesn’t care about punctures and adds a reliable R-0.5 safety net.
On that Adirondacks trip, I was using a pad that was technically within the “shoulder season” range. But a slow leak I’d ignored left me on deflated nylon by midnight. The cold wasn’t just discomfort; it was the specific, tangible consequence of a system failure, forcing a pre-dawn pack-up and a shivering hike out, all for a missed sunrise summit.
This focus on core sleep systems separates a functional kit from a comfortable one, much like how adding specific tent camping accessories can transform your experience from survival to enjoyment.
What About Extreme Cold or Rough Ground?
Sometimes the two-layer system needs a reinforcement. When the forecast dips or the site is a jagged moonscape, your strategy should shift.
The Winter Layering System: Stack Your Pads
In true winter conditions, the pros use a combined approach. Place a closed-cell foam pad (like a Therm-a-Rest Z-Lite Sol) directly on the tent floor. Then, place your inflatable pad (like a Therm-a-Rest NeoAir XTherm NXT) on top.
* Why it works: The foam pad provides stable, non-compressible insulation that isn’t affected by the cold ground sapping heat from the air inside your inflatable. It also acts as a full-area puncture shield. This combo is non-negotiable for winter camping where ground temperatures can rapidly drain body heat.
Comfort Hacks That Actually Work
- A Blanket Under Your Pad: That viral YouTube tip? It’s legit. An old fleece blanket or even a Rumpl-style blanket placed under your sleeping pad adds a micro-layer of dead air space and softness, reducing cold conduction points. It’s a game-changer for car camping comfort.
- Emergency Blanket Boost: In a pinch, placing a reflective space blanket (shiny side up) under your pad can reflect radiant heat back at you. It’s a crinkly, but effective, emergency boost.
These upgrades bridge the gap between basic shelter and a cozy backcountry home, similar to how integrating tent heating stoves or portable air conditioners allows for true four-season climate control.
How Do I Install a Footprint Correctly?
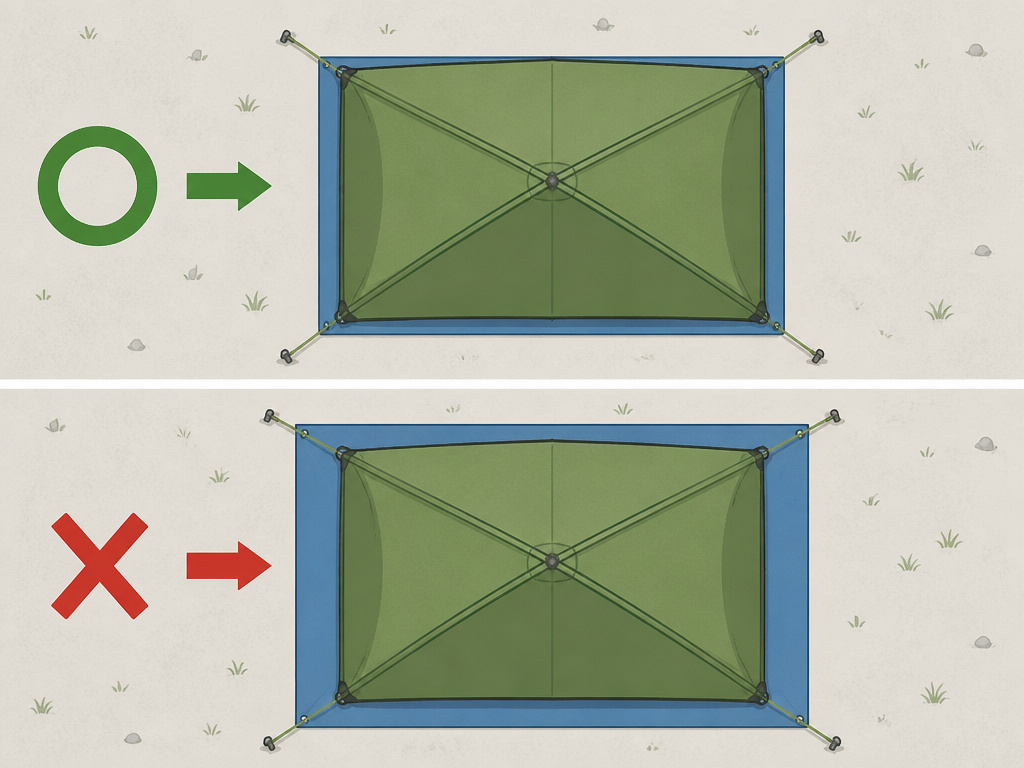
A perfect footprint installed wrong is worse than useless. The cardinal rule is non-negotiable: The footprint must never be visible outside the tent’s rain fly.
- Clear the Site. Remove every pinecone, twig, and pebble. Skip this, and a hidden, pointy object will press a permanent dimple into your tent floor’s coating, creating a future leak point.
- Lay the Trimmed Footprint. Center your pre-cut ground cloth. If it’s a branded footprint, use the grommets to align with your tent’s corner loops.
- Pitch the Tent on Top. Assemble your tent directly over the footprint. The tent should completely cover it.
- Never Stake the Footprint Separately. You want it to move with the tent, not create a separate layer that can catch water or wind.
Common mistake: Not trimming a DIY tarp. If you’re making your own, always cut it 1-2 inches smaller than your tent’s floor dimensions. An exact match will still likely channel water underneath during a downpour.
What Should I Never Put Under My Tent?
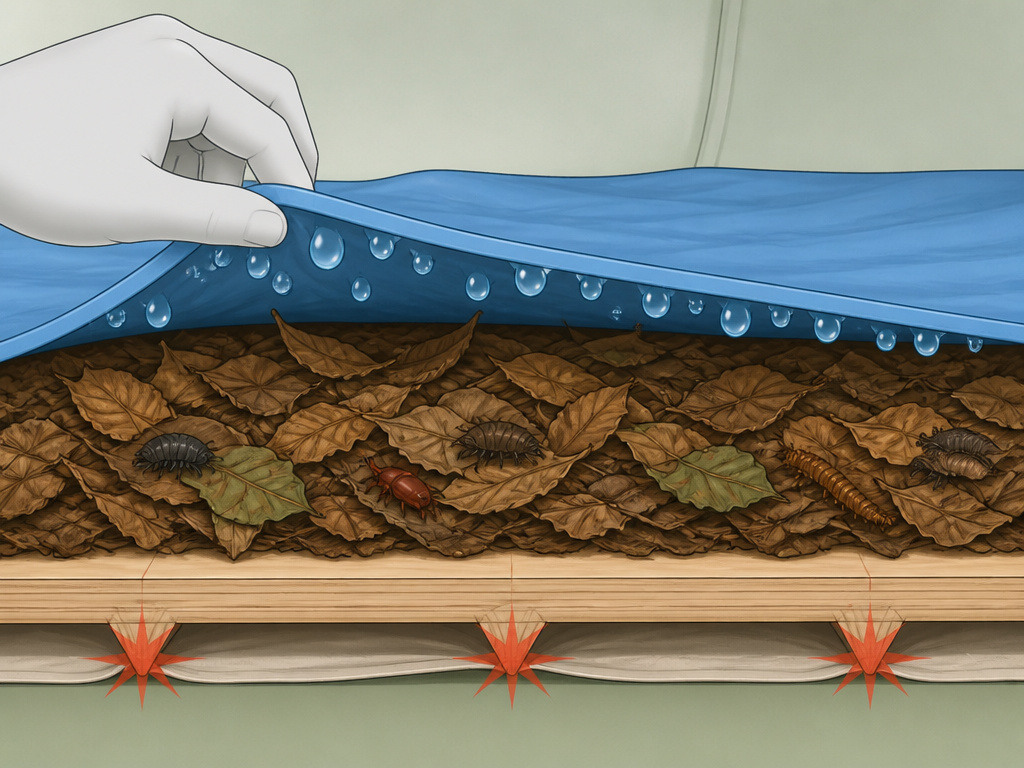
Just as critical as what to add is what to avoid. Some well-intentioned ideas can ruin your gear.
- Plywood or Rigid Boards: They create pressure points on tent poles and seams, can trap moisture leading to mold, and offer zero give for a comfortable sleep.
- Thick Layers of Leaves or Pine Needles: They compress unevenly, hide sharp objects, and become a welcome mat for insects and moisture.
- Non-Breathable Plastic Sheeting (Visqueen): This creates massive condensation on its underside, which then wicks directly into your tent fabric, ensuring a damp, musty interior.
Your goal is a stable, dry, minimally abrasive surface. Every piece of essential camping equipment should serve a clear purpose, anything else is just dead weight.
Frequently Asked Questions
Can I use a regular tarp as a footprint?
Yes, but you absolutely must cut it down to size. A standard 6×8 ft hardware store tarp is almost always too large for a backpacking tent and will funnel water underneath.
Is a footprint necessary for a brand-new tent?
It’s most important for a new tent. Protecting the factory waterproof coating from the very first setup is the best way to ensure a long lifespan for your investment.
How do I find my tent’s HH rating?
Check the manufacturer’s specifications online or on the product’s stuff sack/ tags. If it’s not listed (common with budget models), assume it’s on the lower end and a footprint is a wise addition.
Will extra blankets under my sleeping bag keep me warm?
Not effectively. Blankets compress under your body weight, eliminating the insulating air pockets. They are far better used on top of your bag or, as a comfort layer, under your sleeping pad.
Do I need a footprint for a hammock?
No. Hammocks have no floor to protect. Your system shifts to using tree-friendly straps and an underquilt for bottom insulation.
Before You Go
What goes under your tent isn’t an afterthought; it’s the foundation of a good night. Start by shielding your tent with a simple, trimmed ground cloth. Then, defend yourself with a sleeping pad whose R-value respects the season. For the rough and the frozen, layer a foam pad beneath for bulletproof protection and warmth.
This system works whether you’re loading a spacious car camping tent for a weekend with friends or weighing every ounce for a solo trek. Get these layers right, and you’re not just pitching a tent, you’re building a sanctuary.
