
Learn How To Fix A Ripped Tent And Avoid Common Repair Mistakes
This post contains affiliate links. As an Amazon Associate, we earn from qualifying purchases.
To fix a ripped tent, you need three things: a patch material that matches your tent’s fabric, an adhesive that matches its waterproof coating, and a clean, dry work surface. The adhesive choice is the single biggest point of failure, using the wrong one guarantees the patch will peel off within a season.
Most guides skip the critical first step of identifying your tent’s coating. They tell you to grab a generic fabric glue and hope. That’s why so many DIY repairs fail the first time you pitch the tent in a real downpour.
Here is the complete process, from diagnosing the tear to choosing the right patch and glue, with the specific warnings that keep a repair permanent.
Key Takeaways
- The tent’s waterproof coating, polyurethane (PU) or silicone, dictates the adhesive. Use McNett Seam Grip for PU-coated fabrics and sewing for silicone-coated fabrics.
- Never clean a tear with high-concentration isopropyl alcohol. It strips the waterproof coating, turning a small hole into a permanent leak spot.
- Round every corner of your patch completely. A single sharp corner will catch on your gear bag and peel the patch clean off.
- For tears longer than 10 inches, skip the DIY repair. Home stitching or patching will compromise the tent’s structure and waterproofing, seek a professional service.
- A field stitch is a last-resort temporary fix. Every needle hole is a new potential leak point; use it only until you can apply a proper patch at home.
The #1 Mistake That Makes a Repair Fail
You can cut the perfect patch and apply it with surgeon-like precision. Use the wrong adhesive and the whole repair peels off in your storage sack.
The mistake is assuming all tent fabric is the same. It’s not. The waterproof coating on the inside of your rainfly or tent body is either polyurethane (PU) or silicone. Each bonds to a different type of glue. PU coatings feel slightly tacky or rubbery. Silicone coatings feel dry and papery. If you’re not sure, check your tent’s manual or the manufacturer’s website, this spec is always listed.
Common mistake: Using isopropyl alcohol above 70% concentration to clean the tear area, it dissolves the waterproof coating. You’ll see the fabric turn dull and feel less slick within seconds, and that spot will leak forever.
TL;DR: Identify your tent’s coating first. PU needs glue; silicone needs thread. Getting this wrong voids the repair before you even start.
What You Actually Need (Not What the Kit Says)
A generic tent repair kit gives you a square of nylon and a tube of clear glue. That’s a starting point, not a solution. Here are the specifics that matter.
| Tool/Material | What It Does | What Happens If You Skip It |
|---|---|---|
| Tenacious Tape or spare tent fabric | Provides the patch material. Must be larger than the tear. | A too-small patch concentrates stress on the edges and rips again within two uses. |
| McNett Seam Grip (PU) or needle & thread (Silicone) | Creates the permanent bond. | Generic fabric glue will not chemically bond to silicone-coated fabric. The patch falls off. |
| Rubbing alcohol (≤70%) or warm water & mild soap | Cleans oils and dirt from the repair area. | Dirt acts as a barrier, preventing the adhesive from bonding to the fabric fibers. The patch lifts at the edges. |
| Scissors with rounded tips | Cuts the patch and rounds its corners. | Sharp corners catch on everything in your pack, peeling the patch back on the first trip out. |
| Heavy book or flat weight | Applies even pressure during the cure. | Without pressure, the patch develops air bubbles and weak spots that leak under moderate rain. |
You don’t need a fancy workbench. A clean, dry floor or table works. Lay down a trash bag or piece of cardboard to protect your surface from glue drips. Good lighting is non-negotiable, you need to see the tear’s edges and the coating’s sheen.
PU-Coated Tents: The Glue-It-Down Rule
PU-coated nylon is the most common tent fabric. It has a rubbery, often slightly shiny interior coating. For these tents, glue is your friend, but only the right kind.
McNett Seam Grip is the industry-standard adhesive for a reason. Its formula is designed to remain flexible when cured, moving with the fabric instead of cracking. Generic fabric glue or super glue dries brittle. The first time you fold the tent, that brittle glue cracks and the seal fails.
The process is straightforward, but timing is everything.
1. Clean with warm, soapy water. Dampen a cloth with water and a drop of dish soap. Wipe the area thoroughly, extending an inch beyond where the patch will sit. Let it dry completely. If you must use alcohol, ensure it’s 70% concentration or lower. Higher percentages will damage the PU coating.
2. Cut a rounded patch. Use Tenacious Tape or a scrap of similar fabric. Cut it at least one inch larger than the tear on all sides. Then, go back and round every corner, no exceptions. A single 90-degree corner is a snag point.
3. Apply Seam Grip to both surfaces. Spread a thin, even layer on the back of the patch. Spread another thin layer on the tent fabric where the patch will sit. Wait 2-3 minutes until the glue becomes tacky.
4. Press and roll. Align the patch and press it down firmly from the center outward. Use the back of a spoon or a seam roller to squeeze out any air bubbles and ensure full contact, especially at the edges.
5. Weight it and walk away. Place a heavy book on top of the repair. Let it cure for a full 24 hours. Picking at it or folding the tent early will create weak spots.
I tried to shortcut the cure time on a patched rainfly once. I gave it four hours on a warm day and packed the tent. The next weekend, a light drizzle seeped right through the patch seam. The glue hadn’t fully cross-linked. Now I wait the full day, every time.
TL;DR: For PU-coated tents, use McNett Seam Grip on both the patch and the fabric, round the patch corners, and apply weight for a full 24-hour cure.
When a Field Stitch Is Your Only Option
Sometimes a tear happens miles from the trailhead. If you don’t have tape or glue, a hand-stitch can get you back to camp. This is a temporary fix only.
Use dental floss or a heavy-duty thread from your repair kit. Sew a simple running stitch about a quarter-inch from the tear’s edge. Pull it tight, but not so tight that it puckers the fabric. The goal is to hold the edges together just long enough to get home.
Every needle hole is a new potential leak point and weakens the surrounding fabric. This is why manufacturers like MSR call stitching a “last resort.” As soon as you’re home, remove the stitches and perform a proper glue-and-patch repair. Leaving the stitches in creates a stress line that often leads to a longer tear. This approach is critical for maintaining the integrity of lightweight tent fabrics common in modern backpacking shelters.
Silicone-Coated Tents: The Sew-It-Up Rule
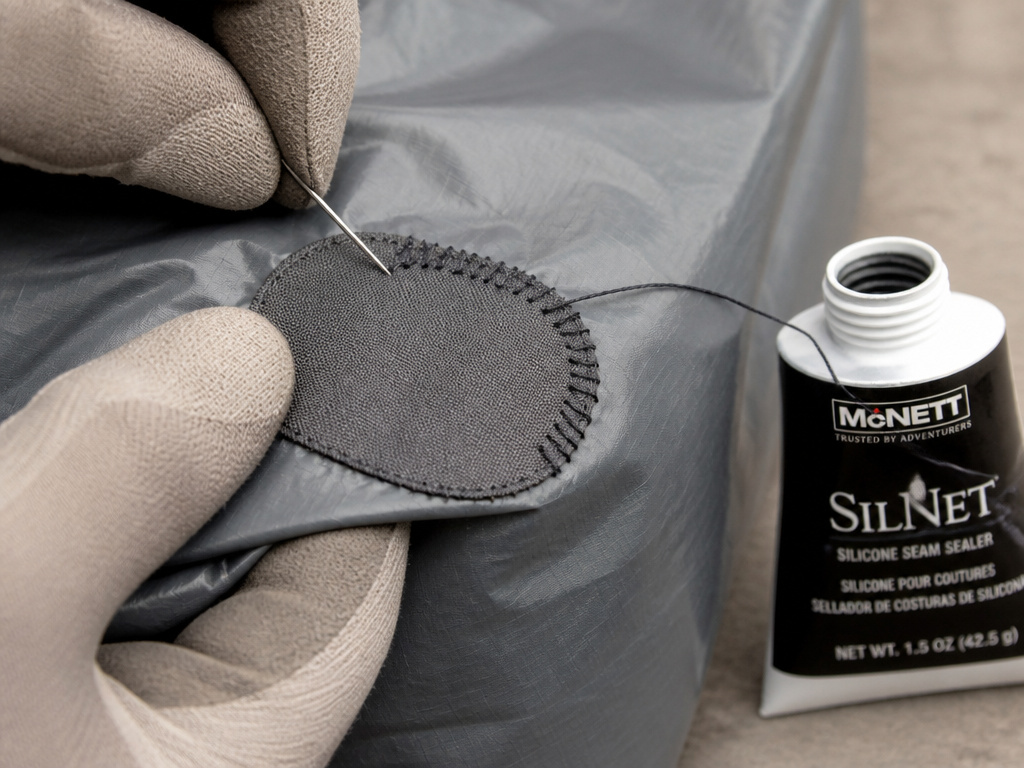
Silicone-coated nylon feels dry and has a matte, paper-like finish. It’s common in high-end, lightweight backpacking tent construction. Glue does not stick to silicone.
For these tents, sewing is the only permanent repair. The coating itself is so slippery that adhesives like Seam Grip cannot form a lasting bond. You can use a silicone-specific sealant like McNett SilNet around the stitched seam afterward to restore waterproofing, but the thread provides the strength.
- Clean the area. Use only warm water and a mild soap. Isopropyl alcohol can damage the silicone coating.
- Cut a rounded fabric patch. Same rule as before: one inch larger than the tear, corners fully rounded.
- Sew the patch on. Use a heavy-duty nylon thread and a sharp needle. A simple whip stitch around the entire perimeter works. Make your stitches about an eighth of an inch apart. Pull the thread snug, but don’t cinch it so tight that it distorts the fabric.
- Seal the stitches. Once the patch is sewn, apply a thin bead of McNett SilNet seam sealer over the line of stitches. This fills the needle holes and restores the waterproof barrier.
- Let it cure. Allow the SilNet to cure completely, which can take up to 48 hours depending on humidity, before packing the tent away.
This method is more labor-intensive than gluing, but it’s the only one that works. The difference in technique is a key consideration when choosing tents for heavy rain, as a failed repair directly compromises storm-worthiness.
Common mistake: Trying to glue a patch onto silicone-coated fabric, the bond fails within a few flexes. You’ll find the patch loose in your stuff sack after the first pitch.
What About Big Tears and Broken Poles?
Not every repair is a simple patch job. Some damage needs a different approach.
Tears longer than 10 inches fall into the “professional repair” category. A patch that large creates a stiff, non-flexing panel on a flexible tent wall. In a stiff wind, that panel acts as a sail, transferring immense stress to the seams around it. You risk tearing the tent further. For damage this extensive, seek out a specialty outdoor gear repair service. They have the industrial sewing machines and reinforcing techniques to handle it properly.
A broken tent pole is a mechanical fix. If the break is clean in the middle of a section, a repair sleeve is the solution. These aluminum tubes slide over the broken pole and are secured with the included hose clamps. If the break is at the connection point where one pole section inserts into another, a sleeve won’t work, it prevents the pole from folding. In that case, you need a replacement pole section from the manufacturer.
Having a basic tent repair kit on hand is wise, but know its limits. These kits are designed for field fixes on the trail, not for major structural repairs at home.
Frequently Asked Questions
Can you use duct tape to fix a tent?
Duct tape is a short-term field fix only. The adhesive dries out and fails within days, especially when folded. It will leave a sticky residue that is harder to clean off than the original tear. Always replace a duct tape patch with a proper fabric-and-glue repair as soon as possible.
How long does a tent patch take to dry?
proper glue-based patch needs a minimum of 24 hours to cure under pressure. In cool or humid conditions, give it 48 hours. Rushing this step is the most common reason a seemingly good repair fails.
Will patching a tent make it leak?
correctly applied patch using the right materials for your tent’s coating will not leak. The patch itself is waterproof, and a good sealant bonds it to the existing waterproof layer. The leak risk comes from using the wrong adhesive or not sealing the edges completely.
Can you sew a tent with a regular sewing machine?
You can, but it’s tricky. You need a heavy-duty needle (size 16 or 18) and polyester or nylon thread. The slippery, coated fabric can jam a home machine. For long seams or silicone-coated tents, hand-sewing is often more reliable and puts less stress on the material.
How do you fix a hole in a tent mesh?
Tenacious Tape works perfectly on mesh. Cut a patch slightly larger than the hole, round the corners, and apply it to one side. No glue is needed for most mesh repairs, the tape’s adhesive does the job. For larger mesh tears, a few hand stitches with a fine thread will reinforce the area before applying the tape.
Before You Go
Fixing a ripped tent comes down to matching your repair to your tent’s material. Glue for PU, thread for silicone. Round your patch corners. Let it cure under weight for a full day. Skip the isopropyl alcohol.
A good repair should last the lifetime of the tent. If you find yourself patching the same spot twice, you likely used the wrong adhesive or rushed the drying time. For major structural damage, professional repair is cheaper than replacing a high-wind tent designed to withstand storms. Keep a roll of Tenacious Tape in your camping accessories kit for the trail, but save the permanent fix for a clean, dry workspace at home.
