
How to Build a Teepee Tent: A Step-by-Step DIY Guide
This post contains affiliate links. As an Amazon Associate, we earn from qualifying purchases.
To build a teepee tent, you need a stable tripod of 12–15 foot poles lashed with natural rope, a half-circle cover cut to the precise slant height of your frame, and a secure lift-pole system for ventilation. The geometry of the cover and the grip of your lashing cord are what separate a drafty shelter from one that holds fast in a prairie wind.
Most DIY guides gloss over the details that make a teepee actually work. They tell you to lash some poles and throw a tarp over them. What they skip is the consequence: a cover cut an inch too short will pull the poles inward, collapsing the frame in a stiff breeze. A slick synthetic rope on the crown knot will slip a fraction every hour until the roof sags open.
I learned this the hard way on a trip in the Wyoming foothills, watching my first build slowly fail over three days of gusty weather. This guide walks you through the process with the specifics that matter, the exact oil mixture for your poles, the brand of sealant that bonds to silnylon, and the one-inch tack trick that stops the top from sagging after a week in the sun.
Key Takeaways
- The foundation is a tripod lashed with a continuous rope. The two base poles must be spread roughly nine feet apart, creating a 30-degree angle at the top for maximum stability.
- Calculate your cover’s radius using the slant height formula: √(ground radius² + center height²). For a 12-foot diameter, 10-foot tall teepee, that’s √(6² + 10²) ≈ 11.7 feet. Then add 8 inches for hems and door overlap.
- Use natural-fiber rope like 3/8” Manila hemp for the primary crown lashing. It grips linseed-oiled wood far better than slick paracord, which can slip under load.
- Seams on silicone-coated nylon (silnylon) must be sealed with a product like GE Silicone II after sewing. The factory coating prevents thread from swelling to seal needle holes.
- A safe interior fire requires a teepee at least 14 feet in diameter. Smaller tents cannot manage the heat and smoke without risk.
What Poles Should You Use for a Teepee?
You need straight, dry poles 12 to 15 feet long and 1.5 to 2 inches in diameter. Green wood is heavier and will warp; deadfall may be rotten. I look for lodgepole pine or straight spruce saplings.
A comfortably sized family teepee needs a canvas roughly 15 feet by 30 feet. The poles should be about three feet longer than the width of that covering.
Storage matters. Rough spots will snag and tear your canvas. Sand every pole smooth with a sheet of 3M Pro Grade Precision 80-grit sandpaper, cheaper paper loads up with pine sap instantly. If you plan to store them outdoors, treat them to prevent rot.
Before you start: Treating poles involves flammable solvents. Work outside with good ventilation, wear nitrile gloves, and dispose of oil-soaked rages in a sealed metal container, as they can spontaneously combust. Always sand away splinters to prevent canvas tears and painful hand injuries during handling.
I mix pure boiled linseed oil (Hope’s 100% Pure is a reliable brand) with odorless mineral spirits, not turpentine, to avoid the strong smell. A 50/50 ratio soaks in well. Apply it evenly and let it cure for a full 48 hours before building. This creates a grippy surface for rope, not a slick varnish.
TL;DR: Source straight, dry poles 1.5–2 inches thick. Sand them smooth and treat with a boiled linseed oil/mineral spirits mix for outdoor storage.
How Do You Lash a Stable Tripod Foundation?
This is the heart of the structure. A wobbly tripod means a collapsible teepee. The goal is a rigid pyramid that can support the rest of the frame and the heavy canvas load.
Lay your three best poles side-by-side. Measure about two feet down from the top of one, this is your lashing point. Tie a clove hitch around that pole. Now, wrap your rope around all three poles four or five times, pulling each wrap tight.
Next, make three or four “frapping” turns between the poles. These turns cinch the bundle and prevent slippage.
Common mistake: Skipping the frapping turns, the poles will twist and groan under the canvas load, often collapsing silently over six hours on a calm night.
Finish with a square knot on the pole opposite your starting clove hitch. Now stand it up. Spread the two base poles so they’re roughly nine feet apart. This creates an acute angle of about 30 degrees at the top, the sweet spot for stability.
What’s the Right Way to Add the Remaining Poles?
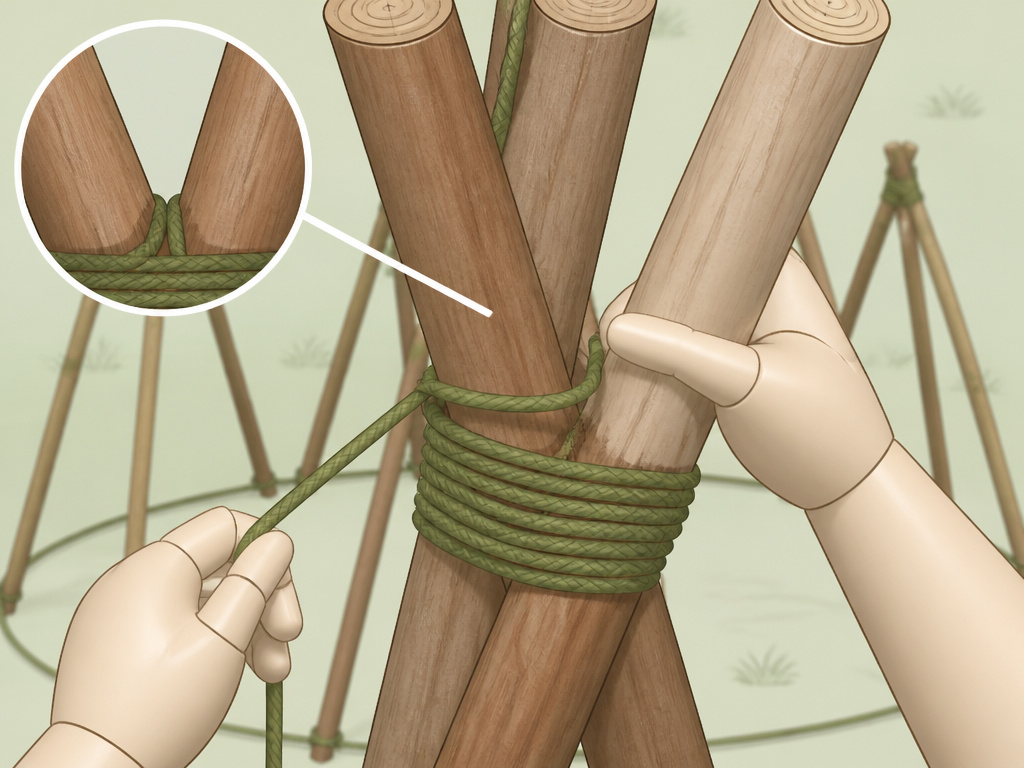
With the tripod solid, add the rest of your poles one by one. Lean each into the V of the tripod, spacing them evenly so they hit the ground about three feet apart, forming a consistent circle.
Here’s the pro technique from traditional builders: use the long tail from your initial tripod knot. As you add each new pole, whip that continuous rope around it, cinching every pole back to the central crown. This creates a unified, solid unit.
If you run out of rope, tie on a new length with a secure sheet bend. The final frame should feel rigid. If it wobbles, your frapping turns weren’t tight enough.
| Aspect | Target Measurement | Consequence of Error |
|---|---|---|
| Tripod Base Spread | ~9 feet apart | Frame becomes tippy or interior space is cramped. |
| Ground Pole Spacing | ~3 feet apart | Cover will gap or bunch, creating drafts. |
| Crown Lashing Height | 2 feet from pole tops | Poles splay outward, deforming the conical shape. |
How Do You Calculate and Sew the Cover?
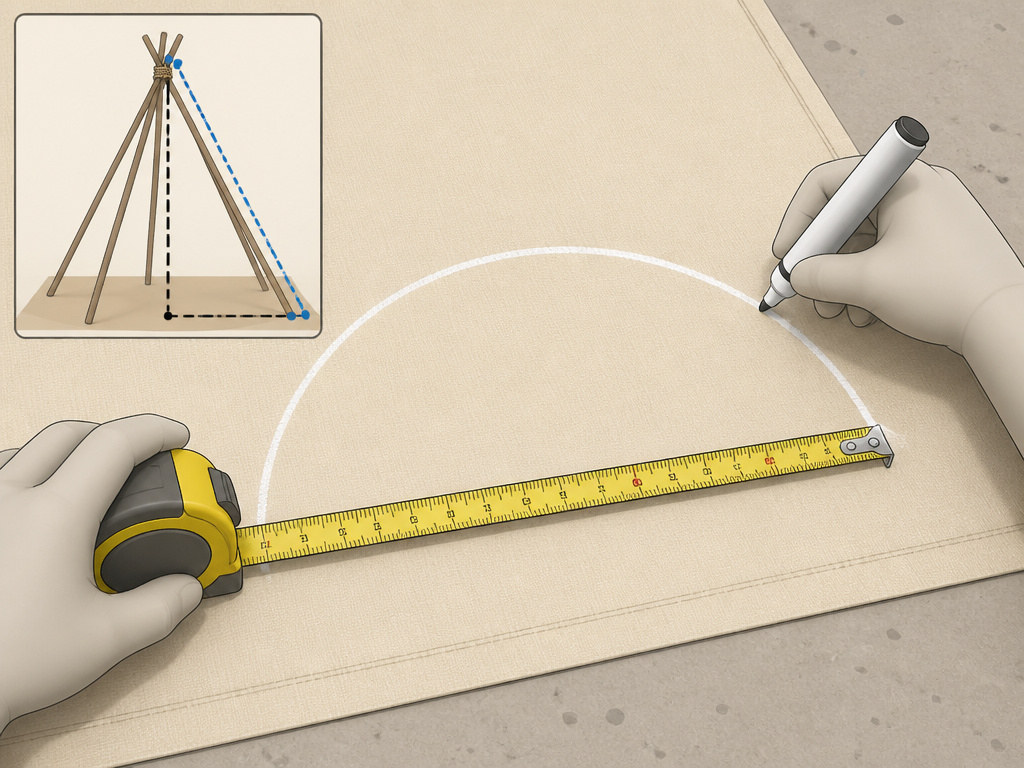
This is where geometry beats guesswork. Your cover is a half-circle. Its radius is the slant height of your poles from ground to top, plus extra for hems and door overlap.
For a teepee with a 12-foot diameter (6-foot radius) and a 10-foot center height:
Slant Height = √(6² + 10²) = √136 ≈ 11.7 feet.
Add 8 inches for a hem and door overlap. Your final fabric radius is 12.5 feet.
Fabric choice dictates your next move. Heavy 10–12 oz canvas is traditional and breathable, perfect for traditional canvas camping. Lightweight 70D+ ripstop nylon is packable and waterproof.
If you use silnylon or any silicone-coated fabric, you must seal the seams with a silicone-based sealant after sewing. The slick coating prevents the thread from swelling and sealing the needle holes. I use GE Silicone II (clear) for this, it bonds to fabric better than generic hardware store silicone.
For canvas, use a heavy-duty needle and polyester thread, opting for a flat-felled seam for strength. The door is a vertical slit in the center of the straight edge of your half-circle. Reinforce its edges with binding tape.
What Are the Final Assembly Steps for a Teepee?
With your frame up and cover sewn, final assembly begins. Install grommets every 12 to 18 inches along the straight bottom edge. Drape the cover over the poles, aligning the door slit with your chosen entrance poles.
Wait. I just remembered something. That oil/mineral spirits mix? If you’re in a humid climate, skip the mineral spirits. It never fully cures for me in Georgia summers, leaving the poles sticky. I learned that the hard way after my canvas came away with permanent oil stains. Just use boiled linseed oil straight, and plan to reapply annually.
Stake the cover down tightly through the grommets. Use at least 8–12 stakes that are a full 12 inches long. Short stakes pull out in soft ground.
Now for the top. The classic design uses two additional poles to create adjustable smoke flaps attached to the top corners of the cover. Then, a rope from the peak of the cover ties to a separate “lift pole” lashed horizontally above the door.
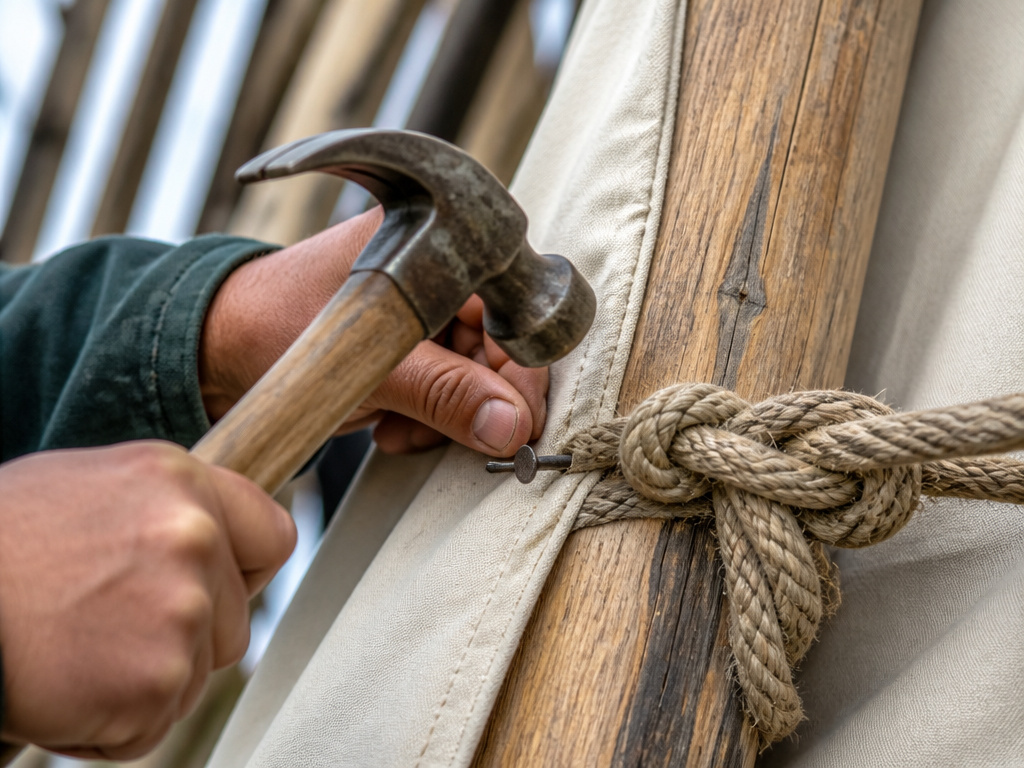
To prevent the canvas from wrinkling and losing the heat seal at the top, hammer a one-inch tack through the knot and the lift-pole flap. This locks it in place. Without it, the knot slowly slips, and the top sags over a week.
If you plan to have a fire inside, the teepee must be at least 14 feet in diameter. Always place the fire centrally under the smoke flaps and use stakes to tie the flap ropes open, directing smoke out. For a safer, controlled heat source, consider integrating a dedicated wood-burning tent stove.
Natural Rope vs. Synthetic Cord: Which is Better?
This is a genuine point of contention. Many modern guides recommend 550 paracord. It works, but traditional builders argue for natural rope.
Synthetic rope is slick. Under the constant, heavy load of a tensioned canvas, it can slip. I used 550 paracord on my first build. A week into a Wyoming trip, a 30mph gust caused the slick cord to slip a full inch on the crown lashing. I woke up to a sagging, drafty roof.
Natural-fiber rope like 3/8” Manila hemp grips linseed-oiled wood like glue. The trade-off is durability; it will rot over a few seasons if left outdoors. My take? Use natural rope for the critical crown lashing and lift-pole tie-off. Use paracord for non-critical ties, like securing smoke flaps. You need at least 50 feet of your main rope; bring 100 to be safe.
| Use Case | Recommended Cordage | Reason |
|---|---|---|
| Crown Lashing & Lift Pole | 3/8” Manila Hemp Rope | Superior grip on wood under load, less prone to slippage. |
| Securing Smoke Flaps & Door | 550 Paracord | Adequate strength, high durability, and easy to adjust. |
| Guy Lines & Non-Critical Ties | 550 Paracord | Cost-effective, strong, and resistant to the elements. |
When Is a Teepee the Wrong Shelter Choice?
A teepee is a fantastic, spacious shelter that sheds wind well. But it’s not the best tool for every job. For fast, lightweight backpacking, a simple lightweight tarp tent pitched with trekking poles sets up in minutes. For family car camping where standing room is the priority, a modern tent with headroom is more comfortable.
And for truly severe weather, a dedicated, engineered storm-proof tent design will outperform a homemade teepee. The teepee excels in basecamp scenarios, backyard projects, or historical reenactment. It’s a rewarding build that connects you to the geometry of shelter. Just know its place alongside other essential camping equipment.
Frequently Asked Questions
How much does it cost to build a teepee tent?
The cost is primarily in materials. For a 12-15 foot diameter teepee, untreated poles can be foraged. Purchasing 10-12 oz canvas or heavy-duty nylon typically costs $100-$200. Grommets, rope, and stakes add another $50. It’s cheaper than a large store-bought canvas tent but requires significant labor.
Can you build a teepee without sewing?
You can, but it’s less durable. Using tarps and grommets or glue on canvas drop cloths creates weak points that fail under tension. For a structure meant to last more than one season, sewing is necessary. A sturdy sewing machine and heavy-duty thread are part of your basic tent camping supplies.
How do you waterproof a canvas teepee?
Heavy canvas is water-resistant but not waterproof. To make it shed rain, treat the outside of the sewn cover. I’ve had the best results with Otter Wax’s Heavy Duty Canvas Wax for its blend of beeswax and pine tar, which doesn’t stiffen the fabric like some pure paraffin blends. Reapply every season or two.
Is it safe to have a fire inside a teepee?
Yes, with strict conditions. The teepee must be large (14+ feet diameter). You must use the smoke flaps correctly, staking them open to create a draft. Never leave a fire unattended, and keep a bucket of sand or water inside the door. Always check local fire regulations and burn bans.
The Bottom Line
Building a teepee is about respecting three things: the rigidity of a well-lashed tripod, the non-negotiable geometry of the half-circle cover, and the critical grip of the right rope. Skip the math on the fabric radius and you’ll fight drafts forever. Use slick paracord on the main lashing and you’ll be retying it in a stiff breeze.
The satisfaction isn’t just in the sleeping. It’s in the smell of treated wood, the heavy drag of canvas over the frame, and the final thunk of the last steel stake going home. When the wind picks up and your shelter stands firm, you’ll know the difference a proper frapping turn makes. You built not just a tent, but a skill. For your next adventure, consider how the right tent accessories can turn that sturdy shelter into a comfortable home under the stars.
