
How to Use Tent Tie Downs for a Storm-Proof Shelter
This post contains affiliate links. As an Amazon Associate, we earn from qualifying purchases.
Properly using tent tie downs involves securing a guy line from a reinforced point on your tent to a stake driven at a 45-degree angle away from the shelter. Use a bowline knot at the tent and a taut-line hitch or a correctly threaded tensioner at the stake, keeping the attachment point low to the ground. Apply tension until the fabric is taut, then re-check after 15 minutes as the material settles.
I’ve watched more tents fail in a breeze than I care to count. The culprit is almost never the tent itself, it’s the assumption that staking is a mindless afterthought. A perfectly good shelter becomes a flapping, collapsing mess because one corner stake was driven straight down into soft soil, or a guy line was tied with a granny knot that slipped at 2 a.m.
This isn’t just about following steps. It’s about understanding a simple mechanical system: your tent is a sail, the stakes are anchors, and the lines are your only control. Let’s get it right.
Key Takeaways
- Match your stake to the ground. A 9-inch MSR Groundhog is my go-to for forest loam, but it’s useless on a beach. In sand or snow, you build a deadman anchor, no debate.
- The 45-degree angle is non-negotiable. A stake driven straight down has about half the holding power against a lateral pull. Angle it away from the tent, every single time.
- Keep the attachment point low. That plastic tensioner or your taut-line hitch knot must sit within three inches of the ground. A high attachment acts as a lever, prying the stake out with ease. This isn’t a suggestion; it’s physics from the tent installation safety handbook.
- Use a bowline at the tent. It won’t slip, it won’t jam, and you can untie it with cold, numb fingers, which you’ll appreciate at dawn.
- Tension is a feel, not a force. Pull lines until the fabric is just taut. Over-tightening strains seams and can warp pole sockets, especially in the cold when aluminum contracts. Under a taut rainfly, you should hear a low thump, not a high-pitched ping.
A tent stake fails in one of two ways: insufficient frictional force causes pull-out, or sideways force exceeds soil resistance, causing the soil to bulge and the stake to tilt. Angling the stake and keeping the guy rope attachment low mitigates both modes of failure.
What Are the Best Tent Stakes for My Campsite?
Forget the flimsy wire stakes that come with most budget tents. They’re placeholders, not tools. The right stake is your foundation, and it’s entirely dependent on what’s underfoot. I learned this the hard way trying to pitch my Big Agnes Copper Spur HV UL2 on a Sierra Nevada granite slab with the included DAC V-stakes, they bent on first strike.
Here’s the breakdown from my gear closet:
| Soil Type | My Go-To Stake | Why It Works | Stake to Avoid |
|---|---|---|---|
| Hard, Rocky Ground | MSR Cyclone Stake (7.5″) | Heat-treated steel tip pierces thin cracks and won’t bend. The corkscrew design grabs rock edges. | Thin wire stakes or cheap aluminum. They’ll snap or bend instantly. |
| Soft Forest Loam | MSR Groundhog Stake (9″) | The large, Y-shaped surface area grips loose, organic soil brilliantly. It’s the workhorse for 90% of my trips. | Nail stakes. They’ll pull straight through with minimal resistance. |
| Sand or Loose Gravel | Deadman Anchor | Friction is unreliable. You must bury an object—a stuff sack filled with sand, a log, or a mesh bag of rocks. | Any standard stake. They’ll pull out in a 10 mph breeze. |
| Snow | MSR Blizzard Snow Stake | Large plastic surface area resists pull-out in consolidated snow. For powder, a deadman (bury a stuff sack) is the only option. | Metal stakes. They conduct heat, melt their own hole, and loosen overnight. |
TL;DR: Your tent is only as secure as your worst stake. Carry a mixed set. For my typical mixed-terrain trips, I pack six MSR Groundhogs and two Cyclones.
Which Knots Actually Hold Up in a Storm?
You need two knots: one fixed, one adjustable. The fixed loop secures to your tent’s reinforced guy-out point. The adjustable hitch secures to the stake, allowing you to fine-tune tension.
For the tent, the bowline is king. It creates a loop that won’t slip closed under load, yet unties easily afterward. The rabbit comes out of the hole, goes around the tree, and pops back down the hole. Practice it five times now. If you use a simple overhand loop, you’ll spend the morning cutting a hopelessly jammed knot out of your guy line.
At the stake, you need an adjustable friction hitch. The taut-line hitch is the classic, reliable skill.
- Wrap the line around your stake and bring the working end back parallel to the main line.
- Make two wraps around the main line, moving toward the tent.
- Pass the working end under the last wrap you made and pull it tight to form the knot.
- To tighten, pull the main line. The knot grips.
- To loosen, push the knot toward the stake. It slides.
Common mistake: Tying the taut-line hitch with the wraps going away from the tent, the knot will slip under load, leaving you with a slack line by morning.
Most tents now include three-hole plastic tensioners. They’re brilliant if you thread them correctly, and utterly useless if you don’t. The mistake I see constantly is feeding the line through the center hole only, creating a simple loop that slips.
I watched this exact failure unfold in a Utah canyon. A camper had mis-threaded every tensioner. A midnight gust hit, the loops slipped, and three stakes popped in succession. We spent 20 frantic minutes in headlamps re-staking a bucking tent while sand whipped our faces. Now, the first thing I do with a new tent is check the factory threading.
The correct method? The side with the fixed knot is your anchor. Pull a small loop of line from the space between that knot and the tensioner body. Hook that loop over your stake. To tighten, pull the loose tail of the line. The cam inside the tensioner locks it via friction.
How Do You Set Up and Tension Guy Lines Correctly?
A perfect pitch is a sequence, not a scramble. Skipping a step compromises the whole system.
Before you start: Clear debris from your stake points. A small rock under the stake creates a pivot, guaranteeing pull-out. In any breeze over 15 mph, have a partner stabilize the tent body while you stake.
Here is my non-negotiable, seven-step drill for any dome or tunnel tent:
- Identify the reinforced points. Only attach lines to the webbing loops or D-rings on the rainfly or tent body. Never tie off to thin, un-reinforced nylon, it will tear.
- Prepare your line. I pre-cut all my guy lines to 10 feet and singe the nylon ends with a lighter. If you don’t, frayed ends will worm into a tensioner and jam it solid. (I learned this at Joshua Tree, picking out fibers with a multitool for 20 minutes.)
- Tie the bowline to the tent. Pass the line through the guy-out point, tie your bowline, and snug it down.
- Place and drive the stake. Find a spot 6-8 feet from the tent, in direct line with the seam or pole it’s supporting. Drive it at a 45-degree angle, hook facing away from the tent.
- Secure the line to the stake. Loop the line once around the stake. Tie your taut-line hitch or hook on your pre-threaded tensioner loop.
- Apply initial, hand-tight tension. Don’t throw your weight into it yet.
- Apply final tension and lock. Lean into the pull to take up remaining slack. For the taut-line, the friction holds. For a tensioner, pull the tail until tight and release.
The step everyone skips? The post-pitch perimeter check. After the tent is fully up and you’ve tossed your gear inside, walk every line. Your weight and the fabric settling will create slack. That final check finds the one loose line that will be your midnight alarm clock.
What Are the Pro Techniques for Sand, Snow, and High Wind?
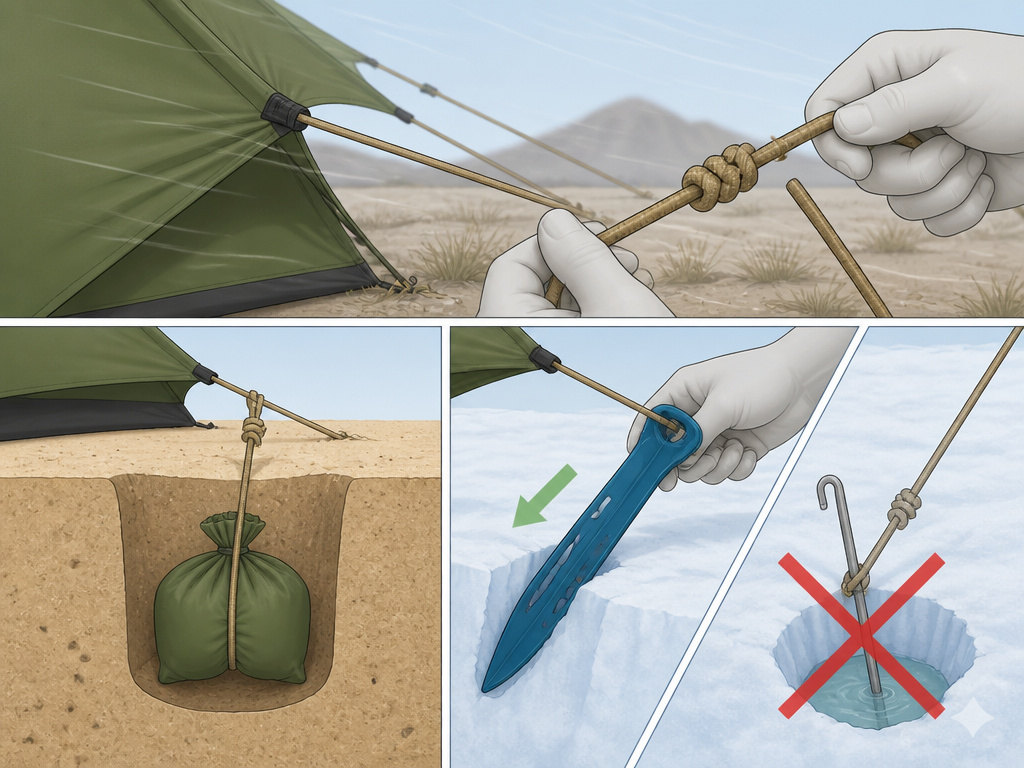
Standard stakes have limits. When you hit sand, snow, or gale-force winds, you need to change tactics.
For sand and loose gravel, friction is your enemy. You must switch to a deadman anchor. Bury a stuff sack, a mesh bag full of rocks, or a sturdy log perpendicular to the direction of pull. Tie your guy line to its center and bury it at least 8-10 inches deep. The mass of the object, not friction, provides the hold.
In snow, the same principle applies. The USAP field manual for tents explicitly states deadman anchors are the strongest option for tents with large surface areas. Bury a stuff sack or a bundle of sticks. For consolidated snow, a wide plastic snow stake like the MSR Blizzard works by creating a larger surface area for the snow to grip.
Common mistake: Using metal stakes in snow, they conduct heat from the sun or tent, melt a pocket around themselves, and loosen within hours. Plastic is mandatory.
In high wind, your goal is to minimize the tent’s profile. Stake out every available loop, including the ones halfway up the rainfly. Consider using a trucker’s hitch on your primary windward lines for extreme, mechanical-advantage tension. For tents engineered for strong gusts, this isn’t overkill, it’s standard procedure. The manual for my Hilleberg tent recommends this for storm conditions.
Why Do Some Tents Have Two Grommets in the Stake Loops?
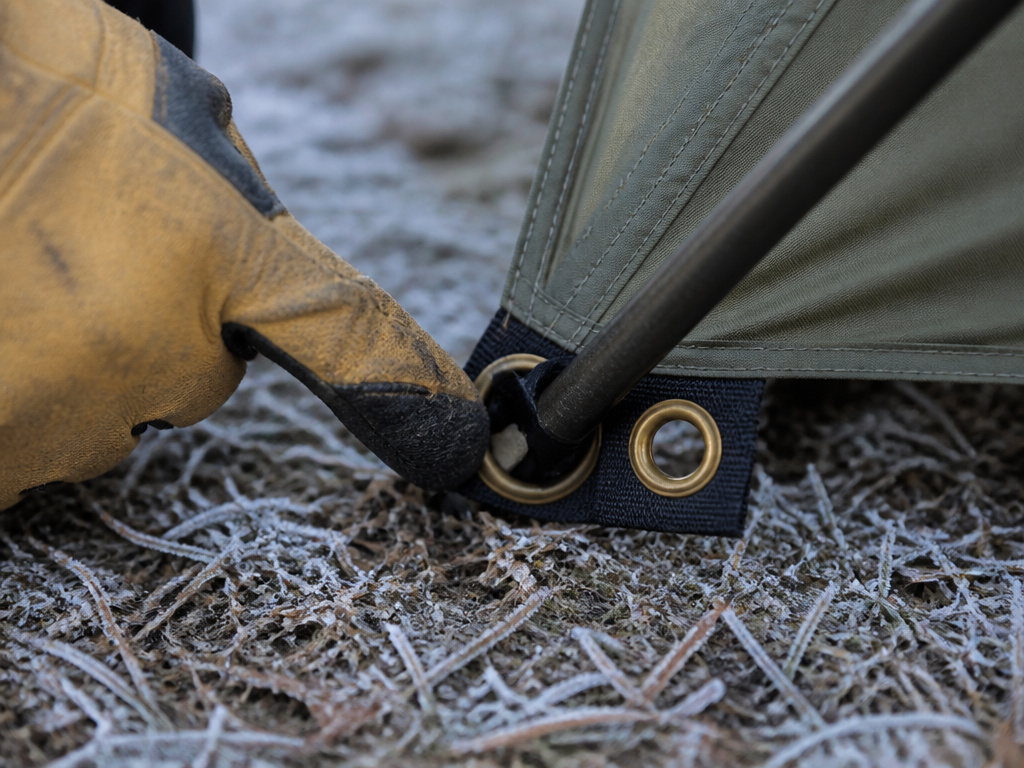
If you own an MSR tent (or several other quality brands), you’ve seen it: two grommets in the little fabric loop where the pole tip goes. This isn’t a spare. It’s a brilliant, simple solution to fabric expansion.
Nylon and polyester expand in heat and humidity and contract in cold, dry air. The outer grommet is for dry, cold conditions when the fabric is tight and contracted. The inner grommet is for humid, warm conditions when the fabric has expanded and is looser.
Using the wrong one stresses the pole. In dry cold, using the inner grommet can pull the pole too far inward, bowing it. In humid heat, using the outer grommet can over-extend the fabric, putting dangerous strain on the seams. This small detail, straight from the MSR owner’s manual, prevents a common point of failure that most campers never identify.
This is especially critical for larger shelters like spacious nine-person tents or tents with high ceilings, where the larger surface area magnifies any stress on the poles.
Frequently Asked Questions
What’s the best rope to use for guy lines?
Skip the paracord. It stretches when wet, leading to a saggy tent by morning. Use a dedicated, low-stretch reflective guy line like Lawson Equipment’s Glowire or Kelty TripTease. The reflectivity is a lifesaver for avoiding trip lines at night.
How tight should the lines actually be?
Tighten until the tent fabric is taut, with no deep wrinkles radiating from the attachment point. The pole should not be visibly bowing inward. A good test: flick the line. It should produce a low, dull thud, not a high-pitched twang. Re-tension after 15 minutes and again at dusk.
Can I guy out a freestanding tent?
Absolutely, and you should. “Freestanding” only means it can hold its shape without stakes on your living room floor. In the wild, guy lines are essential for wind stability and stopping the rainfly from incessantly flapping against the inner tent. It’s a core part of your essential camping gear kit.
What if I’m camping on a wooden platform?
You can’t drive stakes. Use heavy-duty guy line straps that wrap around the platform beams, or thread your line through gaps between planks. As a last resort, use sandbags or gallon jugs filled with water as weights.
Do I need to do anything special after camping near the ocean?
Yes. Rinse your stakes and tent pole ends with fresh water. Salt accelerates corrosion, and aluminum poles can seize in their sleeves. A quick wipe with a silicone-based lubricant on the pole ends (as MSR advises) prevents this.
My shock cords inside the poles are loose. What now?
In cold weather or after years of use, shock cords lose elasticity. To temporarily adjust, quickly pull each pole section back and forth to generate heat and tension the cord. For a permanent fix, you’ll need to replace the cord, a straightforward repair with a kit from brands like Tent Pole Technologies.
Before You Go
Mastering your tie-downs transforms your tent from a fair-weather shelter into a storm-ready bunker. It’s the difference between wrestling a flapping tarp at midnight and sleeping soundly through a gale. Remember the core system: the right stake for the dirt, a bowline and a taut-line hitch (or a correctly threaded tensioner), and tension that’s firm, not fierce.
Your final task is that dusk perimeter check. Walk each line, feel the tension, and make the micro-adjustments. That’s the ritual that finds the slack the wind will find at 3 a.m. For more shelter deep-dives, from storm-resistant tent designs to the best tent camping accessories for comfort, I’ve got you covered. Now go pitch a tent that stays put.
